The general history of Grumman's big follow-up to the F4F
Wildcat should be pretty well known to readers here, so I shall focus on the
history of the particular aircraft I built. Many of my builds are spurred by
the Osprey "Aces" series, and this was the latest. "Hellcat Aces of WWII" is
number 10 in the "Aircraft of the Aces" series, and within is the story of
Esign Ed "Wendy" Wendorf, a pilot with VF-16, the "Airedales", flying from
the new U.S.S. Lexington. I love these first-person accounts, this one told
by Wendorf in fine style.
4 December 1943 saw the first raids on Kwajelein Atoll, to
soften it up for invasion. Ensign Wendorf was part of a three step escort
for the bombers. Seeing no opposition, the group went down to strafe Roi
airfield. After his first pass, Wendorf saw a low-flying "Betty" bomber,
which he blasted into the sea. Seeking to rejoin his group, he spotted 4
Aircraft above him, and climbed to form up. As happened so many times, these
planes he was joining bore red "meatballs" on their wings. Fortunately they
were unaware of his approach, and as the Navy pilot neared he belatedly
realized these were not friends. Quickly gathering his wits he lined up 2
 of
the Zeroes, burning one, and then another in succession. Finally alerted,
the others split up and Wendorf followed one. The maneuverable Japanese
fighter turned tightly and lost "Wendy", and in a flash the other was on his
tail. Diving away failed to shake his pursuer, and Wendorf decided to pull a
loop. As the enemy pilot followed him around, he realized this would not
remove the Zero from his six, so he used a trick Ironically, this maneuver
is described in another Osprey book, "Japanese Naval Aviator", as a standard
move used many times by the Japanese themselves. Hesitating in the loop,
Ens. Wendorf flew inverted for several seconds, as the Zero pilot pulled
madly through the loop. By dropping thru now, Wendorf was right on the enemy
's tail, and finished the dance by burning the Mitsubishi into the Pacific.
of
the Zeroes, burning one, and then another in succession. Finally alerted,
the others split up and Wendorf followed one. The maneuverable Japanese
fighter turned tightly and lost "Wendy", and in a flash the other was on his
tail. Diving away failed to shake his pursuer, and Wendorf decided to pull a
loop. As the enemy pilot followed him around, he realized this would not
remove the Zero from his six, so he used a trick Ironically, this maneuver
is described in another Osprey book, "Japanese Naval Aviator", as a standard
move used many times by the Japanese themselves. Hesitating in the loop,
Ens. Wendorf flew inverted for several seconds, as the Zero pilot pulled
madly through the loop. By dropping thru now, Wendorf was right on the enemy
's tail, and finished the dance by burning the Mitsubishi into the Pacific.
Calming down, The victorious Hellcat driver looked around.
Several other combats were going on, and he climbed to look for action. He
found it. His Grumman was showered by sudden machine gun and cannon fire
from an unseen attacker. Turning to look over his shoulder, a 7.7mm bullet
bounced off his skull over his left eye. He described it as being "hit on
the head with a 2X4 board". (I have read this description many times
before.) His first instinct to dive out was a good one and shook his
tormentor. Leveling out low, Wendorf took stock. Blood was all over, the "G"
forces from the pullout spurting it everwhere. By pressing his hand to the
wound he slowed the blood flow. Two options were available. One was to
contact and ditch next to the rescue submarine on station. At this time the
wounded pilot found his radio inoperative (due to unknown AA hits during the
strafing run) so this option was out. The other was to find his ship and
land. But would he run out of blood before he could accomplish this? Now
finding his compass also inoperative, he lined up on Roi's airfields and
went for it.
Luck was riding with Ed Wendorf. 45 minutes later he spotted
a Carrier's wake, this being t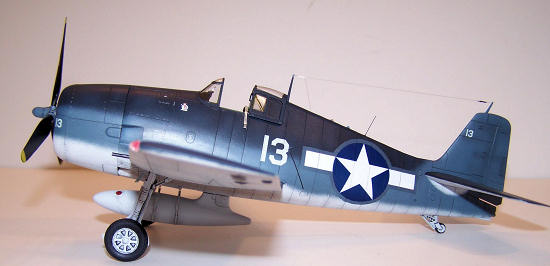 he "Yorktown", whose decks were full with a
strike. The "Yorktown " pointed him in the "Lexington's" direction and he
arrived overhead. Waiting while a previously crashed damaged fighter was
cleared, he now proceeded to land into the safety barrier with no flaps or tailhook, the landing gear having been blown down by compressed air. "Aces"
has a photo of the battered Hellcat, nosed over the barrier at the end of
the ordeal, looking very poorly but getting it's pilot home.
he "Yorktown", whose decks were full with a
strike. The "Yorktown " pointed him in the "Lexington's" direction and he
arrived overhead. Waiting while a previously crashed damaged fighter was
cleared, he now proceeded to land into the safety barrier with no flaps or tailhook, the landing gear having been blown down by compressed air. "Aces"
has a photo of the battered Hellcat, nosed over the barrier at the end of
the ordeal, looking very poorly but getting it's pilot home.
Several things impressed me in this account. First of course
was the incredible skill, aggressiveness, and coolness of Ed Wendorf. First
in the way he handled the fight, then the return bleeding all the way, this
was one cool customer. Thinking all the time, nothing could get him down.
Next the willingness of the "Lexington" to land the smashed up plane to save
a pilot. Then there was the quality of the opposition. There was still
plenty of talent in the Imperial Navy at this point, but with pilots like
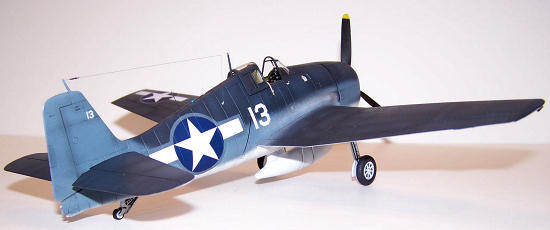
Wendorf and the F6F hellcat, that wouldn't last long. Having read this
story, I had to build the new Eduard Hellcat, and it had to be Ed Wendorf's
"White 13".
Eduard's newest release consists of a hard to open box
containing 5 sprues of grey plastic, a clear set including closed and open
canopies (will the "open" canopy part finally fit? Stay tuned.) The surface
detail is excellent, finely done engraved panel lines including a perfect
representation of the over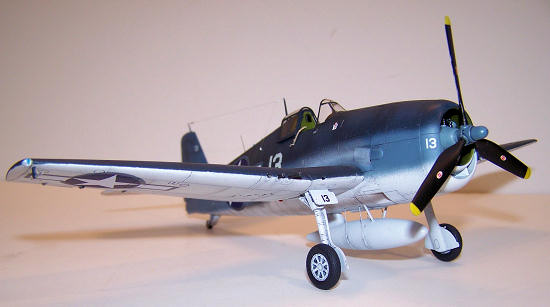 lapped panels on the rear fuselage area. Any
ejector marks are well hidden and sink marks nonexistent. You also get a
color-etched fret with instrument panels and seat harnesses, and a separate
fret with engine wiring harness, bomb fins, window framing and drop tank
straps. Then there's the masking sheet with superbly cut Kabuki masks that
work beautifully. The Decal sheet covers 5 aircraft, all in all one hell of
a deal for the $31.95 I got it for.
lapped panels on the rear fuselage area. Any
ejector marks are well hidden and sink marks nonexistent. You also get a
color-etched fret with instrument panels and seat harnesses, and a separate
fret with engine wiring harness, bomb fins, window framing and drop tank
straps. Then there's the masking sheet with superbly cut Kabuki masks that
work beautifully. The Decal sheet covers 5 aircraft, all in all one hell of
a deal for the $31.95 I got it for.
Upon close examination, the weak points were the cockpit
sidewalls, propeller and hub, and tires, which are 'soft" on detail. The
tires given are smooth tread, I could not find any pictures in my refs that
had these. Too bad, cause the wheels are nice. A quick search of the web
found no available resin replacements (sold out), so I figgered a lot of
folks are buying these Hellcats. Enter my old Hasegawa Hellcat, the VF-17
"Essex" release, which has been in my stash for years. A quick look found
the prop better than the kit's, and the tires were diamond tread. But the
kicker was when I looked at the decal sheet and spied "White 13", Ed
Wendorf's machine! There were all the numbers I would need, and the little
"Airedale" was in the kit sheet. Add in the True Details cockpit set I had
thrown in years ago with it's nice resin sidewalls, and I was in business!
Some shaving was involved to get my resin sidewalls in.
Dry fitting was needed as I would use the kit instrument panel with it's
pretty color etch. Many microscopic levers and switches are provided, some
of which made it and some not. For the interior color I used standard Green
Zinc Chromate. The green areas on the color etch did not agree, so I
overpainted these and it
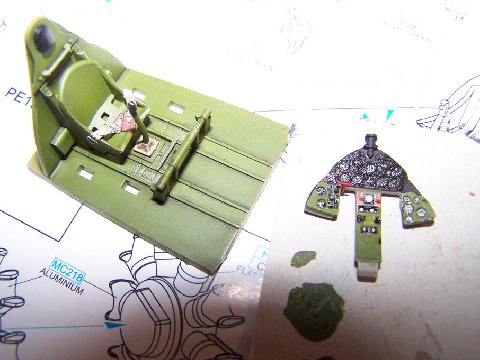 looked better. Details were painted as per the "Walkaround"
book on the Hellcat from Squadron-Signal. Only the lap belts were put in
now, as I wanted to drape the shoulder belts outside the fuselage. The side
windows behind the pilot must be glued in now, carefully using liquid glue.
These must be secure to prevent falling thru during masking later. If
there's plenty of ventilation the chances of fogging are slim. I did not
want to chance the inside braces (photo etch) messing up my windows, so
decided to use Future all over to attach them. If you do this, have the
patience to wait for it to dry, otherwise you will end up like me poking up
through the drop tank slot (you did open that, right?) with a wire trying to
get one back in place. Miracles DO happen, bel
looked better. Details were painted as per the "Walkaround"
book on the Hellcat from Squadron-Signal. Only the lap belts were put in
now, as I wanted to drape the shoulder belts outside the fuselage. The side
windows behind the pilot must be glued in now, carefully using liquid glue.
These must be secure to prevent falling thru during masking later. If
there's plenty of ventilation the chances of fogging are slim. I did not
want to chance the inside braces (photo etch) messing up my windows, so
decided to use Future all over to attach them. If you do this, have the
patience to wait for it to dry, otherwise you will end up like me poking up
through the drop tank slot (you did open that, right?) with a wire trying to
get one back in place. Miracles DO happen, bel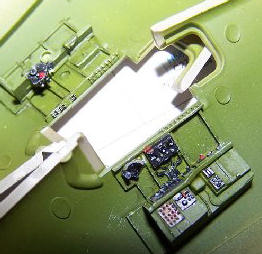 ieve me. Oh, and DO remember
to paint behind the headrest before you close up the fuselage. Mine is still
unpainted as we speak. The Lord giveth, and the Lord taketh away.
ieve me. Oh, and DO remember
to paint behind the headrest before you close up the fuselage. Mine is still
unpainted as we speak. The Lord giveth, and the Lord taketh away.
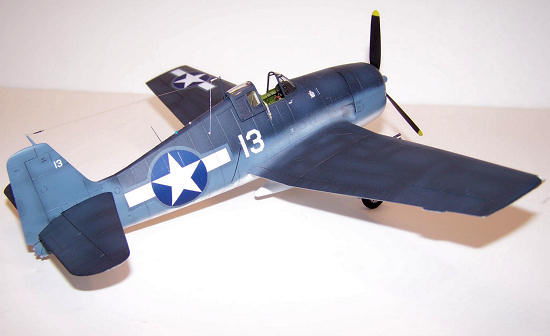
The wings are next. They glue together kinda weird, with
separate flap inserts that I'm not sure are on seam lines. I just glued 'em
carefully and let it go. The method of attachment to the fuselage for wings
and stabilizers is great, with recessed areas in the fuselage making
seam-free attachment possible. You can paint this baby with the stabilizers
off no problem, which is good, because the white semicircles under them
required by the paint scheme are much easier to mask this way. Choose which
of the provided cowlings your aircraft needs, and glue these and the famous
"grin" cowl nose together. The engine was wired using the etched harness,
then painted aluminum with black wash. The landing gear is very well done,
with the many parts delicately molded, including the pivot gears. Follow the
directions carefully here. Well, fill those seams, mask her up and let's
shoot it!
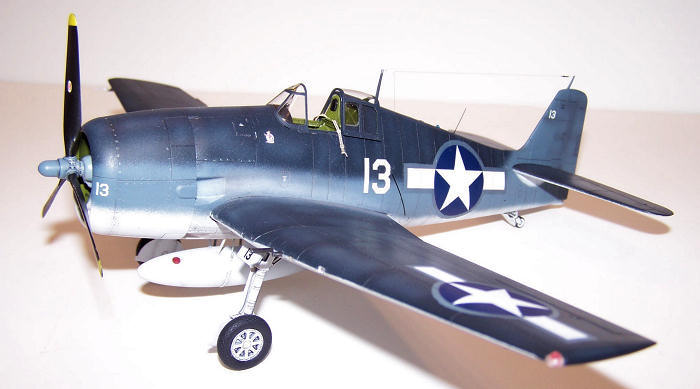
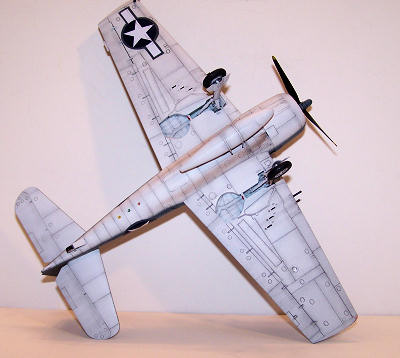
Looking at the profile of "White 13" in the Osprey
book, it say there that the star/bar insignia originally had the 1943 red
surround, which was duly painted out on the way to the Pacific. (No red was
allowed anywhere on pacific A/C.) Looking at the
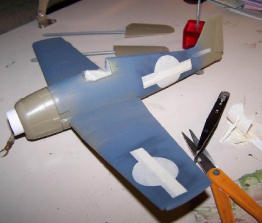 crash picture shows this as
a large light area underneath, apparently painted out with whatever blue was
around. and not very neat. How to reproduce this effect? I decided to first
spray the general areas to represent the overpaint with a mix of
intermediate blue slightly darkened with sea blue. Then a random light
overspray was done with sea blue. I then cut out around the star/bars
including the red surrounds, then lay this over some masking tape and cut
carefully around the decal, which will leave you with a full-size mask to
put in the areas the decals go. If we cut off the red surrounds very
carefully, the decals can be centered and will look like they have light
blue borders.
crash picture shows this as
a large light area underneath, apparently painted out with whatever blue was
around. and not very neat. How to reproduce this effect? I decided to first
spray the general areas to represent the overpaint with a mix of
intermediate blue slightly darkened with sea blue. Then a random light
overspray was done with sea blue. I then cut out around the star/bars
including the red surrounds, then lay this over some masking tape and cut
carefully around the decal, which will leave you with a full-size mask to
put in the areas the decals go. If we cut off the red surrounds very
carefully, the decals can be centered and will look like they have light
blue borders.
NOW those of you who have read my previous reviews know
that on each model, Koppos has to pull at least one giant brain fart. This
usually involves the decals, and this Hellcat is no exception. If you have
been building, reading about and decaling U.S. aircraft for any number of
years, one would think we'd get familiar with the markings, no? You do know
the Stars and bars marking is not symmetrical, d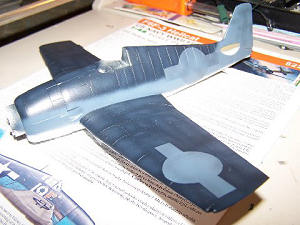 on't you? There is more
circle sticking out the bottom than the top? Well, now you and I do. So I
blithely applied the masks without paying any attention to this. When I
finally discovered my F--- up while trying to apply the decals, it turns out
I got lucky. Only one wing and one fuselage were wrong, a 50% loss rate.
After my fit, out came the masking tape and paints to try and fix it. Trying
to touch this up took some gymnastics, but I did it! I have gotten VERY good
at fixing screw ups over the years, but believe me, thinking first would
probably be better.
on't you? There is more
circle sticking out the bottom than the top? Well, now you and I do. So I
blithely applied the masks without paying any attention to this. When I
finally discovered my F--- up while trying to apply the decals, it turns out
I got lucky. Only one wing and one fuselage were wrong, a 50% loss rate.
After my fit, out came the masking tape and paints to try and fix it. Trying
to touch this up took some gymnastics, but I did it! I have gotten VERY good
at fixing screw ups over the years, but believe me, thinking first would
probably be better.
Confused? You should be. Looking at the photos might
help clear it up.
The easy part was painting the bottom white, top non
specular Sea Blue, and mid section and rudder/fin intermediate blue, all
Model Master enamels. Bottom panel lines were accented with thinned dark
grey sprayed along them ( pictures show very dirty bottoms on these 'cats).
The top panels were hit in the middles with lightened Sea Blue to break up
the monotone. Having glossed the beast with Metallizer Sealer, the offending
decals went down nicely with a little Solvaset, and showed their quality by
not being ragged at all where they were cut. The white Hasegawa numbers had
typical Hasegawa yellowish cast, but beggars can't be choosers. A black
acrylic wash was applied to all panel lines, especially on bottom, with oil
streaks from the big R-2800 also added. Exhaust stains were done, the light
grey sprayed and pastels for the dark edges. The white stains on dark paint
was from the lead in the high-octane fuel, I just learned. Time for the
fiddly bits.
 Stabilizers can be installed now, glue carefully with a
fine brush and it will be clean and seam-free. The landing gear, as I
mentioned, is very well done, and everything fits with little fuss. The
Hasegawa wheel/tire assemblies had larger holes than the Eduard axles, so
these were beefed up with styrene chips and filed to fit. Wheels are white
and tires dark grey, the tread drybrushed with flat black. The Hasegawa prop
needed the hole for the engine shaft bored out, this was done and the
painted and decaled unit attached. For a change, the hub on this one is
Intermediate blue. The windscreen and canopy (supposedly for the open
position) were masked using the perfectly cut set included. What a pleasure
to use, making this usually bitchy job a breeze. Spray interior green first
of course then the Sea Blue. The windscreen fit well.
Stabilizers can be installed now, glue carefully with a
fine brush and it will be clean and seam-free. The landing gear, as I
mentioned, is very well done, and everything fits with little fuss. The
Hasegawa wheel/tire assemblies had larger holes than the Eduard axles, so
these were beefed up with styrene chips and filed to fit. Wheels are white
and tires dark grey, the tread drybrushed with flat black. The Hasegawa prop
needed the hole for the engine shaft bored out, this was done and the
painted and decaled unit attached. For a change, the hub on this one is
Intermediate blue. The windscreen and canopy (supposedly for the open
position) were masked using the perfectly cut set included. What a pleasure
to use, making this usually bitchy job a breeze. Spray interior green first
of course then the Sea Blue. The windscreen fit well.
Now the question-.will this canopy deviate from the norm and fit where it's
supposed to? NO, of course, it still requires being pressed down to be
correct in appearance. This is a constant problem on so many kits. The risk
is run of screwing it up with glue or worse, cracking it while holding down
on it. AAARRGG. he said again. This time I solved the dilemma by cutting
small notches inside the canopy in the area that matched the raised molded
in guide rails on the fuselage. This just holds the canopy down without glue
and minimum stretch. Tedious, but successful. I had a Revell 1/32nd Zero I
bought in 1969, which I remember had a canopy that snapped on and slid open
and closed! C'mon, guys!
The shoulder belts were now glued to the crossbar over
the seat and draped outside the fuselage as in photos. From what I gather
the drop tank provided is not proper for my machine, but I was out of gas
and modifying Hasegawa's seemed too much work, so I lived with this. It was
weathered to match and installed with the etched straps. I drilled four
small holes in the fuselage to accept the straps as per photos, as no
attachment points are given. The regular radio antenna was made from 2 pound
fish line, and the cool whip antenna from sprue. Pitot tube and landing
lights were done and she was rolled out into the Long Island sun just like
her full sized sisters of long ago.
 Well I now have a nice reproduction of an airplane flown by an American
hero. Ed Wendorf, I admire you and all others like you. 2 days later the
Hellcat went to Mosquitocon in New Jersey, where it flew off with the 2008
Theme award, "1943, prelude to Victory". Another Grumman Win.
Well I now have a nice reproduction of an airplane flown by an American
hero. Ed Wendorf, I admire you and all others like you. 2 days later the
Hellcat went to Mosquitocon in New Jersey, where it flew off with the 2008
Theme award, "1943, prelude to Victory". Another Grumman Win.
Eduard's latest is a great kit. Except the small items
mentioned, it really is a deal. Anyone with any kind of build experience can
make a beautiful Hellcat out of this. I will certainly do an F6F-5 when it
arrives in the fleet.
Kit courtesy of Bill Koppos's seemingly endless
hobby budget and lack of sales resistance.
Hellcat Aces of WW2 Barrett Tillman Osprey Pub. 1996
Walk Around F6F Hellcat W.A. no. 9 Squadron Signal pub.1996
Imperial Japanese Naval Aviator 1937-45
Osamu Tagaya Osprey pub. Warrior #55
Bill Koppos