Special Hobby 1/32 F2A-2 Buffalo
| KIT #: | 32010 |
| PRICE: | $59.95 MSRP |
| DECALS: | Two options: VF-2 and VF-3 |
| REVIEWER: | Bill Koppos |
| NOTES: | Best limited run kit I've done. Includes resin and photo etch parts. |
| HISTORY |
 The F2A-2 used basically the same airframe as the earlier mark, but
with a 1200 Horsepower engine that provided a boost in top speed to around 325
mph. The Navy ordered 43 of these, with an additional 8 F2A-1's bought up to
-2 standard. After another delay while Belgium's export order was filled, the
Navy Squadrons finally started getting their aircraft in September 1940. This
was the Brewster fighter in it's top form. Still innocent of armor plate and
fuel tank protection, it was light and handy, with a good armament and range.
Operated by Fighting squadrons VF-3 (Saratoga) and VF-2 (Lexington), it's only
real problems in service were with a weak landing gear and temperamental
Cyclone engines. It seems the biggest problem with the F2A was Brewster
itself, the factory being very poorly equipped for mass production, deliveries
being very slow.
The F2A-2 used basically the same airframe as the earlier mark, but
with a 1200 Horsepower engine that provided a boost in top speed to around 325
mph. The Navy ordered 43 of these, with an additional 8 F2A-1's bought up to
-2 standard. After another delay while Belgium's export order was filled, the
Navy Squadrons finally started getting their aircraft in September 1940. This
was the Brewster fighter in it's top form. Still innocent of armor plate and
fuel tank protection, it was light and handy, with a good armament and range.
Operated by Fighting squadrons VF-3 (Saratoga) and VF-2 (Lexington), it's only
real problems in service were with a weak landing gear and temperamental
Cyclone engines. It seems the biggest problem with the F2A was Brewster
itself, the factory being very poorly equipped for mass production, deliveries
being very slow.
Excuse me for a minute here, back in the bad old days when I was
working for the world's worst forklift company, I was sent to Long Island City
do do a job. Long Island City being the home of the Brewster factory. I had
read that Brewster had problems due to the location of their factory, being a
cavernous five story building with a large elevator going from floor to
floor. LI City is extremely industialized and crowded, not a very good place
for an airplane factory. Looking back, I remember this building I was in
being about 5 stories, with a large central elevator that was being
dismantled. Hmmmm, I wonder? At any rate the laboriously assembled aircraft
had to be transported to Newark, New Jersey for test flying. Compare this to
say, Curtiss, where the finished product went right off the line outside to
the airfield and took off in full view of the line workers!
For all that, the delivery dates of the F2A-2 allowed it to just
sneak in to the colorful era of Navy aircraft, both squadrons having the
"yellow wing" color schemes of the time. Overall light gray was adopted in
early 1941. This was the end of an era, as events and Grumman's Wildcat
overtook the Brewster fighter.
| THE KIT |
 I've been waiting a long time for a 1/32nd Brewster. The old
Combat models vacuform will never get built now. Let me get the
prejudice
out of the way now, I LOVE this plane! Second only in mah heart next to the
P-40. I've had all the models, all the scales. But this baby is big and
chubby. Lately I've been gravitating to 1/32, finding them easier to work on
and more impressive when done.
I've been waiting a long time for a 1/32nd Brewster. The old
Combat models vacuform will never get built now. Let me get the
prejudice
out of the way now, I LOVE this plane! Second only in mah heart next to the
P-40. I've had all the models, all the scales. But this baby is big and
chubby. Lately I've been gravitating to 1/32, finding them easier to work on
and more impressive when done.
Anyhoo, inside the large box, you'll find 9 sprues from large to
tiny. One holds just the carrier (tail hook) tail cone. There's a clear,
resin, photoetch, and instrument film. Molding is nice, with finely recessed
panel lines, delicate sprue gate points, no sink marks. A couple of those
molding lumps are in the way on wings and fuselage, but these can just be
snipped off, except for one by the cockpit area. Obviously, more versions are
on the way (YAY), the land based tail wheel is here as well as alternate
propellers, and fuselage bottom windows, and windscreen. A British B 339 is in
the offing. The clear parts are well done, if a little wavy in the sliding
portion. The engine supplied is quite good, with pushrods supplied, only
wiring need be added to look great. Photoetch fret includes instrument panel,
seat belts, some interior stuff and bomb racks.
| CONSTRUCTION |
OK everybody, construction starts where....? Who said
cockpit? The F2A has a main instrument panel and 2 small side
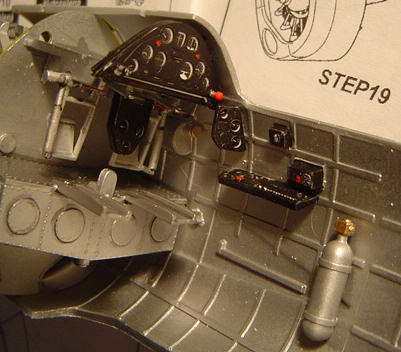 panels, these
were done using the supplied "films", painting the backs white first.
Instructions call for aluminum interior color, details picked out with the
usual black, like the resin throttles, and etched trim wheels. I slightly
changed the location of the machine gun charging handles, and added some knobs
and levers based on my scanty interior references. The rudder pedals have two
really delicate brake lock handles on them, it's a shame they can't be seen
when done. Further back, the seat and fuel tank are assembled, painting all
areas, because remember this airplane has a ventral window, which will allow
plenty of viewing from underneath.
panels, these
were done using the supplied "films", painting the backs white first.
Instructions call for aluminum interior color, details picked out with the
usual black, like the resin throttles, and etched trim wheels. I slightly
changed the location of the machine gun charging handles, and added some knobs
and levers based on my scanty interior references. The rudder pedals have two
really delicate brake lock handles on them, it's a shame they can't be seen
when done. Further back, the seat and fuel tank are assembled, painting all
areas, because remember this airplane has a ventral window, which will allow
plenty of viewing from underneath.
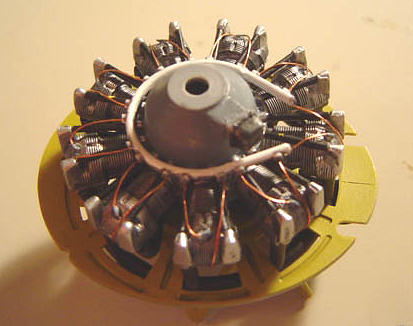 Next comes engine stuff, adding spark plug leads made from
fine copper wire, glued to the back of the ignition ring, and going into holes
drilled in the plug locations. Aren't single row radials great? The rear
portion is a nice resin part, attached to the engine framework and bulkhead. At
the top of the rear bulkhead are the machine guns and resin ammo boxes. These
fit nicely, too, and the ammo boxes look great. The machine guns were
softly detailed, most likely because that can't be seen once the fuselage is
closed. I toyed around with the idea of opening the access panels to show this
area off. I even went as far as buying a wing mounted Browning MG set. Darn
it, they didn't line up with the ammo boxes. As I was building this under a
show induced deadline, I gave up the idea. Maybe on the next one. Time to
close up the fuselage. Surprise! The stuff fits!
Next comes engine stuff, adding spark plug leads made from
fine copper wire, glued to the back of the ignition ring, and going into holes
drilled in the plug locations. Aren't single row radials great? The rear
portion is a nice resin part, attached to the engine framework and bulkhead. At
the top of the rear bulkhead are the machine guns and resin ammo boxes. These
fit nicely, too, and the ammo boxes look great. The machine guns were
softly detailed, most likely because that can't be seen once the fuselage is
closed. I toyed around with the idea of opening the access panels to show this
area off. I even went as far as buying a wing mounted Browning MG set. Darn
it, they didn't line up with the ammo boxes. As I was building this under a
show induced deadline, I gave up the idea. Maybe on the next one. Time to
close up the fuselage. Surprise! The stuff fits!
 (Previous bouts with MPM
limited runs have made me wary). It only took a small amount of bulkhead
filing to get the fuselage halves to come together. The engine mounts actually
hold the engine straight, and the right distance from the cowling face. Cowling
extension and front were added next, and filling and sanding begun. Careful
gluing can keep this to a minimum. By the way, this kit features locating
pins, I believe the first I've seen on a limited run jobber. The canopy sills
were lacking the sliding tracks, so I made some out of sheet styrene and put 'em
in.
(Previous bouts with MPM
limited runs have made me wary). It only took a small amount of bulkhead
filing to get the fuselage halves to come together. The engine mounts actually
hold the engine straight, and the right distance from the cowling face. Cowling
extension and front were added next, and filling and sanding begun. Careful
gluing can keep this to a minimum. By the way, this kit features locating
pins, I believe the first I've seen on a limited run jobber. The canopy sills
were lacking the sliding tracks, so I made some out of sheet styrene and put 'em
in.
Moving to the wings, first the gear bay formers are put in,
they are individual resin pieces and look good. I left out the plastic kit
machine gun barrels as I would replace them with copper tube later, and put the
halves together. Another different feature
 of this model is, all other Brewsters I've done have the bottom wing half as one piece, including the
fuselage bottom. This makes for 2 tough seams to fill fore and aft. The recent
Classic Airframes ones are a real pain in the patootie, with their weird
assembly sequence. These wings are just butt joints, and fit well. Careful
with the glue, and job done. They are molded nicely and the dihedral came out
spot on. Nice, Special Hobby.
of this model is, all other Brewsters I've done have the bottom wing half as one piece, including the
fuselage bottom. This makes for 2 tough seams to fill fore and aft. The recent
Classic Airframes ones are a real pain in the patootie, with their weird
assembly sequence. These wings are just butt joints, and fit well. Careful
with the glue, and job done. They are molded nicely and the dihedral came out
spot on. Nice, Special Hobby.
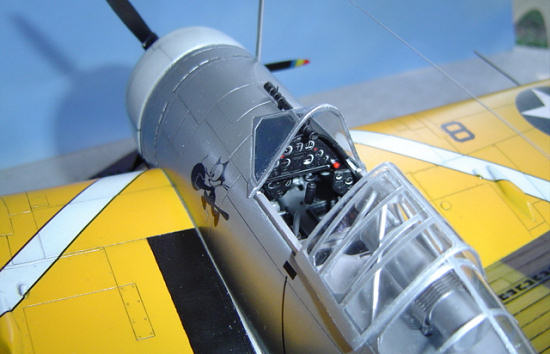
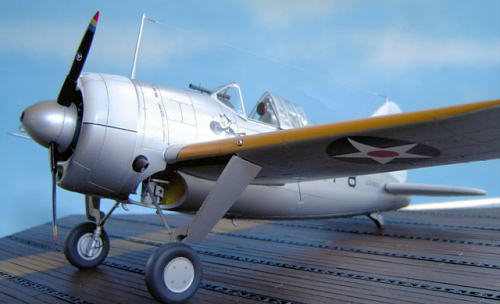
The life raft container behind the pilots seat is next, the nice etched direction finder installed, and the rollover cage. Note, the plans call for the container to be aluminum, but it should be black. Of course I found this out after it was too late. Now, the rear canopy area. I wanted this to look right as it is a signature of the Brewster's looks, and decided to fair it in to the fuselage correctly, even if it meant extra work.
The in progress pics show this area, and the sanding involved. The clear panels were masked off using Tamiya tape, the interior and wheel wells and ventral window stuffed with tissue, and to the paint department.
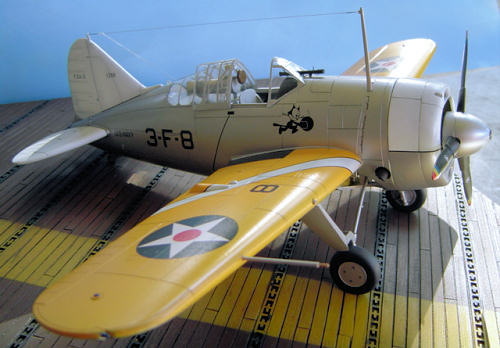
| COLORS & MARKINGS |
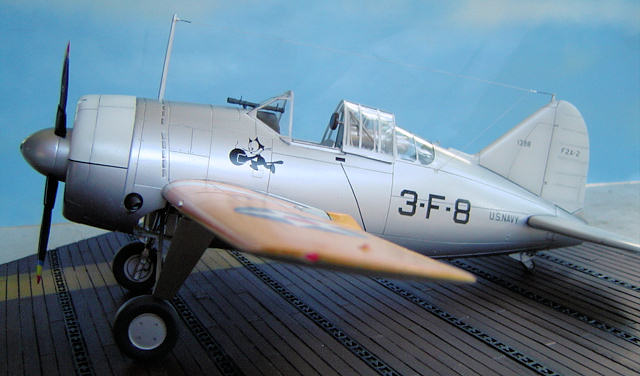
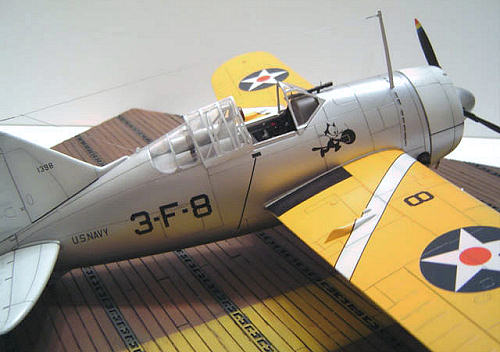
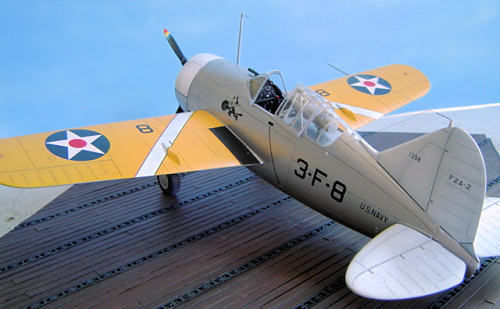
Decals are provided for 2 "yellow wings" airplanes, VF2 from
Lexington, or VF3 from Saratoga. Testor's small jar flat white first, as I was
doing the Saratoga "Felix the Cat" version-always loved that one. Wing
stripes, upper cowl, and tail feathers
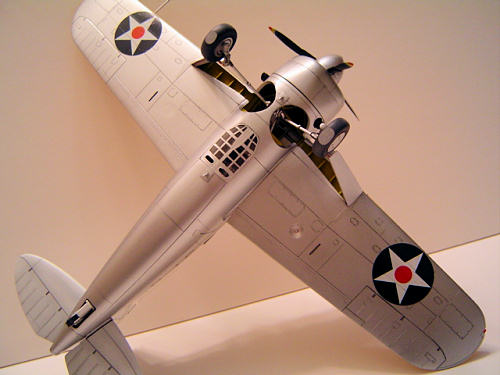 are white. These were masked, and the
upper wings done with Testor's flat yellow with a "tech" of red mixed in, to
make the Orange yellow wing tone. Upon masking the wings, the rest was hit
with Alclad Aluminum. The body was not natural metal, but painted Aluminum
laquer. I've grown to love Alclad, the stuff is not nearly as fussy as has been
said. Easy to use, tintable with enamels, and FAST drying, it really
simplifies jobs where Aluminum is involved. The stripe and tail tapes removed,
I coated the whole thing with Testor's Metallizer sealer, which I use as a
gloss coat, for decaling.
are white. These were masked, and the
upper wings done with Testor's flat yellow with a "tech" of red mixed in, to
make the Orange yellow wing tone. Upon masking the wings, the rest was hit
with Alclad Aluminum. The body was not natural metal, but painted Aluminum
laquer. I've grown to love Alclad, the stuff is not nearly as fussy as has been
said. Easy to use, tintable with enamels, and FAST drying, it really
simplifies jobs where Aluminum is involved. The stripe and tail tapes removed,
I coated the whole thing with Testor's Metallizer sealer, which I use as a
gloss coat, for decaling.
The decals say "Special Hobby" on them, but are probably by this "propagateam" outfit. (Where did they get that name, anyway?) Whatever, they are very good, the first decals I've used that really did not require a setting solution. They are quite thin, and a little delicate, but really settle down nicely. This is important, as half the decals are skinny border stripes for the wing chevrons, cowl and tail. A real problem could have been where they cross right over the wing gun bulges, but it wasn't that bad after all. Felix the cat and his bomb came out perfect!
Now all panel lines were accented with "sludge wash", of course the overall look being kept clean, as this was an immaculate peacetime baby. Another gloss coat covers all, this coat being "dusted" on, for a semi-gloss finish.
| FINAL CONSTRUCTION |
Things to do- Landing gear, painted and attached. The
locating point is fairly obvious and strong. The retraction struts are next,
the attachment point for these being vague, but I attached them where they
seemed to go. The important thing is to keep the main struts slightly raked
forward, and wheel legs vertical. Check reference photos first here. I added
little pivots to the area where the struts go to the main legs, as per photos.
I also made up brake lines from wire, guessing where they run to the rear of
the main legs. At the bottom to the wheels, it changes to some neat 2mm rubber
tubing (Used for bracelets) my kid found at the craft store. Makes perfect
brake lines.
 Propeller, and spinner, the prop tips being the old red,
yellow and blue, that takes a bit of time to spray. When installing this
assembly, do not use the spacer the plans say to use, as this would hold the
blades way too far out. I made a shaft from sprue, and glued it right into the
spinner back plate, this will give you the proper distance. Always keep an eye
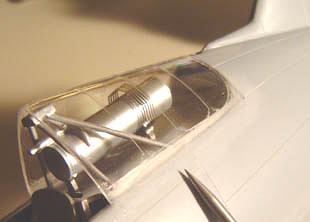
on those references. Now,about that canopy. Here's where things got
interesting. I masked the windscreen, belly glass, and sliding portion and
painted them. Why can't these manufacturers ever give you a sliding portion
that fits over the back part properly? Here I was with nice clear canopy
parts, that sat too high. Dare I try a miniscule amount of glue to hold it
down? NO! I can hear the shouting. Well, you were right. The area in question
blobbed out and fogged up. Arrrgggh! After cleaning and polishing the ruined
area, I finally glued 2 little sprue pins to the inside of the canopy track
and corresponding holes for these under the rear transparency. THAT was fun.
But it sits right and most of the screwed up area is hidden.
Propeller, and spinner, the prop tips being the old red,
yellow and blue, that takes a bit of time to spray. When installing this
assembly, do not use the spacer the plans say to use, as this would hold the
blades way too far out. I made a shaft from sprue, and glued it right into the
spinner back plate, this will give you the proper distance. Always keep an eye
on those references. Now,about that canopy. Here's where things got
interesting. I masked the windscreen, belly glass, and sliding portion and
painted them. Why can't these manufacturers ever give you a sliding portion
that fits over the back part properly? Here I was with nice clear canopy
parts, that sat too high. Dare I try a miniscule amount of glue to hold it
down? NO! I can hear the shouting. Well, you were right. The area in question
blobbed out and fogged up. Arrrgggh! After cleaning and polishing the ruined
area, I finally glued 2 little sprue pins to the inside of the canopy track
and corresponding holes for these under the rear transparency. THAT was fun.
But it sits right and most of the screwed up area is hidden.
Final bits-the tube gun sight was hollowed out, and a drop of white glue placed in either end for lenses. (Ah, the stuff you can see in 1/32nd scale!) I added two small sprue bits to represent the iron back up sights. 2 .50 cal barrels were cut from brass tube, cut to length, and slid into the wings. Pitot tube, landing lights, antennas and wire (2 pound fishing line) finished the project.
| CONCLUSIONS |
 I was pleasantly surprised by this build. Previously I had
done the Pac Coast Macchi 200, and Spec Hobby Polkarpov I-16. Both had some
real bad wing fit and other problems, making them more of a wrestling match
than fun. But the big Brewster went together nicely, the only real dicey area
being the landing gear. This is definitely the best of the MPM family yet
released. Yep, I got her finished the day before the show, she's on her way
tomorrow. I even sprung for the Just Plane Stuff 1/32nd carrier deck, lying
dusty on the local hobby shop's shelf, and squeezed in painting that up, too.
This should come in handy when the promised Trumpeter 1/32nd TBD comes in. I
would recommend the F2A-2 to anyone with some experience, who likes the big
ones.
I was pleasantly surprised by this build. Previously I had
done the Pac Coast Macchi 200, and Spec Hobby Polkarpov I-16. Both had some
real bad wing fit and other problems, making them more of a wrestling match
than fun. But the big Brewster went together nicely, the only real dicey area
being the landing gear. This is definitely the best of the MPM family yet
released. Yep, I got her finished the day before the show, she's on her way
tomorrow. I even sprung for the Just Plane Stuff 1/32nd carrier deck, lying
dusty on the local hobby shop's shelf, and squeezed in painting that up, too.
This should come in handy when the promised Trumpeter 1/32nd TBD comes in. I
would recommend the F2A-2 to anyone with some experience, who likes the big
ones.
October 2006
| REFERENCES |
F2A Buffalo in Action Jim Maas Squadron publications
Brewster F2A Buffalo Andre Zbiegniewski Kagero publications
Copyright ModelingMadness.com. All rights reserved. No reproduction in part or in whole without express permission.
If you would like your product reviewed fairly and fairly quicklyh, please contact the editor or see other details in the Note to Contributors.