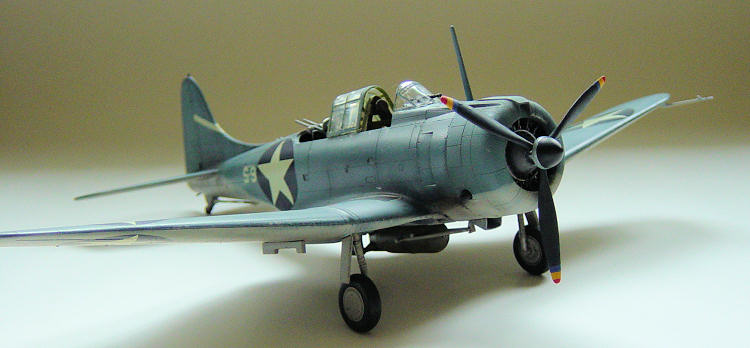
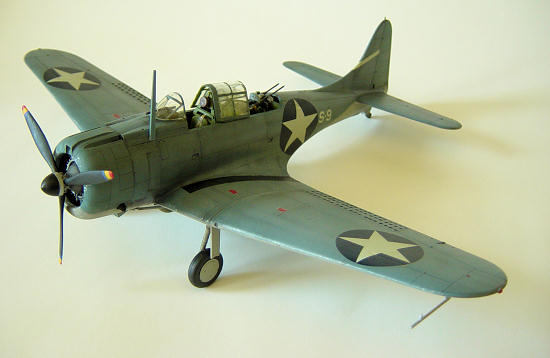
Hasegawa 1/48 SBD-3 Dauntless
| KIT #: | 09119 (Jt 19) |
| PRICE: | $28.00 or so |
| DECALS: | Three options |
| REVIEWER: | Ralph Koziarski |
| NOTES: | Also available in special boxing with perforated dive breaks |
| HISTORY |
Anybody interested in the US Navy’s premier
dive-bomber from World War II would not be ill-advised to read the very
interesting and entertaining histories of the aircraft and its crews on Mr. Tom
Cleaver’s reviews of the Accurate Miniatures kits found on this very site.
Suffice to say, the “Slow But Deadly” served admirably in the Pacific,
| THE KIT |
This kit is Hasegawa’s standard fare. Upon opening
the box you see several gray sprues with crisply molded parts with recessed
panel lines, a decal sheet with three options, a few poly-caps and a separately
bagged sprue of very nicely done clear parts. Panel lines are of the recessed
variety, but I did not check plans to see if all the appropriate “aircraft
topography” is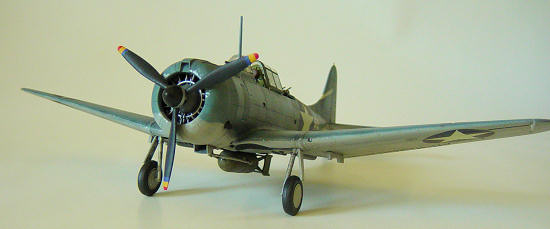 there. Hasegawa tends to oversimply surface details, and I would not be
surprised if this kit is not par for the course. Other details are
oversimplified or lacking entirely. The cockpit really can’t hold a candle to
the Accurate Miniatures kit, and consists of no more than 10-12 parts.
Especially poor, are the twin .30cal machine guns and mount in the rear, and the
simple black and white instrument panel decals. The main bomb harness also lacks
adequate detail, and the under-wing pylons are simply two bars of plastic.
Perhaps the grossest oversight is the lack of perforated dive breaks. The 360
perforations are instead represented by shallow depressions in the plastic.
Hasegawa have released a version of this kit that comes with PE breaks which are
perforated and can be modeled in a deployed position, but this will cost you
extra. This level of detail would be more than adequate in 1/72, but Hasegawa
really could have tried a little bit harder for 1/48th
scale, especially considering the price of the kit.
there. Hasegawa tends to oversimply surface details, and I would not be
surprised if this kit is not par for the course. Other details are
oversimplified or lacking entirely. The cockpit really can’t hold a candle to
the Accurate Miniatures kit, and consists of no more than 10-12 parts.
Especially poor, are the twin .30cal machine guns and mount in the rear, and the
simple black and white instrument panel decals. The main bomb harness also lacks
adequate detail, and the under-wing pylons are simply two bars of plastic.
Perhaps the grossest oversight is the lack of perforated dive breaks. The 360
perforations are instead represented by shallow depressions in the plastic.
Hasegawa have released a version of this kit that comes with PE breaks which are
perforated and can be modeled in a deployed position, but this will cost you
extra. This level of detail would be more than adequate in 1/72, but Hasegawa
really could have tried a little bit harder for 1/48th
scale, especially considering the price of the kit.
| CONSTRUCTION |
Construction began the somewhat Spartan cockpit
which consisted of a floor, sidewalls, multi-piece pilot’s seat, gunner’s ring
mount/seat, instrument panel bulkheads and decals, along with several knobs,
sticks and other miscellany. This was all sprayed interior green then given an
oil wash in black and raw umber. The various boxes, knobs, and switches were
painted black with s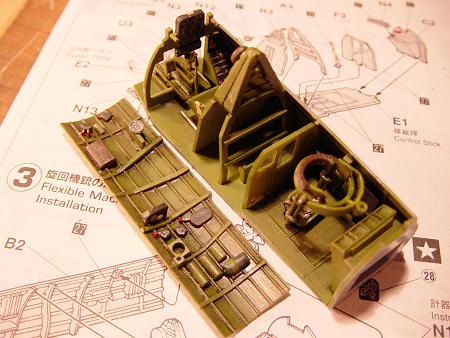 ilver
and red details. In an attempt to improve the poor instrument panel decals, I
first sprayed them with flat coat and then applied a small dot of Krystal Klear
to each dial to simulate the glass covering. I fashioned belts from masking tape
for both the pilot’s and gunner’s seats. The configuration of these harnesses is
entirely fictional, but I’m very much the Impressionist when it comes to
aircraft interiors.
ilver
and red details. In an attempt to improve the poor instrument panel decals, I
first sprayed them with flat coat and then applied a small dot of Krystal Klear
to each dial to simulate the glass covering. I fashioned belts from masking tape
for both the pilot’s and gunner’s seats. The configuration of these harnesses is
entirely fictional, but I’m very much the Impressionist when it comes to
aircraft interiors.
One element which gave me trouble here was the gunner’s seat/ring mount. This assembly is rather fragile as the seat attaches to the ring via two thin rods which had very little contact surface, making it very difficult to align everything. Mine came out somewhat wonky, so I ended up gluing the seat-pan to the floor and sandwiching the ring mount between the sidewalls separately, once the machine guns went in, it was impossible to tell that anything was off.
 truly off.
Well within allotted “screw-up” boundaries for me. After about four days of this
nonsense, I had my breaks perforated and could assemble the wings. These went
together without any further trouble and very neatly fit the fuselage. The
horizontal stabilizers went on after the wings, and the engine cowl was
temporarily fitted as well. I left it unattached at this stage to ease the
installation of exhaust stubs after painting. Finally it came time to see what I
could do about positioning the canopy open.
truly off.
Well within allotted “screw-up” boundaries for me. After about four days of this
nonsense, I had my breaks perforated and could assemble the wings. These went
together without any further trouble and very neatly fit the fuselage. The
horizontal stabilizers went on after the wings, and the engine cowl was
temporarily fitted as well. I left it unattached at this stage to ease the
installation of exhaust stubs after painting. Finally it came time to see what I
could do about positioning the canopy open.
| COLORS & MARKINGS |
All the options provided in the kit are
intermediate blue over light-gray so I wanted to due something to break up the
monotonous scheme. I sprayed the entire kit in black and then began to build up
successive mist coats of Poly Scale Light-Grey on the bottom and Tamiya medium
blue mixed with light-gray up top. Unlike typical preshading, I didn’t want a
uniform light-center with dark edges within each panel, as this can look
somewhat cartoonish if not done just right. Instead I went for a slightly more
random effect, building up more paint in some panels than others, and generally
trying to keep things lighter as I got to the upper s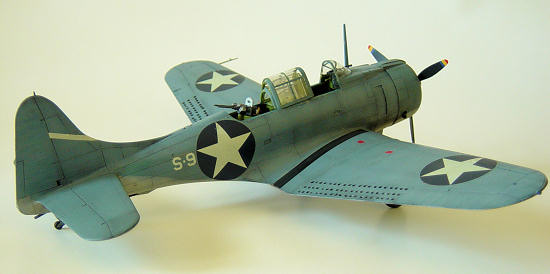 urfaces.
The result is not unlike traditional preshading, but its random nature makes it
more natural in my opinion. And for me, this method is much easier than
preshading along panel lines and then trying to maintain the same level of spray
when filling in the spaces between them. Once dry, the model was given a coat of
floor polish and decaled.
urfaces.
The result is not unlike traditional preshading, but its random nature makes it
more natural in my opinion. And for me, this method is much easier than
preshading along panel lines and then trying to maintain the same level of spray
when filling in the spaces between them. Once dry, the model was given a coat of
floor polish and decaled.
Decals went on without a hitch and conformed nicely to the surface with the aid of Micro-set. After the decals dried, the model was given a light wash of raw umber/black oils (heavier in the gear wells and in a few streaks around them to simulate fluid leaks), a few paint chips applied with a toothpick, and a very light mist coat of about 85% thinner 15% white paint. This was sprayed in a few quick passes from about a foot-and-a-half away in order to tone down the colors on the decals and to added further to the fading effect. A coat of MM Acrylic flat clear, finished the paint session.
| FINAL CONSTRUCTION |
Once painting was completed, the landing gear,
arrestor hook, bomb, machine guns, and canopy segments were all painted and
attached. These components all fit without any kind of issues, with the
exception of the windscreen. This proved to be a si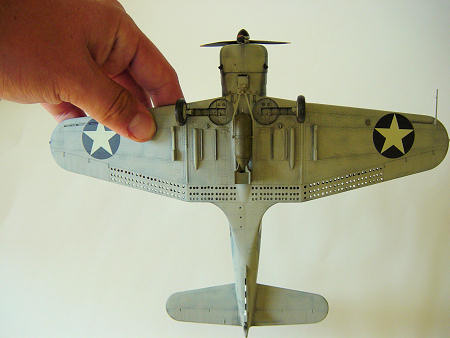 mple
fix, as all I needed to do was widen the opening for the bomb-sight, after
which, the windscreen slid right into place. The antenna mast was glued into
place, and navigation lights were painted when I realized I still had to finish
the prop.
mple
fix, as all I needed to do was widen the opening for the bomb-sight, after
which, the windscreen slid right into place. The antenna mast was glued into
place, and navigation lights were painted when I realized I still had to finish
the prop.
| CONCLUSIONS |
Despite the kit’s lack of details, it builds into a very attractive SBD. The lack of cockpit detail does not bother me much, as I don’t look in there too often, and externally the kit looks spot on. I would have liked to build this model with deployed dive breaks, but that I can live without as well. However, the mind-numbing sessions spent drilling out the dive breaks really killed the fun factor with this model. This hobby should be enjoyable, and yes, challenging, but it should never become a chore. If I had to build another SBD, I really doubt it would be this one, especially considering that a few extra dollars would have gotten me the superior Accurate Miniatures kit
Value: C-
Accuracy/Detail: B-
Options: B
Fun Factor: D+
September 2008
If you would like your product reviewed fairly and quickly, please contact me or see other details in the Note to Contributors.