
Tamiya 1/48 F4U-1D Corsair
| KIT #: | 61061 |
| PRICE: | $23.95 |
| DECALS: | Three options |
| REVIEWER: | Dan Lee |
| NOTES: | Pend Orielle Hellcat/Corsair Resin Wheels and Squadron/Falcon Vaccuform Canopy for the F4U-1D |
| HISTORY |
The
Chance Vought F4U Corsair was one of the best (if not best) naval fighters of
the war despite initial issues with poor take off visibility, low speed stalling
and bouncing on landing on a carrier deck which scared off the US Navy from
using it as a carrier based fighter till 1944.
It served with the British Royal Navy’s Fleet Air Arm (as a carrier based
fighter) as well as the RNZAF in the Pacific Theatre.
Thanks to pioneering work done by the Marines and “consultant” Charles
Lindbergh, it became a very potent fighter bomber which gave the US Navy
flexibility in the composition of their air groups and helped reduce the
importance (and numbers) of the SBDs/Helldivers/Avengers within a carrier air
group.
It remained in
production till 1952 as it served in
 The version of the
Corsair this model represents is the F4U-1D which was an upgrade of the F4U-1A.
The 1D had a improved Malcolm Hood, a water injected P&W R-2800 Double
Wasp engine which had an additional 250hp over the previous version, wing
mounted stub air to ground rocket launchers and had the wing fuel cells removed
and replaced with two droppable external fuel tanks to reduce vulnerability to
ground fire. It carried the
standard armament of 6 .50 caliber machine guns with 400 rounds per gun (350 on
the outer gun.)
The version of the
Corsair this model represents is the F4U-1D which was an upgrade of the F4U-1A.
The 1D had a improved Malcolm Hood, a water injected P&W R-2800 Double
Wasp engine which had an additional 250hp over the previous version, wing
mounted stub air to ground rocket launchers and had the wing fuel cells removed
and replaced with two droppable external fuel tanks to reduce vulnerability to
ground fire. It carried the
standard armament of 6 .50 caliber machine guns with 400 rounds per gun (350 on
the outer gun.)
Roger Hedrick
Roger Hedrick
became a naval aviator in 1936 and was a flight instructor at NAS
Roger scored nine
kills as the XO of VF-17 including shooting down a Zero on his first combat
flight. One of the those that
escaped his guns was Tom Blackburn, who he nearly shot down in a(n) (un)friendly
fire incident in Nov 1943. True to
form Tom Blackburn was more upset that Roger was a poor shot.
The VF-17 “Jolly
Roger’s war ended
on May 11, 1945 when a kamikaze crashed into the Bunker Hill where VF-84’s ready
room was located, killing 22 of VF-84’s aviators.
Roger Hedrick survived with 12 kills/4 damaged and remained in the
| THE KIT |
 Tamiya’s F4U-1D kit
is a magnificent kit with mid 1990s origins.
It consists of three sprues of light grey plastic and one sprue of clear
parts. The parts are flash free and
the detail is excellent. Quite
frankly, I’m surprised that Tamiya stopped at the F4U-1D and did not go on with
kits of the Cold War Corsairs such as the F4U-4, etc.
Tamiya’s F4U-1D kit
is a magnificent kit with mid 1990s origins.
It consists of three sprues of light grey plastic and one sprue of clear
parts. The parts are flash free and
the detail is excellent. Quite
frankly, I’m surprised that Tamiya stopped at the F4U-1D and did not go on with
kits of the Cold War Corsairs such as the F4U-4, etc.
I selected this kit
to build because I had finished building several models in a row with lots of
aftermarket parts including PE which that required a lot of work (not just
because of the aftermarket parts) so I wanted to build a kit that was simple and
fun to build and the Tamiya Corsair fits the bill.
The only aftermarket I used in this kit were Pend Orielle resin wheels
which I had originally bought for a Hellcat model (they use the same wheels) and
a Squadron/Falcon Vaccuform canopy.
| CONSTRUCTION |
The Tamiya parts
were removed from the tree and started with the engine first.
The Tamiya engine is reasonably well detailed for an injection plastic
piece. It was painted flat black
then dry brushed silver while the push rods were painted gloss black.
The only thing I added to it were cut lengths of 30 gauge wire to
represent the ignition harnesses. I
drilled out the spark plug holes a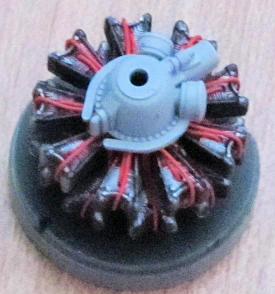 nd inserted the wire.
The wire was halfway inserted into the cylinder head and inserted end of
the wire was wrapped around the top of the cylinder head to represent the
harness coming from the other side of the cylinder.
I added a drop of CA glue to keep the wire in place and then I trimmed it
to fit. I did the same for the
second row of cylinders. Only thing
I did that might be considered odd was that I did not bother to paint the red
wire insulation. It’s a little bit
of work, but I think it makes the engine look better.
nd inserted the wire.
The wire was halfway inserted into the cylinder head and inserted end of
the wire was wrapped around the top of the cylinder head to represent the
harness coming from the other side of the cylinder.
I added a drop of CA glue to keep the wire in place and then I trimmed it
to fit. I did the same for the
second row of cylinders. Only thing
I did that might be considered odd was that I did not bother to paint the red
wire insulation. It’s a little bit
of work, but I think it makes the engine look better.
Once that was done,
I sprayed the hub grey. I’ve built
two of these Tamiya Corsairs and they all seem to have the same problem with the
engine hub. I can’t get it to fit
properly and it comes off when I spin the prop (purely for the purpose to insure
that the prop can move and not because I played with it.)
I spent some time trying to figure out why it comes off and came up with
a possible solution. I shaved off
1/3 of the polycap and then inserted it in place.
This time, the hub did not come off.
I worked on the
landing gear which I think is one of the few areas of this Tamiya kit that could
be considered a pain mostly because of the prominent ejector pin marks on the
sides of the main struts. I ended
up filling them with CA glue and then sanding/polishing them due to the fact
that they are painted in aluminum. Next I worked on the tailwheel/arrester hook
which was no effort at all. I
painted all the parts using a combination of Tamiya X-7 Chrome Silver (base
coat) and Talon Aluminum for the top coat.
The prop was
cleaned up, painted flat black then when the paint was dry the blades were
masked at the base and tip so that I could spray the hub silver (same combo of
X-7 Chrome Silver and Talon Aluminum) and the tips flat white then yellow.
 At the same time I
sprayed the tire hubs flat black (with a little bit of dark grey.)
I still had the mask sheet from the Eduard Hellcat and used the leftovers
to mask the tires for when I sprayed the hubs Gloss Sea Blue.
At the same time I
sprayed the tire hubs flat black (with a little bit of dark grey.)
I still had the mask sheet from the Eduard Hellcat and used the leftovers
to mask the tires for when I sprayed the hubs Gloss Sea Blue.
It was then that I
finally got around to the interior.
The bottom of the cockpit was sprayed XF-4 Yellow Green (Chromate Yellow) and
the top half sprayed with Xtracrlyix US Interior Green.
I used a leftover Ultracast resin seat that matched the Corsair seat
which I used instead of the kit part (because it had cast seat belts which is
much better than the seat belt decal that Tamiya supplies.)
The seat was glued on with CA glue to the plastic frame.
Once things were dry, I added the instrument panel decal as well as hand
painted the various bits as per photos and Tamiya instructions.
I dry brushed the pedals and parts of the cockpit silver for wear and
then I glued together the fuselage.
The fuselage fit
well, but requires some careful sanding filling thanks to both the raised and
engraved detail around the top portion of the forward fuselage.
The wings were glued on at the same time and only a little bit of filler
was required along the mating join.
I let the model sit for a week and a half before I sanded/filled it to remove
the dreaded phantom seams when I use Tamiya Extra Thin glue.
A week to two weeks works fine for me, but YMMV depending on what kind of
glue one uses--the hotter the glue, the longer the wait.
No bleating about the “joys” of sanding/filling as it went smoothly.
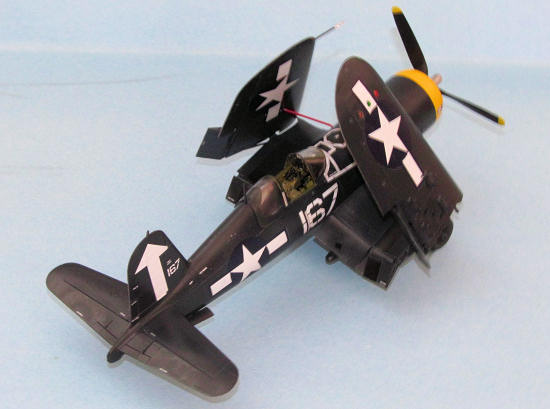
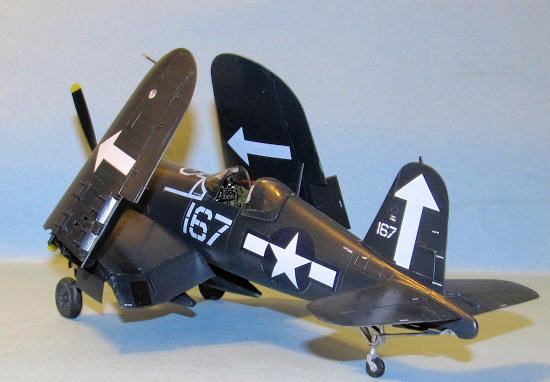
I left the wing tips off as I intended to build this with folded wings.
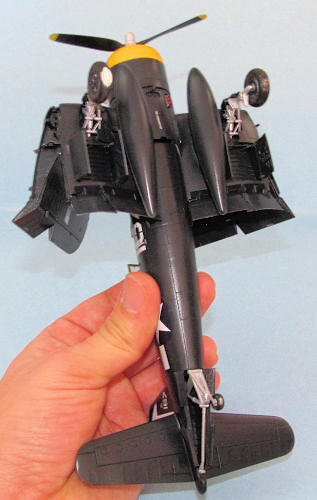
One thing I did add
were the fuel tanks and the rocket launcher stubs even though VF-84’s main job
was to intercept Kamikazes. They
still performed air to ground missions and had the rocket launcher stubs
attached (based on photos of VF-84s F4U-1Ds.)
Finally I glued on
the various gear doors as the interior and exterior would all be the same color.
| COLORS & MARKINGS |
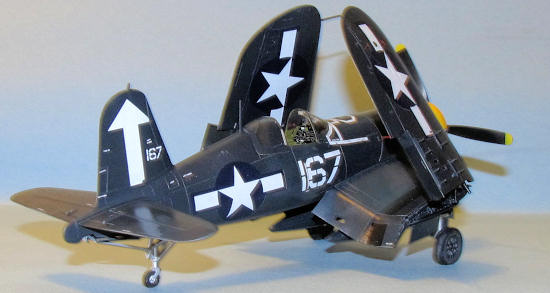
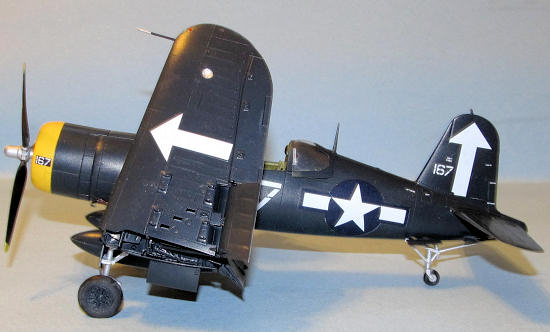
I selected Roger
Hedrick’s often modeled famous 167 because the yellow cowling is a touch of
variety on an otherwise bland late war all Sea Gloss Blue Corsair.
 The first item I
painted was the cowling. The
interior was painted XF-80 Royal Light Grey then the exterior was painted Tamiya
Flat White and when it was dry a coat of Xtracrlyix RLM04 was sprayed on.
The yellow portion and interior were masked before it was sprayed with
two light coats of Xtracrylix Sea Gloss Blue.
The first item I
painted was the cowling. The
interior was painted XF-80 Royal Light Grey then the exterior was painted Tamiya
Flat White and when it was dry a coat of Xtracrlyix RLM04 was sprayed on.
The yellow portion and interior were masked before it was sprayed with
two light coats of Xtracrylix Sea Gloss Blue.
I put a piece of
foam to mask off the cockpit and the sprayed on the Xtracrylix Gloss Sea Blue on
the fuselage and wing parts. It
took several light coats to get an even
I used the Tamiya
Decals. They went okay except a
couple of them silvered and the decal that represents the tape that kept the oil
from spraying the windscreen ripped into several pieces that I had to carefully
rearrange. I used MicroSet to
settle the decals during the initial placement and Solvaset to work on the
really stubborn ones. The only
decals I used Solvaset on at the beginning were the prop manufacturer’s decals
as I did not use a gloss clear coat on the prop.
Weathering and
FInal Coat
The only watercolor
wash I did was around the tape areas just before the windscreen.
Oil stains (very faint) and gunfire residue were added using the Tamiya
Weathering Kit.
Finally, a wet rag
was used to clean off the decal solution residue and the final coat of
Xtracrylix Satin sprayed on to seal everything in.
| FINAL CONSTRUCTION |
 I cut the
Squadron/Falcon Vaccuform canopy using scissors and then carefully sanded down
the edges. It takes some patience
to do as one mistake could ruin the canopy.
The pieces were then masked using Tamiya tape, sprayed Xtracrylix
interior green and then Gloss Sea Blue (done the same time as the plane itself.)
I cut the
Squadron/Falcon Vaccuform canopy using scissors and then carefully sanded down
the edges. It takes some patience
to do as one mistake could ruin the canopy.
The pieces were then masked using Tamiya tape, sprayed Xtracrylix
interior green and then Gloss Sea Blue (done the same time as the plane itself.)
The folding wing
option proved to be more of a pain than I remembered.
I had to tweak the folding wings so that they would line up and look
symmetrical unlike the wonky angles I had originally come up with.
I will have to say that this is the only area I got frustrated with.
The holes for the wing fold braces were drilled out and the braces
themselves were painted flat red before they were attached to the model.
The landing gear
was glued on and the resin wheels were attached using CA glue.
I was going to add
rockets, but decided against it at the last minute.
The rest of the tiny parts (painted earlier) were added.
The canopies were glued on with Elmers.
Lastly, I added the
prop and I was done a Corsair in two and half weeks which is a speed record for
me when it comes to 1/48 aircraft.
| CONCLUSIONS |
I enjoyed building
the Tamiya Corsair as it was a fun, easy and reasonably detailed kit to build
which is why it is a very popular kit.
| REFERENCES |
http://www.acepilots.com/usn_aces2.html
wikipedia.org
If you would like your product reviewed fairly and quickly , please contact me or see other details in the Note to Contributors.