| KIT #: | 7076 |
| PRICE: | $ |
| DECALS: | One option |
| REVIEWER: | Fernando Rolandelli |
| NOTES: |
| HISTORY |
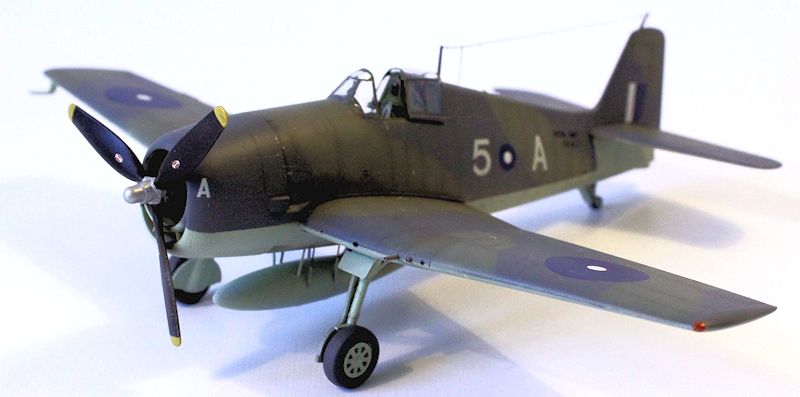
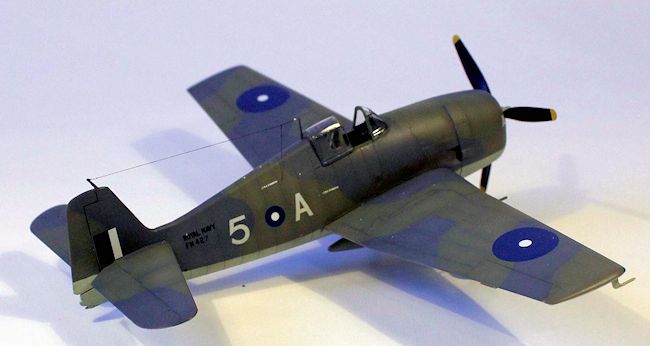
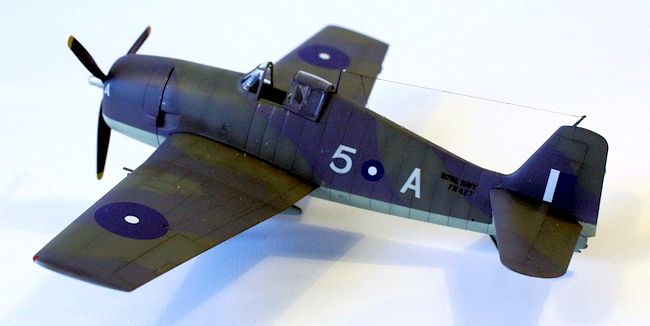
Grumman Hellcat Mk.I, FN427, 1839 Sqn FAA, HMS Indomitable, February 1945.
RN East Indies Fleet Hellcats
Hellcats in Fleet Air Arm service had a less stellar career record than their US
Navy counterparts. Some sources (Zbiegniewski, Kagero) blames faulty doctrine
for that (but that author is deeply anti-British); others show that the real
cause was probably the lack of targets: the Royal Navy was never involved in a
carrier battle in open seas, and when RN Hellcats did engage the enemy they were
as effective as those in
 American hands, being responsible of 52 out of 455
total RN aerial victories. HMS Indomitable was the only “Hellcat Fleet Carrier”,
embarking the 5th Naval Fighter Wing, comprising 1839th
and 1844th Sqns.; the carrier fighting the entire campaign with the
BEIF and BPF (British Pacific Fleet) right to the end of the war.
American hands, being responsible of 52 out of 455
total RN aerial victories. HMS Indomitable was the only “Hellcat Fleet Carrier”,
embarking the 5th Naval Fighter Wing, comprising 1839th
and 1844th Sqns.; the carrier fighting the entire campaign with the
BEIF and BPF (British Pacific Fleet) right to the end of the war.
A “personal history”, however provisional due to the facts that will be
disclosed later, can also be made of FN427. What we know for sure is that BuNo
65969 was turned over to the RN, serialed FN427 and it is consigned as sliding
over the side of HMS Indomitable when landing, date unknown (Sturtivant, Baugher).
Is this the machine that Andrew Thomas (“Royal Navy Aces of WW II”, Osprey
Publications) points out, picture included, as the mount of Lt. Cdr Shotten when
he made two claims on January 24th, 1945, and later by Lt. Mackie
when he shot down a Ki-43 on 29th? Possibly. More on this later.
| THE KIT |
Hellcats were anything but in short supply in kit form, in any scale. In the
“gentlemen’s scale”, I can consign a Frog rendition, both bagged (Mk.I, FAA
markings) and boxed (-5, Aeronavale), with a skinny, flat fuselage sides; an
Airfix, horribly bloated and covered in gimmicks and rivets, but with
interesting FAA markings; a Matchbox, plenty of coloured plastic and trench-like
panels, but also sporting interesting FAA markings (the first contact with BPF
insignia many of us ever had); a completely unremarkable, raised- panelled
Hasegawa and one from
Academy, a
honest kit with a correct shape (exception made of the tip of the fin, and the
infamous cowling “smile”), sunken panel lines of near adequate proportions and
an intention at engine and cockpit detail. Replacing these (the cowling would be
an overkill) and adding some aftermarket decals to replace the unimaginative
ones provided, a good model can be made out of them. Eduard’s kit is in a
different league: both shape and detail are superb through and through. In the
all-plastic “Weekend” boxings fine detail might be a bit short; but the
Profipack renditions include almost all the detail a modeller could wish. The
only thing I added was a vacuformed hood, to properly display it opened.
panelled
Hasegawa and one from
Academy, a
honest kit with a correct shape (exception made of the tip of the fin, and the
infamous cowling “smile”), sunken panel lines of near adequate proportions and
an intention at engine and cockpit detail. Replacing these (the cowling would be
an overkill) and adding some aftermarket decals to replace the unimaginative
ones provided, a good model can be made out of them. Eduard’s kit is in a
different league: both shape and detail are superb through and through. In the
all-plastic “Weekend” boxings fine detail might be a bit short; but the
Profipack renditions include almost all the detail a modeller could wish. The
only thing I added was a vacuformed hood, to properly display it opened.
The kit I used was #7076, depicting a US Navy F6F-3. However, I wanted to depict
a RN Hellcat I, using some Frog decals I had retrieved from a garbage box. It
must be said that Frog decals stand high in my appreciation in the Heroic Age of
modelling; the 1/72nd Eduard kit, on the other side, comes with the
plastic needed to build any version, -3, -5 or -5N. I also grabbed some generic
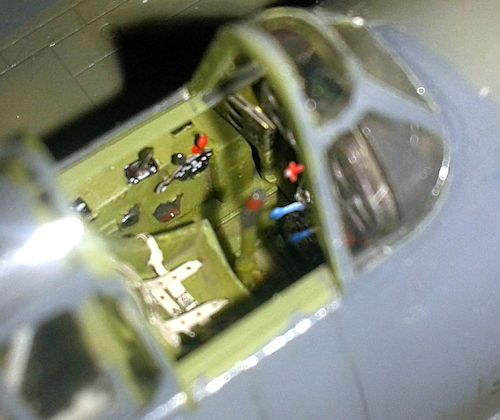
Eduard Sutton harness.
| CONSTRUCTION |
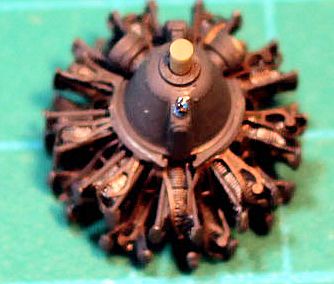 now I am thinking the kit depicts it correctly. The three-piece
cowling calls for careful assembly. The ventral tank is a piece of extremely
awkward design; I have never succeeded in getting a clean assembly in any single
build, in both scales. In 1/72nd, at least, the “V” shaped braces use
to break off almost immediately, simplifying your choices. I did not shorten the
main u/c legs, as in the 1/48th kits; the “sit” looks fine anyway.
The shallow, incorrectly shaped wheel wells are not that noticeable; I left them
alone. I bored the gun tubes, a delicate operation; filling and sanding the seam
in between the muzzles also is. The windscreen was a model fit, but the “wide
hood”, intended to pose it opened, rode a bit too high, calling for a vac
replacement.
now I am thinking the kit depicts it correctly. The three-piece
cowling calls for careful assembly. The ventral tank is a piece of extremely
awkward design; I have never succeeded in getting a clean assembly in any single
build, in both scales. In 1/72nd, at least, the “V” shaped braces use
to break off almost immediately, simplifying your choices. I did not shorten the
main u/c legs, as in the 1/48th kits; the “sit” looks fine anyway.
The shallow, incorrectly shaped wheel wells are not that noticeable; I left them
alone. I bored the gun tubes, a delicate operation; filling and sanding the seam
in between the muzzles also is. The windscreen was a model fit, but the “wide
hood”, intended to pose it opened, rode a bit too high, calling for a vac
replacement.
| COLORS & MARKINGS |
 Emperor early in 1944 (therefore, most probably serving with 800 Sqn in
Home waters), hitting the carrier’s island. It also stated that JX758 was lost
in an accident, during “night flying training”. The picture didn’t look like
taken during nightime, but that was not decisive. Further searches and
consulting only produced that there might have been a “JV147 5-A” involved in
Meridian I. Could it be that there were two aircraft serialled “JV147”? Highly
improbable. Then I got hands on (virtually) a e-copy of Sturtivant’s “Aircrafts
of the Royal Navy”. I rechecked the serials. “JV147”was indeed declared “Z1”
after an accident on HMS Emperor. Having reached a stalemate, I decided that the
only way forward was scrolling the entire stock of RN Hellcat Is, one by one.
Then I got a positive result: there was one “FN427”, serving with 1839 Sqn.,
lost overboard on HMS Indomitable on an unknown date, coded “5-A”. That was
my “5-A”, and the one depicted in the
Osprey book; the caption being wrong (a most common occurrence). As one FN430
was serving in the sister squadron, 1844 Sqn on HMS Indomitable at about the
same time (it is depicted in the Eduard kit), the serial is well within range; I
considered myself satisfied and went on with the build.
Emperor early in 1944 (therefore, most probably serving with 800 Sqn in
Home waters), hitting the carrier’s island. It also stated that JX758 was lost
in an accident, during “night flying training”. The picture didn’t look like
taken during nightime, but that was not decisive. Further searches and
consulting only produced that there might have been a “JV147 5-A” involved in
Meridian I. Could it be that there were two aircraft serialled “JV147”? Highly
improbable. Then I got hands on (virtually) a e-copy of Sturtivant’s “Aircrafts
of the Royal Navy”. I rechecked the serials. “JV147”was indeed declared “Z1”
after an accident on HMS Emperor. Having reached a stalemate, I decided that the
only way forward was scrolling the entire stock of RN Hellcat Is, one by one.
Then I got a positive result: there was one “FN427”, serving with 1839 Sqn.,
lost overboard on HMS Indomitable on an unknown date, coded “5-A”. That was
my “5-A”, and the one depicted in the
Osprey book; the caption being wrong (a most common occurrence). As one FN430
was serving in the sister squadron, 1844 Sqn on HMS Indomitable at about the
same time (it is depicted in the Eduard kit), the serial is well within range; I
considered myself satisfied and went on with the build.
Trying to get an environmentally healthy workstation, I started using
Xtracrilyxs paints sometime ago; main problem is that they are a bit fragile and
tend to peel off under stress. That made masking a tough proposition, both with
tape and liquid mask. I solved the problem getting most of the tack out of the
Tamiya tape, and washing the liquid mask dissolving it with water. I worked;
only some small spots peeled off. Colours were standard British EDSG/DSG over
Sky, Grumman employed “equivalent” colours closely patterned after the MAP ones
(from their early times as
a
British Purchase Commission contractor). Some weathering and the manufacturer’s
own interpretation of the colour would account for any difference. The
 instruction show Black anti-slip walkways, but in pictures I found no trace of
them. Xtracrylix Gloss varnish was applied with a wide flat brush in preparation
for decals, a single coat produces a high sheen. I used most of the decals for
FN430, “6-R” in the twin RN Hellcat boxing, #7078, as roundels and fin flashes
looked better proportioned and coloured and would perform better –actually
flawlessly- anyway. The serial were carefully deprived of the last two digits,
which were replaced by some in the SAMI BPF decal sheet (the font is the same
size but just a bit thinner; the decals are thin but not that good and ended up
showing a little silvering). I used the “5s” and the “A”s from the old Frog
sheet; they performed admirably, but they are much thicker than modern decals;
several gloss varnish coats and some sanding helped the “step” go down a bit.
Stencils are provided in moderate quantities; but there are no instructions as
where to place them, except the manufacturer’s logo in the prop blades! I tried
to follow the instructions in the #7078 kit, with partial success.
instruction show Black anti-slip walkways, but in pictures I found no trace of
them. Xtracrylix Gloss varnish was applied with a wide flat brush in preparation
for decals, a single coat produces a high sheen. I used most of the decals for
FN430, “6-R” in the twin RN Hellcat boxing, #7078, as roundels and fin flashes
looked better proportioned and coloured and would perform better –actually
flawlessly- anyway. The serial were carefully deprived of the last two digits,
which were replaced by some in the SAMI BPF decal sheet (the font is the same
size but just a bit thinner; the decals are thin but not that good and ended up
showing a little silvering). I used the “5s” and the “A”s from the old Frog
sheet; they performed admirably, but they are much thicker than modern decals;
several gloss varnish coats and some sanding helped the “step” go down a bit.
Stencils are provided in moderate quantities; but there are no instructions as
where to place them, except the manufacturer’s logo in the prop blades! I tried
to follow the instructions in the #7078 kit, with partial success.
| CONCLUSIONS |
An extremely high quality kit, an easy build, a well-shaped and proportioned
resulting model and an interesting research. All a modeller may wish for. For
the price, it is a bargain; it tempts you to build quite a collection of them.
| REFERENCES |
- “Royal Navy Aces of WW II”, Andrew Thomas, Osprey Publications;
- “Model Aircraft Monthly” 2005-8, SAMI Publications;
- “Fleet Air Arm Aircraft, 1939-1945”, Ray Sturtivant and others, Air Britain
Publications;
- “Grumman F6F Hellcat”, Andre Zbiegniewski, Monographs n° 10, Kagero
Publications;
- Joe Baugher website.
February 2015
If you would like your product reviewed fairly and fairly quickly, please contact the editor or see other details in the Note to Contributors.