Minicraft 1:144th
PBY-5A
|
KIT #: |
14435 |
|
PRICE: |
around €9-15
|
|
DECALS: |
Two options |
|
REVIEWER: |
Frank Spahr |
|
NOTES: |
1995 boxing |
The Consolidated
PBY
or Catalina (British designation) is probably the best known seaplane ever.
Hence I feel I can get away without a detailed history or specifications for the
purpose of this review. The truth
is out there, try
www.pby.com
or wikipedia for starters.
Built from 1936 on, the
PBY
was constantly updated and produced in very large numbers (around 4,000) and
operated by
 numerous
airforces and civilian operators. Even today, some
PBY´s
are serving in aerial firefighting.
numerous
airforces and civilian operators. Even today, some
PBY´s
are serving in aerial firefighting.
The most prolific version, the
PBY-5A,
was introduced in 1940. Amongst other improvements, it was the first amphibian
in the series as opposed to the earlier flying boats without wheels.
PBY´s
saw widespread wartime service in patrol/reconnaissance, anti-submarine, cargo
and – very notably – search-and-rescue. To name just three memorable events
PBY´s
participated in: The hunt for the
Bismarck, the battle of Midway, and
the loss of the USS Indianapolis.
The USAF´s postwar designation for the
PBY
was OA-10, and as such they continued to serve in limited numbers. The last
operational plane was stricken in 1957. French oceanographer Jacques Cousteau
made the plane popular when acquiring a
PBY-6A
in the 1970s and featuring it in his TV shows. Sadly, the plane crashed in 1979
off Lisbon, killing Cousteau´s son Philippe.
The
PBY
has gained fame for her reliability and resilience, adapting to numerous roles
and functions, and it is also a very popular modeling subject.
I bought this kit last year at the Luebeck model
show, after seeing very neat displays of 1:144th
scale planes, including the
PBY.
The manageable size led to the kit actually being built, as opposed to the
magnificent Revell 1:48 offering I have had in my stash for years now but no
idea where to display it.
 The
kit has recessed panel lines, a bit deep maybe, but reasonably all right after
painting. The detail level is so-so, with hardly any cockpit interior and no
more interior whatsoever; but who would see that anyway? The kit contains all
the machine guns for a war version, but neither other weapons such as depth
charges nor any of the rather elaborate antennae present on these planes. I did
not go into any soul-searching regarding accuracy of engines or overall
dimensions, as this aspect surely was no imperative on this build. Generally
speaking, I do build kits because of the fun involved, and it has to be a really
serious glitch to motivate me to change it. On the whole, I let others embark on
the quest for the Holy Grail Of Accuracy, if this is what their hearts delights.
Honestly speaking, I wanted a cool model of a
colourful
and beautiful plane and try my hands on making a somewhat livelier seascape than
I usually do.
The
kit has recessed panel lines, a bit deep maybe, but reasonably all right after
painting. The detail level is so-so, with hardly any cockpit interior and no
more interior whatsoever; but who would see that anyway? The kit contains all
the machine guns for a war version, but neither other weapons such as depth
charges nor any of the rather elaborate antennae present on these planes. I did
not go into any soul-searching regarding accuracy of engines or overall
dimensions, as this aspect surely was no imperative on this build. Generally
speaking, I do build kits because of the fun involved, and it has to be a really
serious glitch to motivate me to change it. On the whole, I let others embark on
the quest for the Holy Grail Of Accuracy, if this is what their hearts delights.
Honestly speaking, I wanted a cool model of a
colourful
and beautiful plane and try my hands on making a somewhat livelier seascape than
I usually do.
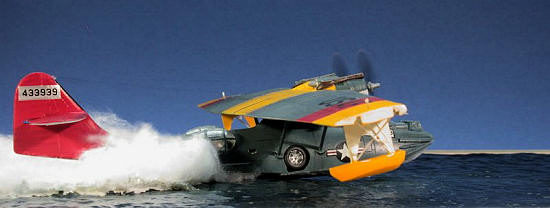
The
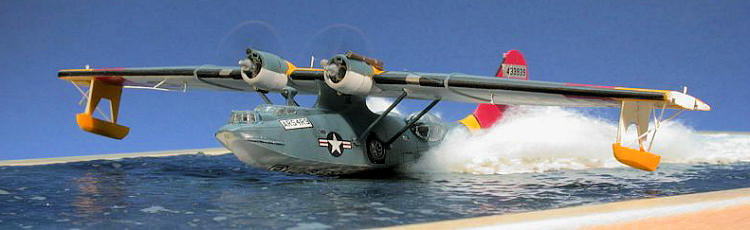
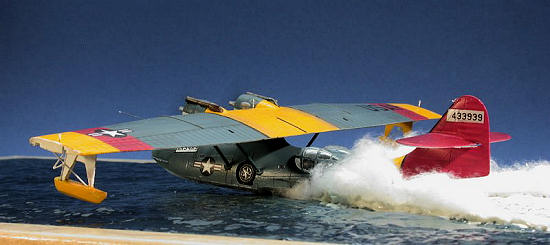
kit contains decals for two aircraft, one of them BuNo 44-33939, a postwar
air-sea rescue plane operating from California in 1946. This aircraft is also
depicted in the large Revell kit, although later in its career when operating in
Alaska. Anyway, this was the plane I wanted to model.
 I
didn´t want to go all without research; the bare minimum consisted of some
quality time on my couch with the Squadron booklet and some internet research,
mostly to find a good period image of the plane.
www.pbyrescue.com
turned out to be a very helpful site and contained the image I had been looking
for. I could make out a teardrop-shaped radome atop the cockpit (missing
I
didn´t want to go all without research; the bare minimum consisted of some
quality time on my couch with the Squadron booklet and some internet research,
mostly to find a good period image of the plane.
www.pbyrescue.com
turned out to be a very helpful site and contained the image I had been looking
for. I could make out a teardrop-shaped radome atop the cockpit (missing
 from
the kit) as well as underwing angled mounts for yagi antennae.
from
the kit) as well as underwing angled mounts for yagi antennae.
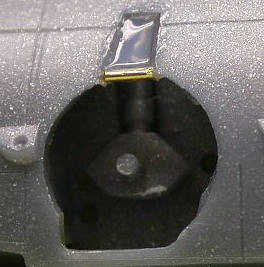
I began by assembling what cockpit there is
and painting the parts interior green and black. Next, the wheel wells were
added. As I had decided to depict the aircraft on a sea base, the wheels would
be retracted. The small undercarriage fairings from the kit were not used.
Instead I glued a piece of brass wire along the fairing´s lower edge and filled
the area of the fairing with some applications of self-leveling white glue. The
various small windows were filled with Maskol at that stage, as I didn´t plan to
use the kit parts. The bow turret was modified; I felt no need to be able to
rotate it and I did not want to fiddle it between the fuselage halves during
assembly.
Further
assembly and cleanup of the fuselage went well, and very little filler was used.
I soon had the hull as the first subassembly, ready for the most tedious part of
the build, masking the transparencies. I procrastinated a bit by assembling the
wing first. This went mostly OOB apart from the outriggers and their bracing.
The outriggers were made removable, the iffy
 “moving
feature” was deleted.
“moving
feature” was deleted.
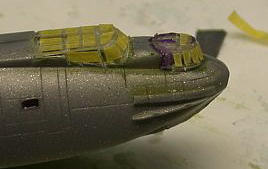
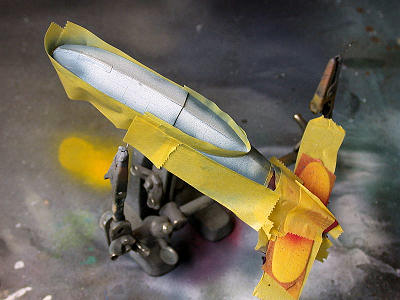
After
attaching the transparencies and cleaning up the surrounds, I masked the //%$
waist blisters using Parafilm M; Tamiya tape was used for the cockpit and bow
turret. That took *some* time and entailed a less-than-bright mood on my part,
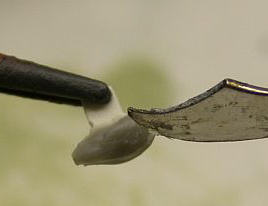
but it had to be done. In between I made a replacement radome. Starting with a
piece of sheet styrene trimmed to shape, I applied dental casting wax to both
sides to achieve the desired shape. That went rather well, and after painting
with acrylics the thing looked good enough for yours truly.
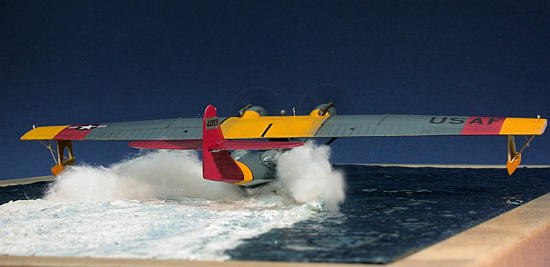
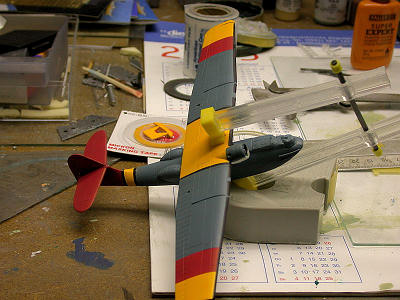
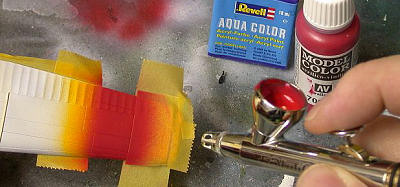 In hindsight, most of this build was spent
masking. The colourful scheme needed loads of masking and careful preparation in
respect to the painting sequence. Apart from Tamiya tape, I used Aizu ultra-fine
masking tape which is available as narrow as 0.4 mm (0.015 in). I did not need
those but the 1.5 mm stripes served well. They were used to mask the black
stripes atop the wing and those around the fuselage separating the yellow waist
band from the red and blue grey areas. As always, I took the precaution of
spraying another pass of the original colour after masking. That mostly
prevented the bleeding in of the new colour after masking. Generally
In hindsight, most of this build was spent
masking. The colourful scheme needed loads of masking and careful preparation in
respect to the painting sequence. Apart from Tamiya tape, I used Aizu ultra-fine
masking tape which is available as narrow as 0.4 mm (0.015 in). I did not need
those but the 1.5 mm stripes served well. They were used to mask the black
stripes atop the wing and those around the fuselage separating the yellow waist
band from the red and blue grey areas. As always, I took the precaution of
spraying another pass of the original colour after masking. That mostly
prevented the bleeding in of the new colour after masking. Generally
 speaking
, I started by priming the subassemblies with white enamel paint to make sure I
had a good grip on the styrene. The areas under the outriggers were prepainted
in white, and the outriggers then attached to the wing using Maskol. Thus the
paint demarcations worked fine. I continued by spraying the black de-icer boots
and stripes, masked those, and then respraying white preparatory to spraying
yellow and red. Those shades will look brightest when sprayed on a white
background. On the fuselage, I needed some trial-and-error until I realized I´d
best spray it all blue grey first and then mask those areas and end up with a
retouch of the white undersides. It was far easier masking the vertical surfaces
than trying the same with the area under the hull step.
speaking
, I started by priming the subassemblies with white enamel paint to make sure I
had a good grip on the styrene. The areas under the outriggers were prepainted
in white, and the outriggers then attached to the wing using Maskol. Thus the
paint demarcations worked fine. I continued by spraying the black de-icer boots
and stripes, masked those, and then respraying white preparatory to spraying
yellow and red. Those shades will look brightest when sprayed on a white
background. On the fuselage, I needed some trial-and-error until I realized I´d
best spray it all blue grey first and then mask those areas and end up with a
retouch of the white undersides. It was far easier masking the vertical surfaces
than trying the same with the area under the hull step.
After
removing the masks I found some glitches despite all effort made; I corrected
those and did some more masking for the silver background of the fin number. I
have to say that no lifting of paint whatsoever occurred in all the steps of the
masking process. The paints used were a wild range of acrylics, from Revell,
Vallejo and JPS respectively. All performed well.
 Next
came the mating of wings and fuselage to a good fit. I used a very useful
clamp I had bought at Telford – highly recommended! After this operation I
glued the outriggers in place, without the supports for the time being.
Next
came the mating of wings and fuselage to a good fit. I used a very useful
clamp I had bought at Telford – highly recommended! After this operation I
glued the outriggers in place, without the supports for the time being.
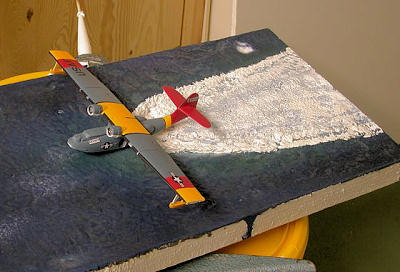
Now
I was ready to prepare the sea base. I had decided to use my standard IKEA
picture frame that fits in my transport box and display cabinet. I cut a piece
of foam board to fit into the picture frame and determined where to put the
plane. In the end, it was put more or less smack in the middle, not the ideal
position compositionwise, but unavoidable in regard to the plane´s size and the
space needed for an impressive wake.
A
groove was cut into the foam board to accept the hull step area, to capture the
moment right before take off. I did not find any image showing the real amount
of wake the
PBY
would produce during take-off, so I had to conjecture and guess. I ended up with
a triangular area of disturbed water, bordered by a wake behind the aircraft
tapering out rather soon. I assumed the prop wash would disturb the water in a
larger area than the passage of the hull alone would do, but I can be wrong
there. My only excuse to anyone in the know would be: “Well, I thought it did
look cool that way …”
 To
produce the disturbed water behind the plane, I put brush cleaner into my
airbrush and gently (!) sprayed the affected area with it. The stuff will
dissolve the foam board´s surface, when done properly, which means NOT IN
EXCESS. The wake was sculpted using acrylic filler from the hardware
supermarket. The water effect in the remaining area comes from several layers of
wall paint, applied copiously with a large brush. That leaves a lightly stippled
and irregular surface. This can be colored as desired using acrylic model paints
in various shades of blue and green. The disturbed water was then highlighted
with white wall paint. The final water effect was achieved using some good coats
of clear gloss acrylic, applied with a foam roller. Of late, I find I use mostly
hardware supermarket stuff for my sea bases!
To
produce the disturbed water behind the plane, I put brush cleaner into my
airbrush and gently (!) sprayed the affected area with it. The stuff will
dissolve the foam board´s surface, when done properly, which means NOT IN
EXCESS. The wake was sculpted using acrylic filler from the hardware
supermarket. The water effect in the remaining area comes from several layers of
wall paint, applied copiously with a large brush. That leaves a lightly stippled
and irregular surface. This can be colored as desired using acrylic model paints
in various shades of blue and green. The disturbed water was then highlighted
with white wall paint. The final water effect was achieved using some good coats
of clear gloss acrylic, applied with a foam roller. Of late, I find I use mostly
hardware supermarket stuff for my sea bases!
Having
sorted this out, it was time for decaling. Preparatory to that, the model
received a good gloss acrylic coat to prevent silvering. The decals took very
long to leave the carrier paper, but then they worked well. Micro Sol was used
to achieve a good fit. After all the decals were applied, a satin coat was added
to seal and blend things in further yet.
Before
adding the notorious fiddly bits, I did my limited weathering. A postwar rescue
plane would definitely not look as if dragged to hell and back, so I did some
accentuation of panel lines using artist´s oil paint and Humbrol thinners
(thanks Chukw!) Some light exhaust stains were applied to the wings, but nothing
major. I tried to remember that less is more.
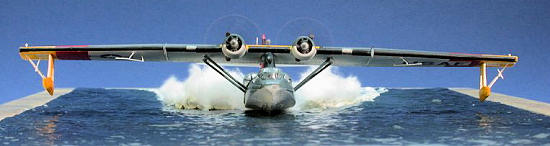
I
don´t remember who asked me what I would do re the props, but he sure had a
major point there. Standing props would look dead, at least in the images, and I
considered the alternatives. Clipping the prop blades seemed the most viable to
me, and likely to look better than any acetate sheet with painted on prop blur I
could produce.
 In
the end I took a different approach: I drilled a somewhat larger hole into the
kit engines and carefully glued a piece of brass tubing into it, using white
glue. The prop shafts were cut away and replaced with lengths of brass wire,
heated and melted into the prop from the backside. That combination turned in
the face of my airbrush or a hair dryer, and I happily noticed the faint yellow
circle produced by the prop tips. There is one very talented German modeler who
inserts small air tubes connected to a compresso
In
the end I took a different approach: I drilled a somewhat larger hole into the
kit engines and carefully glued a piece of brass tubing into it, using white
glue. The prop shafts were cut away and replaced with lengths of brass wire,
heated and melted into the prop from the backside. That combination turned in
the face of my airbrush or a hair dryer, and I happily noticed the faint yellow
circle produced by the prop tips. There is one very talented German modeler who
inserts small air tubes connected to a compresso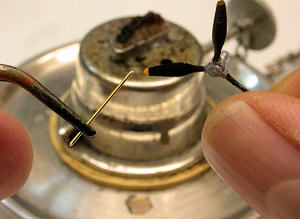 r
into his model bases, and I have admired his models at shows. The props spin
nicely without any engines, wires and the like. I made a try but could not get
enough pressure to make the props turn, so for the time being my props will only
turn in the presence of a suitable airflow. But it looks nice in the pictures!
r
into his model bases, and I have admired his models at shows. The props spin
nicely without any engines, wires and the like. I made a try but could not get
enough pressure to make the props turn, so for the time being my props will only
turn in the presence of a suitable airflow. But it looks nice in the pictures!
The
number of fiddly bits wasn´t too large, but some of them were needed anyway. The
pitot tube was added from brass wire; the abovementioned radome was added. The
pretty iffy kit parts for the outrigger bracing/actuators were redone in brass
wire, too. The main wing supports were added from round styrene stock, omitting
the need to clean up the kit parts. The underwing antenna supports were made
from leftover
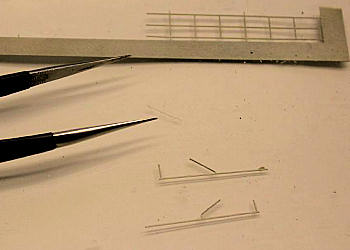 1:250th
scale PE ship´s railings. They are no complete yagi antennae, but I could not
see all the dipoles in the images, so I omitted them. They could be added from
PE railing rather easily.
1:250th
scale PE ship´s railings. They are no complete yagi antennae, but I could not
see all the dipoles in the images, so I omitted them. They could be added from
PE railing rather easily.
Another
light satin coat sealed and blended the model, and now I could finally remove
all those annoyin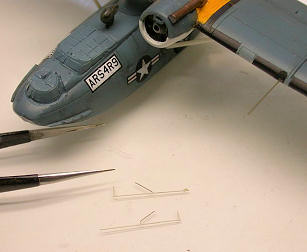 g
cockpit masks and the Maskol from the small windows. Some glitches were
inevitably discovered, but acrylics are very forgiving re touchups, so some work
with a toothpick to remove excess paint and a small paint to correct defects did
the job as good as I could. The small windows were filled with Ponal white glue,
a brand that dries completely transparent. Other brands may remain opaque –
better make sure yours works before you use it in earnest.
g
cockpit masks and the Maskol from the small windows. Some glitches were
inevitably discovered, but acrylics are very forgiving re touchups, so some work
with a toothpick to remove excess paint and a small paint to correct defects did
the job as good as I could. The small windows were filled with Ponal white glue,
a brand that dries completely transparent. Other brands may remain opaque –
better make sure yours works before you use it in earnest.
The
antenna wires were made from Caenis ultra-fine flyfishing thread, glued with
white glue and made taut with heat from a dental waxing instrument. This stuff
is really good, it is much more forgiving than stretched sprue!
Finally,
the model was placed on the base using clear acrylic gel. The foam and spray
were added from cotton wool, and I could take my photographs.
All
in all this was a fun build, not overly strong in the accuracy department, but
fun nonetheless – and I really have a
PBY
in my display cabinet now!
 W.E.
Scarborough:
PBY
Catalina in action. Carrollton 1983
W.E.
Scarborough:
PBY
Catalina in action. Carrollton 1983
www.pby.com
www.pbyrescue.com
http://en.wikipedia.org/wiki/PBY
Frank Spahr
January 2009
Copyright ModelingMadness.com. All rights reserved. No reproduction in part or in whole without express permission.
If you would like your product reviewed fairly and quickly, please
contact the editor or see other details in the
Note to
Contributors.
Back to the Main Page
Back to the Review Index Page 2024