Academy 1/72 PV-1 Ventura
| KIT #: | |
| PRICE: | $18.00 |
| DECALS: | One option |
| REVIEWER: | Stephen Young, MD |
| NOTES: |
| HISTORY |
The Lockheed PV-1 Ventura was the widely used twin engine medium patrol bomber used by the US Navy in World War II. Developed by Lockheed from the model 18 Lodestar commercial passenger airplane production of the Ventura was assigned by Lockheed to the Vega division. The Ventura was unique for powerful twin Pratt and Whitney R-2800 engines, a high wing loading unique wing configuration, high speed and heavy armament. It was a “hot” ship due to the high wing loading and many aircraft and crews were lost as a result of over loading on take off. Nonetheless it provided the US Navy with a fast, heavily armed and maneuverable land based patrol bomber used aggressively as a submarine hunter in the Atlantic U-boat war and as a attack and patrol aircraft in the Pacific theater. With power and speed provided by the P&W engines it could out run many contemporary Japanese fighters.
 My build is
a presentation model for the daughter of Commander Theodore Holmes who fought in
WWII in both the Atlantic and the Pacific theaters with VP-103. Established at
Deland, Florida on March 1, 1943, on June 16, 1943 VP-130 was deployed to
Edinburgh Field, Trinidad performing anti-submarine warfare and convoy patrols.
On August 6, 1943 Lieutenant (jg) Holmes was involved in one of the more famous
battles of the Atlantic U-boat war involving the ultimate sinking of Kapitan
Leutnant Ralph Kapitzki's U-615 in 1943 near Curacao. This costly engagement was
the largest aircraft versus U-boat battle of the war involving US Army B-18's, a
B-24, seven US Navy PBM Mariners and Lt. Holmes PV-1 over several days
ultimately leading to the scuttling of the U-615, the death of Kapitan Kapitzki
and the capture of most of the crew. At the time of this battle the U-boat
captains had been ordered by Admiral Karl Donitz to stay on the surface and
fight it out with anti-aircraft guns if discovered by aircraft and a fierce
battle ensued over 3 days starting on August 5, 1943. First attacked by a US
Army B-18 on the night of July 29, 1943 near Curacao and again by a B-24 on
August 1, the U-boat suffered unrelenting bad luck when on the night of August 5
she was caught on the surface by a PBM Mariner commanded by Lt (jg) J.M. Erskine
who attacked without inflicting damage. On August 6 a VP-205 Mariner piloted by
Lt. A.R. Maruski discovered and attacked U-615 on the surface but was shot down
with the loss of all hands. Later that day another Mariner piloted by Lt. L.D.
Crockett attacked the sub again immediately followed by Lt. Holmes' PV-1 which
slipped through the U-boat's heavy flak unscathed performing a depth charge
attack that straddled the surfaced U-boat damaging it sufficiently severely to
prevent its subsequent diving. A second PBM piloted by Lt. J.W. Dresbach
subsequently attacked but during his attack Lt. Dresbach was killed with no
additional damage to the U-boat. As night fell additional attacks by PBMs and a
B-18 were made. The next morning the U-boat was rediscovered by radar by another
searching PBM and the arrival of the destroyer USS Walker made Kapitzky realize
all was lost and he ordered the sub scuttled. Forty-three submariners were
rescued and captured. Kapitan Leutnant Kapitzky died of his wounds. The
Distinguished Flying Cross was awarded to Lt. Holmes, Lt. Crocket, Lt. Dresbach,
and Lt. Dresbach's co-pilot Lt. (jg) O.R. Christian.
My build is
a presentation model for the daughter of Commander Theodore Holmes who fought in
WWII in both the Atlantic and the Pacific theaters with VP-103. Established at
Deland, Florida on March 1, 1943, on June 16, 1943 VP-130 was deployed to
Edinburgh Field, Trinidad performing anti-submarine warfare and convoy patrols.
On August 6, 1943 Lieutenant (jg) Holmes was involved in one of the more famous
battles of the Atlantic U-boat war involving the ultimate sinking of Kapitan
Leutnant Ralph Kapitzki's U-615 in 1943 near Curacao. This costly engagement was
the largest aircraft versus U-boat battle of the war involving US Army B-18's, a
B-24, seven US Navy PBM Mariners and Lt. Holmes PV-1 over several days
ultimately leading to the scuttling of the U-615, the death of Kapitan Kapitzki
and the capture of most of the crew. At the time of this battle the U-boat
captains had been ordered by Admiral Karl Donitz to stay on the surface and
fight it out with anti-aircraft guns if discovered by aircraft and a fierce
battle ensued over 3 days starting on August 5, 1943. First attacked by a US
Army B-18 on the night of July 29, 1943 near Curacao and again by a B-24 on
August 1, the U-boat suffered unrelenting bad luck when on the night of August 5
she was caught on the surface by a PBM Mariner commanded by Lt (jg) J.M. Erskine
who attacked without inflicting damage. On August 6 a VP-205 Mariner piloted by
Lt. A.R. Maruski discovered and attacked U-615 on the surface but was shot down
with the loss of all hands. Later that day another Mariner piloted by Lt. L.D.
Crockett attacked the sub again immediately followed by Lt. Holmes' PV-1 which
slipped through the U-boat's heavy flak unscathed performing a depth charge
attack that straddled the surfaced U-boat damaging it sufficiently severely to
prevent its subsequent diving. A second PBM piloted by Lt. J.W. Dresbach
subsequently attacked but during his attack Lt. Dresbach was killed with no
additional damage to the U-boat. As night fell additional attacks by PBMs and a
B-18 were made. The next morning the U-boat was rediscovered by radar by another
searching PBM and the arrival of the destroyer USS Walker made Kapitzky realize
all was lost and he ordered the sub scuttled. Forty-three submariners were
rescued and captured. Kapitan Leutnant Kapitzky died of his wounds. The
Distinguished Flying Cross was awarded to Lt. Holmes, Lt. Crocket, Lt. Dresbach,
and Lt. Dresbach's co-pilot Lt. (jg) O.R. Christian.
After the
tour in the Caribbean/South Atlantic VP-103 was withdrawn and on July 3, 1944
was ordered to report to the Pacific theater. The squadron arrived at Ponam,
Marcus Island in the Pacific on October 10, 1944. Redesignated VPB-103 on
October 1, 1944 the squadron was assigned to the 308th Bomb Wing, 5th Air Force
Pacific. Part of the squadron detachment based at Morotai, Lt. Holmes operated
as a coastal raider conducting 300 to 600 mile seach-and-destroy missions
including patrols, mining missions, and other
 combat missions until the squadron
was withdrawn on May 1, 1945 to the US to re-equip with the Lockheed PV-2
Harpoon. Lt. Holmes was awarded a second DFC in March, 1945. The war ended
before the squadron could be redeployed to the Pacific and Lt. Holmes remained
in the US Naval Reserve being promoted to Lieutenant Commander in 1948. Upon
retirement in September 1955 he was promoted to Commander.
combat missions until the squadron
was withdrawn on May 1, 1945 to the US to re-equip with the Lockheed PV-2
Harpoon. Lt. Holmes was awarded a second DFC in March, 1945. The war ended
before the squadron could be redeployed to the Pacific and Lt. Holmes remained
in the US Naval Reserve being promoted to Lieutenant Commander in 1948. Upon
retirement in September 1955 he was promoted to Commander.
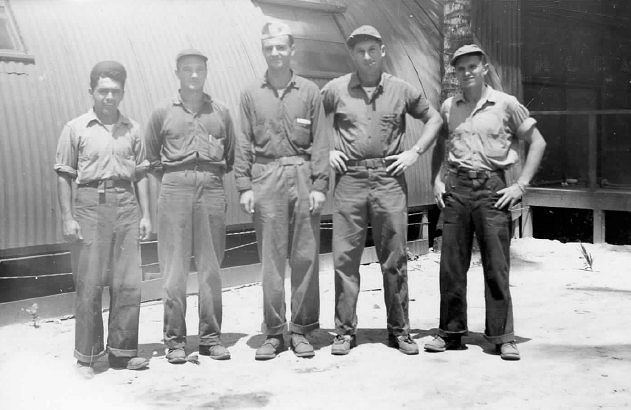
It was a great experience to honor his memory with a PV-1 build. His daughter possesses many interesting items of memorabilia from her father including his personal flight logs, some navigation instruments and personal flying gear as well as some priceless contemporary photographs some of which I have included for this article. She also possesses several excellent detail photos of brand new PV-1 similar to the one he flew in the U-boat battle which he was ferrying from the US. Unfortunately due to brake failure the plane was written off on landing. This plane was finished in the Atlantic ASW paint scheme. His daughter requested a model finished in the Pacific theater colors and based on reviewing some of father's pictures from the war. Most often he flew a specific aircraft but unfortunately no photographs of that particular plane exist so some artistic inference was applied.
| THE KIT |
Academy's PV-1 series of kits has been around a while. According to other modeling authorities the molds are originally from Frog models. Academy refined and retooled the molds and has issued the model in several versions including the RAF Ventura II with a Boulton Paul dorsal turret, bombardier nose, early and late gun ship nose with various decals. The kit is still in production by Minicraft but is pricey if purchased retail; I bought the late WWII gunship version, catalog #11615 for less on Ebay.
The kit comes in the standard two piece tray box and consists of 4 sprues of gray plastic and a small sprue of clear parts. The instructions are simple diagram type with generic paint color call outs. A 3 view diagram shows the camouflage and the decal placement. The decal sheet is small. Panel lines are engraved. The shape of the wing and fuselage look right but I can not vouch for their accuracy. The fowler flap rails on the trailing edge of the wings is represented by simple but fragile rails on the upper and lower wing parts. The clear parts are thick and include the cockpit enclosure, ventral tunnel gun enclosure, dorsal turret fuselage windows and ventral nose window panel. The simple cockpit includes a instrument panel with a decal for instruments, generic seats, two control sticks/wheels, and a rear bulkhead without a opening. It does not closely resemble the real cockpit as control wheels are incorrect for a PV-1, a console is missing, and the co-pilot's seat is a smaller seat which was added after production by the Navy. The bomb bay doors are separate and need to be used to close the bomb bay opening in the fuselage. Unfortunately there is no actual bomb bay floor included in the kit as either a separate structure of part of the fuselage halves. This does lead to some potential for misalignment and weakness in the fuselage structure. In addition the front and rear of the bomb bay doors is in the real aircraft included a extension which was part of the doors. On the model this is represented incorrectly as separate projections on the fuselage halves instead of as part of the bomb bay doors. I decided not to correct this in the model.
| CONSTRUCTION |
Construction started with the cockpit which was assembled and painted with
Testors Model Master interior green with MM acrylic interior yellow for the
bulkhead. Seat belts were added from masking tape strips. A wash of Tamiya
acrylic black thinned with denatured alcohol was used to add visual depth and
interest. The interior areas around the nose and bombardier window, dorsal
turret and tunnel gun were painted in interior green. The fuselage interior
windows were attached using cyanoacrylate glue. Instead of trapping the dorsal
 turret base between the two fuselage halves I opened up the turret opening so I
could add the turret after final painting. The fuselage halves were glued
together using thin acrylic cement. I use the liquid cement from a industrial
plastic store called TAP Plastics since a 8 oz can costs about $6. It is fast,
very thin, and runs into joints very well by capillary action and probably the
same as Tamiya Extra Thin Cement. The two halves require care in lining up and I
added short strips of 0.010 sheet plastic to reinforce the join. Despite using
care in alignment the joint required some filling with Bondo auto putty thinned
with lacquer thinner to deal with joint misalignment. The next area of attention
was the engine nacelles and the engines which are represented by 9 cylinders
attached to a 9 cylinder bulkhead. The engines and engine bulkhead were painted
black with gray and silver for the push rods and the interior of the nacelle
halves painted with interior green. The halves were then joined with the
engine/bulkhead trapped between the halves. The bulkhead attachment was
reinforced with CA glue. The instructions call for including the propellers in
the assembly to allow rotation but I preferred to leave the propellers off until
completion to simplify painting. The wings required some construction changes
since the upper halves have no support at the wing root attachment to the
fuselage and are a weak point. To support this I attached two small pieces of
0.010 styrene sheet to support the upper half against the lower half. The wing
tops and bottom halves were assembled followed by attachment of the engine
nacelles. The landing gear bays were airbrushed with interior green. Each right
and left wing was then cemented to the fuselage with care to maintain the same
amount of dihedral on each wing. The horizontal stabilizer was cemented on to
the fuselage followed by attachment of the fins/rudders. The bomb bay doors were
not attached to allow access for attaching the antenna wires later. Some filling
with the thinned Bondo and sanding was required at the wing joints and engine
nacelles. Once the clean up was completed the openings and engines were masked
off in preparation for painting. I used Microscale Micro mask to mask off the
fuselage windows.
turret base between the two fuselage halves I opened up the turret opening so I
could add the turret after final painting. The fuselage halves were glued
together using thin acrylic cement. I use the liquid cement from a industrial
plastic store called TAP Plastics since a 8 oz can costs about $6. It is fast,
very thin, and runs into joints very well by capillary action and probably the
same as Tamiya Extra Thin Cement. The two halves require care in lining up and I
added short strips of 0.010 sheet plastic to reinforce the join. Despite using
care in alignment the joint required some filling with Bondo auto putty thinned
with lacquer thinner to deal with joint misalignment. The next area of attention
was the engine nacelles and the engines which are represented by 9 cylinders
attached to a 9 cylinder bulkhead. The engines and engine bulkhead were painted
black with gray and silver for the push rods and the interior of the nacelle
halves painted with interior green. The halves were then joined with the
engine/bulkhead trapped between the halves. The bulkhead attachment was
reinforced with CA glue. The instructions call for including the propellers in
the assembly to allow rotation but I preferred to leave the propellers off until
completion to simplify painting. The wings required some construction changes
since the upper halves have no support at the wing root attachment to the
fuselage and are a weak point. To support this I attached two small pieces of
0.010 styrene sheet to support the upper half against the lower half. The wing
tops and bottom halves were assembled followed by attachment of the engine
nacelles. The landing gear bays were airbrushed with interior green. Each right
and left wing was then cemented to the fuselage with care to maintain the same
amount of dihedral on each wing. The horizontal stabilizer was cemented on to
the fuselage followed by attachment of the fins/rudders. The bomb bay doors were
not attached to allow access for attaching the antenna wires later. Some filling
with the thinned Bondo and sanding was required at the wing joints and engine
nacelles. Once the clean up was completed the openings and engines were masked
off in preparation for painting. I used Microscale Micro mask to mask off the
fuselage windows.
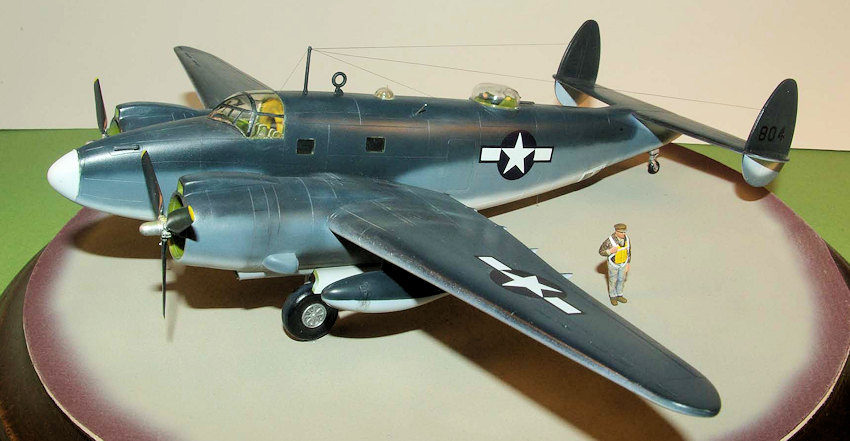
Commander
Holmes' daughter requested that the model be completed in the Pacific theater
colors which for the time of VPB-130's deployment was the US Navy tri-color
scheme of specular white undersurfaces, intermediate blue vertical surfaces, and
dark sea blue upper surfaces. She also had documentation from her father's
actual personal flight logs regarding the plane he flew most often and this
plane had the Bureau of Aeronautics number ending in 804. Unfortunately she had
no actual photographs of the airplane so I used some artistic license in the
pattern of the paint application. Based on review of photographs of war time
PV-1s there was quite a bit of variation and deviation from the standard SR-2C
Specification for Exterior Colors, Insignia, and Marking of Naval Aircraft dated
January 5, 1943 other wise known as the tri-color pattern as d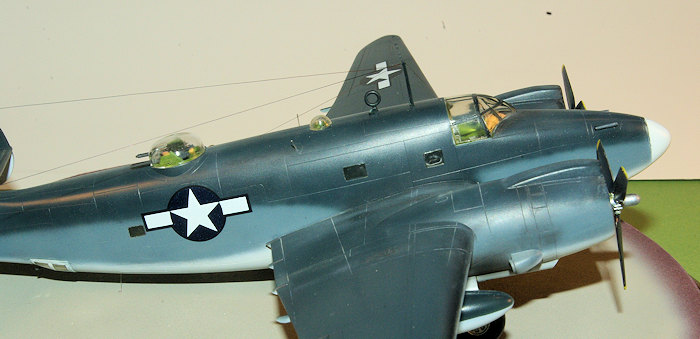 ocumented in the
Official Monogram US Navy & Marine Corps Aircraft Color Guide book.
Specifically, there are several photographs in Steve Ginters fantastic book of
PV-1s in the Pacific showing a variation in the pattern of intermediate blue on
the fuselage which looked attractive so I decided to use that pattern. I used
Rustoleum gloss white decanted from the spray can to spray all white surfaces,
followed by masking when dry to allow airbrushing of Testors Model Master
intermediate blue on the bottom of the rudders, the fuselage, and the engine
nacelles. Once this dried, additional masking was done to protect the
intermediate blue and white areas and Testors MM dark sea blue was airbrushed
on. After the color coats were dry the masking was removed and the entire model
sprayed with Testors glosscote lacquer in preparation for decal application. I
used Microscale US National Insignia for the stars and bars and the aircraft
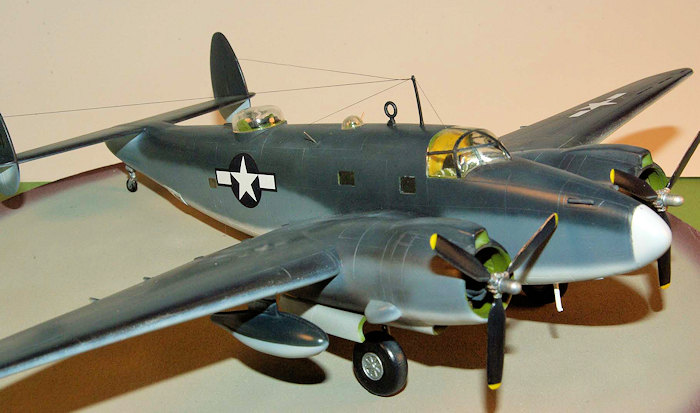
number came from the spares box. The canopy, tunnel gun windows, and dorsal
turret were hand painted with Testors acrylic. The kit antenna mast behind the
cockpit was attached. The two small aerial masts were attached by drilling a
small hole followed by insertion of a small length of stainless steel wire with
CA glue applied from inside the fuselage. The three antenna wires are strands of
my daughter’s hair anchored into holes drilled with a #80 bit into the fins and
fuselage and passed through a hole drilled in the plastic antenna mast and then
anchored through a hole drilled in the fuselage behind the cockpit. CA glue was
used with light traction using a small clamp to hold the hairs sufficiently
taut. After the glue set the hair was trimmed and the bomb bay doors attached
with CA. Nothing works better than hair for antenna wires as it is quite strong
and not fragile. The remainder of the parts were attached including the landing
gear and under surface antenna. The landing gear doors have no locating
pins/attachments so I glued small pieces of 1/64th brass rod to them to
facilitate gluing to the landing gear well walls. The clear parts were attached
using Testors clear cement.
ocumented in the
Official Monogram US Navy & Marine Corps Aircraft Color Guide book.
Specifically, there are several photographs in Steve Ginters fantastic book of
PV-1s in the Pacific showing a variation in the pattern of intermediate blue on
the fuselage which looked attractive so I decided to use that pattern. I used
Rustoleum gloss white decanted from the spray can to spray all white surfaces,
followed by masking when dry to allow airbrushing of Testors Model Master
intermediate blue on the bottom of the rudders, the fuselage, and the engine
nacelles. Once this dried, additional masking was done to protect the
intermediate blue and white areas and Testors MM dark sea blue was airbrushed
on. After the color coats were dry the masking was removed and the entire model
sprayed with Testors glosscote lacquer in preparation for decal application. I
used Microscale US National Insignia for the stars and bars and the aircraft
number came from the spares box. The canopy, tunnel gun windows, and dorsal
turret were hand painted with Testors acrylic. The kit antenna mast behind the
cockpit was attached. The two small aerial masts were attached by drilling a
small hole followed by insertion of a small length of stainless steel wire with
CA glue applied from inside the fuselage. The three antenna wires are strands of
my daughter’s hair anchored into holes drilled with a #80 bit into the fins and
fuselage and passed through a hole drilled in the plastic antenna mast and then
anchored through a hole drilled in the fuselage behind the cockpit. CA glue was
used with light traction using a small clamp to hold the hairs sufficiently
taut. After the glue set the hair was trimmed and the bomb bay doors attached
with CA. Nothing works better than hair for antenna wires as it is quite strong
and not fragile. The remainder of the parts were attached including the landing
gear and under surface antenna. The landing gear doors have no locating
pins/attachments so I glued small pieces of 1/64th brass rod to them to
facilitate gluing to the landing gear well walls. The clear parts were attached
using Testors clear cement.
| COLORS & MARKINGS |
As noted
above the US Navy tri-color scheme was used although there is no photograph of
#804 for reference. I used Testors MM enamels for the blue colors and Rustoleum
gloss white decanted from the spray can for the white. I use a lot of white
paint and the reason I use the Rustoleum is that it is very inexpensive; a large
spray can is around $4 at Home Depot or the local hardware stor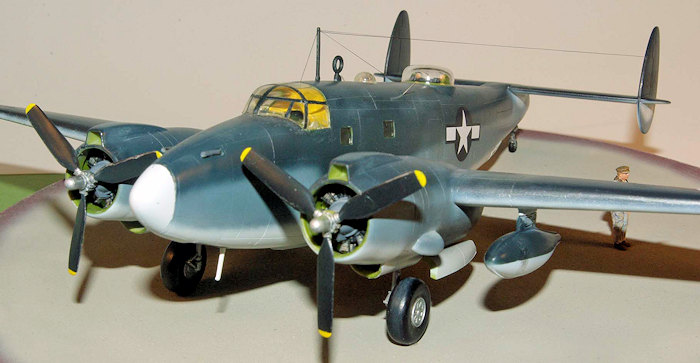 e. I also use Rustoleum's gloss black for the same reason. The paint is ready to airbrush out
of the can; I decant enough to fill a 1 oz jar at a time. After application of
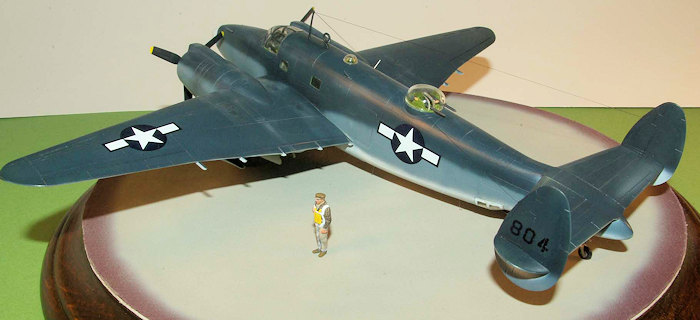
the decals the model was airbrushed with Testors Dullcote and weathering was
applied using pastels and airbrushing of thinned black for the exhaust stains.
Period photos show extreme weathering on any planes in the Pacific in the
tri-color scheme especially those based on islands where the coral dust and dust
from the unpaved dirt airstrips covered everything. I used tan and black pastel
chalk for most of the weathering but am still trying to improve my
ability/technique in this facet of building. Most pictures show the black paint
sand blasted off the leading edge of propellors so I tried to show that with a
dry brush application of silver. I made a base using a wood clock face purchased
from Michael's craft store staining and varnishing the wood. The top is covered
with a circular piece of artist's matt board painted gray. To attach the model
to the base small pins of 1/64 brass rod were glued into drilled holes in the
main wheels which were then glued to holes drilled in the base. In additional
invisible thread was used to further anchor the model to the base by running a
length through a hole drilled in the base just in front of the tail wheel
through a #xx hole drilled in the bottom of the fuselage and then brought out
through another hole just behind the bomb bay and passed through the base where
it was tied and glued.
e. I also use Rustoleum's gloss black for the same reason. The paint is ready to airbrush out
of the can; I decant enough to fill a 1 oz jar at a time. After application of
the decals the model was airbrushed with Testors Dullcote and weathering was
applied using pastels and airbrushing of thinned black for the exhaust stains.
Period photos show extreme weathering on any planes in the Pacific in the
tri-color scheme especially those based on islands where the coral dust and dust
from the unpaved dirt airstrips covered everything. I used tan and black pastel
chalk for most of the weathering but am still trying to improve my
ability/technique in this facet of building. Most pictures show the black paint
sand blasted off the leading edge of propellors so I tried to show that with a
dry brush application of silver. I made a base using a wood clock face purchased
from Michael's craft store staining and varnishing the wood. The top is covered
with a circular piece of artist's matt board painted gray. To attach the model
to the base small pins of 1/64 brass rod were glued into drilled holes in the
main wheels which were then glued to holes drilled in the base. In additional
invisible thread was used to further anchor the model to the base by running a
length through a hole drilled in the base just in front of the tail wheel
through a #xx hole drilled in the bottom of the fuselage and then brought out
through another hole just behind the bomb bay and passed through the base where
it was tied and glued.
The 1/72 nd scale figure is from the Airfix 1/72nd scale WWII US Navy personnel kit. I had some trouble cleaning up seam lines on the figures from this kit since the green plastic used has a vinyl like character and does not trim or sand cleanly. The figure was painted with Vallejo acrylics and added a nice touch and sense of scale to the display.
| CONCLUSIONS |
The 1/72 nd scale Academy kit is dated and not up to current industry standards for detail, engineering, and quality but it is readily available at a reasonable price. I recommend it for modelers with some experience. With a good amount of work and more modeling skill than mine plus scratch built or additional resin parts it can be built into a world class model. Still with reasonable modeling skills a nice looking model can be built. The only other 1/72 scale option I know of is the Special Hobby kit which is much more expensive. Pavla makes a resin interior set and Owl makes conversion set for the night fighter version used in the Pacific. Of course the 1/48th Revell kit and available aftermarket items is also a more state of the art kit and would build up into a very impressive and large model.
This was a gratifying project to complete and present to Commander Theodore Holmes daughter in memory to one of the Greatest Generation who risked or sacrificed all they knew to defeat the Axis powers during WWII. The story of the battle with U-615 is at once a fascinating and sad story in the annals of warfare.
| REFERENCES |
Personal communications and WWII era photographs from Commander Theodore Holmes' daughter
Naval Fighters Number Eighty-Six, Lockheed-Vega PV-1 and PV-2, Steve Ginter, Naval Fighters series, 2010
The Fighting Flying Boat, Richard A.Hoffman, Naval Institute Press, 2004
PV-1 Ventura in Action, Squadron/Signal Publications, Aircraft No. 48, 1981
The Official Monogram US Navy & Marine Corps Aircraft Color Guide, V.2 1940-1949, John M. Elliott, Monogram Aviation Publications, 1989
Wikipedia, PV-1 article including web links to sites showing interior photos, diagrams
20 June 2016
Copyright ModelingMadness.com If you would like your product reviewed fairly and fairly quickly, please
contact
the editor or see other details in the
Note to
Contributors.