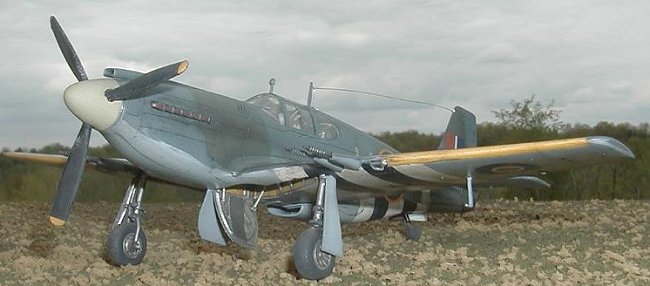
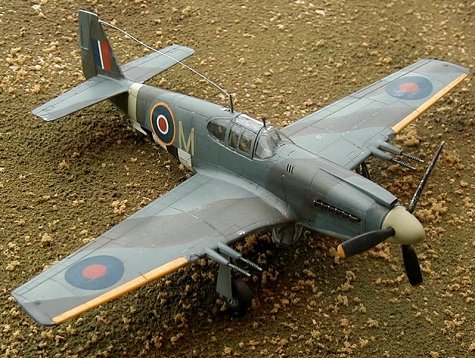
Accurate Miniatures 1/48 Mustang IA
|
KIT # |
3410 |
|
PRICE: |
@$30.00 |
|
DECALS: |
Two Aircraft |
|
REVIEWER: |
Michael Wolf |
|
NOTES: |
Built OOB |
|
HISTORY |
In April 1940, the British Purchasing Commission arrived in the United States to procure badly needed aircraft for the Royal Air Force (RAF). Europe was already embroiled in what would become World War II although France had yet to be invaded. The RAF was in dire need of all forms of aircraft, but most sorely, fighters. Many in the British government abhorred the idea buying “foreign-built” airplanes, but with the slow production rates of the Spitfire and Hurricane, there was little choice. Several US aircraft manufacturers were approached, including a small California firm, North American Aviation, which had never before built a fighter (or pursuit) aircraft. When the BPC asked NAA to build the Curtiss P-40 under license, the president of NAA, “Dutch” Kindleburger, is reported to have replied that NAA could build a much better plane than the Curtiss and in a very short time. Stories abound that 120 days was promised, but cannot be documented. Regardless, less the Allison engine, which had yet to be delivered by the US government, the prototype, called NA73X by NAA, rolled out 107 days after the contract was signed.
 NA73X incorporated several advances in the science of
aerodynamics. One was the use of the “laminar flow” wing which reduced drag at
cruise and during combat situations but required more maintenance to keep free
of imperfections; another was the use of thermodynamics in the engine cooling
system: the air entering the radiator tunnel was slowed before passing through
the radiator, which (naturally) heated the air, making it expand. The heated air
was then compressed before exiting the rear of the tunnel, actually traveling
faster than the air entering, providing a “poor man’s jet” … a boost to airspeed
thought to be around 15 knots.
NA73X incorporated several advances in the science of
aerodynamics. One was the use of the “laminar flow” wing which reduced drag at
cruise and during combat situations but required more maintenance to keep free
of imperfections; another was the use of thermodynamics in the engine cooling
system: the air entering the radiator tunnel was slowed before passing through
the radiator, which (naturally) heated the air, making it expand. The heated air
was then compressed before exiting the rear of the tunnel, actually traveling
faster than the air entering, providing a “poor man’s jet” … a boost to airspeed
thought to be around 15 knots.
The choice of engine would become an issue because the Allison suffered at altitude, having a single-stage supercharger. Above 15,000 feet, the engine just did not produce the horsepower required. That did not stop the aircraft from being an outstanding photoreconnaissance or ground attack platform. Remarkably, the US Army Air Corps had originally referred to the airplane as the “Apache” … it was the Brits that called their new fighters the “Mustang”.
|
THE KIT |
The much lamented, late Accurate Miniatures produced the cannon-armed version of the Mustang used to such good advantage by the RAF. The engineering of this kit is outstanding; the parts breakdown logical, the fit was tight. The kit came boxed in the now-familiar AM manner; the parts trees bagged with the decals and clear parts below a “false bottom”. The bottom of the box shows a picture of a completed kit, although that “demonstrator” shows an open canopy and true “Sky” fuselage band and squadron code. The decals, printed by DisaClear in Mexico, were clear, sharp and in register throughout, although the aforementioned fuselage band and squadron codes were much too dark to be “Sky”.
 Not having built an Accurate Miniatures Mustang since the
summer of ‘98 (the P-51B) or, actually, a Mustang of any flavor since then, I
was again reminded why I enjoyed building kits by this manufacturer. The level
of detail, right out of the box, is exemplarily. The panels are lightly scribed;
the “dzus” fasteners are delicately engraved; the fabric effect on the tail
surfaces is just right; the cockpit detail is spot on.
Not having built an Accurate Miniatures Mustang since the
summer of ‘98 (the P-51B) or, actually, a Mustang of any flavor since then, I
was again reminded why I enjoyed building kits by this manufacturer. The level
of detail, right out of the box, is exemplarily. The panels are lightly scribed;
the “dzus” fasteners are delicately engraved; the fabric effect on the tail
surfaces is just right; the cockpit detail is spot on.
Not too long ago, I’d seen a series of articles elsewhere on the Net where the builder had completed a Gekko building it by the IPMS “Out of the Box” rules. He’d also used a technique for weathering the paint that I thought most interesting. Therefore, I decided that I’d build this model as close to the OOB rules as I could; I’d use the aforementioned technique on the paint; I’d try using “Blue Tac” (actually, it’s American counterpart) for the first time; and I’d try using pastels for exhaust and cordite stains as well as for dust.
|
CONSTRUCTION |
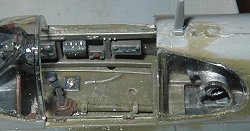
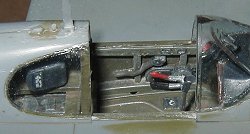 Construction began, naturally, with the cockpit. The
sidewalls were removed from the sprue, cleaned up (very minor) and added to the
fuselage sides. Any other parts that were going to be shot ModelMaster (MM)
Interior Green were likewise removed and cleaned. The batteries, radio and
electrical boxes were picked out in Scale Interior Black. A dry brushing of RAF
Medium Sea Grey was used for highlighting. Assorted details (switches, knobs and
the like) were picked out in white and red. A wash of grimy black was used to
pop out the 3-D details. Small rectangles of Interior Black were painted in the
appropriate
Construction began, naturally, with the cockpit. The
sidewalls were removed from the sprue, cleaned up (very minor) and added to the
fuselage sides. Any other parts that were going to be shot ModelMaster (MM)
Interior Green were likewise removed and cleaned. The batteries, radio and
electrical boxes were picked out in Scale Interior Black. A dry brushing of RAF
Medium Sea Grey was used for highlighting. Assorted details (switches, knobs and
the like) were picked out in white and red. A wash of grimy black was used to
pop out the 3-D details. Small rectangles of Interior Black were painted in the
appropriate 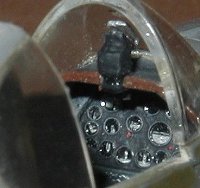 places along the cockpit sides, the back of the camera and
instrument panel. These were then carefully detailed with a “zillion-ought”
brush (one so fine that it’s difficult to see edge-on) and white paint to
simulate the numerous placards found in military cockpits. Once the cockpit was
completed, I attached the engine cowls to the appropriate fuselage half. This
was not in accordance with the instructions, but I rather feared the same
problem that I’d experienced with another kit (a story for a MUCH later time!).
The fuselage halves were then joined. Which, it turned out, was a little
premature, because the tail gear was to be trapped between the halves. D’oH!
The gear had to be slightly modified so that it could be attached later without
needing to pry the halves apart. The seams were lightly sanded, as there was no
need for any filler.
places along the cockpit sides, the back of the camera and
instrument panel. These were then carefully detailed with a “zillion-ought”
brush (one so fine that it’s difficult to see edge-on) and white paint to
simulate the numerous placards found in military cockpits. Once the cockpit was
completed, I attached the engine cowls to the appropriate fuselage half. This
was not in accordance with the instructions, but I rather feared the same
problem that I’d experienced with another kit (a story for a MUCH later time!).
The fuselage halves were then joined. Which, it turned out, was a little
premature, because the tail gear was to be trapped between the halves. D’oH!
The gear had to be slightly modified so that it could be attached later without
needing to pry the halves apart. The seams were lightly sanded, as there was no
need for any filler.
 The horizontal stabilizers were attached with Tenax,
allowing a bead to run the entire length of the seam. When the part was pressed
into the fuselage half, a small bead of melted styrene was pushed out. When dry,
this bead was carefully trimmed away leaving a completely invisible join. The
wings were likewise joined to the fuselage. The fit here was not as tight as the
stabilizers, but was more than adequate. The carburetor scoop was then attached
to the upper cowling and the radiator scoop to the lower wing section. I decided
to attach the radio antenna behind the cockpit at this time so that the finish
would match the rest of the airframe. This would have consequences, as I found
out much later in the building process.
The horizontal stabilizers were attached with Tenax,
allowing a bead to run the entire length of the seam. When the part was pressed
into the fuselage half, a small bead of melted styrene was pushed out. When dry,
this bead was carefully trimmed away leaving a completely invisible join. The
wings were likewise joined to the fuselage. The fit here was not as tight as the
stabilizers, but was more than adequate. The carburetor scoop was then attached
to the upper cowling and the radiator scoop to the lower wing section. I decided
to attach the radio antenna behind the cockpit at this time so that the finish
would match the rest of the airframe. This would have consequences, as I found
out much later in the building process.
I could not find any references whether the British Mustangs had the Sutton Harness retrofitted. I say this because the kit did not come with a decal for the harness and a seat sans harness just looks … well … naked. This is where pushing the limits of the OOB rules came in to play. I knew that I could not manufacture buckles or use PE or the like. I am not sure on this, but I decided to use tape to simulate the buckles. Tape was also used for the grommets with the “holes” being a dot of black ink from a pen.
 All seams were checked and any necessary re-scribing done.
Overall, the kit went together quite well and all seams were tight. The
razorback canopy was added, as were the side windows. I would have preferred the
Malcolm Hood, but the markings that I wanted to build had the razorback, so I
was stuck. I originally attached the clear parts with Tenax, run very carefully
along the joins. With the windscreen, the adhesive “sucked” up along the
instrument panel glare panel. That was unacceptable. My only choice then was to
pull the windscreen off and use the other windscreen included with the kit, the
piece with the “vent” in the port side. That was sanded off and the glass
polished until clear. The windscreen was then re-attached using Krystal Klear.
The side windows, the part of the Mustang that has always given me fits, did not
seem to want to lie in the slots as I thought they should. So, I thought that I
could improve the fit by sanding the glass until the profile matched that of the
surrounding fuselage. It was during this process that the radio antenna came
under repeated fire. I bent that bugger to and fro, several times over. But it
hung on until the bitter end. Anyway, back to the glass. I eventually removed
the windows and sanded everything down and polished all the scratches out. After
dipping in Future, they looked as good as new. Again, Krystal Klear was used to
affix them to the fuselage.
All seams were checked and any necessary re-scribing done.
Overall, the kit went together quite well and all seams were tight. The
razorback canopy was added, as were the side windows. I would have preferred the
Malcolm Hood, but the markings that I wanted to build had the razorback, so I
was stuck. I originally attached the clear parts with Tenax, run very carefully
along the joins. With the windscreen, the adhesive “sucked” up along the
instrument panel glare panel. That was unacceptable. My only choice then was to
pull the windscreen off and use the other windscreen included with the kit, the
piece with the “vent” in the port side. That was sanded off and the glass
polished until clear. The windscreen was then re-attached using Krystal Klear.
The side windows, the part of the Mustang that has always given me fits, did not
seem to want to lie in the slots as I thought they should. So, I thought that I
could improve the fit by sanding the glass until the profile matched that of the
surrounding fuselage. It was during this process that the radio antenna came
under repeated fire. I bent that bugger to and fro, several times over. But it
hung on until the bitter end. Anyway, back to the glass. I eventually removed
the windows and sanded everything down and polished all the scratches out. After
dipping in Future, they looked as good as new. Again, Krystal Klear was used to
affix them to the fuselage.
Other small details included drilling out the cannons, pitot tube (now THAT was interesting!) and boring out the ends of the fishtailed exhaust stacks. The landing gear drag links were drilled and filed until the desired opening was achieved. Parafilm-M was used to mask off the glass using a new #11 Xacto blade.
By now, it was ready for the paint shop.
|
PAINT & DECALS |
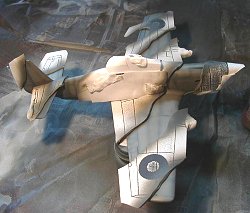
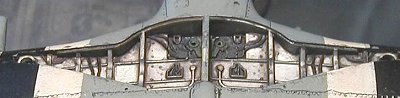 The instructions said that the landing gear wells were to
be natural metal. OK … I can do that. The main gear wells and the interiors of
both sets of doors were shot using buffable Aluminum. Once dry and lightly
buffed with a Q-Tip, I wadded up some “poster putty” (similar to the Brits’ Blue
Tac) and stuck it into the wells. This is pretty interesting stuff. I smoothed
out the edges until just the gear well was filled, nothing else.
The instructions said that the landing gear wells were to
be natural metal. OK … I can do that. The main gear wells and the interiors of
both sets of doors were shot using buffable Aluminum. Once dry and lightly
buffed with a Q-Tip, I wadded up some “poster putty” (similar to the Brits’ Blue
Tac) and stuck it into the wells. This is pretty interesting stuff. I smoothed
out the edges until just the gear well was filled, nothing else.
The first order of business was the leading edges of both
wings. I do not care for decals for leading edges, primarily because I just
can’t seem to match the colors used. After the yellow was dry, I masked off the
leading edge, using a tape very similar to the much-hyped Tamiya tape, but
available locally. Since the decal fuselage stripe and squadron codes were far
too dark, and more of a brown than “Sky” I decided to shoot both the stripe and
the markings. I also shot the assembled propeller spinner as well; the whole
idea of shooting all the “Sky” was to get matching colors after all! When dry,
the stripe and the “M” on both sides of the fuselage were masked off. The
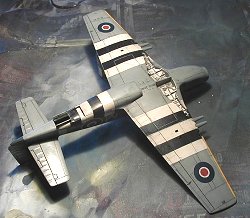
general area where the Invasion Stripes would end up was masked off and flat
white shot.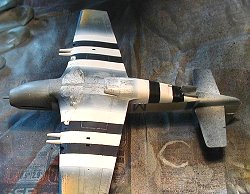
This led to a real quandary. How do you fade white? I wanted to fade all of my colors equally. The article on the aforementioned Gekko said to paint all of one color before continuing on to the next. So, again … how to fade the white? My solution was to add a couple drops of Interior Panzer Buff to the color cup giving a slight off-white appearance. This color was shot on the panel interiors, staying just inside the panel lines. The base color (white in this case) was then added back to the color cup and heavily thinned, on the order of 5% white. The whole area was then misted with this mixture until the colors blended. When dry, I masked off for the black stripes and shot “real” flat black. I actually shot RLM66 in the interior of these stripes, blending everything with heavily thinned black. When I removed the tape covering the white, I saw, much to my horror, that there were several places where the black had run under the tape. GRRRR!!
 OK, mask off the black this time. And make darn sure that
the edges of the tape are burnished down tight. Does the idea that I really
don’t like D-Day stripes come across here? Anyway, I re-shot the white; faded
the white as before and then blended everything together. When the tape came off
… are you holding your breath? (I was) Everything looked fine. Whew!
OK, mask off the black this time. And make darn sure that
the edges of the tape are burnished down tight. Does the idea that I really
don’t like D-Day stripes come across here? Anyway, I re-shot the white; faded
the white as before and then blended everything together. When the tape came off
… are you holding your breath? (I was) Everything looked fine. Whew!
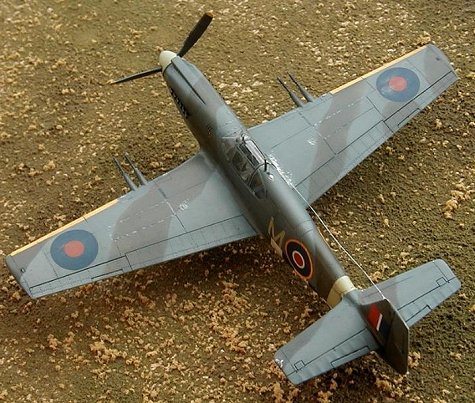
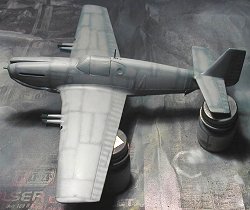
I covered the D-Day stripes back up again making sure that the tape was tight. The bottom received Medium Sea Grey. When dry, I used tape along the aft fuselage and bottom of the stabilizers, poster putty for the engine cowl. The next color shot was Ocean Grey. That was faded with a mix that was 50%white. The areas in the control surfaces and the flaps were faded, leaving the rivet line the base color. The effect is quite subtle; enough so that I am not sure it comes across in the pictures.
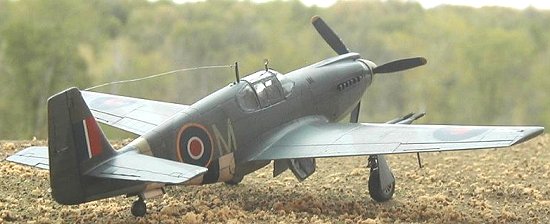
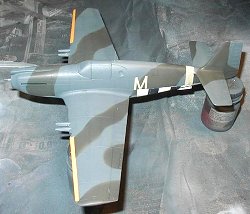
 As a slight aside here, I’d already decided to use the
AeroMaster sheet on Early Mustangs because I liked the side roundels better than
the kit decals. The AeroMaster instruction sheet was enlarged so that the
drawings showing the Type C camouflage was to scale. I used that sheet as a
pattern, removing all areas that were going to be RAF Green. Using a rope of
poster putty along the edge of the mask, I began building the rest of the
pattern. When completed, the RAF Green was shot, faded with, believe it or not,
Faded Olive Drab. Heavily thinned RAF Green then blended everything together.
After the paint was dry, the masks were carefully removed. Allowing the paint to
cure overnight, I thought that I’d try something else. Using a fine sanding
stick wet, I slowly passed over all surfaces. With the RAF Green, this showed
some of the Faded Olive Drab though the base color. The affect is, again, quite
subtle, yet most realistic. Suffice it to say that I am most pleased with the
results.
As a slight aside here, I’d already decided to use the
AeroMaster sheet on Early Mustangs because I liked the side roundels better than
the kit decals. The AeroMaster instruction sheet was enlarged so that the
drawings showing the Type C camouflage was to scale. I used that sheet as a
pattern, removing all areas that were going to be RAF Green. Using a rope of
poster putty along the edge of the mask, I began building the rest of the
pattern. When completed, the RAF Green was shot, faded with, believe it or not,
Faded Olive Drab. Heavily thinned RAF Green then blended everything together.
After the paint was dry, the masks were carefully removed. Allowing the paint to
cure overnight, I thought that I’d try something else. Using a fine sanding
stick wet, I slowly passed over all surfaces. With the RAF Green, this showed
some of the Faded Olive Drab though the base color. The affect is, again, quite
subtle, yet most realistic. Suffice it to say that I am most pleased with the
results.
 The landing gear and wheels were shot “non-buffable” steel,
yet I buffed them out anyway because I like the end result. A wash that is part
grimy black, part rust was used. The result there is that there’s a tinge of
russet behind the grime. The oleos were painted chrome silver. I’m not yet to
the point of using Bare Metal Foil. Another time, another Mustang. Wheels were
done with Grimy Black and a layer of earthen pastel dust was added. The cannons
were shot Gunmetal and lightly buffed. Exhaust stacks were first shot with Burnt
Iron then washed with RustAll, applied in as many layers as necessary until I
received the desired results. A spot of black was added to each stack’s exhaust.
The landing gear and wheels were shot “non-buffable” steel,
yet I buffed them out anyway because I like the end result. A wash that is part
grimy black, part rust was used. The result there is that there’s a tinge of
russet behind the grime. The oleos were painted chrome silver. I’m not yet to
the point of using Bare Metal Foil. Another time, another Mustang. Wheels were
done with Grimy Black and a layer of earthen pastel dust was added. The cannons
were shot Gunmetal and lightly buffed. Exhaust stacks were first shot with Burnt
Iron then washed with RustAll, applied in as many layers as necessary until I
received the desired results. A spot of black was added to each stack’s exhaust.
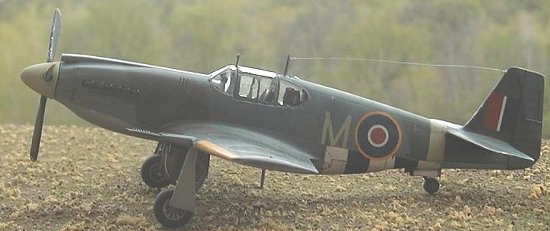
Once all of the painting was completed, the tape over the
fuselage stripe, squadron code (“M”) and the wing leading edges were removed.
The model was shot with Future in preparation for Decals. The AeroMaster
fuselage und under-wing roundels were multi-part.
 Careful examination when
adding the second and third pieces (if applicable) led to perfectly centered
results. I wanted to fade the markings because “new” markings on a “faded”
finish just looks too bogus. Using a fine sanding stick wet, I gently scuffed up
the markings. The jury is still out whether this was affective or not. Another
coat of Future sealed in the decals for further weathering. A black wash was
added to the control surface hinge lines, including the flaps, upper and lower.
A grimy black wash was used for the panel lines. After the excess had been
removed, the model received another coat of Future. Black, dark gray and lighter
gray chalk pastels were scrapped on a medium sand stick. I used a Q-Tip to pick
up a little of the black, rubbing it along where I thought the exhaust stain
would be. I rubbed this in pretty good, following the airflow pattern along the
fuselage side. I then added a little of the lighter gray, especially immediately
behind the stacks. The same basic process was used for the cordite stains,
although with the cannon barrels so far out in front of the wing leading edge,
most of the staining was behind the shell ejection chutes.
Careful examination when
adding the second and third pieces (if applicable) led to perfectly centered
results. I wanted to fade the markings because “new” markings on a “faded”
finish just looks too bogus. Using a fine sanding stick wet, I gently scuffed up
the markings. The jury is still out whether this was affective or not. Another
coat of Future sealed in the decals for further weathering. A black wash was
added to the control surface hinge lines, including the flaps, upper and lower.
A grimy black wash was used for the panel lines. After the excess had been
removed, the model received another coat of Future. Black, dark gray and lighter
gray chalk pastels were scrapped on a medium sand stick. I used a Q-Tip to pick
up a little of the black, rubbing it along where I thought the exhaust stain
would be. I rubbed this in pretty good, following the airflow pattern along the
fuselage side. I then added a little of the lighter gray, especially immediately
behind the stacks. The same basic process was used for the cordite stains,
although with the cannon barrels so far out in front of the wing leading edge,
most of the staining was behind the shell ejection chutes.
|
FINISHING TOUCHES |
 I removed the masking from the canopy. I’ve done better
jobs, but this one will pass muster. It was at this time that the badly abused
radio antenna decided to part company with the airframe. And this is where I had
to depart from the OOB rules. I fashioned another antenna from sprue, drilled a
hole down the center and a matching hole behind the canopy. A wire was super
glued into the shaped sprue and attached. One-pound monofilament line was super
glued between the now-panted antenna and a pre-drilled hole in the leading edge
of the vertical stabilizer. Cigarette smoke was used to snap the line taught,
although it had, surprisingly, sagged a little before I took the accompanying
pictures. That has since been rectified. A short line was added between the
aerial and a point just aft of the antenna. Insulators were fashioned out of PVA
and the aerial painted chrome silver. The landing gear was added with super
glue, taking care to align them in all axes. The gear door covers were then
carefully added and aligned as well. After the leading edge landing lights were
added, this puppy was finally completed.
I removed the masking from the canopy. I’ve done better
jobs, but this one will pass muster. It was at this time that the badly abused
radio antenna decided to part company with the airframe. And this is where I had
to depart from the OOB rules. I fashioned another antenna from sprue, drilled a
hole down the center and a matching hole behind the canopy. A wire was super
glued into the shaped sprue and attached. One-pound monofilament line was super
glued between the now-panted antenna and a pre-drilled hole in the leading edge
of the vertical stabilizer. Cigarette smoke was used to snap the line taught,
although it had, surprisingly, sagged a little before I took the accompanying
pictures. That has since been rectified. A short line was added between the
aerial and a point just aft of the antenna. Insulators were fashioned out of PVA
and the aerial painted chrome silver. The landing gear was added with super
glue, taking care to align them in all axes. The gear door covers were then
carefully added and aligned as well. After the leading edge landing lights were
added, this puppy was finally completed.
|
CONCLUSIONS |
This is one builder that laments the decline and downfall of Accurate Miniatures, regardless of whether we’ll ever see any of their kits released under another label. The fit and finish of every kit of theirs that I’ve built to date has left the other manufacturers far in the dust. That is just my opinion, of course. But I feel that this Allison-powered Mustang is one of the best kits I’ve seen. The average modeler could turn out a real beauty simply by paying attention to the seams and careful detail painting. The more advanced modeler can really do the art justice with such a kit as this as a starting point.
What can I say? I highly recommend this kit to all modelers, if you can still find them!
Copyright ModelingMadness.com. All rights reserved. No reproduction in part or in whole without express permission from the editor.
If you would like your product reviewed fairly and fairly quickly, please contact the editor or see other details in the Note to Contributors.
Back to Reviews Page 2016