Accurate Miniatures 1/48 TBF-1C Avenger
|
KIT # |
3403 |
|
PRICE: |
$35.98 |
|
DECALS: |
One aircraft |
|
REVIEW : |
Ewart Yong |
|
NOTES: |
Verlinden detail set and Dangerboy Hobbies wing fold used. |
|
BACKGROUND |
I guess by now enough has been said and written about the history of this great airplane so I guess that I will not go into that. I purchased the kit by mail order about 5 years ago and like most, only got around to building it recently. In the meanwhile, I obtained the Verlinden detail set and wingfold details from KMC. It was a real pain trying to obtain the KMC wingfold detail since it was already out of production when I wanted it. Anyway, I was fortunate to obtain a set through a friend. On opening this set, I was impressed by the resin castings and the photo-etched details, but alas the instruction sheet did not explain clearly how one was supposed to install the folded wings. Since it looked pretty fragile to me, I decided to abandon the idea of displaying the model with the wings folded... Thankfully, Dangerboy announced the release of their wingfold set and I gladly got my hands on a set after all the rave reviews.
|
THE KIT |
The Accurate Miniatures kit can only be described as fantastic!
Detail on
most parts is very finely molded and intricately portrayed. Panel lines
are recessed and extremely well molded. Clear parts were realistically
thin and free from any distortions. I especially liked the idea of having
a false bottom where the clear parts and decal sheet were packed thus separating these more delicate bits from the rest of the kit parts. The
biggest disappointment was the instruction sheet but I was quite well
prepared for this after reading numerous reviews on AM kits. The diagrams
were more like hand sketches and did not clearly show the attachment of
certain parts. This shortcoming was however more than compensated for by
the excellent descriptions for each construction step.
|
CONSTRUCTION |
As usual, construction began with the cockpit interior. I used all the kit
parts except the pilot's seat which was replaced with the resin part from
the Verlinden set. I added lead foil belts and fuse wire buckles to the
radio operator's seat and spray painted the interior according to the
instructions. A thin black-brown wash of water colours was applied to
accentuate the details and the entire interior was further highlighted by
drybrushing a lighter shade of the basic colour over the raised detail. The dorsal gun turret was also assembled and painted as per the kit
instructions with only the addition of the electrical junction box from the
Verlinden set.
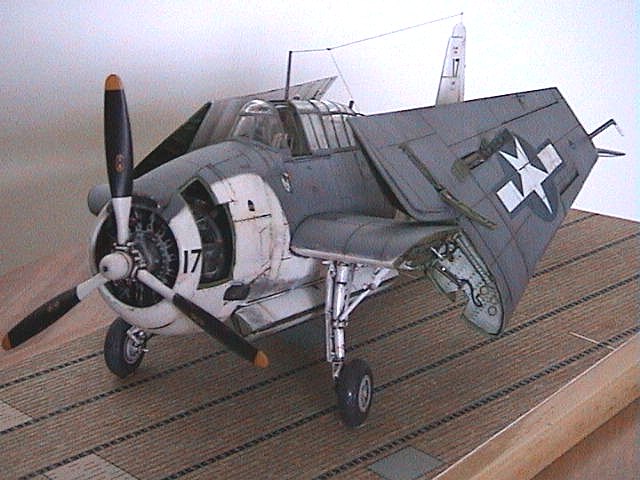
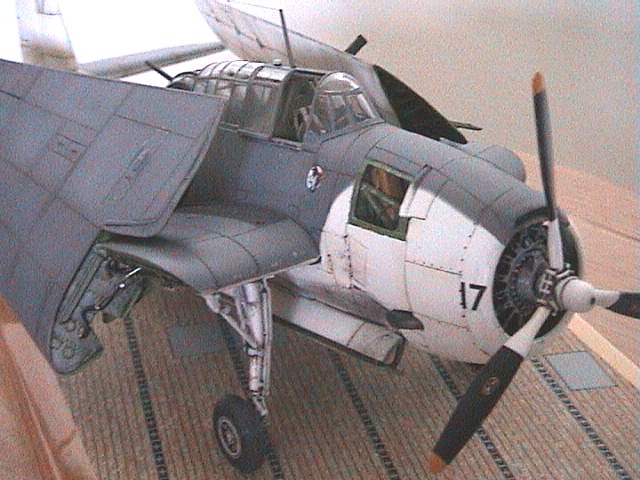
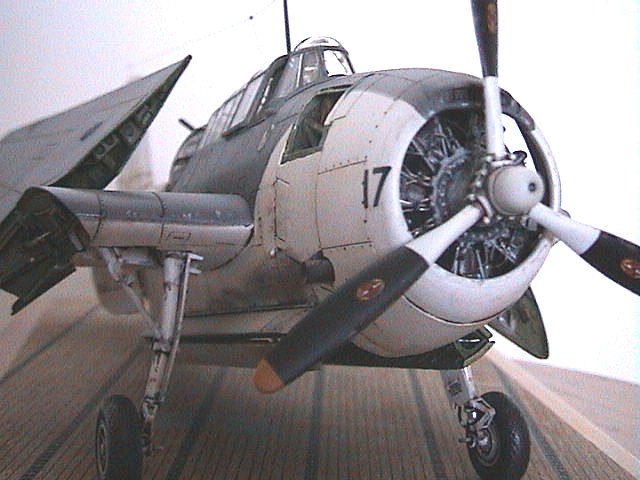
I decided to display the model with the engine access panels open and used
the excellently cast Verlinden radial engine. Unfortunately, the Verlinden
detail set seemed to be designed for the TBM-3 so some modifications were
required for the opened acess. I assembled the engine, painted and
detailed it and mounted it to the engine mount. The etched brass ignition
harness from the Verlinden set were overetched and therefore unusable. I
replaced these with fuse wire of the appropriate diameter. As my luck
would have it, the diameter of the assembled radial engine turned out to be
too large and the cowl could not be fitted over this assembly. In
desperation, I tore apart the engine, shortened the individual cylinders
and used these with the AM kit's crankcase. I just got the engine to fit
although it is slightly off centre when viewed from the front. I decided
not to correct this and live with the imperfection.
Construction of the rest of the kit went rather smoothly. The inner wing
portion of the Dangerboy wingfold set was superglued to the fuselage. One
of these had to be trimmed down slightly in profile as it did not fit
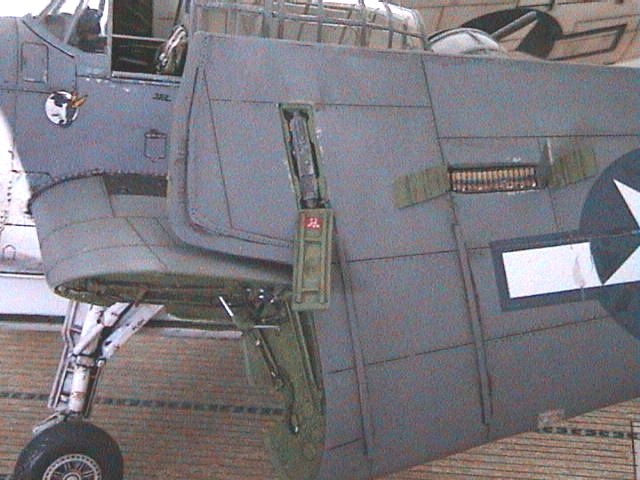
properly in the fuselage recess. Having obtained the Verlinden set and
noting that it would be a pity not to display the gun bay, I took the bold
step of opening the gun bay and ammo compartment in the solid resin wing.
This was achieved with a motor tool and the appropriate routing bits. The
sides of the compartments were boxed in with styrene sheets and painted
accordingly. The ammo box was displayed opened to show the belted 50 cal.
rounds. The 50 cal. ammo was from True Details etched parts. The 50
cal. machine gun from the Verlinden set was used although my references seemed
to suggest that it was way overscale.
|
PAINT & DECALS |
The fuselage and the wings were painted as separate entities. I sprayed
the white and masked off these areas for the gull gray topside colour. To
achieve the soft demarcation, I masked the separation line with blue tack.
Testors enamels were used throughout. After allowing the paint to cure for
about three days, the model was sprayed with Humbrol gloss clear varnish in
preparation for decal application. Decals were excellent and reacted well
to the setting solutions which I used. In fact, for the national insignia
on the wings, my over zealous application of Aeromaster Sol caused some
tearing; these areas were duly touched up when the decals were fully set.
My only gripe during the application of the decals were that the diagrams
in the instruction sheet were vague, with no indication of the decals'
orientation. This was especially irritating with the smaller stencil
decals.
When the decals were fully set, the model was wiped with a cloth dampened
with a mild detergent solution to remove any traces of decal residue. The
model was sprayed again with clear gloss varnish. Panel lines were
accentuated with a dark brown wash of water colours and the faded effect on the paint work was simulated by spraying selected panels with a thinned
solution of the base colour lightened with about 40 percent white. After
allowing to dry for about a day, Testors Dullcote was sprayed. Slight
paint chipping, exhaust stains and oil streaks were added before being
sprayed again with another coat of Dullcote.
The gun turret, canopy and antenna wire were added at this stage together
with the wings in their folded position. Take note that the wing fold
attachment plugs have to be trimmed and adjusted since they were not symmetrical. The wings in the folded position were epoxied in place and
left to dry. The ammo box lid, hatches and gun bay hatch were then
attached. Actuating arms for the wing folds were added from brass wire and
plastic scraps super glued in place based on the excellent close up
photograph of the wing fold detail supplied with the KMC set.
I do not normally mount my models on a base, but as I wanted to minimize
handling of the model, I decided to mount the model on a base. Verlinden's
US World War 2 carrier deck was pasted on a wooden base and given several
coats of Testors Dullcote from a spray can to eliminate the slight sheen.
The model was then secured to the base with self tapping screws.
|
CONCLUSIONS |
Overall, this proved to be a very enjoyable project. I completed this model over eight months. The Dangerboy wingfold set simplified things a lot, especially for those like me who intend to pose the aircraft with the wings folded but find difficulty with the more complex KMC set or scratchbuilding. I do not build to enter contests or even strive for perfection so I hope you readers out there can forgive me if you find a few blemishes, imperfections, glue stains or technical errors in these pictures.
Nov 2004 update: Please note that Dangerboy is now out of business and their materials are no longer available.
Copyright ModelingMadness.com. All rights reserved. No reproduction in any form without express permission from the editor.
If you would like your product reviewed fairly and fairly quickly, please contact the editor or see other details in the Note to Contributors.
Back to Reviews Page 2026