Amodel 1/72 Polikarpov I-180
|
KIT #: |
7283 |
|
PRICE: |
$11.00 a few years back
|
|
DECALS: |
one option |
|
REVIEWER: |
Peter Burstow |
|
NOTES: |
Short run |
The Polikarpov I-180 was almost the last gasp of the I-16 line, redesigned, with
a longer fuselage and a straight wing leading edge. It was powered by the M-88
engine, a licensed built Gnome Rhone Mistral
 Major 1,100 h.p. two-row radial.
The 40 odd turn hand-crank undercarriage of the I-16 was replaced with a
pneumatically operated mechanism.
Major 1,100 h.p. two-row radial.
The 40 odd turn hand-crank undercarriage of the I-16 was replaced with a
pneumatically operated mechanism.
The aircraft had a bad start, with the first
prototype crashing on its maiden flight, on 15 December 1938, killing the famous
test pilot
Valery Chkalov.
The second prototype crashed during testing on 5 September 1939, killing another
test pilot Tomas Suzi. The third prototype crashed on 6 July 1940, the pilot
parachuting safely.
Ten aircraft were manufactured based on the
second prototype, and another three, designated I-180S, based on the the third
prototype.
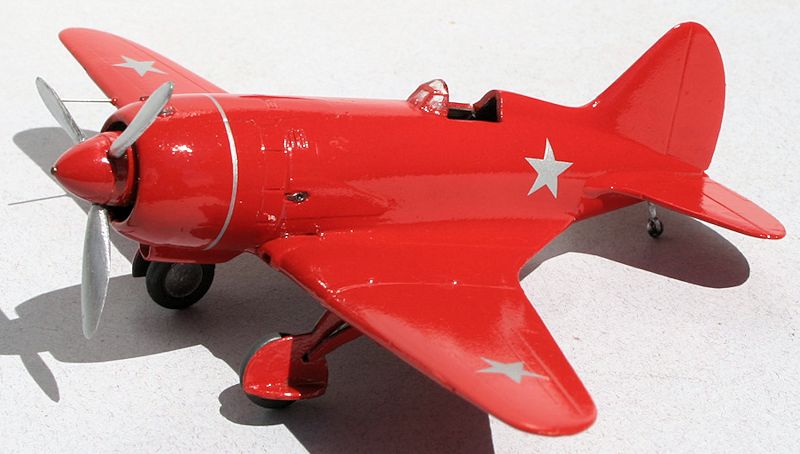
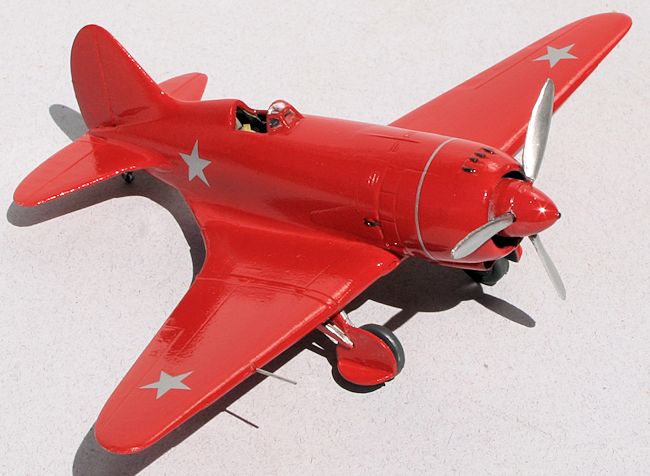
The kit represents the third prototype, and is
small, spanning 140 mm or about 5½ inches. There
are 34 parts moulded in a light grey, soft plastic. The plastic has a slightly
rough surface appearance, lots of flash, and a few lumps and bumps, but the
pieces seem to be well shaped and finely detailed with
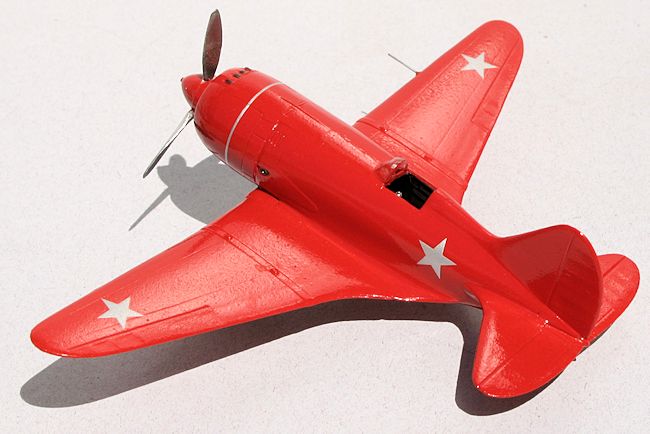 recessed lines.
There is a fabric effect on the ailerons and tailplane,
and framework detail on the cockpit side walls. There are small sink marks on
several parts.
recessed lines.
There is a fabric effect on the ailerons and tailplane,
and framework detail on the cockpit side walls. There are small sink marks on
several parts.
Many of the small thin parts such as exhaust
pipes, pitot tube, and u/c legs have mould misalignment ledges, very small and
easily sanded off.
There are two clear parts for the windscreen and separate hood, which is not
used on some of the versions. The decal sheet has four silver stars, nothing
else.
Three versions are shown on the instructions,
the third prototype, all silver without a hood, the same aircraft, silver with a
black cowling and the hood. A third version is described in the instructions as
a serial aircraft, probably intended as one of the I-180S production aircraft,
all red, with silver stars and no hood.
Building commenced with the cockpit, the two part seat, rudder pedals and a
control column were added to the floor. The floor was then attached to the lower
wing centre section. The instrument panel and a tank were fitted to the
starboard fuselage side. Positive location points were provided for all the
small parts, which is unusual for a limited run kit. Some of the detail is just
visible through the small cockpit opening.
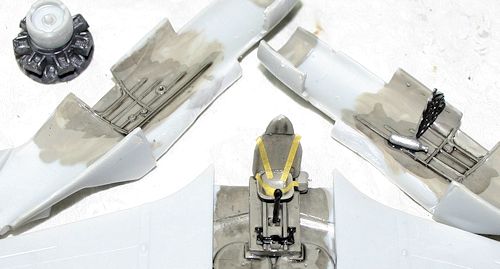 The cockpit was painted medium grey as per the
instructions, then given a dark wash to pick out the frame detail. I painted the
tank flat aluminium, the control column, rudder pedals and instrument panel
black, then added masking tape belts, and picked out details in chrome silver.
The next sub-assembly was the engine, comprising two
cylinder banks in half relief, a prop shaft and the rear half of the spinner.
The cylinders were painted Mr Metal Color 'Iron', then buffed, which brought out
the cooling fin details.
The cockpit was painted medium grey as per the
instructions, then given a dark wash to pick out the frame detail. I painted the
tank flat aluminium, the control column, rudder pedals and instrument panel
black, then added masking tape belts, and picked out details in chrome silver.
The next sub-assembly was the engine, comprising two
cylinder banks in half relief, a prop shaft and the rear half of the spinner.
The cylinders were painted Mr Metal Color 'Iron', then buffed, which brought out
the cooling fin details.
The fuselage attached to the upper wing halves,
so I assembled the wing. I had to remove a lot of material from the lower wing
tips to get them to fit in the cut-out in the upper wing halves. I then added
the right fuselage half, then the left half with the engine assembly between. I
then closed up the top fuselage joint. It seemed an odd way of doing things, but
reduced the filling required in the hard to get at wing roots. I had to carve a
lot off the inside of the fuselage halves to clear the top of the undercarriage
wells, and shave a little off the engine firewall to get it all to fit.
 Next step was to add the top deck to the
cowling, again a little trimming was needed to get a good fit. Then added the
front cowling ring. Discovered that my assembly method had widened the front of
the fuselage slightly, so I cut through the bottom of the ring and spread it by
about 1 mm. When it was dry I filled and smoothed the resulting gap. All the
joints needed a little cleaning up, mostly one or two layers of Mr Surfacer was
enough, except at the lower rear wing to fuselage joint which needed a lot of
putty.
Next step was to add the top deck to the
cowling, again a little trimming was needed to get a good fit. Then added the
front cowling ring. Discovered that my assembly method had widened the front of
the fuselage slightly, so I cut through the bottom of the ring and spread it by
about 1 mm. When it was dry I filled and smoothed the resulting gap. All the
joints needed a little cleaning up, mostly one or two layers of Mr Surfacer was
enough, except at the lower rear wing to fuselage joint which needed a lot of
putty.
The
last bit of the main assembly was the one piece tailplane, again a little
trimming was needed to get a good fit with the fuselage, and the joints needed a
little filling with Mr Surfacer.
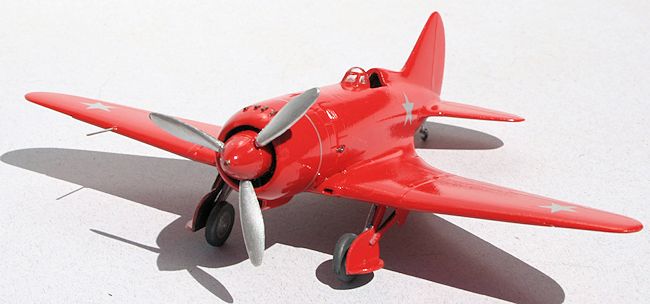
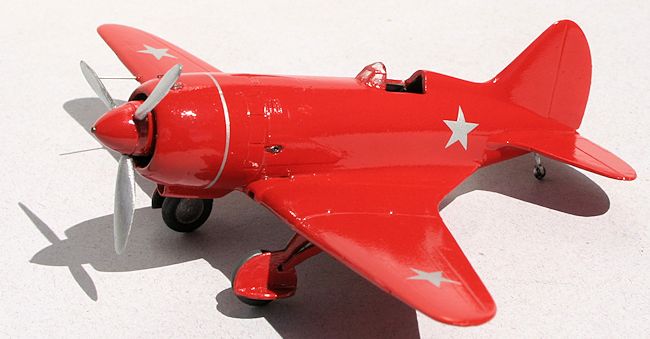
After masking the engine and cockpit, priming
and the usual joint and glitch repair, I painted the model overall gloss 'Cherry
Red' using a White Knight rattle can enamel.
The silver star decals worked with no problem on the gloss surface. I
used a little setting liquid to make sure they stayed put. Once dry they were
sealed with a little floor polish.
The box art, and a photo of a crashed example
shows an unpainted metal ring around the cowl, a common feature on Polikarpovs,
I used a Xtradecal 0.5 mm stripe for this, great fun!
The windscreen went on with a little sanding and trimming to make it fit, I left
the canopy off, it was full of glitches and too small to sand and polish. The
propeller was paint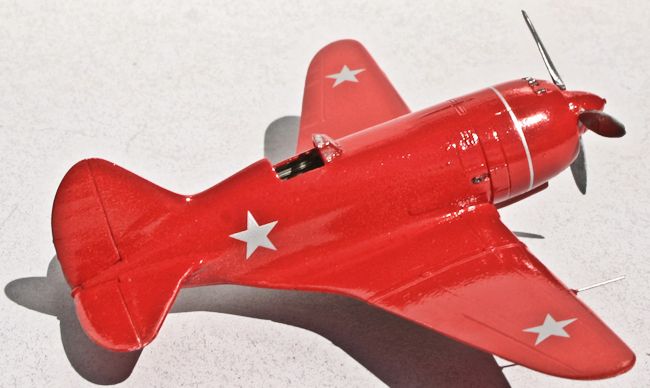 ed aluminium, and attached with the pre-painted spinner.
The rather complicated undercarriage was then
added. Each leg had three door parts. Amodel thought it confusing enough that
they supplied front and side elevation views, in addition to the exploded style
assembly instructions. As I had pre-painted the parts, I used a slow superglue
for the assembly. Separate closed position doors were also supplied, and might
have been a better option, for what was the only really tricky part of the
build. I replaced
the pitot with a bit of 0.5mm brass rod.
A little bit of touch up and detail painting, then an
overall coat of floor polish and it was made.
It
turned out a nice little model, and a good exercise of basic modelling skills.
It looks like it belongs at the air races with the Gee Bees and the Travel Airs,
must be the paint job, just needs a few company logos and a NX serial.
 Needed a small amount of joint filling and
sanding, less than normal for a short run kit. The kit was much better than the
other Amodels I have built recently, but still required plenty of dry-fitting
and trimming to get it all together. My method of moving the wing root gaps to
the underside of the cowling worked well enough, changing two long and hard to
clean up joints, to one that was small, easily accessible, and not very visible.
Needed a small amount of joint filling and
sanding, less than normal for a short run kit. The kit was much better than the
other Amodels I have built recently, but still required plenty of dry-fitting
and trimming to get it all together. My method of moving the wing root gaps to
the underside of the cowling worked well enough, changing two long and hard to
clean up joints, to one that was small, easily accessible, and not very visible.
I enjoyed the build but after three recent
Amodel Polikarpovs, I may avoid another Amodel for a while. Recommended
for experienced modellers due to the tricky assembly and carving required.
http://en.wikipedia.org/wiki/Polikarpov_I-180
Vaclav Nemecek, The History of Soviet Aircraft from 1918, Key Publishing, London
1986.
Kit Instructions.
Peter
BurstowJanuary
2014
Thanks to If you would like your product reviewed fairly and
fairly quickly, please
contact
the editor
or see other details in the
Note to
Contributors.
Back to the Main Page
Back to the Review
Index Page