| KIT #: | 2830 |
| PRICE: | $25.00 SRP (yes, really) |
| DECALS: | Three options |
| REVIEWER: | Dave Cummings |
| NOTES: |
| HISTORY |
The Mig-3 was a product of the newly formed
design team of Mikoyan and Gurevich and the first operational Soviet fighter of
the “modern formula” to be delivered in quantity to the VVS beginning March of
1941.
It is a tribute to man’s
pursuit of excellence
 that anything innovative could be produced in light of a
Soviet dictatorship that smothered initiative and offered little personal
incentive to achievement yet grave consequence for failure.
War was inevitable and there was a rush to modernize the force so
technical problems and delays in producing the new fighter had Stalin demanding
someone’s head.
Mikoyan was
investigated, but happened to have a brother who was the Minister of Foreign
Trade.
Mikoyan being too
politically well connected to shoot, another scapegoat had to found.
Major General Filin was the officer in charge of aircraft development
making him a suitable replacement, so he was shot.
that anything innovative could be produced in light of a
Soviet dictatorship that smothered initiative and offered little personal
incentive to achievement yet grave consequence for failure.
War was inevitable and there was a rush to modernize the force so
technical problems and delays in producing the new fighter had Stalin demanding
someone’s head.
Mikoyan was
investigated, but happened to have a brother who was the Minister of Foreign
Trade.
Mikoyan being too
politically well connected to shoot, another scapegoat had to found.
Major General Filin was the officer in charge of aircraft development
making him a suitable replacement, so he was shot.
The MiG-3 met a VVS demand
for a high altitude interceptor to defend against strategic bombing attack so
was designed for maximum performance at altitudes above 15,000 feet.
It was therefore unfortunate that air combat on the Russian front
typically took place at lower altitudes.
The Germans never mounted a strategic bombing campaign and air combat
revolved around tactical support of ground forces.
Coupled with inferior armament and difficult handling, the MiG-3 quickly
found itself at a disadvantage when it faced Luftwaffe fighters. Nevertheless,
it was fast and many Russian “aces” achieved impressive results with the type.
Production ceased in the spring of 1942 with a total of 3,322 being
produced.
| THE KIT |
When
travelling on business with some time left to kill I like to look up local hobby
shops for something to do.
While in
 was love at first sight, even though it was a Trumpeter kit.
You never quite know what you are going to get with them.
I had built their P-40B which was excellent in engineering but wrong in
shape and dimensional accuracy.
was love at first sight, even though it was a Trumpeter kit.
You never quite know what you are going to get with them.
I had built their P-40B which was excellent in engineering but wrong in
shape and dimensional accuracy.
Fortunately this kit appears to be spot on in accuracy as well as great
engineering.
Sprues are light gray
and well packaged in poly bags and a big strong box.
It has a segmented canopy which is well done and fairly clear. The windshield is
molded with a section of fuselage and when in place looks part of the airframe
instead of something stuck on later as an afterthought.
Also on the clear sprue are landing light lense, reflector gunsight, and
even separate wing tip navigation light lenses.
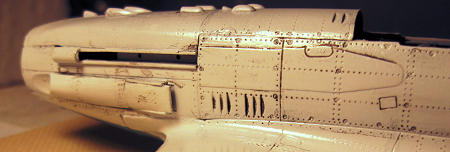
Detailing is excellent with crisp engraving and rivet detail.
Interior is done as a self contained unit with sidewalls.
Detail here is good (for my standards at least) lacking only seat belts.
The wing root intakes are separate inserts, no seam to clean up down in
that difficult to get to hole.
The
fabric over frame effect of the ailerons seems a bit overdone as does the rivet
detail, but it all looks good under paint.
The rear half of the fuselage and outer wing panels are smooth reflecting
their wood construction.
Sprue
attachment points are a bit heavy and require careful cutting of smaller, easily
broken parts.
But the plastic is
rather soft and easily cut.
In
fact, to me it was almost like working with a resin kit.
The wheels are nicely done though not flat spotted.
Options are canopy position, rockets (thought the holes in the wing are
pre-drilled so maybe not really an option), and markings for three aircraft.
Ailerons and flaps are separate but there is little detail on the interior side
of the flaps and none in the wing itself so probably designed to be attached in
the up position, the instructions are not clear on
 the subject.
No information is given about the markings. In fact there is no written
information about anything.
Instructions are pictures only.
One
set is the well drawn construction steps and the other is a color page of the
three aircraft options.
Paint
references are for Gunze / Mr. Color.
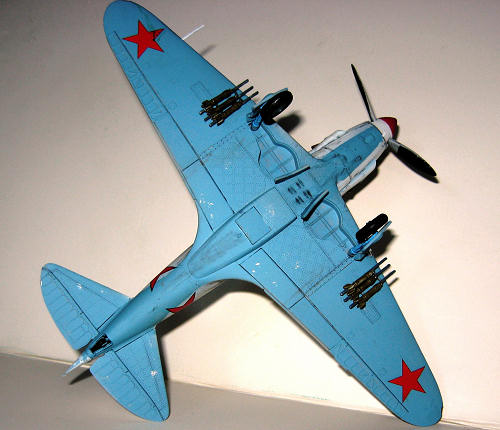
The box art plane is green upper, light blue lower and a black engine
cowling. The all white one with the red forward spinner and arrow is another and
the third is green upper and light blue lower with a yellow spinner. The decals
have a lot of red stars of various sizes that depict marking schemes over
succeeding periods of time.
The
RO-82 rockets are well done and were commonly found on this type, used both
air-to-ground and air-to-air.
the subject.
No information is given about the markings. In fact there is no written
information about anything.
Instructions are pictures only.
One
set is the well drawn construction steps and the other is a color page of the
three aircraft options.
Paint
references are for Gunze / Mr. Color.
The box art plane is green upper, light blue lower and a black engine
cowling. The all white one with the red forward spinner and arrow is another and
the third is green upper and light blue lower with a yellow spinner. The decals
have a lot of red stars of various sizes that depict marking schemes over
succeeding periods of time.
The
RO-82 rockets are well done and were commonly found on this type, used both
air-to-ground and air-to-air.
With
no information given and being unfamiliar with the type I first set about doing
some research to see just what it was I would be modeling.
I first checked the reviews in Modeling Madness (of course) and then
found an amazing website for WWII Soviet aircraft; The VVS Research Page by
Massimo Tessitori.
I really can’t
tell you what a wealth of information and pictures is available there you must
check it out for yourself.
| CONSTRUCTION |
Build up
of the cockpit is pretty straight forward.
Interior color for the MiG-3 is a blue-grey.
Not wanting to go the time and expense of buying a bottle of Russian
Interior Grey for the only Russian cockpit I’m likely to do in the foreseeable
future, I mixed my own blue-grey using ……some blue and some grey.
Color photos of a MiGs interior show the floor to be some green/brown
color.
I deduced Olive Drab to be
close enough and painted my floor a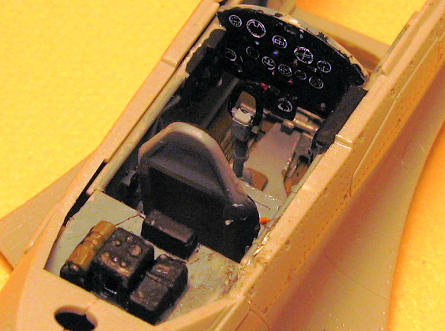 ccordingly.
Flat black panels, a little dry brushing, some instrument decals from the
spares box, looks good to me.
I cut
some strips from a manila envelope for harness straps with a drop of silver on
the ends for hardware (I hear ya, you guys can buy all the photo-etch seat belts
you want, not me brother).
ccordingly.
Flat black panels, a little dry brushing, some instrument decals from the
spares box, looks good to me.
I cut
some strips from a manila envelope for harness straps with a drop of silver on
the ends for hardware (I hear ya, you guys can buy all the photo-etch seat belts
you want, not me brother).
The
cockpit insert, radio deck and tail-wheel were glued in place in the right
fuselage half.
The instructions are
not clear about positioning the radio deck but when you test fit it becomes
apparent where it goes.
The
fuselage halves were then cemented together.
Problem!
Huge gap in the
lower rear, the halves did not want to mate together.
I concluded that the upper tail-wheel strut detail was the culprit and
sanded it down with an emery board.
It was better but I still had to slop some more glue on and hold it tightly with
my hands to get a half way decent fit.
It finally set up OK, but it had put up a good fight so I stopped for the
day to get my blood pressure back under control.
Trumpeter is famous for providing some beautifully detailed parts that
are completely invisible when the airframe is closed up.
My tail-wheel strut was an example of more trouble than it’s worth.
OK, back
to work.
Some Mr. Surfacer and
sanding on that fuselage glue seam.
On the positive side it only involves the rear half of the fuselage and there is
no panel detail here to be re-scribed. Cement the wings together.
Attach the wing root intake inserts, a little fiddly, but they fit OK.
The wing to fuselage join is very tight and
took a little wedging here and there to get it seated, but the result was
very little gap which is appreciated.
A bit of Gap Filling Super Glue and a little sanding was needed around
the intake inserts.
Next are the
cowl panels, upper first.
The
spinner backing plate closing off the nose is not listed as a part of this step
and is scheduled for a later step.
I deviated from the plan here and cemented this nose part before the cowl
panels had set as it assisted me in getting everything aligned.
I like the way the cowl panels mate along panel lines doing away with
that pesky
 fuselage center glue seam.
Fit was OK but required some filling and sanding in a few places.
In photos these engine covers don’t appear to be precision fits anyway.
Horizontal stabilizers, ailerons, and flaps presented no problems.
The radiator housing under the belly is a separate piece and when glued
in place covers another one of those habitual problem areas, the wing trailing
edge to fuselage belly seam.
Good
thinking.
I masked the canopy
with scotch tape and cut the framing out with a surgical blade (ever wonder
what’s in those drawers in the exam room at the Docs office while you’re setting
there waiting).
The framing is well
molded but not very prominent so much care is needed to guide the blade.
I then attached with clear parts cement (expensive white glue).
Fit here is very good.
fuselage center glue seam.
Fit was OK but required some filling and sanding in a few places.
In photos these engine covers don’t appear to be precision fits anyway.
Horizontal stabilizers, ailerons, and flaps presented no problems.
The radiator housing under the belly is a separate piece and when glued
in place covers another one of those habitual problem areas, the wing trailing
edge to fuselage belly seam.
Good
thinking.
I masked the canopy
with scotch tape and cut the framing out with a surgical blade (ever wonder
what’s in those drawers in the exam room at the Docs office while you’re setting
there waiting).
The framing is well
molded but not very prominent so much care is needed to guide the blade.
I then attached with clear parts cement (expensive white glue).
Fit here is very good.
Having a
completed airframe at this point, I flew it the obligatory two laps around the
room to confirm that, indeed, I had still not grown up, and landed her at the
paint booth. By the way, Trumpeter’s
commitment to detail and accuracy extends to the accurately portrayed weak
tail-wheel strut that plagued the real aircraft, be careful with it.
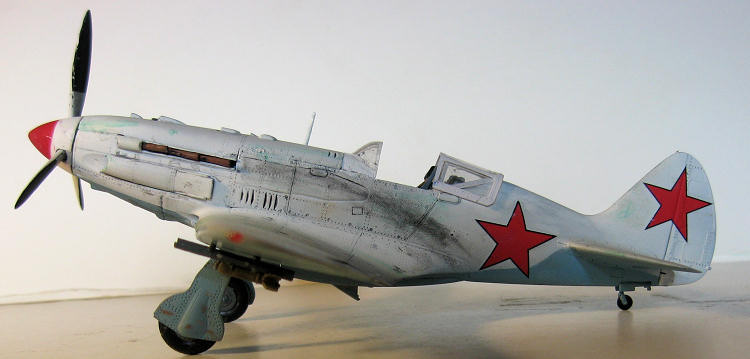
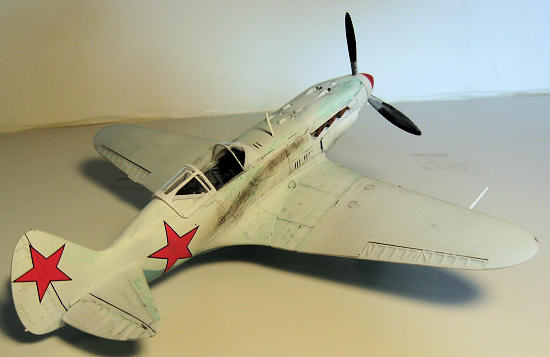
| COLORS & MARKINGS |
On
Mr. Tessitori’s website I found a color profile and a colorized photo of the
white plane with red arrow and patriotic slogan that had caught my eye.
It is from the 122d
IAP, and
it was…….. What’s this?
There are
two versions of the MiG-3, early and late?
Mine is the early, the beautiful white plane with red arrow on the box
was really a late version!
Damn,
what to do?
Ok, I’ll just pretend I
never saw this website…..no one will know…….Drat, I’ll know.
OK, Plan B.
Perusing the
website for more white MiGs I found that a great many winter camo Russian
fighters have no other markings but the red star insignias, all else being
painted over.
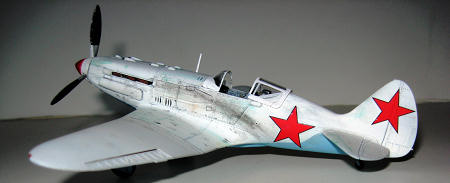
I found one with a
red spinner belonging to 12 victory ace I.F. Golubin of 16 IAP based in the
Moscow area winter 41/42, and it is an early model.
Had to give up that neat red arrow but this scheme is at least similar.
So indeed one can do a great many
 different aircraft with the decals provided as
all you need is the national insignia, and you get several versions of those.
different aircraft with the decals provided as
all you need is the national insignia, and you get several versions of those.
Painting
was done with a metal Aztec A7778 and mini-compressor.
I just bought the set which is my first really serious air-brush and this
is the first model I have used it on.
I love it.
It’s easy and
makes me look a better painter than I really am.
I first
pre-shaded the panel lines with flat black enamel.
Pre-shading really highlights the contrast of the mixed metal and wood
construction of the airframe.
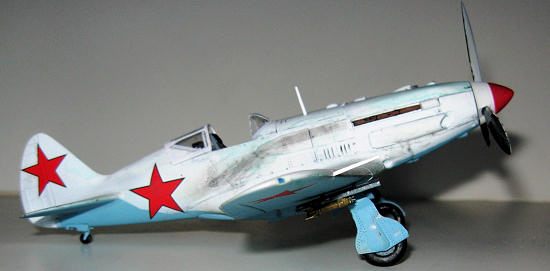
Next
up was the light blue undersides.
Let’s see, no Russian Light Blue.
Plenty of Model Master RLM 65 though.
I mixed in some dark blue a couple drops at a time until it looked right
to me and thinned with alcohol (What? You can’t tell the difference).
The demarcation line was masked with Tamiya tape.
Model Master Insignia White was thinned 50/50 with alcohol and sprayed in
light coats.
This let me build up
the paint until I had good coverage with just enough pre-shading showing
through.
There were many variations
of winter camo applied to VVS aircraft so you have to know your subject.
They vary from hastily applied tempura white washes that wear quickly and
show a lot of the underlying green to pristine solid white factory painted
examples depicted by that colorized photo of the beautiful white Mig with red
arrow and patriotic slogan (sigh).
The photo of Golubin’s MiG and attendant color profile drawing shows it to be
overall white upper with faint patches of green showing through in places.
That being the case I elected to paint the white first and add the green
splotches over so I could better control where they appear.
The
highly thinned white paint needed a couple of days to cure and dried
sufficiently glossy to allow decaling without need for a clear gloss overcoat.
The spinner was masked which is not easy to do on round parts.
Tamiya tape was cut into thin strips so it conformed to the curvature
then larger pieces to mask off the remaining white.
The nose cap was then sprayed Insignia Red.
I thinned some Tamiya Clear Green acrylic to simulate the underlying
green showing through in the spots I deemed appropriate.
I dabbed it on with a soft brush then blotted with a damp cloth leaving a
spot that looked appropriately translucent as if the white
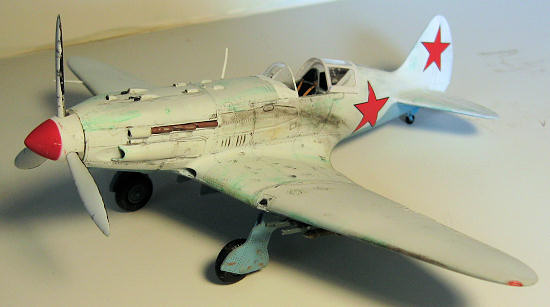 had worn just thin
enough for color to show through.
I
think the effect conveys the story I was trying to tell with it quite well (it
is art you know).
had worn just thin
enough for color to show through.
I
think the effect conveys the story I was trying to tell with it quite well (it
is art you know).
Again the
photo purported to be Golubin’s MiG shows only the black bordered stars on
fuselage and tail.
By the end of 41
upper wing stars were rarely being applied but the lower wing stars remained to
signal nervous ground troops.
Trumpeter’s decals are well printed and thin.
They take a minute of soaking and another minute to release easily.
Get them in position without delay as they want to stay where they are
put, keep them wet while you are working them.
Over the smooth wood fuselage and wing they required no setting solution.
The stars on the tail were hit with a little Micro-Sol to settle them
into the ribbing detail of the rudder.
The next
order of business was to apply a wash of black acrylic and water.
Some may think Trumpeters rivet detail is overdone but I liked the way it
accepted the wash.
The wash really
popped the paneling detail and I applied it liberally to help “grime up” the
white paint.
Pastels were used to
further grime up the airframe, these aircraft operated under very harsh
conditions.
There are a lot of
little air scoops on the cowl that need their openings painted black.
Exhaust stains on photos of MiG-3s are the most pronounced of any
aircraft type I have seen.
What was
that, cheap gasoline?
An engine
designed for high altitudes running too rich at the lower altitudes?
Whatever, it is common to the type and stands out starkly.
I used black pastel chalk smudged on with my little finger.
Lastly was some paint chipping using silver enamel (but only the metal
areas, duh).
I then sealed
everything with a coat of gloss and finished off with Testor’s DullCoat
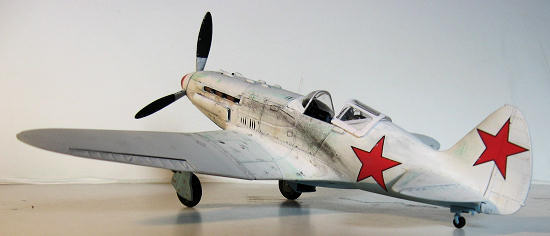
| FINAL CONSTRUCTION |
At this
stage of the project I could see it all coming together as I had visualized.
I am then tempted to hurry up and finish it so I can get it under the
lights of my display case for all to gaze in wonder and amazement.
Actually, I am the only one in the family that possesses any wonder at
these magnificent machines and the intrepid soles that flew them.
At best I get, “ooh, I like the yellow part, it goes with the curtains.”
Anyway, I have to remind myself that there is still much to do that will
take some patience.
 A wheel is a
model in itself and every part is important to the whole.
A wheel is a
model in itself and every part is important to the whole.
I put a small drop each of blue and red
in the wing tip navigation light cutouts. With the paint dry it’s time to affix
the clear lenses.
These have to be
the tiniest plastic model airplane parts I have ever encountered. You must
carefully cut them off the sprue so that they don’t go flying off to neverland.
Then you have to clean up that sprue attachment point on a part really
too small to see well let alone hold with forceps.
At least I assume that’s the way you do it.
Myself, I just filled the openings with clear parts cement.
The gun
barrels were painted Gun-Metal and glued into their holes in the cowl.
The landing gear was painted assembled and attached.
Photos show everything underneath: gear well, doors, struts, etc. all
painted the light blue underside color.
The strut attachment point in the wing allows a solid join for the gear.
The RO-82 rockets were assembled, painted O.D, and glued in position.
Next was the prop and antenna mast.
I am a bit ambivalent about antenna wire and didn’t use one this time.
| CONCLUSIONS |
Trumpeter’s MiG-3 is beautifully engineered and molded.
But don’t let that fool you, test fit everything and make sure you
understand what the instruction diagram is really trying to convey. This kit may
not be right for inexperienced modelers.
There were no real problem areas but a little modeling experience is
helpful with this one.
Overall it
was a good build experience and makes an excellent replica of the type.
I highly recommend it and am sure I will build another.
Maybe a late version, a white one with red arrow and patriotic slogan,
yeah….
| REFERENCES |
Web
sites: VVS Research Page by Massimo Tessitori and MM Kit Reviews.
October 2012
Copyright ModelingMadness.com. All rights reserved. No reproduction in part or in whole without express permission.
If you would like your product reviewed fairly and fairly quickly, please contact the editor or see other details in the Note to Contributors.
Back to the Review Index Page 2023