|
KIT # |
? |
|
PRICE: |
$ out of production |
|
DECALS: |
N/A |
|
REVIEWER: |
Emilio Diaz |
|
NOTES: |
Conversion |
|
HISTORY |
 controls. It was powered by
the M-22, a Soviet-built version of the Bristol Jupiter VI, equipped with
a two bladed prop. The second prototype was built with an American
Wright-Cyclone SRG-1820-F2 and a Hamilton-Standard propeller and a N.A.C.A. designed cowling. Flying for the first time during early January
1934 with V. Stepanchonok as the test pilot. Both aircraft were fitted
temporarily with fixed ski landing gear, because of the harsh winter
conditions, completed their flight trials successfully by April of 1934.
controls. It was powered by
the M-22, a Soviet-built version of the Bristol Jupiter VI, equipped with
a two bladed prop. The second prototype was built with an American
Wright-Cyclone SRG-1820-F2 and a Hamilton-Standard propeller and a N.A.C.A. designed cowling. Flying for the first time during early January
1934 with V. Stepanchonok as the test pilot. Both aircraft were fitted
temporarily with fixed ski landing gear, because of the harsh winter
conditions, completed their flight trials successfully by April of 1934.
The design was accepted for production as the I-16 and the "Ishachok" (little donkey) went on to become the backbone of the Red Air Force. The aircraft had it's baptism of fire with the Spanish and the Chinese as a soldier of fortune. It later fought in every major theater of the Great Patriotic War: South from the vast steppes of the Ukraine, north to the snow drift covered forests of Finland and east to the deserts of Manchuria. Flying from all the combat fronts of the great empire, I-16's fought till replaced with the next generation of Soviet fighters. She will always be remembered as a stout defender of the Motherland.
|
THE KIT |
I decided to model the second prototype of this significant aircraft,
by using the old Airmodels/WK Models solid resin kit as a starting point.
I had started this kit back in the late 1980's and put it away till I
could get some decent references. I just bought Red Star Vol. # 3 and
Soviet Air force Colors, so it was time to bring the old kit out. I made
drawings using the enlarged 1/72nd plans of the I-16 from the Soviet Air
force book. Next I laid out the model on these drawings to check for
errors. The old kit looked good , except for the wing details, which were
a mixture of all the I-16 types.
|
CONSTRUCTION |
 First, I had detailed the cockpit using plastic rod, sheet, stretched
sprue, H.O. train fittings when I first started the model. All I added
now was a modified seat from Academy's F4U-4b, replacing the original
resin kit part. The only photo etched parts I used were the seat belts
for the seat. The model is one solid piece and not much of the cockpit
can be seen with the entry door up, so I kept the detailing light. Having
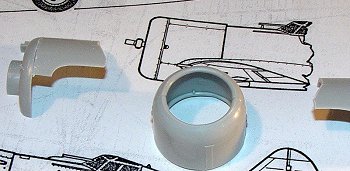
a cowling left over from a dash 4 Corsair conversion, I modified these
parts using 1/72nd plans that came from the
First, I had detailed the cockpit using plastic rod, sheet, stretched
sprue, H.O. train fittings when I first started the model. All I added
now was a modified seat from Academy's F4U-4b, replacing the original
resin kit part. The only photo etched parts I used were the seat belts
for the seat. The model is one solid piece and not much of the cockpit
can be seen with the entry door up, so I kept the detailing light. Having
a cowling left over from a dash 4 Corsair conversion, I modified these
parts using 1/72nd plans that came from the
 French book, "Les avions de
chasse Polkarpov". I enlarged these to 1/48th and laid out to parts and
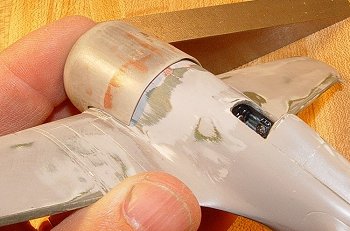
marked the places to cut. I then modified the fuselage, to accept the
new cowling, by cutting off the nose of the W/K model and sanded the
fuselage till the old cowling taper was removed. This was easily done
with a large 10 inch bastard file to remove most of the resin
French book, "Les avions de
chasse Polkarpov". I enlarged these to 1/48th and laid out to parts and
marked the places to cut. I then modified the fuselage, to accept the
new cowling, by cutting off the nose of the W/K model and sanded the
fuselage till the old cowling taper was removed. This was easily done
with a large 10 inch bastard file to remove most of the resin
 and
finished with a small 6 inch smooth file. I fitted the cowling to the
fuselage and removed the material for the wing root recess with a
cordless Dremel tool set at slow speed so as not to melt the plastic.
and
finished with a small 6 inch smooth file. I fitted the cowling to the
fuselage and removed the material for the wing root recess with a
cordless Dremel tool set at slow speed so as not to melt the plastic.
Next I filled in the wheel bays, using Micro Ballons with super
glue and scribed in the landing gear covers. In order to scratch build
the ski landing gear, I had a front and side profile photo of the
aircraft with the skis attached, I enlarged these photos till the
fuselage matched the kit length. This then gave me the proper dimensions
of the landing skis, I made these using Contrail plastic airfoil shaped
struts and balsa stock for the ski bodies. The skis where sanded to
 profile and sealed with several coats of primer. I added these to the
model by first drilling the attachment points and then drilling and
pinning the landing skis struts with wire. These were then trial fitted
to the model to make sure everything lined up.
profile and sealed with several coats of primer. I added these to the
model by first drilling the attachment points and then drilling and
pinning the landing skis struts with wire. These were then trial fitted
to the model to make sure everything lined up.
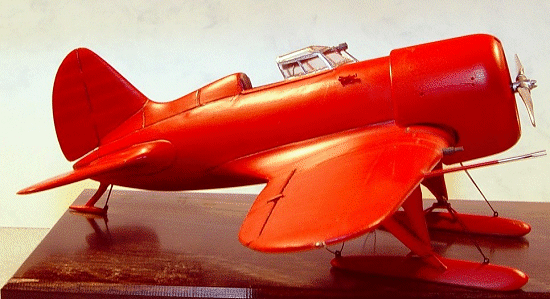
The model was nearly ready for painting, but first I had to remove all the external detail by sanding, in order to redo the incorrect rib detail on the wings and tail units by spray painting. This included removing the ailerons. I began by masking off all the rib and panel detail in negative with masking tape. Next step was to spray the model with light coats of primer, till the rib detail was level with the masking tape. I then removed the masking tape and lightly polished the ribs till I got the effect wing rib tape. Next I added the aileron hinges using plastic rod, glued the ailerons and the landing skis back on the wing using slow setting Gel Super Glue. Now the model was ready for painting.
|
COLORS AND MARKINGS |
 I sprayed the base color Tamiya gloss red using a Badger dual action
airbrush. I waited for a week to let the gloss red dry fully but still
had problems and so I waited another week. Anyone else have any luck in
spraying Tamiya gloss paint? If so, how about some tips. After 14 days I
then over coated the Tamiya base color with a light dusting of satin
floor varnish. I then applied washes to bring out the panel lines and
started final assembly of the model.
I sprayed the base color Tamiya gloss red using a Badger dual action
airbrush. I waited for a week to let the gloss red dry fully but still
had problems and so I waited another week. Anyone else have any luck in
spraying Tamiya gloss paint? If so, how about some tips. After 14 days I
then over coated the Tamiya base color with a light dusting of satin
floor varnish. I then applied washes to bring out the panel lines and
started final assembly of the model.
|
FINAL CONSTRUCTION |
Started final construction by rigging the landing skis using
stretched sprue and H.O. scale lifting eyes. I then added a Squadron
canopy and Bare Metal foiled the frame work. Scratched built the OP-1
optical gun sight and gun barrels using plastic tubing, wire and plastic
rod . Using one of the engines from Monogram's JU-52, I modified the
radial engine, crankcase grill cover and prop, to represent the SRG-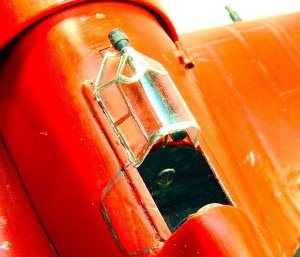 1820.
I then used a cut down sewing needle to represent the two pronged pitot
tube.
1820.
I then used a cut down sewing needle to represent the two pronged pitot
tube.
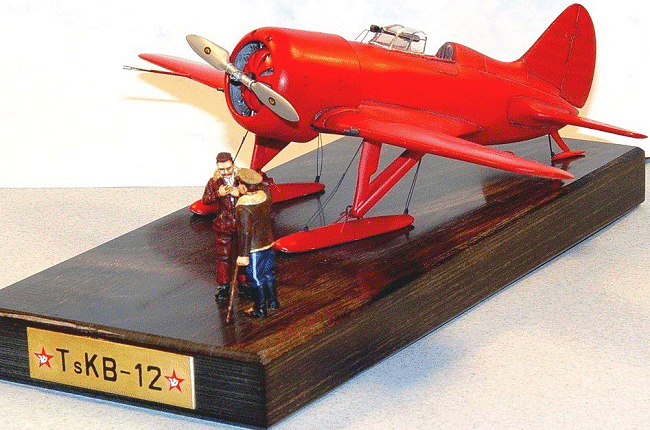
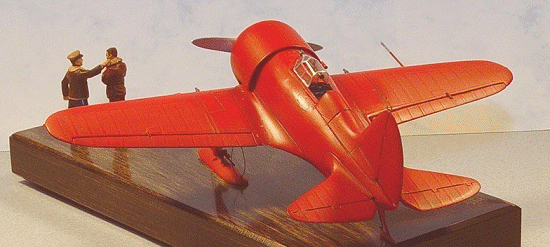
The model was almost done. I added the scratched built instrument venturi tube and the aircraft running lights using items from CMK 1/72nd running light lenses. I then started polishing the aircraft to highlight the different panel effects between metal, plywood and fabric. I then made a base using a piece of teak wood, which resembles ice covered asphalt, adding an old metal pilot figure and a modified Russian officer figure from ICM to add interest. I finished up the base by adding a brass tag with rub on letters and Russian parade decals.
|
CONCLUSIONS |
The completed model and base make up a surprisingly small diorama. The looks of the TsKB-12bis are definitely Soviet Era Russian. I enjoyed building this little model and it makes a wonderful addition to my collection. I hope you enjoy the model and thanks for taking time to read the review. You can contact me at Emilio.Diaz@ispat.com. if you have any questions or comments.
|
REFERENCES |
Polikarpov's I-16 Fighter, It's Forerunners and Progeny, by Yefim Gordon
and Kevin Dexter
Les avions de Chasse Polikarpov, by Herbert Leonard
Soviet Air force Fighter Colors 1941-1945, by Erik Pilawskii
Koku-Fan, March 1986, Modeling Manual on the I-16
Polkarpov Fighters in Action, Part 2, Aircraft Number 162, by Hans-Heiri
Stapfer
Scale Models, August 1979, Vol. 10, No.119, I-16 study by Harry Woodman
April 2004
Copyright ModelingMadness.com. All rights reserved. No reproduction in part or in whole without express permission from the editor.
If you would like your product reviewed fairly and fairly quickly, please contact the editor or see other details in the Note to Contributors.