Zvezda 1/72 La-5
| KIT #: | 7203 |
| PRICE: | $? |
| DECALS: | One option |
| REVIEWER: | Jon Hudak |
| NOTES: | Not in current (June 2005) Catalogues |
| HISTORY |
The La-5
Lavochkin was a development and refinement of the earlier LaGG-3 series
which was not without its share of problems. This fighter was like a wild
horse, in the hands of an expert "rider" it could be tamed and it's weak
points overcome while exploiting its strong ones and many early Russian
aces flew it with success. It suffered from multiple quality issues and was
disliked by many pilots and was not easy to fly. As early as 1941 work was
begun on adapting a radial engine to the LaGG 3's airframe as a possible
alternative should production of inline engines be interrupted due to the
hasty relocation of factories as well as possible shortages of the type.
Could it also have anything to do with the surplus M-82 radial engines that
were basically just lying around in limbo too? Development continued
into1942 and the radial engine was successfully mated to the LaGG's rather
slender fuselage. While the engineers were definitely onto something, it
was still not without it's share
 of flaws. With these changes came a
reduction in forward visibility due to the enlarged cowl area and an
increase in weight from the heavier radial engine as well as excess drag
due to the less streamlined nose. However these tradeoffs were worth it for
the top speed increased significantly and the rate of climb was superior to
the LaGG-3's. Also of great importance, firepower was increased with two 20
mm ShVak cannons at the front of the fuselage whereas the LaGG-3 had just
one 20mm cannon and one Berezin UBS 12.7mm machine gun depending on which
version.
of flaws. With these changes came a
reduction in forward visibility due to the enlarged cowl area and an
increase in weight from the heavier radial engine as well as excess drag
due to the less streamlined nose. However these tradeoffs were worth it for
the top speed increased significantly and the rate of climb was superior to
the LaGG-3's. Also of great importance, firepower was increased with two 20
mm ShVak cannons at the front of the fuselage whereas the LaGG-3 had just
one 20mm cannon and one Berezin UBS 12.7mm machine gun depending on which
version.
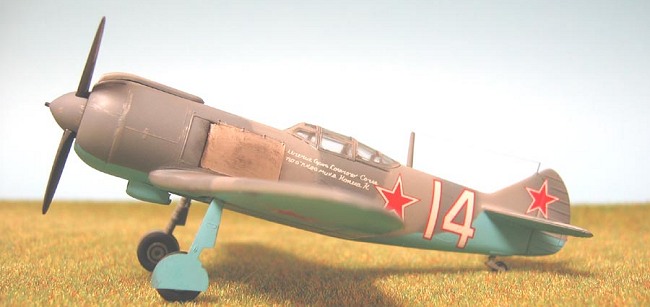
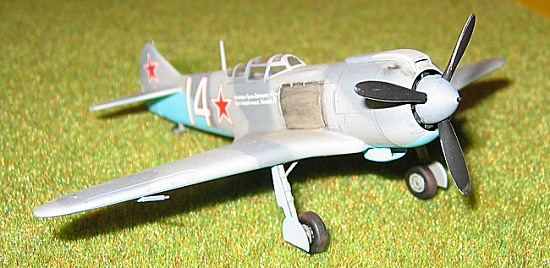
The new radial engine La-5 had proved its superiority over the LaGG-3 and it was ordered into production which began in July of 1942 using the ASh-82A engine developing an impressive 1700 horsepower. Throughout its production numerous changes were incorporated to the series resulting in the F model with its new cut down fuselage spine and revised canopy which gave better rearward visibility and later the FN version as depicted here. The FN version benefited from the ASh82-FN engine which was equipped with direct fuel injection and good for about 150 more horsepower than the ASh-82F engine. The easiest way to tell this model apart from the previous F model was the extra long supercharger air intake that was positioned atop the cowl and the extra duraluminum fuselage panel that was positioned under the cockpit area. The FN model was the fastest yet and some sources quote it with a top speed of about 402 mph compared to around 366 mph in the F model. The FN model first saw combat in 1943 and could pretty much tangle with anything the Luftwaffe could throw at it. It was the first Soviet fighter to equal or best the Bf109-G6 and was praised by it's pilots. It would play a major part in taking away air superiority from the Luftwaffe and many a VVS ace would achieve ace status in this fine fighting machine.
| THE KIT |
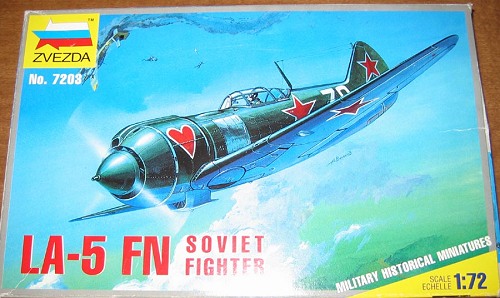 From what I've been told this is the old Italeri kit. This makes sense as I
own a couple of older boxings both of which are under this label. If I had
to guess I’d say this kit probably originated in the early 1970s. This was
somewhat confirmed by a receipt found in the bottom of one of these kits
dated from 1973. And all for the princely sum of $1.79. Ah, the good ole
days! That's less than a Big Mac nowadays. Inside are two sprues molded in
an olive green plastic with a third smaller one for the clear parts which
are not too thick and acceptable for the scale. Despite its age this is
still a pretty nice little kit, and while most of the exterior detail is of
the fine raised variety there are recessed lines for the leading edge wing
slats and control surfaces. Not to worry class for remember the Lavochkin
was of a mostly wooden construction so you're not going to have much in the
way of panel lines to fret over anyway. One item of note is the thinness of
the main landing gear doors, they look perfect in scale thickness and I've
seen few modern kits offer this even 25 or 30 years later.
From what I've been told this is the old Italeri kit. This makes sense as I
own a couple of older boxings both of which are under this label. If I had
to guess I’d say this kit probably originated in the early 1970s. This was
somewhat confirmed by a receipt found in the bottom of one of these kits
dated from 1973. And all for the princely sum of $1.79. Ah, the good ole
days! That's less than a Big Mac nowadays. Inside are two sprues molded in
an olive green plastic with a third smaller one for the clear parts which
are not too thick and acceptable for the scale. Despite its age this is
still a pretty nice little kit, and while most of the exterior detail is of
the fine raised variety there are recessed lines for the leading edge wing
slats and control surfaces. Not to worry class for remember the Lavochkin
was of a mostly wooden construction so you're not going to have much in the
way of panel lines to fret over anyway. One item of note is the thinness of
the main landing gear doors, they look perfect in scale thickness and I've
seen few modern kits offer this even 25 or 30 years later.
| CONSTRUCTION |
Provided with the kit is one skimble-scamble instruction sheet that shows
all the construction steps on just one page. Talk about confusing and
miserly, who designed this type of format, Ebenzeer Scrooge? It may look a
bit daunting at first but its nothing that cant be tackled by the
accomplished modeler so fear not. As usual, construction started in the
cockpit which is a little on the sparse side and one where the super
detailers could have a field day. It consists of the usual floor, seat,
stick, instrument panel and the “hands in his lap” pilot who would look
just as well at home on a park bench watching the pigeons eat as he would
seated in his Lavochkin.
 I'd previously painted the propeller flat black so that was one less thing
I had to do. I then sprayed the completed cockpit assembly and interior of
the fuselage halves, wheel well areas and the separate insert piece for
this area with Polly Scale Dark Gull Gray acrylic which is a reasonably
close match for the dark bluish gray interior on the original. Though I've
only used them a couple of times in the past, Pollyscale acrylic paints for
me have either been hit or miss when it comes to running it through an
airbrush. Despite the fact that I thinned it with their brand of airbrush
thinner it still clogged up my airbrush something fierce and there were
dried clumps of it in every conceivable nook and cranny which made me
skeptical about using it again. Getting back to the cockpit, details like
the gun grip and instrument panel were painted in flat black and a little
color thrown in for the switches on the instrument panel while a silver
pencil was used to highlight the gauges and “plumbing” on the fuselage
sides. With this done I trapped the completed assembly between the fuselage
halves and added the wheel well insert piece and set the assembly aside to
dry. Be wary of the locating points for the cockpit assembly, there are
"ridges" on either fuselage half for mounting but they are not very
prominent and therefore makes mounting it a wee bit fiddly.
I'd previously painted the propeller flat black so that was one less thing
I had to do. I then sprayed the completed cockpit assembly and interior of
the fuselage halves, wheel well areas and the separate insert piece for
this area with Polly Scale Dark Gull Gray acrylic which is a reasonably
close match for the dark bluish gray interior on the original. Though I've
only used them a couple of times in the past, Pollyscale acrylic paints for
me have either been hit or miss when it comes to running it through an
airbrush. Despite the fact that I thinned it with their brand of airbrush
thinner it still clogged up my airbrush something fierce and there were
dried clumps of it in every conceivable nook and cranny which made me
skeptical about using it again. Getting back to the cockpit, details like
the gun grip and instrument panel were painted in flat black and a little
color thrown in for the switches on the instrument panel while a silver
pencil was used to highlight the gauges and “plumbing” on the fuselage
sides. With this done I trapped the completed assembly between the fuselage
halves and added the wheel well insert piece and set the assembly aside to
dry. Be wary of the locating points for the cockpit assembly, there are
"ridges" on either fuselage half for mounting but they are not very
prominent and therefore makes mounting it a wee bit fiddly.
 The wings came next which are a standard three piece affair and consist of
a full lower and two separate uppers. Although somewhat suspicious of the
“pins” (part #s 23) that stick up out of the tops of the wings, I did
decide to add them after all before gluing the wing together. I didn't know
what these were at first and the hole that they protrude through is
surrounded by a raised circular ring for some added detail. The completed
wing assembly was glued on next followed by the stabilizers. The wing
assembly wasn't the greatest fit and liberal amounts of filler were used
thus destroying the natural join line at the root. Oh well, you win some
you lose some so they say. The engine which I'd painted flat black with a
gray crank case cover was merely press fitted into place between the
fuselage halves. I didn't dry brush it or anything as you wont see it once
the fan blade covers are added later along with the propeller and spinner.
The wings came next which are a standard three piece affair and consist of
a full lower and two separate uppers. Although somewhat suspicious of the
“pins” (part #s 23) that stick up out of the tops of the wings, I did
decide to add them after all before gluing the wing together. I didn't know
what these were at first and the hole that they protrude through is
surrounded by a raised circular ring for some added detail. The completed
wing assembly was glued on next followed by the stabilizers. The wing
assembly wasn't the greatest fit and liberal amounts of filler were used
thus destroying the natural join line at the root. Oh well, you win some
you lose some so they say. The engine which I'd painted flat black with a
gray crank case cover was merely press fitted into place between the
fuselage halves. I didn't dry brush it or anything as you wont see it once
the fan blade covers are added later along with the propeller and spinner.
The cowl ring cover came next and benefited from some careful sanding to
keep its contours even with the fuselage. I must admit that I felt quite
beetleheaded about the grossly overscale “pins” that were popping like
prairie dog heads out of their holes in the upper wings. They looked more
like coffee cans then anything else so taking a Sentai sanding stick I made
short work of them and felt better about myself afterwards. It turns out
these round circles were actually fuel filler caps on the real thing.
Though this is an older kit the fit is still pretty good but its not as
close fitting as a more modern high quality mainstream kit so a little more
filler was required particularly with the aforementioned wing roots and
also where the rear of the wing assembly joins up at the bottom of the
fuselage and the leading edges of the wings. The oil cooler scoop was then
added underneath the fuselage and the long supercharger intake scoop thats
synonymous with the FN version was added above the cowl. With things
looking pretty good and no major problems encountered the model was now
ready for paint.
| COLORS & MARKINGS |
Before painting, the model was washed in some soapy water then rinsed and
dried to avoid any potential problems. As said before, though they weren't
always my kettle of fish, Pollyscale acrylics were the only paints I had in
my arsenal for VVS aircraft. Not wanting to go out and throw more moolah
out the window I sought out the Jedi Master of Pollyscale paints, my friend
"Pollyscale Mike" for some sage advice before going into battle. Some paper
towel was stuffed into the wheel wells and with my newly learned arts I
thinned the paint this time with a little bit of ordinary tap water, just a
few drops mind you and the bottom and outsides of the gear doors were
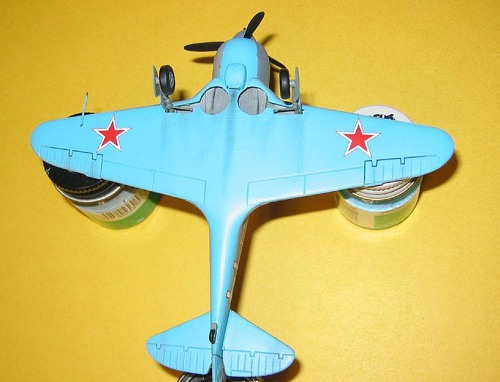
sprayed with their USSR Underside Blue. Though I think I thinned the
 paint
a little too much and it required a couple of coats to cover, this time I
had no problems with clogging and cleanup was a snap with some Testors
Acryl airbrush cleaner. In the meantime I'd dunked the two piece canopy in
Future which really cleared things up and a flaw in the rear section was
cleaned up using some polishing cloths in the 3200-12000 grit range and a
little “Model Wax” detailer with the yellow label. I then set to masking
the canopy with some Pactra masking tape and Bare Metal Foil and attached
it. The rest of the airframe was masked off and the upper surfaces were
sprayed with Pollyscale USSR Light Topside Gray, no problems this time. On
my way to mastering the Pollyscale I was! All went well so far and now it
was time to spray the dark gray.
paint
a little too much and it required a couple of coats to cover, this time I
had no problems with clogging and cleanup was a snap with some Testors
Acryl airbrush cleaner. In the meantime I'd dunked the two piece canopy in
Future which really cleared things up and a flaw in the rear section was
cleaned up using some polishing cloths in the 3200-12000 grit range and a
little “Model Wax” detailer with the yellow label. I then set to masking
the canopy with some Pactra masking tape and Bare Metal Foil and attached
it. The rest of the airframe was masked off and the upper surfaces were
sprayed with Pollyscale USSR Light Topside Gray, no problems this time. On
my way to mastering the Pollyscale I was! All went well so far and now it
was time to spray the dark gray.
This is the first time I'd ever tried a wraparound camouflage scheme and at
first I started by blowing up some plans to 1:72 scale that showed the
camouflage pattern. I then cut out a couple of pieces for the wings and
taped them down with some tiny rolled "loops' of Tamiya tape so I could
achieve a nice "clean" feathered edge. Again, more Pollyscale paint this
time and for the dark gray I used their USSR Dark Topside Gray. While this
was the first time using this method I naturally screwed up a couple of
areas but I could see what a nice result can be achieved and would probably
try it again in the future. While this method is fine for a relatively flat
surface like a wing top its almost impossible for a curved fuselage and my
patience like the inevitable tide soon ebbed and I decided to just say the
heck with all this tomfoolery and break out my double action airbrush (Sotar
20/20 it rocks!) that I got for Christmas and freehand the rest and touch
up any FUBAR'ed areas and nab the spinner while I was at it too. In the end
I got a pretty good finish though there was a bit of touching up that I had
to do and it was quite a time consuming process mainly because I'd used an
acrylic and after almost every pass I had to clean the tip with a pipe
cleaner dipped in solvent. I'm sure an enamel based paint may have been a
better choice for this method and wouldn't have clogged as readily, live
and learn they say.
 With the paint taken care of I then sprayed on a coat of Future in
preparation for the decals. Since this was an OOB project and I have at
least one more to build and do a really nice job on I did not want to use
some of the more flashier markings I had from the excellent Aeromaster
"Fighting Lavochkins" sheet no. 72-036 like Captain Gregori Kostylev's
colorful mount or "Silver 15" of Captain Likholetov so I resorted to an old
SuperScale Sheet no. 72-345 Lavochkin La-5, La-5FN & La-7 Russian Aces
sheet. This all worked out to my advantage as I thought it would be cool to
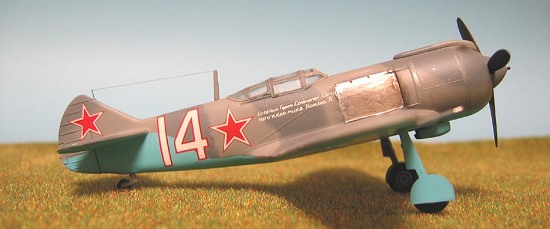
do the top scoring Allied ace of WW2, Ivan Kozhedub's "White 14." This was
one of his earlier La-5FNs and was less colorful with no flashy large
inscriptions on the side like on the cover of the "in Action" Squadron
book. I only used the numbers from the Super Scale sheet and the Cyrillic
inscription, whereas the rest of the markings/national insignia came from
the AeroMaster sheet. Since there were only a total of 10 decals to apply
this didn't take long at all and for once I got a break as the decals
performed flawlessly with some Micro Set setting solutions and a little
Micro Sol for the ones on the vertical fin which needed a little more
coaxing to settle into the recesses but thats normal. I was surprised at
how well the Super Scale decals went on especially for it being an older
sheet and I wish all decals went on this easily. A coat of Pollyscale Clear
Gloss went on the next day after giving the areas a wipe down with a damp
cloth to remove any excess setting solutions and or ju-ju/etc and then the
model was given a coat of Polly Scale Clear Flat for the final finish.
With the paint taken care of I then sprayed on a coat of Future in
preparation for the decals. Since this was an OOB project and I have at
least one more to build and do a really nice job on I did not want to use
some of the more flashier markings I had from the excellent Aeromaster
"Fighting Lavochkins" sheet no. 72-036 like Captain Gregori Kostylev's
colorful mount or "Silver 15" of Captain Likholetov so I resorted to an old
SuperScale Sheet no. 72-345 Lavochkin La-5, La-5FN & La-7 Russian Aces
sheet. This all worked out to my advantage as I thought it would be cool to
do the top scoring Allied ace of WW2, Ivan Kozhedub's "White 14." This was
one of his earlier La-5FNs and was less colorful with no flashy large
inscriptions on the side like on the cover of the "in Action" Squadron
book. I only used the numbers from the Super Scale sheet and the Cyrillic
inscription, whereas the rest of the markings/national insignia came from
the AeroMaster sheet. Since there were only a total of 10 decals to apply
this didn't take long at all and for once I got a break as the decals
performed flawlessly with some Micro Set setting solutions and a little
Micro Sol for the ones on the vertical fin which needed a little more
coaxing to settle into the recesses but thats normal. I was surprised at
how well the Super Scale decals went on especially for it being an older
sheet and I wish all decals went on this easily. A coat of Pollyscale Clear
Gloss went on the next day after giving the areas a wipe down with a damp
cloth to remove any excess setting solutions and or ju-ju/etc and then the
model was given a coat of Polly Scale Clear Flat for the final finish.
Ivan Kozhedub:
While much can be written about Ivan Kozhedub he was the highest scoring
Allied ace of WW2 with 62 victories and he scored most of them in the
La-5/7 series and was an excellent pilot. After a nearly disastrous mission
at the Battle of Kursk where he finally scored his first victory he learned
three important lessons that day.... always watch your tail, never breach
flight discipline and strive to conserve your ammunition. It was on this
day that he was nearly shot down when he ignored orders to stay with his
squadron and instead broke off to attack more Stukas that were approaching.
You could say it was a lesson well learned and one he would never
forget. Much can be written of his perils and many a German plane fell to
his guns but he also had the distinction of shooting down an Me-262 while
flying an La-7 in 1945 with the 176 GIAP. One other
 lesser known fact and
one that he was not proud of were two more "kills" that happened one day in
April of 1945 when he saw an American B-17 under attack by two German
fighters. He quickly came to the drive off the attackers by firing a burst
between the two enemy planes which quickly broke off and dove away. Before
he could give chase, Ivan spotted an unfamiliar formation of fighters whose
leader fired at Kozhedub from a long distance. Kozhedub quickly pulled up
behind the last plane in the formation and with a burst of rounds sent it
down in flames. He then maneuvered up in a half loop and shot at the leader
of the formation sending him down as well before seeing the white and blue
stars on the wings and fuselage of the "enemy" planes which were P51
Mustangs. Luckily one of the pilots managed to bail out and when asked
later said he was shot down by a FW-190 with a red nose! After the war
Kozhedub was promoted to Colonel in 1951 and put in command of 324 IAD who
flew Mig-15s in Korea with great success. Considered too valuable by Stalin
Ivan was forced to lead this unit from the ground so he wouldn't be lost in
combat.
lesser known fact and
one that he was not proud of were two more "kills" that happened one day in
April of 1945 when he saw an American B-17 under attack by two German
fighters. He quickly came to the drive off the attackers by firing a burst
between the two enemy planes which quickly broke off and dove away. Before
he could give chase, Ivan spotted an unfamiliar formation of fighters whose
leader fired at Kozhedub from a long distance. Kozhedub quickly pulled up
behind the last plane in the formation and with a burst of rounds sent it
down in flames. He then maneuvered up in a half loop and shot at the leader
of the formation sending him down as well before seeing the white and blue
stars on the wings and fuselage of the "enemy" planes which were P51
Mustangs. Luckily one of the pilots managed to bail out and when asked
later said he was shot down by a FW-190 with a red nose! After the war
Kozhedub was promoted to Colonel in 1951 and put in command of 324 IAD who
flew Mig-15s in Korea with great success. Considered too valuable by Stalin
Ivan was forced to lead this unit from the ground so he wouldn't be lost in
combat.
| FINAL CONSTRUCTION |
With all the major work done it was time for the
small final bits. One of the first things I pondered on doing was how to
finish the metal panels just aft of the cowling. Originally I'd planned to
just paint them but since it looked like masking and painting them would be
much too onerous of a task I decided to try something new and use some Bare
Metal Foil. It took a couple of tries but it worked out in the end and
besides, no airbrush to clean! The masking was removed from the canopy and
any 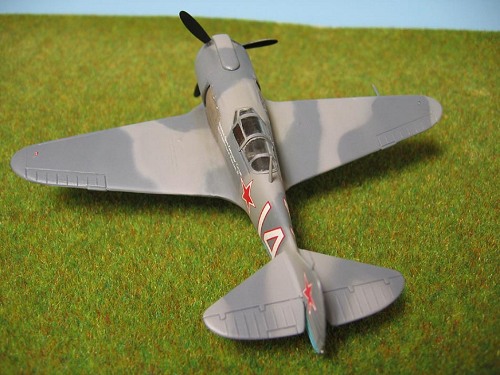 areas needing touching up were cleaned up with a sharpened toothpick.
Next the insides of the gear doors and landing gear struts were painted
with some more Dark Gull Gray and the tires which are in two pieces were
assembled and cleaned up. The rims were painted this same color and the
tires in flat black along with the fan blades for the cowling. Why they
chose to split them horizontally and not vertically down the middle is
beyond me as it made alignment a nightmare. If you just read that part over
then that means I gotcha! Come on people, seriously now who ever heard of
such a thing?
areas needing touching up were cleaned up with a sharpened toothpick.
Next the insides of the gear doors and landing gear struts were painted
with some more Dark Gull Gray and the tires which are in two pieces were
assembled and cleaned up. The rims were painted this same color and the
tires in flat black along with the fan blades for the cowling. Why they
chose to split them horizontally and not vertically down the middle is
beyond me as it made alignment a nightmare. If you just read that part over
then that means I gotcha! Come on people, seriously now who ever heard of
such a thing?
The completed landing gear units and tail wheel were glued on and aligned
as was the pitot tube which I painted in the underside blue color on the
bottom and dark gray on top complete with a silver tip. By now the model
was almost finished and the last things to do were stretch an antenna out
of some black sprue securing it at both ends with some good ole' Elmers
White Glue and painting the wingtip lights with a base coat of chrome
silver followed by some Tamiya clear red and green colors. The prop and
spinner unit were pressed into place and I lightly weathered my "Lavo" with
some black pastels in the appropriate areas and a silver pencil around the
cowling and retaining straps etc., which were some of the few areas on the
outside of the airplane that were metal. Still, the foil panels looked a
little too stark and bright and were toned down by drybrushing them with
some Testors Dullcote Laquer then touched up with some more black pastel
for the exhaust stains. Thank you "Master Lee"! With that said the model
was finished and I was proud to have such an accomplished important VVS
fighter in my collection.
| CONCLUSIONS |
While this was more or less a practice model for
me, in the end it still came out pretty good all things considered and I
was happy to add it to my collection of built kits. It's definitely a cool
little airplane and it looks great in the display cabinet amongst all my
Japanese stuff and the one or two Italian and German aircraft that I have
in there as well. It built up rather well and the only thing I did to alter
it from stock out of the box was to replace the tip on the tail by drilling
a small hole and adding a piece of wire for the antenna to attach to and
some seat belts made from tape. I've always liked the La-5 series ever
since I saw one almost twenty years ago in what was one of my favorite
books on modeling called "Building And Displaying Model Aircraft" by Robert
Schleicher. It showed a Lavochkin being used in a war game posed on a stick
in mock combat with I believe a FW-190. Ever since then it captivated me
and now almost 20 years later I've finally got my built up Lavochkin. I
guess good things come to those who wait. Despite it's age I'd have to give
it a thumbs up, it looks great right out of the box and the super detailers
could make it really shine. Recommended.
For more Lavochkin models of this type there is the Cooperativa early model La-5 and there is the excellent recent Eduard La-7, both of which I have and I especially look forward to building the Eduard kit. Now if only they would modify the kit and make an up to date La-5F or FN version, I'll keep my fingers crossed, are you listening Eduard?
June 2005
| REFERENCES |
LaGG & Lavochkin Aces of World War 2 by George
Mellinger Osprey Publishing
La 5/7 Fighters in action Squadron Signal Publishing
Copyright ModelingMadness.com. All rights reserved. No reproduction in part or in whole without express permission from the editor.
If you would like your product reviewed fairly and quickly, please contact the editor or see other details in the Note to Contributors.