Accurate Miniatures 1/48 Yak-1 on skis
|
KIT: |
|
|
KIT # |
3423 |
|
PRICE: |
$27.50 |
|
DECALS: |
One VVS aircraft |
|
REVIEW : |
|
|
NOTES: |
Kit also comes with wheels |
|
HISTORY |
 Operation Barbarossa, Hitler’s ill-advised attack on the
Soviet Union commenced in June 1941 and unleashed a frightening combination of
brutal destruction with the devastating extremes of weather. When the German’s
invaded the Soviet Union with over 150 divisions that initially crushed what
little opposition that the Soviets were able to offer, Hitler was convinced that
his forces could completely overwhelm his enemy before the winter weather would
take its toll. Fortunately, Hitler was wrong.
Operation Barbarossa, Hitler’s ill-advised attack on the
Soviet Union commenced in June 1941 and unleashed a frightening combination of
brutal destruction with the devastating extremes of weather. When the German’s
invaded the Soviet Union with over 150 divisions that initially crushed what
little opposition that the Soviets were able to offer, Hitler was convinced that
his forces could completely overwhelm his enemy before the winter weather would
take its toll. Fortunately, Hitler was wrong.
Air operations were vital to Hitler’s thrust, providing close air support to Army operations that enabled his ground forces to advance with frightening speed. In the far northern theatre of operations, the window of opportunity for attack is very small, with late winter/early spring being a preferred time. This is due to the fact that during the warmer months, melting snow and ice renders the terrain into a muddy quagmire that sucks everything up and makes military operations difficult.
The strategic city in the Arctic is the important port of
Murmansk along the Barents Sea. Due to the warming effects of the Gulf Stream,
Murmansk was able to accommodate shipping and aircraft during all months of the
year, even during the brutal Russian winter. As a result, most of Britain’s
and the US’ aid to Russia eventually passed through this strategically
important area. Of equal importance was the rail line that ran from Murmansk to
Kandalaksha that eventually ran into
 Moscow. To cut this lifeline would mean
that Russia would not be able to accept aid from the west. As a result, German
and Finnish forces combined during the winter of 1941 to capture this vital
outpost. The German’s created their northernmost General Headquarters in the
Finnish City of Rovaniemi, located in the heart of Lapland to support this
offensive.
Moscow. To cut this lifeline would mean
that Russia would not be able to accept aid from the west. As a result, German
and Finnish forces combined during the winter of 1941 to capture this vital
outpost. The German’s created their northernmost General Headquarters in the
Finnish City of Rovaniemi, located in the heart of Lapland to support this
offensive.
Land-based military operations were encountered in two major areas of the Arctic supported by Rovaniemi; the Kandalaksha front, and along the Litsa River just to the west of Murmansk. Russian resistance prevented the combined German/Finnish forces from accomplishing this strategic goal on several occasions. In addition, German U-boat attacks in the Barents Sea took a toll on shipping operations into Murmansk in this time frame.
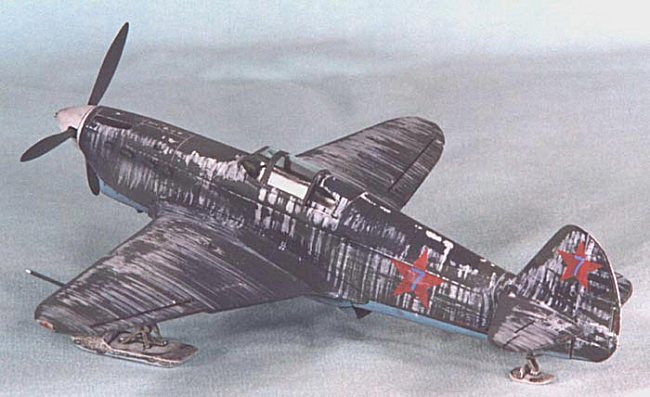
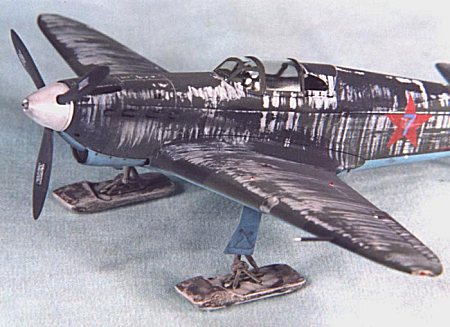
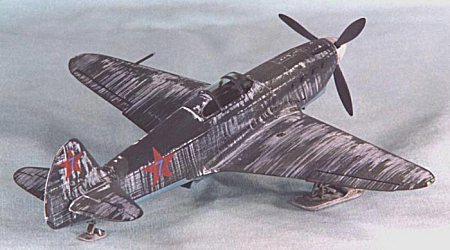
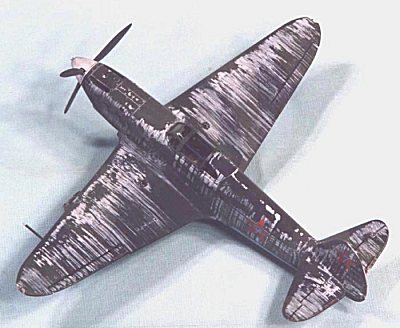
This kit represents a ski-equipped YAK-1 fighter that operated in the late winter/early spring of 1941-42. Most ski-equipped Yaks flew with the Northern Fleet Air Force, Naval Aviation and were used primarily as patrol aircraft. I chose to model this aircraft with a highly weathered winter camouflage scheme, as the water based white distemper paint would rapidly wear away under normal use. Harsh operating conditions provided minimal maintenance operations so these aircraft received little upkeep in the field.
|
THE KIT |
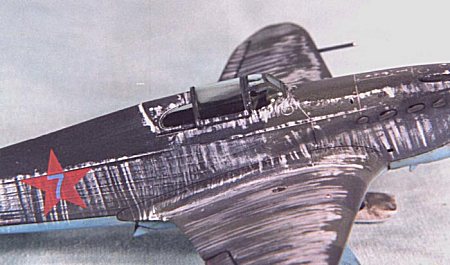
I always enjoy building an Accurate Miniatures (AM) kit as no other manufacturer combines the accuracy, detail, and quality of an AM kit. The name accurate is no marketing hype! The kit consists of approximately 90 injected molded plastic parts that are the envy of the business in quality. The instruction book is typical AM, detailed and loaded with information that you need to build up a great model. A word of caution to you "expert" model builders out there, better follow those directions because some of the assembly sequences will "bite ya in da butt" if you don’t follow them! The kit features only one decal option, a generic aircraft flown in the winter of 1941-42.
|
CONSTRUCTION |
This was a straight out-of-the-box build (OOB) of the kit since it is highly accurate and no additional parts are really necessary to produce a quality model. After washing the parts in mild dishwater soap and letting them dry, I then pre-painted all the parts as indicated in the instructions. For interior parts, I used Polly Scale British Interior Gray-Green. Starting with the interior, I built up the kit as per the instructions. I had no major difficulties in assembling the fuselage components.
After installing the chin oil radiator components, I then
glued the fuselage halves together with liquid cement. A tip is to sand and fill
the seam on the turtleback section of the fuselage before you install the
fuselage top. Guess who didn’t and
 had to bend files inside to finish the
seam! Installing the oil cooler outlet door (B51) was a challenge; it doesn’t
fit well and I had to file the side pins down and contort my fingers to get it
in with a little glue. Fortunately, the engine coolant radiator door went in
much easier.
had to bend files inside to finish the
seam! Installing the oil cooler outlet door (B51) was a challenge; it doesn’t
fit well and I had to file the side pins down and contort my fingers to get it
in with a little glue. Fortunately, the engine coolant radiator door went in
much easier.
After installing the stabilizers with liquid cement, I tackled the wings. Follow the instructions closely, as gluing the wing spar in place is critical to get the correct dihedral. I used the following technique. I first glued with liquid cement the center portion of the spar. I used a spring type clamp to hold it in place until the glue set in an hour. I then did the right part of the wing in the same manner, followed by the left part. Next up was the top of the wings glued in place. I then glued the ailerons in, offsetting them slightly. Now to the problem piece. The carburetor air intake (C49) is an AM anomaly. It does not fit without a large gap. You can shim it with plastic card, or take the easy way out (like me!) and just fill it with putty. I then sanded all the seams and applied a little Mr. Surfacer where needed.
The model was painted, decaled, and weathered as described in the following subsections and then final assembly took place.
For final assembly I installed all the landing gear ski components, and cockpit details. Lastly, I installed the propeller assembly, pitot, and exhaust stacks. After a heavy coating of equal parts Future, rubbing alcohol, and Tamiya Flat Base (X-21), I installed all the clear plastic components.
|
PAINT & DECALS |
 The model was painted in an early YAK-1 scheme of dark green
and black, with a bright blue undersides. I used Polly Scale USSR Underside
Blue, Dark Green RLM 82, and White RLM 21, and Aeromaster Acrylic RLM 22 Black.
I first airbrushed the underside blue, and then the dark green on the top
portions. I enlarged on my scanner the painting pattern provided on the
instruction sheet to the correct size to make paper masks. I then used Tombo
Mono Multi Liquid Glue to coat the backside of the cutout masks. This is really
a great product for paper masks. The adhesive (when dry) will not pull up paint
but is fairly tacky so you can use paper masks around curves. I then carefully
lifted the edges with a toothpick to provide a slight amount of overspray and
airbrushed the black. After letting the paint dry overnight I shot a light coat
of Polly Scale Gloss Finish to prepare for the streaky white finish.
The model was painted in an early YAK-1 scheme of dark green
and black, with a bright blue undersides. I used Polly Scale USSR Underside
Blue, Dark Green RLM 82, and White RLM 21, and Aeromaster Acrylic RLM 22 Black.
I first airbrushed the underside blue, and then the dark green on the top
portions. I enlarged on my scanner the painting pattern provided on the
instruction sheet to the correct size to make paper masks. I then used Tombo
Mono Multi Liquid Glue to coat the backside of the cutout masks. This is really
a great product for paper masks. The adhesive (when dry) will not pull up paint
but is fairly tacky so you can use paper masks around curves. I then carefully
lifted the edges with a toothpick to provide a slight amount of overspray and
airbrushed the black. After letting the paint dry overnight I shot a light coat
of Polly Scale Gloss Finish to prepare for the streaky white finish.
For the ski landing gear, I airbrushed the top of the ski with white and then hand painted the struts RLM02. Next was a heavy wash of burnt umber. I then sanded the bottoms with 80-grit sandpaper to scratch and gouge the surface. I hand painted a light coat of Testors Metalizer Steel to the gouged area. I sealed the whole assembly with a light coat of Polly Scale Gloss Finish and applied a heavy burnt umber oil wash to the entire assembly. I then removed most of the wash from the bottom with a cloth dampened with thinner.
I wanted to do a highly weathered white distemper finish since these aircraft received very little maintenance attention at the front. And quite frankly, plain white is boring! I used a rake brush to apply a streaky finish using Humbrol Flat White (#34) in varying dry brush patterns. After I was satisfied with the coverage, I took a piece of cloth dampened sparingly with thinner and gently rubbed off the white paint until I got the desired effects. After letting the paint dry overnight I sealed it with a light coat of Polly Scale Gloss Finish.
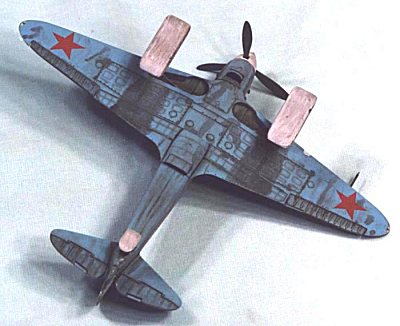 The kit only comes with one decal option, and unfortunately
they are very translucent. After a short drying period of about an hour, I
applied MicroSol setting solution to get the decals to melt into the surface. I
repeated with a second coat of setting solution to get all the decals fully
down. They responded very well to the setting solution with no permanent
wrinkling. After drying overnight, I wiped the decals off with a moist cloth
with a bit of soap to remove any residue and after drying I shot a very light
coat of Polly Scale Gloss Finish over the decals to seal them.
The kit only comes with one decal option, and unfortunately
they are very translucent. After a short drying period of about an hour, I
applied MicroSol setting solution to get the decals to melt into the surface. I
repeated with a second coat of setting solution to get all the decals fully
down. They responded very well to the setting solution with no permanent
wrinkling. After drying overnight, I wiped the decals off with a moist cloth
with a bit of soap to remove any residue and after drying I shot a very light
coat of Polly Scale Gloss Finish over the decals to seal them.
For weathering, I chose to accentuate the engraved panel lines and surface detail on the bottom with a burnt umber oil wash. After spraying a mix of Polly Scale Flat Finish, I then randomly applied some ground up black and burnt umber pastels with a soft brush to simulate staining and exhaust. I then further stained the aircraft bottom by applying the burnt umber wash by dripping it onto the surface while blowing a fan set to high to simulate spray kicked up by the skis. After final assembly, I then sprayed a very heavy coat of an equal mix of Future, rubbing alcohol, and Tamiya Flat Base (X-21) to make a dull, dirty finish.
|
CONCLUSIONS |
This is an excellent model of an important WW II aircraft. I am pleased that finally a major kit manufacturer is making 1/48 kits of Russian aircraft. Overall the quality and accuracy are exceptional. The level of detail engraved in the kit is downright incredible. AM still lives up to their awesome reputation with this kit. I spent a little under 20 hours building this kit which is about average for me on an AM build.
|
REFERENCES |
Schiffer Publishing, Stalin’s Eagles, $59.95
Ivy Books, Fighting In Hell, $6.99
Avery Publishing, West Point Military History Series: The Second World War (sold as set)
Modeling The Aircraft Of The Soviet VVS, www.geocities.com/~ipmsfortcrook/vvs
If you would like your product reviewed fairly and fairly quickly, please contact the editor or see other details in the Note to Contributors.