Accurate Miniatures 1/48 IL-2m3
| KIT #: | 3407 |
| PRICE: | $25.00 'used' |
| DECALS: | Two options |
| REVIEWER: | Jonathan Prestidge |
| NOTES: |
Eduard pre-painted etched seatbelts used |
| HISTORY |
From the kit instructions:
“The Ilyushin IL-2 Stormovik was THE Soviet ground attack aircraft. To the
Soviet soldier, the IL-2 was known as the “Flying Tank”. With its considerable
armor plate and formidable armament, the name fit. First flown as a
single-seater (Type 1), the IL-2m (Type 2) was developed to provide better
protection from rear attack when a gunner’s position was added. With the Type 3
the wings received a sweep to correct for the change in the center of gravity
due to the addition of the gunner’s position. Despite all of the armor plate and
impressive armament these aircraft suffered appalling losses. Even when
production reached 1,000 aircraft per month, new planes ba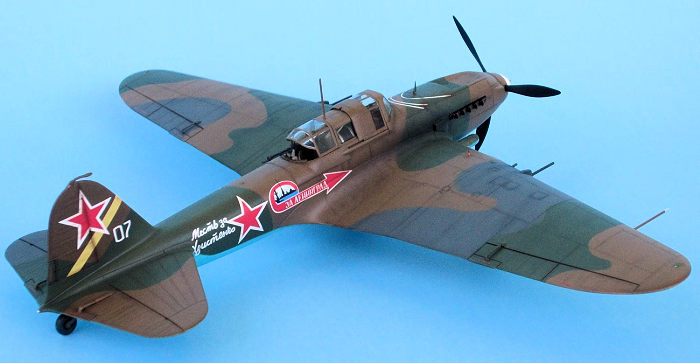 rely
equaled attrition. By May of 1945 over 36,000 of these tank-busting aircraft had
been constructed - more than any other military aircraft in history. This
heavily armored and armed plane ranged over the battlefields of Russia and
harassed German ground forces all the way to Berlin in 1945. While more than
36,000 IL-2’s were produced, fewer than a dozen examples survive today. This kit
represents the definitive Stormovik, the two seat IL-2m3 (type 3) version with
metal swept wings, a wooden fuselage and rear gunners’ position.”
rely
equaled attrition. By May of 1945 over 36,000 of these tank-busting aircraft had
been constructed - more than any other military aircraft in history. This
heavily armored and armed plane ranged over the battlefields of Russia and
harassed German ground forces all the way to Berlin in 1945. While more than
36,000 IL-2’s were produced, fewer than a dozen examples survive today. This kit
represents the definitive Stormovik, the two seat IL-2m3 (type 3) version with
metal swept wings, a wooden fuselage and rear gunners’ position.”
If ever an aircraft represented the ideals of the regime that spawned it, the IL-2 was that machine. Constructed of wood and metal the IL-2 was simple, rugged, and able to remain flight worthy in primitive field conditions. It was powered by a liquid cooled, V-12 called the AM-38. Power from the AM-83 was uprated throughout the conflict culminating in the AM-38F of 1,720-hp used in the IL-2m3.
Contemporary close support aircraft developed by America, Germany and Japan were either dive-bombers or converted fighters. Those machines minimized exposure to ground fire through speed and angle of attack and were less armored than the IL-2. From the outset, the IL-2 was designed to operate at low altitudes over the front lines where exposure to ground fire was constant. It was purpose built with extensive armor for the engine, the pilot, the cooling system and the fuel tanks. Even the sliding canopy section for the pilot has minimal glass area for added protection and makes the Stormovik look like a “Flying Tank”.
 One area
where the Soviets were ahead of the rest of the world at the outset of WWII was
in the development of aircraft weapons. I always thought of rocket weapons as a
German development but the Soviet RS-82 rockets were in use from the first day
of the war to the last and fitted to every Soviet aircraft in use including
fighters, bombers, ground-attack aircraft, etc. The RS-82 was used as an
air-to-ground weapon and as an air-to-air weapon. Early IL-2s used up to thirty
two of the RS-82 rockets. Later Stormoviks (the subject of this kit) used four
of the larger RS-132 rockets, two 250 kg bombs, two 7.62mm (.3 in) wing-mounted
machine guns, two hard-hitting 23mm VYa cannons (also in the wings) and a 12.7mm
(.5 in) UB machine gun for the rear gunner.
One area
where the Soviets were ahead of the rest of the world at the outset of WWII was
in the development of aircraft weapons. I always thought of rocket weapons as a
German development but the Soviet RS-82 rockets were in use from the first day
of the war to the last and fitted to every Soviet aircraft in use including
fighters, bombers, ground-attack aircraft, etc. The RS-82 was used as an
air-to-ground weapon and as an air-to-air weapon. Early IL-2s used up to thirty
two of the RS-82 rockets. Later Stormoviks (the subject of this kit) used four
of the larger RS-132 rockets, two 250 kg bombs, two 7.62mm (.3 in) wing-mounted
machine guns, two hard-hitting 23mm VYa cannons (also in the wings) and a 12.7mm
(.5 in) UB machine gun for the rear gunner.
Some IL-2m3s were further optimized for the anit-tank role with the fitment of two 37mm NS-OKB-16 automatic anti-tank cannon. These weapons were able to penetrate all but the frontal armor of the fearsome Tiger tanks. Use of the 37mm guns required the removal of bombs, rockets and the wing-mounted 23mm cannon. The 37mm cannon pods were included in the kit and the instructions even covered the deletion of the 23mm wing guns if you chose that option.
| THE KIT |
 Accurate
Miniatures’ Ilyushin IL-2m3 Stormovik was released in 1997 and received rave
reviews at that time. When it debuted, it was deemed the most accurate IL-2m3 in
any scale. It had an excellent interior, state-of-the-art surface detailing,
minimal flash, excellent instructions (to be FOLLOWED), good quality decals for
one aircraft, decent clear parts, weighted or non-weighted tires and it was
accurate in shape and dimension. The kit was well molded in shiny, light gray
plastic.
Accurate
Miniatures’ Ilyushin IL-2m3 Stormovik was released in 1997 and received rave
reviews at that time. When it debuted, it was deemed the most accurate IL-2m3 in
any scale. It had an excellent interior, state-of-the-art surface detailing,
minimal flash, excellent instructions (to be FOLLOWED), good quality decals for
one aircraft, decent clear parts, weighted or non-weighted tires and it was
accurate in shape and dimension. The kit was well molded in shiny, light gray
plastic.
I decided to give this one a go because Tamiya released their IL-2m3. When I saw the build reviews of the Tamiya, I really liked the rugged look of the completed models of the Stormovik. Since I had this kit in the stash (and I’m far too cheap to spend $65+ for a kit) I started building. Other than a set of pre-painted Eduard seatbelts for the pilot’s seat, this one was built completely OOB.
| CONSTRUCTION |
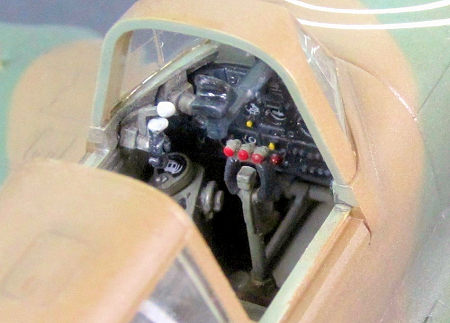
Assembly of the Accurate Miniatures kit began with careful review of the instructions. For the size of the finished kit there were not too many parts. I removed most of the parts from the sprues and cleaned up any sprue attachment points and minor flash. Next, parts that could be assembled prior to paint were glued together resulting in a series of subassemblies.
I then sprayed the
interior, landing gear and wheel wells with Poly Scale British Interior Green
(FS34226) thinned with Future. The semi-gloss finish allowed washes to flow
freely and also made it easier to remove excess wash from the high spots.
Detailing continued in the cockpit/fuselage/wing interior where I brush painted
details per the kit instructions. I then added Eduard seatbelts to the pilot’s
seat. A thin black soapy water wash was applied. Once the wash had dried, I
drybrushed the in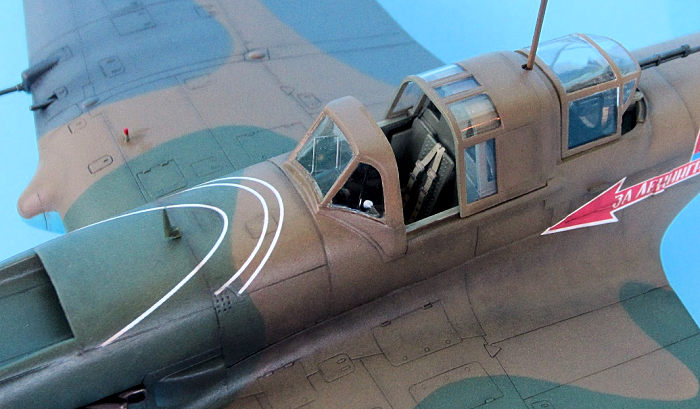 terior
with a slightly lighter shade of interior green. I completed “Step 1” and “Step
2” of the instructions without difficulty.
terior
with a slightly lighter shade of interior green. I completed “Step 1” and “Step
2” of the instructions without difficulty.
With the interior detail painting complete, I closed up the fuselage. I cut the horn balance from the rudder at this time and left it off until the end of the build (even so I broke it off multiple times). When installing the gunner’s canvas sling (part 111) in “Step 3,” I managed to break it. I saw in other reviews that this was par for the course, so you have been warned. After a quick repair and a bit of trimming, I was back in business. Also in “Step 3,” I found the fit of part 115 (the rear gun mount) to be a bit odd and would recommend leaving it off until the end of construction (if so, don’t solidly glue the gunner’s canopy in place).
The nose section was also assembled in “Step 3”. With careful dryfitting, everything went together nicely. I made sure that the nose section lined up properly with the fuselage section prior to the glue setting permanently.
 In “Step 4”
I replaced the overly thick front radiator flap (part 91) with a piece of sheet
styrene for a much improved scale appearance. “Step 4” was then completed per
the instructions.
In “Step 4”
I replaced the overly thick front radiator flap (part 91) with a piece of sheet
styrene for a much improved scale appearance. “Step 4” was then completed per
the instructions.
The Tricky Part: At this point I had a lower wing center section with interior, a fuselage, and a nose section. After these sub-assemblies were completely dry, I carefully assembled them PER THE INSTRUCTIONS. The sequence is very well detailed in the instructions. Slow down and take your time here!
In “Step 5,” deviating from the instructions and following my usual procedure, I glued the upper wings to the fuselage before gluing the upper and lower wing halves together (filler free seam every time). This left me with an excellent upper wing to fuselage fit. I did need putty where the lower outboard wing sections met the lower inboard section but this was much easier to fill and sand than the wing roots.
After completing “Step 5,” I departed from the instruction sequence, leaving the landing gear, prop and armament off until after the airframe was painted, decaled and weathered. In preparation for paint, I glued the Flettner rods (parts 89, 90 & 97) and the non-moving canopy sections (parts 130 and 151) to the airframe. I also tacked the gunner’s canopy in place with a few drops of white glue and masked off the open cockpit with thin cardboard pieces. The clear parts were dipped in Future prior to attachment. White glue was used to attach the canopy sections. Once dry, I masked the canopy using Tamiya tape and a new #11 blade. Sanding and final paint prep was then completed!
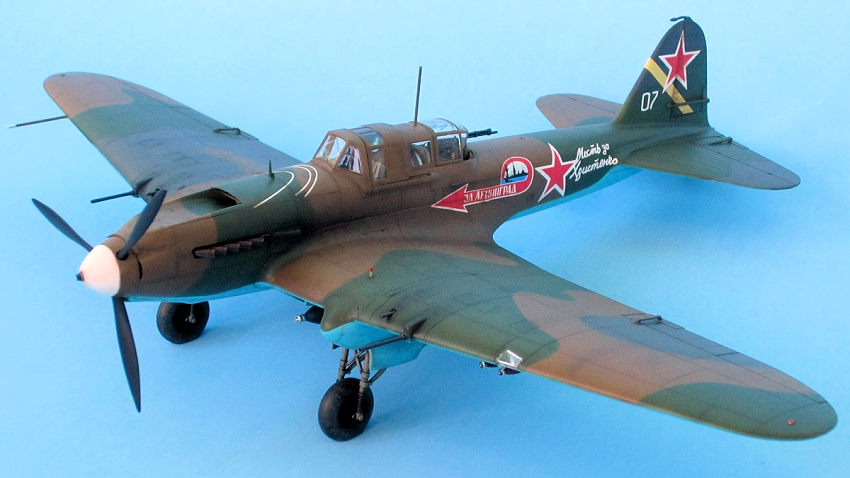
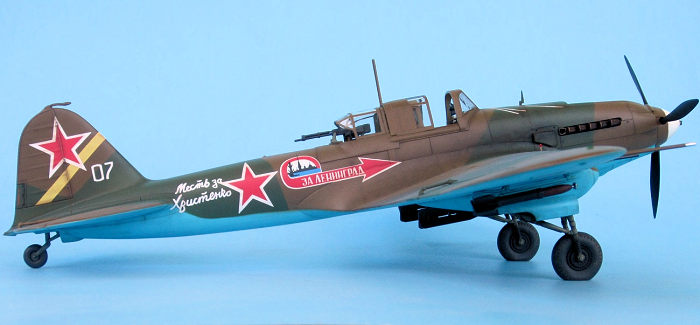
| COLORS & MARKINGS |
The airplane depicted in
this kit was from the 566 ShAP (Battle Regiment) on the Leningrad (St.
Petersburg) front in the summer of 1944. The instructions call out earth brown
(FS30219), dark green (FS34102) and dark gray (FS36081) over underside blue
(FS35414). I used Polly Scale acrylics and pre-shaded the colors for the
airframe. I masked between the colors with thinly rolled snakes of kneaded
eraser. I then applied a thick coat of rubber cement over the color I was
protecting. This technique is m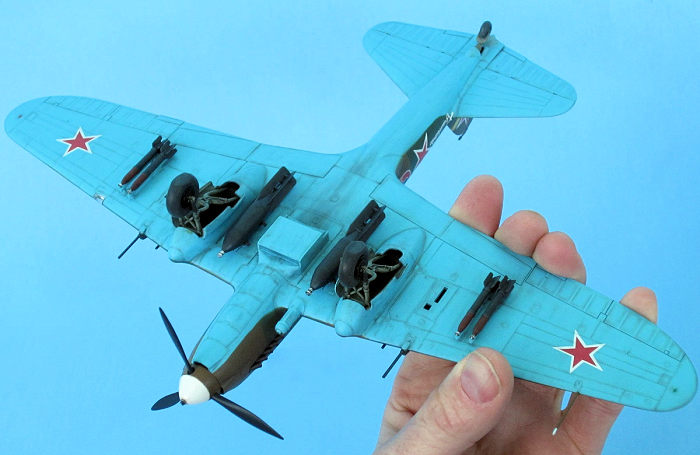 uch
faster for me than cutting paper/tape masks and keeps out paint better than any
method I have previously tried. Once the paint was dry, the rubber cement peeled
right off. I had no ill effects due to the rubber cement reacting with the
underlying acrylic paints or peeling them off.
uch
faster for me than cutting paper/tape masks and keeps out paint better than any
method I have previously tried. Once the paint was dry, the rubber cement peeled
right off. I had no ill effects due to the rubber cement reacting with the
underlying acrylic paints or peeling them off.
Next, I used pastels to emphasize the panel lines and dirty the airframe a bit. These planes saw hard use, but they weren’t around long enough to get too weathered. I then sealed everything with a coat of Future in preparation for decals.
The kit markings went down beautifully. I wetted the area receiving the decals with Micro Set. Once in position, the decals responded well to an application of Micro Sol. After weathering the decals, I gave the plane a final semi-gloss clear coat.
The landing gear and other fiddly bits were added at this time. All gun barrels were drilled out with a pin vice. To get the sliding section of the pilot’s canopy to sit correctly, I had to thin the inside rear and lower edges significantly. I left the gunner’s canopy section loose to display the kit with it on or off as was often done in summer months. Final touchups, weathering and detailing were then completed.
| CONCLUSIONS |
I am very happy with the
end result and the finished kit looks tough on the shelf. This is still a really
nice kit. With a little patience, dryfitting, and careful reading of the
instructions, it turns out great. The ne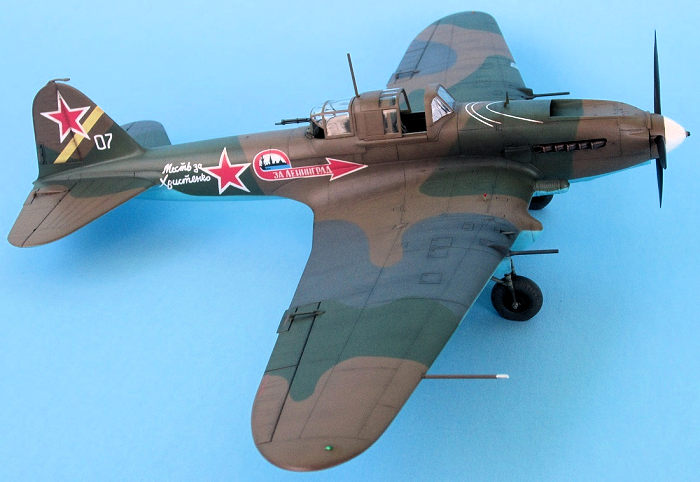 wer
Tamiya kit has some finer detail in places, but you will have to look really
closely to see it. Tamiya’s IL-2m3 may also be a bit easier construction-wise,
but it is a matter of degree due to the inherent complexity of the IL-2’s engine
intake. As far as accuracy, the nose profile of the Accurate Miniatures
Stormovik is slightly flatter on top than that of the Tamiya. It is hard to tell
looking at photos of the actual aircraft which is more correct. I like the
comprehensive painting instructions of the Accurate Miniatures IL-2 far better
than the Tamiya painting instructions.
wer
Tamiya kit has some finer detail in places, but you will have to look really
closely to see it. Tamiya’s IL-2m3 may also be a bit easier construction-wise,
but it is a matter of degree due to the inherent complexity of the IL-2’s engine
intake. As far as accuracy, the nose profile of the Accurate Miniatures
Stormovik is slightly flatter on top than that of the Tamiya. It is hard to tell
looking at photos of the actual aircraft which is more correct. I like the
comprehensive painting instructions of the Accurate Miniatures IL-2 far better
than the Tamiya painting instructions.
Finally, the Accurate Miniatures kit is still readily available for a fraction of the cost of the Tamiya IL-2m3 (I paid $15 for mine). If you only build the latest and greatest then the Tamiya Stormovik is your bird. If you want a great model of this tough looking and historically significant aircraft at a reasonable price then the Accurate Miniatures IL-2m3 is a real contender. I look forward to building my Accurate Miniatures IL-2 single-seater. Recommended!
If you would like your product reviewed fairly and fairly quickly, please contact the editor or see other details in the Note to Contributors.
Back to the Main Page Back to the Review Index Page Back to the Previews Index Page