Pacific Coast Models 1/32 Ta-152C-0
| KIT #: | 32014 |
| PRICE: | $69.95 MSRP |
| DECALS: | Three options |
| REVIEWER: | Tom Cleaver |
| NOTES: | Short Run |
| HISTORY |
The Focke‑Wulf Fw‑190 had been plagued from the outset with a lack of
high altitude performance, a situation that led to the continued development of
the Bf‑109 series past its development peak, due to the fact it had outstanding
high altitude performance, which became more and more necessary as the Eighth
Air Force increased in size and effectiveness with its high altitude daylight
assault on Germany.
 The Dora‑9, powered by the Junkers Jumo 213A ‑ a bomber engine ‑ went
some distance in solving the problem of high altitude performance, but the
airplane still lost power above 25,000 feet, which was just the altitude the
B‑17s and B‑24s came in at.
The Dora‑9, powered by the Junkers Jumo 213A ‑ a bomber engine ‑ went
some distance in solving the problem of high altitude performance, but the
airplane still lost power above 25,000 feet, which was just the altitude the
B‑17s and B‑24s came in at.
Tank argued continually with the Reichluftfartministerium (RLM) to
be allowed to put a Daimler‑Benz DB603 series engine in the Jumo‑powered
airframe, convinced that such a powerplant would provide the high altitude
performance so needed. Tank's success with the high‑altitude Ta‑152H ‑ the first
of the series that carried its designer's name in its designation ‑ which was
powered by the Jumo 213E, demonstrated that he was on the right track.
Finally, in August 1944, following the failure of the Ta‑152B program,
permission was granted to adapt the Ta‑152B airframe to the DB603 series engine.
Tank made a maximum effort to bring the new type forward, utilizing as much of
the B‑series airframe as possible. Plans were afoot to commence production
deliveries from the Roland Group by April 1945.
Two Fw‑190D prototypes were modified with DB603L engines as the
Fw‑190V20/U1 and Fw‑190V21/U1; unfortunately, the V20 was destroyed in an air
raid on August 5, 1944. The V21 first flew on
The Ta‑152C-0/V6, powered by
a DB603LA engine, was otherwise similar to the Fw‑190V21, and made its first
flight on  yro
gunsight, was the development prototype of the Ta‑152C‑1, and flew on
yro
gunsight, was the development prototype of the Ta‑152C‑1, and flew on
The V6 and V8 were powered by the DB603L, while the V7 was powered by the
DB603EM, which offered 1,800 h.p. at takeoff, boosted to 2,250 h.p. with MW50,
an improvement of 150 h.p. in both categories over the DB603L. The V7 was the
fastest of the three prototypes with a sea level maximum speed of 342 mph and
370 mph without and with MW50, though at higher altitudes the DB603L provided
substantially better performance.
Unfortunately, both the DB603EM and the DB603L required 96 octane C3
fuel, which was becoming harder to get hold of in 1945 Germany; as a result, it
was decided that the production aircraft would be powered by the DB603LA, since
this engine could use both 87 octane B4 or the higher‑octane C3.
The production versions would have been the Ta‑152C‑1 and Ta‑152C‑3, with
the latter substituting a 30mm MK103 for the MK108, with all equipped with the
R11 all‑weather equipment fit.
By the spring of 1945, however, Western and Soviet forces were sweeping
into 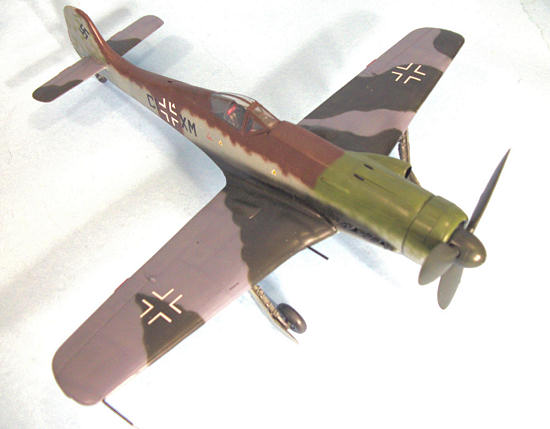 for
development. The factories where the Ta‑152C was to be produced were still at
the component production stage when their assembly lines were overrun.
for
development. The factories where the Ta‑152C was to be produced were still at
the component production stage when their assembly lines were overrun.
There can be little doubt that, had the war lasted into 1946, that the
Ta‑152C would have proven a worthy opponent to the Spitfire 22/24 and the P‑51H,
which were its closest Allied contemporaries.
Luftwaffe researcher Jerry Crandall has unearthed a Luftwaffe Quartermeister Report dated 20 April 1945, which shows two serviceable Ta 152 C‑1/R31s on strength with Stab JG 301 stationed at Welzow, Werke Nummern unknown. Unfortunately there are no known photos. At this late date, it is most likely these airplanes - if they were indeed there - were grounded due to lack of fuel. It is also likely they were not given any sort of unit markings in the last three weeks of the war. Allied personnel likely would have mistaken them for Fw-190D-9s after V-E Day, and their most likely disposition would have been the scrap heap with everything else Luftwaffe.
| THE KIT |
This is the first 1/32 scale Ta-152C released as an injection-molded kit.
Jerry Rutman did an all-resin Ta-152C that is reviewed here
http://modelingmadness.com/reviews/axis/cleaver/cleaver152.htm
For those modelers who complained that the  news
is that this kit has little if anything in common with that kit.
The engine plug looks nothing like the one supplied for the earlier kit;
I know nothing about the DB603 (and I doubt 99.999% of those reading this do
either), but given it is different, it is likely to be a representation of the
DB603. When finally assembled,
there is little of this to be seen, so those who suffer from “Luftwaffe
Hand-Wringing OCD” (a disorder now found in the DSM-VI) can rest easy here and
just build a model. The radiator is
also more accurate and looks OK when compared to the few existent photos of
Ta-152Cs. The kit provides a very
nice photoetch detail fret from Eduard that provides the instrument panel and
seat belts.
news
is that this kit has little if anything in common with that kit.
The engine plug looks nothing like the one supplied for the earlier kit;
I know nothing about the DB603 (and I doubt 99.999% of those reading this do
either), but given it is different, it is likely to be a representation of the
DB603. When finally assembled,
there is little of this to be seen, so those who suffer from “Luftwaffe
Hand-Wringing OCD” (a disorder now found in the DSM-VI) can rest easy here and
just build a model. The radiator is
also more accurate and looks OK when compared to the few existent photos of
Ta-152Cs. The kit provides a very
nice photoetch detail fret from Eduard that provides the instrument panel and
seat belts.
The kit provides markings for both the V6 and V7, as well as some “whiffer” markings for the (alleged) JG301 airplanes. However, the model builds up as the V7 only, because it only has the cowling for the supercharger associated with that airframe for the DB603EM engine; the V6 airframe had a slightly different, somewhat longer, supercharger cowling, which would probably also be what the Ta-152C-1 would have looked like.
| CONSTRUCTION |
This is a limited-run kit.
That said, it assembled easier than either the Ta-152H or the Fw-190A kits from
PCM.
 fuselage
together before inserting the cockpit, and ended up with it not quite seated
properly, so it has about a 2-3 degree “down” angle, which is noticeable with
the cockpit opened, which is why this is the only Fw-190 in the collection with
the canopy closed. Given it will be
on display at Planes of Fame later this year, it's a fault that won't be
noticeable, but those of you building for your own collection should be sure to
test-fit that cockpit - I think it needs a bit of “narrowing” towards the
forward end of the resin cockpit piece, to insure proper fit.
Test-fit twice before gluing once.
fuselage
together before inserting the cockpit, and ended up with it not quite seated
properly, so it has about a 2-3 degree “down” angle, which is noticeable with
the cockpit opened, which is why this is the only Fw-190 in the collection with
the canopy closed. Given it will be
on display at Planes of Fame later this year, it's a fault that won't be
noticeable, but those of you building for your own collection should be sure to
test-fit that cockpit - I think it needs a bit of “narrowing” towards the
forward end of the resin cockpit piece, to insure proper fit.
Test-fit twice before gluing once.
| COLORS & MARKINGS |
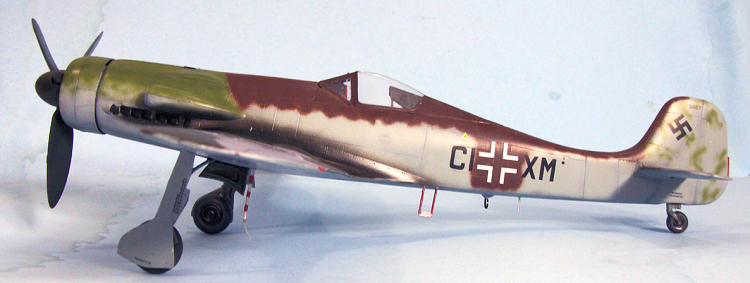
Nobody really knows what the colors were on the Ta-152C-V7, but they
could have been RLM81 and RLM83 on the fuselage, and RLM82 and RLM 75 on the
upper wings, with RLM76 on the lower surfaces.
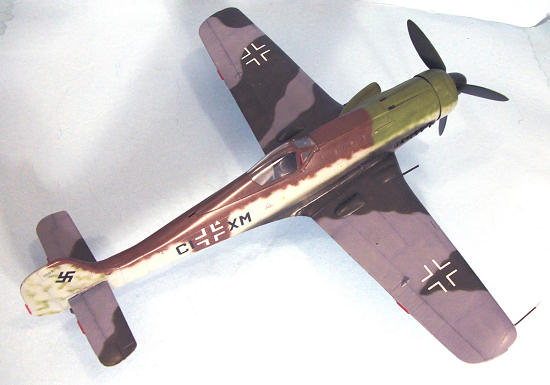
From the one well-known picture of this prototype, it is certain that the
upper wing lighter color did not “wrap around” on the lower forward surface.
It is also certain that the center sections of the lower surface were
left unpainted. Since this is a
colorful choice, it's how I did the model.
You could also paint it pink and chartreuse upper surfaces and no one
could disprove you, but the hand wringers would
 probably
be upset with you if you took it to a contest, even if they couldn't prove it
wrong. (That's a joke, hand wringers)
probably
be upset with you if you took it to a contest, even if they couldn't prove it
wrong. (That's a joke, hand wringers)
The kit decals were used.
They are very thin and easy to screw up, which I did with the fuselage crosses,
which I had to replace with decals from the dungeon.
Be very careful to let these fully detach from the backing, and use
plenty of water on the surface where they are being applied.
Once in position, mop up the water with tissue paper and then apply a
decal solvent. These finally went
down with a final application of Solvaset after using Micro-Sol.
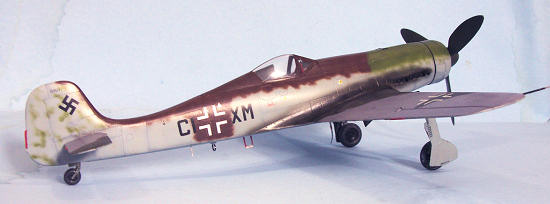
When everything was done, I washed off the solvent residue and gave the
model a coat of Xtracrylix “Flat” varnish, which is not completely flat out of
the bottle, a look I wanted for this.
| FINAL CONSTRUCTION |
| CONCLUSIONS |
Unless someone releases a 1/32 Fw-190 “Kangaruh,” this is my last 1/32
Fw-190, the collection is complete.
This is a very good kit, and any modeler with experience of doing at least one
limited-run kit successfully should have no problem creating a very nice model
from what's in the box. It's one of
the best kits I have seen from Pacific Coast Models, and highly recommended.
Copyright ModelingMadness.com. All rights reserved. No reproduction in any form without express permission from the editor.
If you would like your product reviewed fairly and fairly quickly, please contact the editor or see other details in the Note to Contributors.