Revell 1/32 Arado Ar-196A-3
|
KIT #: |
04688-0389 |
|
PRICE: |
Yen 5,600 SRP - Yen
3,920 (30% off!) At HLJ |
|
DECALS: |
Three Options |
|
REVIEWER: |
Tom Cleaver |
|
NOTES: |
|
Following Hitler’s decision to create the Wehrmacht, the
Kriegsmarine set out a requirement for a shipboard reconnaissance floatplane
that resulted in the Heinkel He-60 biplane.
Performance was lacking, and a 1935 request for submissions resulted in
the He-114, powered by the DB 600 engine.
Since supplies of this powerplant were limited, the Kriegsmarine
requested that Heinkel resubmit the airplane with a radial engine.
The performance of this version was not substantially better than the
He-60.
At this point, the process
was opened to other manufacturers.
 Designs were received from Dornier,
Gotha,
Arado and Focke‑Wulf.
With the
exception of the submission from Arado, all were traditional open cockpit
biplanes.
Arado’s monoplane Ar-196
was far superior to the competition, and four prototypes were ordered.
Two had single main floats with stabilizing floats below the wings, and
two had twin floats.
The twin-float
Ar-196A version was accepted, as being more stable on the open ocean.
Designs were received from Dornier,
Gotha,
Arado and Focke‑Wulf.
With the
exception of the submission from Arado, all were traditional open cockpit
biplanes.
Arado’s monoplane Ar-196
was far superior to the competition, and four prototypes were ordered.
Two had single main floats with stabilizing floats below the wings, and
two had twin floats.
The twin-float
Ar-196A version was accepted, as being more stable on the open ocean.
20 Ar-196A-1 versions were produced in the summer of 1939.
Production changed to the land-based Ar-196A-2 in November 1939.
This version featured increased armament of two 20mm cannon in the wings
and underwing shackles for two 50-kg bombs, in addition to the 7.62mm machine
gun in the forward fuselage and flexible 7.62mm weapon for the observer of the
Ar-196A-1.
In December 1940, the
Ar-196A-4 was introduced into production with a strengthened airframe, an
additional radio, and a VDM prop. The “mis-numbered” Ar-196A-3 entered
production in 1941, with additional airframe strengthening.
The Ar-196A-5 was the final production version, introduced in 1943.
Production ceased in 1944.
The Ar-196A was popular with pilots for its maneuverability and
sea-keeping, and was introduced to the coastal reconnaissance units as their
main aircraft.
The Ar-196A initially equipped Bordfliegerstaffeln 1./196 and
5./196, with first airplane going aboard
Admiral Graf Spee in August
1939 just before the pocket battleship left Kiel a week before the outbreak of
war, to take up position in the South Atlantic as a raider.
The Arado was used for spotting targets of opportunity, but was damaged
before the
Battle
of the River Plate.
 In the spring of 1940, 1.Kustenfliegergruppe 706 was formed with
Ar-196s and He-115s.
On
May 5, 1940,
two Ar-196A-2s of this unit captured the submarine HMS Seal, operating in
the
Kattegat.
In April 1941, four Ar-196A-4s of
Bordfliegerstaffel 1./196
went aboard the battleship
Bismarck
before her ill-fated mission into the north
Atlantic.
Two were launched to drive away shadowing Catalina flying boats during
the mission, but were unrecoverable in the wintry seas of the
Denmark Strait.
Bordfliegerstaffel 5./196 was based on the Biscay coast operating
out of
Bordeaux
in 1941-42, assigned to hunt RAF Whitley bombers of Coastal Command that
patrolled the routes the U-boats used to enter and leave their bases.
The Ar-196s were so successful that Coastal Command was forced to replace
the Whitleys with Beaufighters.
Ar-196s also operated be See Aufklarungsstaffeln in Norway and the Black
Sea, as well as the
Aegean Sea.
Ar-196s were also operated by the Romanian and Bulgarian Air Forces in
the Black Sea region, the only use of the aircraft by foreign air forces.
In the spring of 1940, 1.Kustenfliegergruppe 706 was formed with
Ar-196s and He-115s.
On
May 5, 1940,
two Ar-196A-2s of this unit captured the submarine HMS Seal, operating in
the
Kattegat.
In April 1941, four Ar-196A-4s of
Bordfliegerstaffel 1./196
went aboard the battleship
Bismarck
before her ill-fated mission into the north
Atlantic.
Two were launched to drive away shadowing Catalina flying boats during
the mission, but were unrecoverable in the wintry seas of the
Denmark Strait.
Bordfliegerstaffel 5./196 was based on the Biscay coast operating
out of
Bordeaux
in 1941-42, assigned to hunt RAF Whitley bombers of Coastal Command that
patrolled the routes the U-boats used to enter and leave their bases.
The Ar-196s were so successful that Coastal Command was forced to replace
the Whitleys with Beaufighters.
Ar-196s also operated be See Aufklarungsstaffeln in Norway and the Black
Sea, as well as the
Aegean Sea.
Ar-196s were also operated by the Romanian and Bulgarian Air Forces in
the Black Sea region, the only use of the aircraft by foreign air forces.
At least 3 Ar 196As survived the war.
One is now displayed in the
Maritime
Museum
at
Varna,
Bulgaria;
one is at
the Smithsonian
Institution, and one was at
Willow Grove
Naval Station in
Pennsylvania.
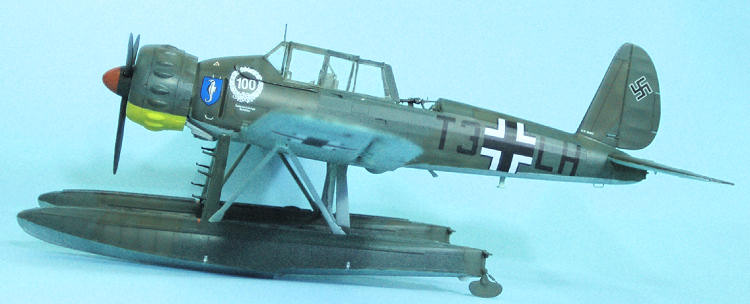
This is the second Ar-196A kit in this scale (the first being the HPM
all-resin/very-expensive kit released a year before this kit), and makes up into
the “classic” Ar-196A-3.
The first
Ar-196A (that I am aware of) was a 1/72 kit released by Airfix back in the late
1960s.
HiPM and MPM both released
1/48 kits of the airplane.
This kit
leaves all others in the dust.
The
surface detail is superb, and the kit provides a fully-detailed cockpit and an
engine with accessories section.
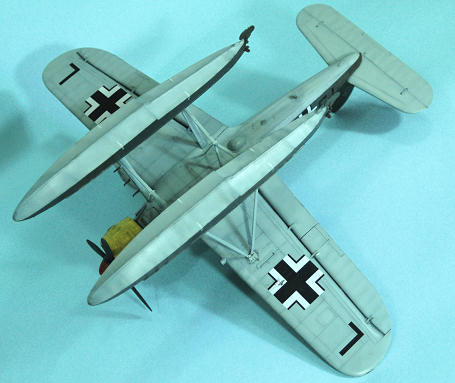
The model can be assembled with wings folded or extended.
Decals are provided for three different aircraft.
 Much has been made of what a bargain this kit is, given that its sale
price is around $40.
However,
there is the old saying “you get what you pay for,” and in fact it is pretty
obvious once you get into the project that it was very definitely “produced
at a price.”
Fit is not as good
as one might initially expect.
As with many kits that come with dropped flaps, wings that can be folded,
and open engines, it turns out that the kit is best built in the “opened up”
option, since the lack of good overall fit is much less obvious in that
configuration.
Thus, if one
opts to extend the wings or close up the cowling, things become “fiddly.”
Much has been made of what a bargain this kit is, given that its sale
price is around $40.
However,
there is the old saying “you get what you pay for,” and in fact it is pretty
obvious once you get into the project that it was very definitely “produced
at a price.”
Fit is not as good
as one might initially expect.
As with many kits that come with dropped flaps, wings that can be folded,
and open engines, it turns out that the kit is best built in the “opened up”
option, since the lack of good overall fit is much less obvious in that
configuration.
Thus, if one
opts to extend the wings or close up the cowling, things become “fiddly.”
I built the model as sub-assemblies, starting with the wings and the
pontoons, then working on the fuselage.
I pre-painted everything in the cockpit.
There are no instrument decals provided, so I used the AirScale 1/32
Luftwaffe Instruments decal sheet.
The kit does not provide seatbelts, rather molding some inaccurate belts into
the pilot’s seat and the observer’s seat.
Since the model was not going to a show but rather out to the Planes of
Fame Museum, I decided to live with the seatbelts and painted them after
painting all the overall interior in Xtracrylix RLM02.
I painted other detail in the cockpit per the instructions (I really hate
Revell “instructions” - they should be called “the guessing game,” since that is
what you spend a lot of time doing).
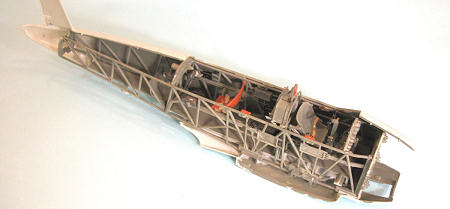
 There was some difficulty in installing the cockpit into the fuselage,
mostly due to my inability to decipher the vague instructions.
Once I had figured out the hard way what had to be where, things went
together easily.
It you start
assembling the cockpit interior by including the large section of structure
below the fuselage floor from the outset, things will come together much easier.
There was some difficulty in installing the cockpit into the fuselage,
mostly due to my inability to decipher the vague instructions.
Once I had figured out the hard way what had to be where, things went
together easily.
It you start
assembling the cockpit interior by including the large section of structure
below the fuselage floor from the outset, things will come together much easier.
Getting the cowling to close around the engine was “fiddly” in the
extreme.
I test-fitted, glued,
pulled loose and refitted all the interior structure twice and finally
discovered that the easy way was to put the formers onto the engine before
attaching anything else, then attaching the cowl panels, then attaching the rear
part worked best.
Even then things
did not go together all that smoothly, which became apparent when I painted the
model.
Oh well, it’s going to sit
behind glass at a minimum of 3 feet from the viewer, and no IPMS geek will ever
get his mitts on it, so all is as well as it gets.
If you plan to show this model at a show, you will need to spend more
time fitting things, and perhaps you will indeed want to display things opened
up.
The wings needed a bit of “urge” (i.e., pushing and shoving) to get them
to attach properly in the open position.
Warning: do not attach any of the small parts like the aileron
balances, the pitot tube, the steps on the float struts, or anything else like
that until you are in the final assembly stage after you have painted the model
and applied the decals.
These parts
are delicate and easy to knock off (ask me how I found out!).
I do not understand why Revell decided to make the canopy as they did.
This idiotic design is guaranteed to give you several opportunities to
get glue on the clear areas.
All I
can say is take your time and be very, very, very careful.
I assembled this closed up since there was no cockpit detail I was
anxious to display, and it will keep the dust out over the years out at the
museum.
With the airframe assembled and the pontoons assembled, it was time to
paint the thing.
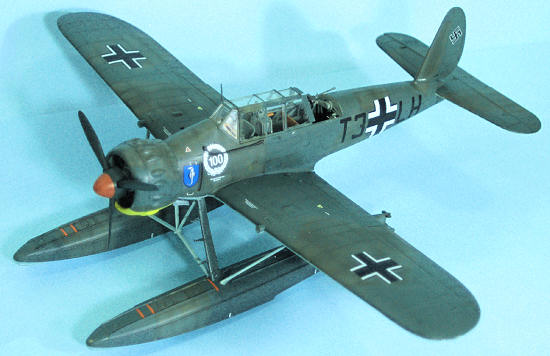
 I followed the kit painting profiles.
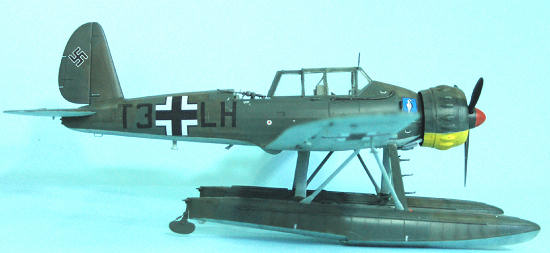
I used Tamiya “Light Blue” which is RLM65 Hellblau for the lower
surfaces.
For the upper surfaces, I
created RLM73 using Tamiya “Dark Green” (RLM71) with some
RAF
Ocean
Grey mixed in, while the RLM72 was created with Tamiya “Black Green” and
RAF
Ocean
Grey.
The lower cowling panel was
painted Tamiya “Flat Yellow” and the forward part of the prop spinner was
painted Gunze “German Red.”
The
prop and the rest of the spinner were painted Tamiya “Black Green.”
I followed the kit painting profiles.
I used Tamiya “Light Blue” which is RLM65 Hellblau for the lower
surfaces.
For the upper surfaces, I
created RLM73 using Tamiya “Dark Green” (RLM71) with some
RAF
Ocean
Grey mixed in, while the RLM72 was created with Tamiya “Black Green” and
RAF
Ocean
Grey.
The lower cowling panel was
painted Tamiya “Flat Yellow” and the forward part of the prop spinner was
painted Gunze “German Red.”
The
prop and the rest of the spinner were painted Tamiya “Black Green.”
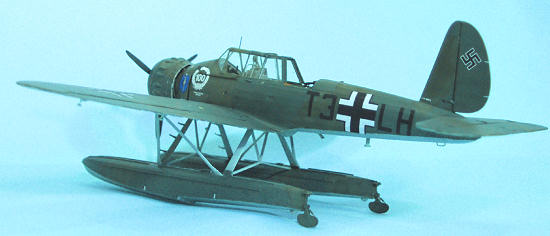
I used the kit decals to do the Ar-196A-3 that was based aboard the
Tirpitz, since the model will eventually be displayed on the HPM resin German
Navy catapult. The kit decals went down without problem, and I used a SuperScale
swastika decal to finish things off.
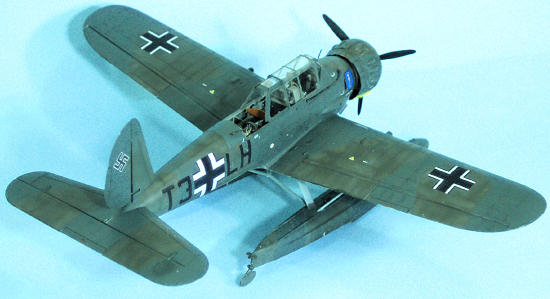
 I attached the floats.
There is a problem in doing this, because if you assemble the wing the fit
the wing root it will have a degree or so too much dihedral, which means the
outer float struts won’t easily attach in their designed location.
A bit of industrial-strength bending (just to the point of starting
to crack the upper seam) brought the wings into proper dihedral and all was
attached.
Again, if you do this
with the wings folded, this will not be a problem.
I attached the floats.
There is a problem in doing this, because if you assemble the wing the fit
the wing root it will have a degree or so too much dihedral, which means the
outer float struts won’t easily attach in their designed location.
A bit of industrial-strength bending (just to the point of starting
to crack the upper seam) brought the wings into proper dihedral and all was
attached.
Again, if you do this
with the wings folded, this will not be a problem.
I did very little weathering on this airplane, because the original
probably wasn’t flown that often, being based aboard Tirpitz, the German
battleship that never went anywhere.
Because it was aboard a battleship, where the Golden Rule (in any Navy)
is “if it moves, salute it, and if it doesn’t move, paint it,” these would have
been very well-maintained airplanes, since their crews had little else to do
with them.
If you like floatplanes, this is a wonderful kit.
It’s a whole lot cheaper than the resin 1/32 kit and a whole lot better
than the other Ar-196 kits in the other scales.
If you go into the project knowing it wasn’t designed and produced by
Tamiya and act accordingly, you’ll have a nice result.
It’s not a limited-run kit, but if you follow the rules for a limited-run
kit (test fit three times before gluing once), you’ll do well.
You’ll have a much easier time if you do it opened up with the wings
folded, but then you need to detail that accessories section if you don’t want
it to scream “half-built model” at the world.
Recommended for those who like models that aren’t found in the middle of
the beaten path.
Review kit
courtesy of HobbyLink
Japan:
order yours at
http://www.hlj.com/product/REV04688
Tom Cleaver
August 2011If you would like your product reviewed fairly and fairly quickly, please contact the editor or see other details in the
Note to
Contributors.
Back to the Main Page
Back to the Review
Index Page