| KIT: | Hasegawa 1/32 FW-190S-8 Conversion |
| KIT #: | ? |
| PRICE: | $45.00 MSRP |
| DECALS: | See Review |
| REVIEWER: | Tom Cleaver |
| NOTES: | UMI resin conversion $50.00 |
| HISTORY |
By 1943, the Schlachtgruppen were converting from the Ju-87 Stuka to the Fw-190 at the rate of one Gruppe every three weeks. There was concern that pilots might have difficulty converting from the slower Ju-87, with its non-retractable landing gear and lower overall performance to the high-performance Fw-190. As a result, the RLM directed Focke-Wulf to investigate the possibility of creating a two-seat conversion trainer.
The first of three aircraft designated Fw-190A-8/U1 flew without incident on January 23, 1944. The second seat for the instructor was installed in the area previously occupied by the radio equipment and GM1 tank, and had only rudimentary instrumentation. A long canopy covered both cockpits. All armament was deleted to save weight.
 Approximately 58
conversions were completed by the fighter school at Altenburg during 1944.
Sources state that these were mostly Fw-190A-5 aircraft, which would be logical,
since the older sub-type would have been relegated to second-line duties by
then. There are no photos of any of these airplanes that I am aware of, and the
only photos of 2-seat Fw-190s I have seen are all modified Fw-190A-8 airframes.
It is believed that in addition to these 58 aircraft, an unknown number of
war-weary airframes were also converted “in the field” by units equipped with
the Fw-190, where it was used as a high-speed liaison and hack. Whatever the
total number, it was probably less than 100. These conversions were known as
the Fw-190S (for “Schule”), with the designation S-5 or S-8 identifying
the original airframe type. While the original prototypes carried no armament,
and those created at Altenburg likely had no weapons, some of the later
conversions may have retained the upper fuselage machine guns, and could have
retained other armament. Some contemporary “hexperten” have questioned whether a
flying school could have been able to convert this many aircraft, but Altenburg
was a major school with a depot for repairing aircraft damaged in training, and
the Luftwaffe trained their ground crews to a much higher standard than did the
RAF or USAAF, so the technical skill and necessary equipment would certainly
have been available.
Approximately 58
conversions were completed by the fighter school at Altenburg during 1944.
Sources state that these were mostly Fw-190A-5 aircraft, which would be logical,
since the older sub-type would have been relegated to second-line duties by
then. There are no photos of any of these airplanes that I am aware of, and the
only photos of 2-seat Fw-190s I have seen are all modified Fw-190A-8 airframes.
It is believed that in addition to these 58 aircraft, an unknown number of
war-weary airframes were also converted “in the field” by units equipped with
the Fw-190, where it was used as a high-speed liaison and hack. Whatever the
total number, it was probably less than 100. These conversions were known as
the Fw-190S (for “Schule”), with the designation S-5 or S-8 identifying
the original airframe type. While the original prototypes carried no armament,
and those created at Altenburg likely had no weapons, some of the later
conversions may have retained the upper fuselage machine guns, and could have
retained other armament. Some contemporary “hexperten” have questioned whether a
flying school could have been able to convert this many aircraft, but Altenburg
was a major school with a depot for repairing aircraft damaged in training, and
the Luftwaffe trained their ground crews to a much higher standard than did the
RAF or USAAF, so the technical skill and necessary equipment would certainly
have been available.
As it turned out, the former Ju-87 pilots turned out to have little difficulty transitioning to the Fw-190, so there was little need for the converted trainers. My friend Hans Busch told me he trained for a few hours in a 2-seat Fw-190 before moving on to single-seater Focke-Wulfs in 1944 when KG 51 converted from the Ju-88 on to the Me-262, to get experience in flying high-performance single-seaters.
 Sources allege that the 58
known to have been converted at Altenburg were generally equipped with a “flat”
rear canopy, though there is no photographic evidence for this and the original
prototype had a “faceted” rear canopy to give the instructor some forward vision
out to the side. The only Fw-190S left in existence, an Fw-190S-8 which is on
display at the RAF Museum at Hendon, has flat rear panels. There are several
photos of Fw-190S-8s with faceted rear canopies, so this configuration was used.
Sources allege that the 58
known to have been converted at Altenburg were generally equipped with a “flat”
rear canopy, though there is no photographic evidence for this and the original
prototype had a “faceted” rear canopy to give the instructor some forward vision
out to the side. The only Fw-190S left in existence, an Fw-190S-8 which is on
display at the RAF Museum at Hendon, has flat rear panels. There are several
photos of Fw-190S-8s with faceted rear canopies, so this configuration was used.
As to markings, some of the conversions used at Altenburg likely had the triple-digit trainer identification numbers, but again I haven’t seen photos. The Fw-190S-8 at Hendon is in totally spurious markings for JG 54, a unit that likely never had one of these, and was not putting unit markings on its aircraft from mid-1944 to the end of the war. According to photographs, this aircraft had no markings other than national markings when it was surrendered to the RAF, and it had RAF markings over those when it was displayed at Farnborough with the Ta-152H-1 in 1946. Other photos of Fw-190S-8s are also similarly-plain, with only national markings. This would logically be what would have been done with a field conversion done by a squadron.
| THE KIT |
 I should note at the outset
of this review that I have had a role in the creation of this conversion set,
acting as the “cheerleader” who urged Dave Thompson of UMI Resins to proceed
with the project. This full-build review is a review of the test kit.
I should note at the outset
of this review that I have had a role in the creation of this conversion set,
acting as the “cheerleader” who urged Dave Thompson of UMI Resins to proceed
with the project. This full-build review is a review of the test kit.
There have been limited-run kits of the 2-seat Fw-190 in both 1/72 and 1/48 scale from MPM, but no one has come up with a 2-seat version in 1/32 scale prior to this conversion kit by UMI Resins.
The conversion is a “drop fit” that completely replaces the fuselage halves, and is made of a very high-quality resin with a surface almost indistinguishable from styrene, that takes paint with no problem. Resin parts are included for the rear cockpit, while the kit cockpit is used for the front seat. Vacuformed canopies with both the faceted and unfaceted rear canopies are provided, to be used in conjunction with the kit windscreen. The fuselage fits either the Hasegawa 1/32 Fw-190A-8 or A-5 kits.
| CONSTRUCTION |
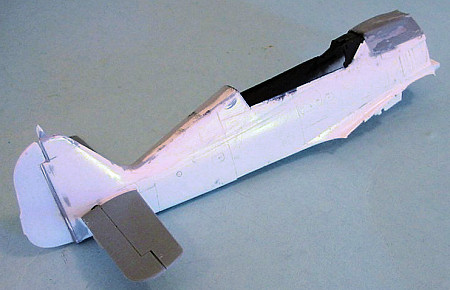
Assembly of this model is only slightly different from assembly of the standard
kit. The resin replacement fuselage halves are the same thickness as the
original kit parts. There is a requirement for the usual clean-up for resin
parts to insure the centerline is clean and to remove flash from other areas,
and the modeler should sand the inner surface of the solid rear fairings to
insure good fit. The rudder is separate.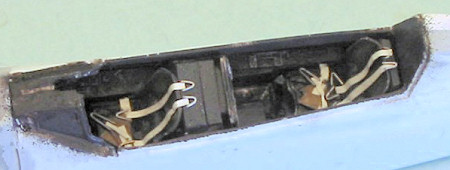
The fuselage is designed to be assembled before insertion of the cockpit, which slips in afterwards. I found the best way to assemble the fuselage was to start at the rear and glue the fuselage halves together as you move forward. Once the rear fuselage is glued together, the forward fuselage can be aligned and glued. I found it useful to attach the kit gun cover at this point to help align the forward fuselage and insure proper fit. I applied Mr. Surfacer to the fuselage centerline, and to a couple of places on the fuselage side to get the proper surface. This was nothing out of the ordinary for a “garage” kit and far less than most, a tribute to both the part design and the quality of the casting.
 I assembled the cockpits
together, then painted the entire thing with Xtracrylix RLM 66 Schwarzgrau,
then dry brushed it with aluminum to pop out detail, and used instrument decals
for both panels. I made the seat belts from lead foil taken from a wine bottle
(“hic! I’m not drinkin’ honey, it’s model supplies!”). The cockpit slipped into
position inside the fuselage without difficulty.
I assembled the cockpits
together, then painted the entire thing with Xtracrylix RLM 66 Schwarzgrau,
then dry brushed it with aluminum to pop out detail, and used instrument decals
for both panels. I made the seat belts from lead foil taken from a wine bottle
(“hic! I’m not drinkin’ honey, it’s model supplies!”). The cockpit slipped into
position inside the fuselage without difficulty.
The wings, tail surfaces, engine and cowling were assembled per the kit instructions. There was no problem in fitting these parts to the conversion fuselage.
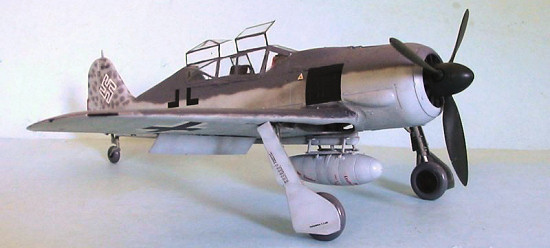
The canopy was a mystery at first. I wanted to pose it open, but the question
was - how did it open? William Green says the forward canopy hinged to the
right and the rear canopy slid open. However, looking at every photo of a
2-seater I could find, there was no rail for the rear canopy. Thus, both
probably hinged to the right, but again, how? Some modelers who have built the
MPM 1/48 kit have hinged the entire canopy, sim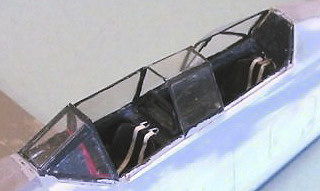 ilar
to the Erla Haube of a Bf-109. I thought this was wrong, because the
extended canopy needed additional stiffening, as did that of the Bf-109G-12, and
that made me pretty certain it had hinged like the G-12, with the right side
panels not moving. I finally found proof my guess was right at a walk-around
page at the Aircraft Resource Center that had close-up photographs of the Fw-190S
at Hendon
http://www.aircraftresourcecenter.com/AWA1/401‑500/walk448_Fw‑190S_MPTD/walk448.htm
. The photos of the canopies from the right side clearly showed a piano hinge
on the upper edge of the right side panel, proving that only the left side of
the canopy was raised, with the right side not moving, just like the
Bf-109G-12. Thank goodness for the internet!
ilar
to the Erla Haube of a Bf-109. I thought this was wrong, because the
extended canopy needed additional stiffening, as did that of the Bf-109G-12, and
that made me pretty certain it had hinged like the G-12, with the right side
panels not moving. I finally found proof my guess was right at a walk-around
page at the Aircraft Resource Center that had close-up photographs of the Fw-190S
at Hendon
http://www.aircraftresourcecenter.com/AWA1/401‑500/walk448_Fw‑190S_MPTD/walk448.htm
. The photos of the canopies from the right side clearly showed a piano hinge
on the upper edge of the right side panel, proving that only the left side of
the canopy was raised, with the right side not moving, just like the
Bf-109G-12. Thank goodness for the internet!
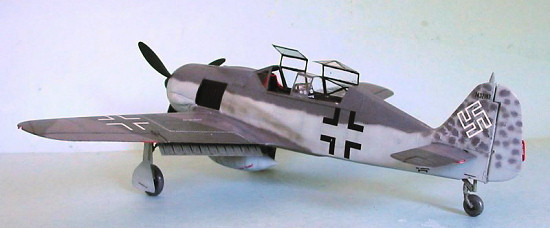
Once the mystery had been solved, I cut out the canopies, and then attached the vacuform canopy to the fuselage. Fit was excellent. With this done, it was time to proceed with painting.
| COLORS AND MARKINGS |
Painting:
There are only a very few contemporary photos of the 2-seater, and the question
of how they were painted is not clear. I took one photo of a faceted-canopy
conversion, and decided to base my “best-guesses” on what I could discern. The
upper fuselage  color seems to be
one shade. Given that after the fall of 1944 RLM 74 was not used, I guessed
that the color was most likely RLM 75, since tonally in this black and white
photo it was a lighter color. While the upper surfaces of wings and tail can’t
be seen in the photo, my next guess was that since these were field conversions,
the only part of the airplane that would have been repainted would be the
fuselage. Since these were likely to be war-weary airframes, I guessed that the
RLM 74/75 upper surface camouflage was faded and worn. I also noted that the
spinner and prop blades were the same tonal shade, and so guessed this would be
overall RLM 70 Schwarzgrun.
color seems to be
one shade. Given that after the fall of 1944 RLM 74 was not used, I guessed
that the color was most likely RLM 75, since tonally in this black and white
photo it was a lighter color. While the upper surfaces of wings and tail can’t
be seen in the photo, my next guess was that since these were field conversions,
the only part of the airplane that would have been repainted would be the
fuselage. Since these were likely to be war-weary airframes, I guessed that the
RLM 74/75 upper surface camouflage was faded and worn. I also noted that the
spinner and prop blades were the same tonal shade, and so guessed this would be
overall RLM 70 Schwarzgrun.
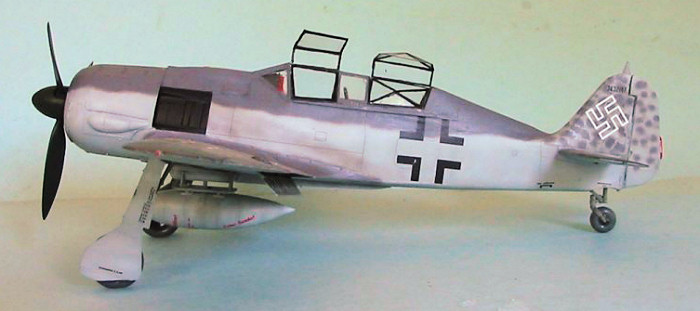
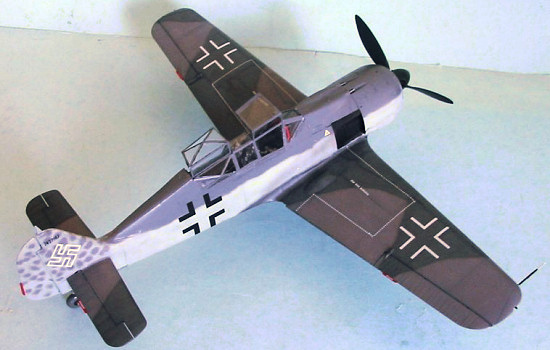
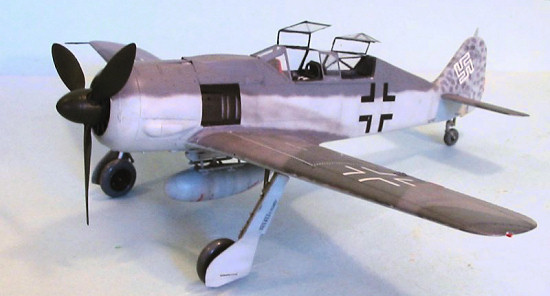
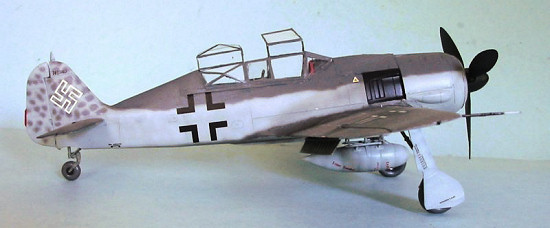
I used Xtracrylix paints for all of this, after first “pre-shading” the model by airbrushing black over the panel lines. The lower surfaces were painted RLM 76, lightened with white to simulate fading. The upper fuselage was painted with “fresh” RLM 75. The vertical fin and rudder were mottled with “fresh” RLM 75. The upper surfaces of the wings and horizontal stabilizer were done with “faded” RLM 75, which had light grey and a bit of red added to do the “color shift” this paint experienced at high altitudes in Europe. The “faded” RLM 74 was done by adding in a little RLM 02 to give a “green shift” to the color. The wheel wells and landing gear were all painted with RLM 02 with the detail “popped out” with a coat of Tamiya “Smoke”.
Decals:
While some of these airplanes might have carried 3-digit Schule numbers,
particularly those at Altenburg, the most likely event is that those converted
at the unit level carried no unit markings whatsoever. They were field
conversions done during the last year of the war, when fewer and fewer airplanes
carried any unit markings, with the fuselages overpainted after the conversion
 work was done. The photograph
I was using for reference shows the airplane to be unmarked other than national
markings, with an oversized “open” black cross on the fuselage - which
demonstrates this was no “factory” or even “depot” conversion - and a white
“outline” swastika on the vertical fin. No insignia can be distinguished on the
wings, but my best guess is these would have been the original crosses - “open”
white outline crosses on the upper surfaces and “white border” black crosses on
the lower surfaces. I also guessed there would be no markings other than fuel
triangles and stencils on the lower area on the fuselage after the repaint,
while the wings and tail surfaces would retain their stencil markings. All of
this was done by piecing things together from the kit decal sheet and the decal
dungeon for the fuselage cross and “outline” swastika.
work was done. The photograph
I was using for reference shows the airplane to be unmarked other than national
markings, with an oversized “open” black cross on the fuselage - which
demonstrates this was no “factory” or even “depot” conversion - and a white
“outline” swastika on the vertical fin. No insignia can be distinguished on the
wings, but my best guess is these would have been the original crosses - “open”
white outline crosses on the upper surfaces and “white border” black crosses on
the lower surfaces. I also guessed there would be no markings other than fuel
triangles and stencils on the lower area on the fuselage after the repaint,
while the wings and tail surfaces would retain their stencil markings. All of
this was done by piecing things together from the kit decal sheet and the decal
dungeon for the fuselage cross and “outline” swastika.
Given the paucity of photographic information about these airplanes, a modeler is left with making a “best guess” about what a particular airplane would have looked like, particularly those at Altenburg. MPM’s Fw-190S-5 kit shows the airplane with 3-digit numbers and a Schlactgruppen black triangle marking. I think this combination would be spurious, since they would not have taken the time for any sort of unit markings, though the identification numbers could have been applied during the repaint at the Altenburg depot. So far as what I have done here, this is all an “informed guess” based on my pretty extensive research over the years about how the Luftwaffe operated. And none of the “hexperten” can prove any of it wrong.
| FINAL BITS |
My reference photo shows a fairly clean airplane. I applied some exhaust stains to the fuselage, and some scuffing to the wing root on the left wing. I glued the canopies in the open position after attaching the landing gear and lowered flaps. Do be sure when you attach the lowered flaps to bend the attachment tabs so the flaps are not lowered so far, since what the kit provides is not right for the Fw-190.
| CONCLUSIONS |
 If you have never done a
resin conversion, this one is so easy you would have no problem making it your
first one. Many modelers are reluctant to trust their “carpentry skills” when it
comes to cutting up an expensive kit and fiddling other parts into place, which
isn’t necessary here. Quality of the resin parts is first-rate, and no cutting
or hacking is required, merely the replacement of the kit fuselage parts and
canopy with the conversion set, and the addition of the rear cockpit. I really
like having this one-of-a-kind (at the moment) model sitting next to my other
big Wurgers. This conversion is highly recommended for anyone who is a fan of
the Fw-190 series.
If you have never done a
resin conversion, this one is so easy you would have no problem making it your
first one. Many modelers are reluctant to trust their “carpentry skills” when it
comes to cutting up an expensive kit and fiddling other parts into place, which
isn’t necessary here. Quality of the resin parts is first-rate, and no cutting
or hacking is required, merely the replacement of the kit fuselage parts and
canopy with the conversion set, and the addition of the rear cockpit. I really
like having this one-of-a-kind (at the moment) model sitting next to my other
big Wurgers. This conversion is highly recommended for anyone who is a fan of
the Fw-190 series.
Ordering This Conversion:
Dave Thompson is not going to start production of this conversion set until he receives orders. Making an initial order does not require payment until the set goes into production and is ready for shipment (Dave will notify you), and orders will be filled in the order they were received. There will only be 100 of these sets made. You can contact Dave at UMI Resins umiresin@aol.com make your order.
June 2006
Conversion set and kit courtesy UMI Resin.
If you would like your product reviewed fairly and quickly by a site that has over 300,000 visitors a month, please contact me or see other details in the Note to Contributors.