Special Hobby 1/72 IMAM Ro 57
| KIT #: | SH72087 |
| PRICE: | $16.98 (14.96 at Squadron) |
| DECALS: | Two options |
| REVIEWER: | Brian Baker |
| NOTES: |
Nice kit of little known subject |
| HISTORY |
 Scott did an
“in-box” review of this kit some time back,
so you can refer to that for some of the historical information on this
aircraft. In 1939, the
I.M.A.M company designed and built a prototype of a light, twin engine
interceptor fighter powered by two 840 hp. Fiat A74 RC38 fourteen cylinder
radial engines. This was the
problem, as the airplane was underpowered, and could never function effectively
in its designated role due to its substandard performance, a problem faced by
many Italian fighters during this time period. After
its introduction into Regia Aeronautica units, it was modified with bomb racks,
heavier armament, and dive brakes, and it was somewhat more effective in the
fighter bomber role. Only about 60 were produced, and the type was never as well
known as other Italian combat aircraft.
Scott did an
“in-box” review of this kit some time back,
so you can refer to that for some of the historical information on this
aircraft. In 1939, the
I.M.A.M company designed and built a prototype of a light, twin engine
interceptor fighter powered by two 840 hp. Fiat A74 RC38 fourteen cylinder
radial engines. This was the
problem, as the airplane was underpowered, and could never function effectively
in its designated role due to its substandard performance, a problem faced by
many Italian fighters during this time period. After
its introduction into Regia Aeronautica units, it was modified with bomb racks,
heavier armament, and dive brakes, and it was somewhat more effective in the
fighter bomber role. Only about 60 were produced, and the type was never as well
known as other Italian combat aircraft.
| THE KIT |
There is no
date information anywhere in this kit, but reviews first appeared
in about 2005, so it is safe to assume that the kit dates back almost 10
years. At that time, Special Hobby
was producing kits of lesser-known aircraft, and this kit is a prime ex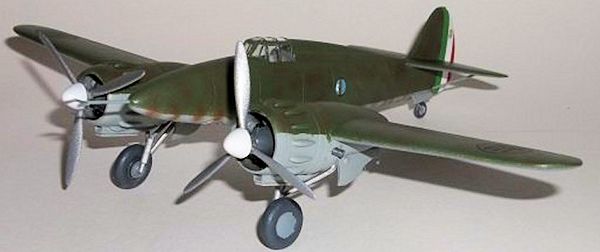 ample of
their successful efforts to produce limited-run kits that would appeal to the
discriminating experienced modeler.
ample of
their successful efforts to produce limited-run kits that would appeal to the
discriminating experienced modeler.
The kit
consists of 29 parts molded in grey plastic, two clear canopy and widow parts,
and 51 resin parts. Panel lines are recessed and crisp, not overdone like many
kits, and the resin parts are mostly well done.
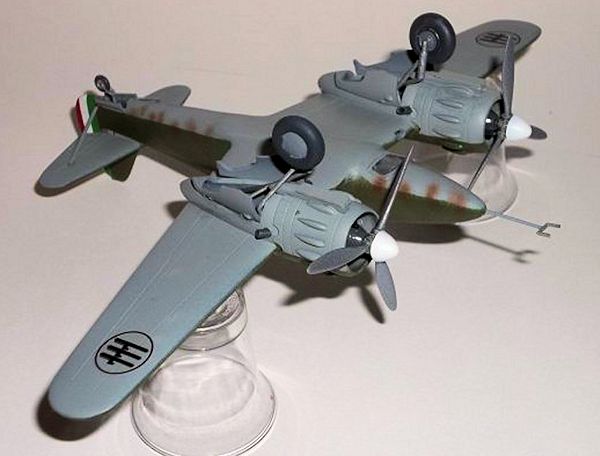
There is a full interior, but no sidewall detail. The landing gear is a
problem, as it took me a while to figure it out.
The propellers have resin hubs and plastic blades, and you have to be
careful, as they have opposite rotation.
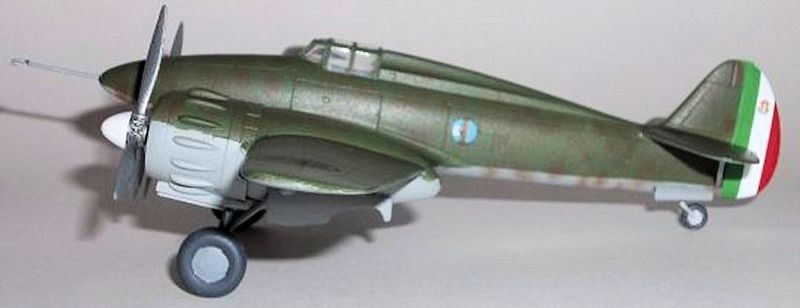
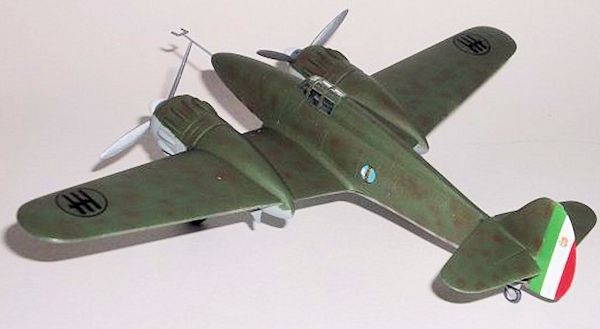
There are two decal options, the prototype, and
what is described as the “first serious production aircraft to be flight
tested”. It should be noted that
the fighter bomber version, designated Ro 57bis, was issued by Special Hobby as
a separate kit, SH72045, and it appears that this kit, although probably also
out of production, is also available on line from numerous suppliers.
 camouflage pattern, while
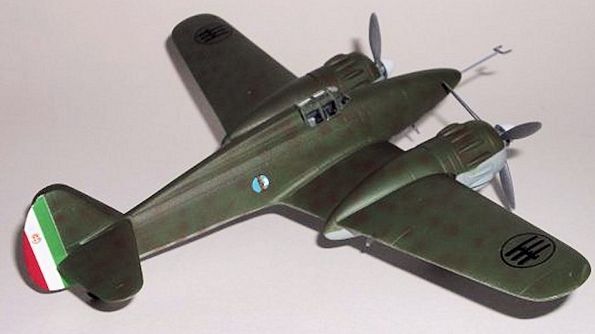
the test model is merely dark green on top.
Both aircraft have pale grey undersurfaces.
The prototype has the colorful tail stripes, while the test model has a
white fuselage band and tail cross. I built the prototype, as I like colorful
models.
camouflage pattern, while
the test model is merely dark green on top.
Both aircraft have pale grey undersurfaces.
The prototype has the colorful tail stripes, while the test model has a
white fuselage band and tail cross. I built the prototype, as I like colorful
models.
The instruction sheet consists of eight pages, beginning with a brief historical sketch in English and Czech, followed by a sprue diagram, color guide in Gunze Sangyo which was useless to me, four pages of assembly drawings, and two pages showing color schemes and markings for two aircraft. The drawings were generally good except for the confusion relating to the landing gear assembly. This consists of two rod-like units which attach to the main gear strut which has no other bracing. A drawing of the assembled unit would have been helful. Somehow, I figured it out without too many problems, although I must admit that I’d be afraid to fly an airplane with that type of gear. The color information on the four view drawings gave the name of the color in Czech, plus FS numbers and Gunze references. All were useless to me, so I used Modelmaster Italian olive green, Italian dark brown, and Italian blue-grey, and the model looks OK in those colors.
| CONSTRUCTION |
Assembly
begins with the cockpit interior. This is mainly resin, and should be painted
before assembly. There is some detail on the instrument panel, but I used some
printed instrument panel sheets I
keep on hand for the purpose. With the thick canopy, you can’t see much inside
anyway, so it’s no big deal. The
panel and the seat assembly can be installed after the fuselage halves are
joined. Only a little filler is
required on the fuselage joint lines.
The wings go together easily, and require only a little trimming on the
roots to get the proper dihedral angle.
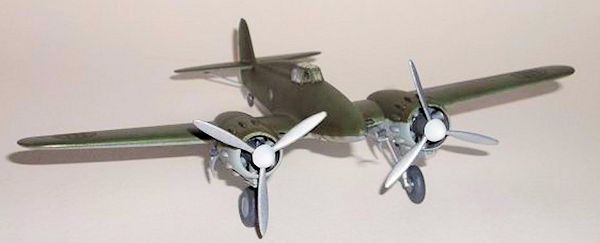
The engines
consist of a crankcase, fourteen individual resin cylinders, and resin propeller
hubs which contain three prop blades each.
These are opposite rotation, so be sure not to glue them in place with
the same rotation. The hubs are
only used on the prototype, as the production model used a base plate and
spinner, with the prop blades being glued to the base plates.
 The
cylinders fit into small holes in the crankcase in the usual fashion. I drilled
out the holes to make sure the cylinders would fit, and everything lines up OK.
The props will fit over the crankshaft located on the crankcase, so this is a
no-brainer. The resin cowlings fit
over the engines onto the wing nacelle sections, and the problem here is that
the nacelles are slightly too large, meaning that the cowling only go back so
far, about a foot less than they should.
This means that the cowlings are a foot (in scale) too far forward.
Correcting this problem seemed to be a little too complicated (you’d have to
sand down the nacelles on the wings) so I just accepted the problem and the
error. The cowlings are nicely
done, and they fit tightly in place, so I left it at that. The tailbracing
struts were very thin, with sprue attachment points in the middle, so I replaced
these with struts made of plastic rod.
Kit manufacturers could avoid this problem by having the sprue attachment
points on the strut ends, not in the middle.
The
cylinders fit into small holes in the crankcase in the usual fashion. I drilled
out the holes to make sure the cylinders would fit, and everything lines up OK.
The props will fit over the crankshaft located on the crankcase, so this is a
no-brainer. The resin cowlings fit
over the engines onto the wing nacelle sections, and the problem here is that
the nacelles are slightly too large, meaning that the cowling only go back so
far, about a foot less than they should.
This means that the cowlings are a foot (in scale) too far forward.
Correcting this problem seemed to be a little too complicated (you’d have to
sand down the nacelles on the wings) so I just accepted the problem and the
error. The cowlings are nicely
done, and they fit tightly in place, so I left it at that. The tailbracing
struts were very thin, with sprue attachment points in the middle, so I replaced
these with struts made of plastic rod.
Kit manufacturers could avoid this problem by having the sprue attachment
points on the strut ends, not in the middle.
| COLORS & MARKINGS |
| CONCLUSIONS |
If you would like your product reviewed fairly and fairly quickly, please contact the editor or see other details in the Note to Contributors.