Special Hobby 1/72 Fiat CR.25
| KIT #: | SH 72036 |
| PRICE: | €21.60 |
| DECALS: | Three options |
| REVIEWER: | Chris Busbridge |
| NOTES: | Listed as 'discontinued' on Hannants web site |
| HISTORY |
Please refer to Carmal Attard's
Airmodel Fiat Cr.25 article for historical
detail. One point not covered, but worthy of note, is the competition the
Cr.25 was pitched against during its initial design and development. One of
them was the infamous Breda Ba.88 Lince. The Regia Aeronautica inexplicably
ordered the Breda Ba.88 into production in preference to the Cr.25 because
of its higher top speed. When the Ba.88 was kitted out with all its
military gear, it was found to be a completely useless machine. Meanwhile,
173 Squadriglia, equipped with its modest force of Cr.25's, went on to have
a fine service record and was well liked by its crew.
| THE KIT |
 I bought Airmodel's 1/72 Fiat Cr.25 kit a while ago. Although I have built
vacform kits before, I just never got around to starting it. With this
Special Hobby release, I probably never will! This kit is well moulded,
with clean and evenly engraved panel lines. Fabric effect is nicely
rendered throughout. Internal detail is rather basic (no sidewall detail
for example). This is a shame as the cockpit canopy and nose glazing parts
are very clear and thin. A possible way around this is to purchase the
cockpit detail set from either ItalianKits or Alitaliane (other sets
available are replacement cowlings & u/c and posable elevator and rudder
parts). The decals are nicely printed and the instruction sheet is easy to
follow. The painting guide gives a fair description of the complex mottle
scheme, but it may pay to look elsewhere for better references. For a look
at what comes in the box, please
visit the preview.
Unfortunately, the very useful Ali d'Italia booklet is now out of print.
I bought Airmodel's 1/72 Fiat Cr.25 kit a while ago. Although I have built
vacform kits before, I just never got around to starting it. With this
Special Hobby release, I probably never will! This kit is well moulded,
with clean and evenly engraved panel lines. Fabric effect is nicely
rendered throughout. Internal detail is rather basic (no sidewall detail
for example). This is a shame as the cockpit canopy and nose glazing parts
are very clear and thin. A possible way around this is to purchase the
cockpit detail set from either ItalianKits or Alitaliane (other sets
available are replacement cowlings & u/c and posable elevator and rudder
parts). The decals are nicely printed and the instruction sheet is easy to
follow. The painting guide gives a fair description of the complex mottle
scheme, but it may pay to look elsewhere for better references. For a look
at what comes in the box, please
visit the preview.
Unfortunately, the very useful Ali d'Italia booklet is now out of print.
| CONSTRUCTION |
 With such a basic interior, the fuselage is quickly assembled. The cut out
in the fuselage for the nose glazing is a bit generous, so I shimmed it out
with strips of plasticard to get a better fit. All the other items such as
the wings and horizontal stabilizers fit without the need for putty. The
resin engines are a laborious process, as each cylinder has to be glued
onto the crankcase before being made ready to fit onto their wing fairings.
The engine cowls are the only items that
With such a basic interior, the fuselage is quickly assembled. The cut out
in the fuselage for the nose glazing is a bit generous, so I shimmed it out
with strips of plasticard to get a better fit. All the other items such as
the wings and horizontal stabilizers fit without the need for putty. The
resin engines are a laborious process, as each cylinder has to be glued
onto the crankcase before being made ready to fit onto their wing fairings.
The engine cowls are the only items that
spoil the show. The radius of the curved section around the cowling front
needs to be increased (and its aperture increased as well). Photo
references or Carmel's article will help when correcting this feature.
Another problem is the undercarriage. The legs are spaced too far apart
to get a snug fit onto each wheel or to capture each wheel. I carefully
removed the interlinking framework, made them about 0.5mm shorter in width,
then drilled small hole at the end of each leg to take a length of rod as
an axle. Only then could each leg be re-assembled and fitted into each
wheel well.
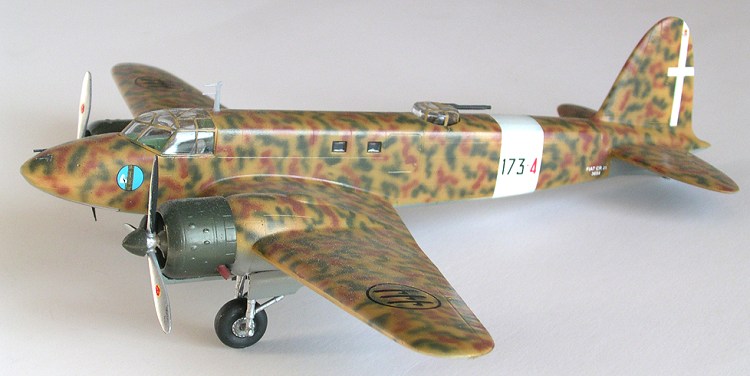
| COLORS & MARKINGS |
 With the main assembly complete and what little cockpit detail there was
dealt with, the rest of the glazing is installed and masked with Tamiya
tape. Grey primer is sprayed on and any flaws checked, which was hardly any
in this case. The lower surfaces where sprayed with Xtracolor X134, allowed
to dry and then a base coat sprayed on the upper surfaces for the mottle,
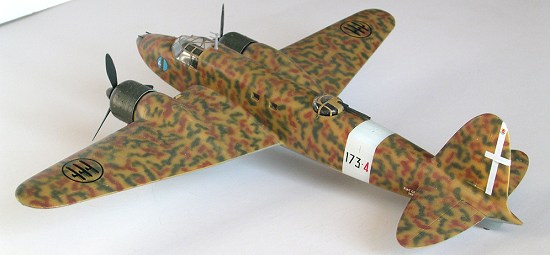
using Humbrol 63. The mottles are sprayed using Humbrol 149 for the Green
and 118 for the brown. Needless to say this was by far the most time
consuming and delicate process of the whole build. I had a good photograph
from which to match the scheme, which I did as closely as I could. This
allows me to tune into the mottle technique and then it carry over onto
areas hidden from view. All aircraft in this squadriglia sported a very
similar pattern. One variation is the cowlings. Most had yellow cowlings to
start with which, in most cases, were gradually over painted with Dark
Olive Green to reduce visibility. Anyone unable to contemplate tackling
such a
With the main assembly complete and what little cockpit detail there was
dealt with, the rest of the glazing is installed and masked with Tamiya
tape. Grey primer is sprayed on and any flaws checked, which was hardly any
in this case. The lower surfaces where sprayed with Xtracolor X134, allowed
to dry and then a base coat sprayed on the upper surfaces for the mottle,
using Humbrol 63. The mottles are sprayed using Humbrol 149 for the Green
and 118 for the brown. Needless to say this was by far the most time
consuming and delicate process of the whole build. I had a good photograph
from which to match the scheme, which I did as closely as I could. This
allows me to tune into the mottle technique and then it carry over onto
areas hidden from view. All aircraft in this squadriglia sported a very
similar pattern. One variation is the cowlings. Most had yellow cowlings to
start with which, in most cases, were gradually over painted with Dark
Olive Green to reduce visibility. Anyone unable to contemplate tackling
such a
complex scheme could try modelling earlier incarnations of this aircraft,
which included a civilian transport and a touring aircraft, each with
simpler plainer markings. No decals are known for these unfortunately.
When satisfied with the results, I prepared the model with Future before applying the decals, which worked fine. All that's left is to added the mid turret and nose guns as well as the mast and wheels.
| CONCLUSIONS |
 In summary, a seemingly easier build
than AirModels vacform kit, apart form the issue with the cowling shape and
undercarriage fit. Anyone who is a dab hand with an airbrush should find
this a very satisfying build. It is quite a good looking aircraft as well.
As Carmel states, ing. Rosatelli has borrowed a few design cues from his
larger creation, the Br.20. Anyone who has the Italeri kit should consider
building a Cr.25 to put alongside... just to compare!
In summary, a seemingly easier build
than AirModels vacform kit, apart form the issue with the cowling shape and
undercarriage fit. Anyone who is a dab hand with an airbrush should find
this a very satisfying build. It is quite a good looking aircraft as well.
As Carmel states, ing. Rosatelli has borrowed a few design cues from his
larger creation, the Br.20. Anyone who has the Italeri kit should consider
building a Cr.25 to put alongside... just to compare!
February 2005
Copyright ModelingMadness.com. ALl rights reserved. No reproduction in part or in whole without express permission.
If you would like your product reviewed fairly and fairly quickly, please contact the editor or see other details in the Note to Contributors.