
| KIT #: | 2676 |
| PRICE: | $55.00 |
| DECALS: | Four options |
| REVIEWER: | Andrew Garcia |
| NOTES: | Includes photo etch fret |
| HISTORY |
The Macchi C.200 Saetta, was a radial engine fighter (also identified as the MC.200) built by Aeronautica Macchi (Breda and SAI-Ambrosini as well) in Italy. It was used in various forms throughout the Regia Aeronautica (Italian Air Force). Its distinctive cowl used the Magni-NACA separate streamlined fairings for maximum speed with a distinctive copper surface front cowl oil cooler.
The MC.200 had excellent maneuverability and general flying characteristics left little to be desired. Stability in a high-speed dive was exceptional, but it was under armed with only two .50 cal fuselage mounted guns.
The first prototype (MM.336) C.200 flew on 24 December 1937. It was followed by the second prototype early the next year. During testing, the aircraft attained 805 km/h (500 mph) in a dive, although it could achieve only 500 km/h (310 mph) in level flight due to a lack of engine power. Nevertheless, this was better than the performance of the competing Fiat G.50, Reggiane Re.2000, A.U.T. 18, IMAM Ro.51, and Caproni-Vizzola F.5.
From the time Italy entered war on 10 June 1940, until
the armistice of 8 September 1943; the MC.200 flew more operational sorties than
any other Italian aircraft. The Saetta ranged over Greece, North Africa,
Yugoslavia, across the Mediterranean and Russia. Its very strong all-metal
construction and air-cooled
 engine made the aircraft ideal for ground attack and
several units flew it as a fighter-bomber. Over 1,000 were built by the time the
war ended.
engine made the aircraft ideal for ground attack and
several units flew it as a fighter-bomber. Over 1,000 were built by the time the
war ended.
The Saetta underwent very few modifications during its service life. The most visible change was to its canopy. It started out with an enclosed canopy then switched to an open canopy. Later aircraft were fitted with an upgraded radio and an armored seat. Some late-production Saettas were built with the MC.202 Serie VII wing, thus adding two 7.7 mm (.303 in) Breda-SAFAT machine guns to the armament.
The five versions of the C.200 were:
M.C. 200 (prototypes) - Two prototypes fitted with the 840 hp Fiat a.74 RC 38 radial piston engine.
M.C. 200 - Single-seat interceptor fighter, fighter-bomber aircraft. This was the general production version. There were “serie” modifications so use a reference photo because the use of prop spinners or no spinner, covered and open canopy’s and a mass balance vertical tail versus a straight tail surface, radios and no-radios, two types of props, and even some wing guns when the C.202 wing was used on final production variants all come under this “general production” version nomenclature.
M.C.200bis - Breda-proposed modification with a Piaggio P.XIX R.C.45 engine producing 1,180 hp. His aircraft was a conversion from an early production C.200. It did not enter production as the C.200 had been replaced by more advanced designs such as the C.202/205.
M.C.200AS – this was an adapted version for North African Campaign featuring an underside oil cooler in addition to the cowl ring cooler..
M.C.200CB – the fighter-bomber version capable of carrying 710 lbs of bombs or two external fuel tanks as a fighter escort for supply transports.
The Saetta was to have been replaced outright by the C.202 after only one year in production, but the C.200's service life was extended because Alfa Romeo could not produce enough of the RA.1000 (license-built DB 601) engines, and more C.200s were built using C.202 parts while waiting for production to increase.
| THE KIT |
Italeri released their MC.200 in June of 2010. As much as I like the MC.200 aircraft the price point for this model, a MSRP around $55.00 to $60.00, was beyond what I want to pay given I had several Classic Airframes and Special Hobby MC.200 releases in my stash. The reviews I did see were not overly complimentary.
Even when discounted or on sale it is in the $40.00 retail price range. I am not that price sensitive meaning if I want a kit I will buy it. I was discouraged from getting this kit when it was released solely due to its price point since the MC.200 was not of great modeling interest and I perceived it to be overpriced. What I have found is if it’s not a must have subject modelers will pass on buying it if the perceived price/value is not properly aligned. Unfortunately this can lead to missing out on enjoying a very nice kit.
 It is the first current era all styrene kit of this
subject in this scale if you don’t count the ancient SMER release. Despite what
I have read panning its lack of detail or overly done detail (thick recessed
panel lines or deep rivet holes) after building two other MC.200’s recently from
other manufacturers, I feel this kit has nice detailing throughout. The panel
lines and the rivet detail did not appear to be exaggerated as I had read from
some kit builder comments. The kit was an all new-tooling of the MC.200. Since
it was released in the last few years I expected quite a bit from it since the
state of art is now quite high for plastic models. The kit is a simple package
of plastic parts on two parts trees moulded in gray styrene, plus one small tree
with three clear parts, one small fret of photo-etch, and a small sheet of
decals.
It is the first current era all styrene kit of this
subject in this scale if you don’t count the ancient SMER release. Despite what
I have read panning its lack of detail or overly done detail (thick recessed
panel lines or deep rivet holes) after building two other MC.200’s recently from
other manufacturers, I feel this kit has nice detailing throughout. The panel
lines and the rivet detail did not appear to be exaggerated as I had read from
some kit builder comments. The kit was an all new-tooling of the MC.200. Since
it was released in the last few years I expected quite a bit from it since the
state of art is now quite high for plastic models. The kit is a simple package
of plastic parts on two parts trees moulded in gray styrene, plus one small tree
with three clear parts, one small fret of photo-etch, and a small sheet of
decals.
There were moments when I was building the kit that I thought the panel lines and other details were a bit too deep or too large compared to the finely recessed lines found in very recent U.S., British, Czech, Chinese and Japanese manufacturers plastic kits. There is a high degree of panel detail and rivets on this kit which I found quite nice but sometimes impressed me as being a bit too deep. I also found under a coat of paint they were not a problem. The finished kit did not suffer from any detraction caused by poorly done panel lines or rivet detail. The concerns I read from some other reviewers did not stand the actual hands on and close up building test. It is a nicely moulded kit.
Although the box art has a banner stating “Super Decals Sheet” I would not agree with that statement. The decal sheet is nice, providing four alternative schemes but it does not in my opinion make for a “super” sheet. Take a look at the SkyModels decal sheet for the MC.200 and that I would say is a “super decals sheet”. Italeri corrected this when they issued their second new-tooling MC.200 kit # 2711 removing the “super decal” claim from the box art.
The instructions are excellent. They are composed of photographs and well detailed explanations. The parts count is low and should be low for such a simple aircraft. The cockpit is nicely laid out and includes a photo-etched instrument panel as well as etched pilot's shoulder harness/restraints. The sidewalls have adequate detail but compared to the resin in the older Classic Airframes release it is not an improvement. In a sense it is adequate with a nice separate trim wheel but limited because the rest of the cockpit moulding is a little flat. More separate parts in this area could have provided a state of the art kit. The distinctive magnetic compass is missing or done so poorly I could not recognize it in the moulding. The gunsight is someone’s incorrect imagination of what the MC.200 gunsight should look like. This, the gunsight, was my only big disappointment in the cockpit area. There are so many other nice touches I can’t understand why a short cut was applied to the gunsight. No aftermarket surprisingly has appeared to fix this despite a few resin bits from Quickboost for other MC.200 components such as the exhaust, pitot, antenna and hollow tipped gun barrels.
A Pavla resin cockpit replacement will provide an improvement in this area. The view through that narrow cockpit opening is limited so this is not a deal breaker when it comes to buying the kit. I think Italeri put together the right blend of detail for your ability to see inside, even with a flashlight that would satisfy most modelers. The opportunity is there for improved detailing with a Pavla resin or some scratch building work if you like. I enjoy using resin cockpits but in some aircraft it just does not meet the must have requirement. The Italeri MC.200 is a borderline case when it comes to my using a resin cockpit replacement or not. Italeri’s inclusion of etched metal to dress up the cockpit area was a wise move and redeems the evaluation and overall score for the kits cockpit area.
The engine is very well done. The shape and separate
components provide a highly detailed engine including exhausts and push rod
tubes. After building the Classic Airframes and Special Hobby C.200 Saetta kits
this engine is a beauty and the best plastic FIAT A.74 RC 38 engine I have seen
to date. The prominent push rods are provided as separate items. Some have
commented in other reviews that it only lacks some photo-etched ignition wiring
to complete the look but I found in my review of museum aircraft
 close up
photographs the C.200 wiring shows it goes to the rear and not to the front into
a wiring harness. Thus it is not as prominent as in U.S. radial engine aircraft
and an etched part not required – especially one that goes to a front wiring
harness which would be wrong for this engine. Take a look at the Flying Machines
Fiat 1/48th G.50 which uses the same engine. The photo etch and instructions
correctly show the engine wiring comes from the rear of the engine in step one
of its assembly. For a nice engine comparison use the gold standard which would
be the Vector # 48007 Fiat A-74 engine for this aircraft. I will use a Vector #
48007 Fiat A-74 engine in a future build.
close up
photographs the C.200 wiring shows it goes to the rear and not to the front into
a wiring harness. Thus it is not as prominent as in U.S. radial engine aircraft
and an etched part not required – especially one that goes to a front wiring
harness which would be wrong for this engine. Take a look at the Flying Machines
Fiat 1/48th G.50 which uses the same engine. The photo etch and instructions
correctly show the engine wiring comes from the rear of the engine in step one
of its assembly. For a nice engine comparison use the gold standard which would
be the Vector # 48007 Fiat A-74 engine for this aircraft. I will use a Vector #
48007 Fiat A-74 engine in a future build.
The kit does provide the option of a separately molded cowling access panel. By leaving it off you can reveal the Fiat engine. Years ago I loved having this feature and we saw them frequently on Monogram and Revell kits. I no longer like this option. If or when I do want an exposed engine it is because a resin aftermarket replacement has such fantastic details that I am compelled to open up an engine area. As much as I love this kits plastic engine, opening up side panels is not what I would recommend doing to Italeri. I found the side panels created difficult to finish seams and caused extra gluing for a lesser final result. The addition of plastic NACA cowl bumps as separate items to accommodate the open cowl panel detracts from an otherwise nice cowl moulding.
There was one big plus for the Italeri cowl, Part number 15b, which is a small tab on the top of the cowl between the machine guns is there and correctly moulded. The part is either missing or not correctly represented on the Classic Airframes and Special Hobby kits so this was a pleasant surprise to find it separately moulded and correctly shaped.
The wing subassembly has an adequate main wheel well that captures some of the complex look of a MC.200’s rear engine accessory/main wheel well compared to the 'boxed-in' and flatly detailed wheel wells provided in most other MC.200 kits. If you look at close ups from actual aircraft or had the opportunity to put your head underneath this area in a museum aircraft you will quickly recognize the compromise made in 2D injection parts compared to the actual very busy 3D look of the C.200. There are some significant electrical wires and pneumatic hoses for example that are missing. Again, I would hope this would be the area some resin caster with superior abilities like Vector, Pavla, SBS or Aires could give us a big hand. This would be an ideal Quickboost part! This area much more than the cockpit is viewable due to the large wheel bay opening. Jaguar resin provided an MC.202 wheel bay for the Hasegawa kit years ago to address this area. Italeri did an adequate job by providing some essential details in a boxed in environment but I would like to see more here. See page 60 of the MMP reference for a color detail photograph.
The ailerons, elevators, and rudder are moulded separate, and the flaps are separately molded so they can be positioned up or down. Keep in mind the ailerons would also be deflected down with the flaps. Pavla resin set # 48037 provides replacement control surfaces to address this area if you desire to improve the details.
The main landing gear are quite nice. Compared to the other MC.200 alternatives it is a huge improvement due to the well engineered mounting slots and square gear leg end-pieces ensuring proper alignment and rake. They are well detailed and the main gear door mounting frames are rendered in photo-etch which will provide a solid mount of the doors to their respective struts while maintaining in scale thickness and accurate mounting fixtures. The combination of superbly moulded plastic and etched attachment points gives an excellent representation of the landing gear and doors. They way they are engineered should lead to correct placement and a superior end result especially compared to other alternatives. The wheels are quite nice as well. They have a weighted flattened bottom look and once painted and attached add to the models overall look.
The cockpit tub is a simple assembly. Once painted and the etched bits attached to the seat it goes into the fuselage halves. Although there are locator pins on the fuselage halves parts A14/A15, the fuselage halves were a challenge to line up and hold together. This might be caused by the large gap in the main gear area but after building the limited run alternatives I was looking for this to be a solid and trouble free join.
 The
engine mounts to the nose with a fool proof direction shaped mounting key
which is a huge improvement over the limited run kits. The wing and tail
surfaces all go together without any gaps and provide for flaps down
alternatives.
The
engine mounts to the nose with a fool proof direction shaped mounting key
which is a huge improvement over the limited run kits. The wing and tail
surfaces all go together without any gaps and provide for flaps down
alternatives.
Assembly is a simple build for the average modeler. This is a huge improvement over the time it takes to work the limited run kits. The etched metal parts are in just the right spots, the chains and harness for the seat and landing gear attachment points, to provide the level of thin detail only etched metal can do so there was some superior kit design on this aspect of the Italeri C.200 Saetta.
There are some areas where I was extremely pleased to see Italeri catch the shape and details such as in the clear light at the rear tip of the fuselage cone, various engine details, the two wing pitot tubes shape, and the nose surface oil cooler detail. The oil cooler even has rib detail on the inside of the cowl which are prominent features of the actual aircraft – kudos to Italeri for this inside detail moulding effort because it is visible and an accurate representation.
The propeller hub and backing plate are excellent and the kit includes the Macchi (Fiat) logo prop stencils which are the most common type on this aircraft. Thank you Italeri for releasing such nice details in a kit! The use of etched parts was superb – adding the right details to the right places – especially giving the two option cockpit instrument panel choices – either multiple layered etched with decal instrument dials or a well printed flat decal that gives you an adequately detailed cockpit out-of-the box (OOB). The armored headrest is delicately represented and missing in the other VII serie MC.200 models.
The shortcomings I initially noted while building the kit were the exhausts could have been moulded differently. They are comprised of two parts for each exhaust. Due to their small size and shape this causes a difficult to join and align process and the seams are hard to fix. This feeling was a reaction to the fiddly nature of the assembly process for the exhaust. Once they were dry and sanded with a flex-I-file they looked quite nice with thin walls and a realistic appearance that was far better than a thicker solid cast alternative. When I did the final painting Italeri won me over to complement them on this part – well done!
The engine cowl I would have preferred to be simpler using just a two part moulding – with a separate nose and no access panel one-piece cowl. The cowl has a separately provided, beautifully moulded front oil-cooler but getting the attachment points from the tree cleaned without damaging the small crevices on this part made me wonder if there is a better way to provide this part in plastic with attachments somewhere else to avoid the impossible to fix and very visible contact points that mar the welded seams. The multiple cowl parts and NACA blisters were an unnecessary enhancement and detracted from my finished kit. This added feature, the access panel, results in some unneeded distractions and hard to fix seams on the finished kit in terms of large seams or gaps to fix on the cowl. But, this might be necessary in order to provide the internal ribbing and attachment points for the engine which is a huge improvement over limited run alternatives.
I read a review of this kit where the reviewer disliked the kits plastic gun tubes and replaced them with metal tubes. Since there is a noticeable perforated air cooled tube jacket with a pronounced taper, I chose to drill out the machine gun opening (you can also buy the Quickboost # 48342 resin replacement gun barrels) and see how it looked. There is an amazingly detailed brass replacement from Master Models in Poland that is available but it does not have the flash extension with tapered tip. I wanted to see the OOB look on this build and with some drilling out of the tip and silver dry brushing on the cooling jacket I think it looks much better than a pair of hollow metal straight tubing replacements.
For the detail oriented, the wings and horizontal tail have a hinge cover separate from the fuselage (see page 58 in the MMP book for this detail). You can fix this with small thin pieces of styrene sheet. At the wing roots, the reinforcing plates actually cover the intersection of panel lines, so you might want to remove the molded detail and replace it with thin plastic stock. I chose not to on this OOB build.
I am not sure why Italeri noted 'Super Decals Sheet' for this kit. I expected a huge decal sheet the same size as the box when I opened it. Instead, I found a small sheet with four options. I guess that’s better than one option but it seemed to be commercial puffery which is not well liked by most modelers who buy a kit without looking at the inside contents. There was nothing wrong with the decals themselves – they are terrific, thinly printed, and a fine variety of alternatives were provided. The decals were well printed by Cartograph and look perfect.
The kit provides marking options for four aircraft; a C.200, 369a Squadriglia/22 Gruppo Autonomo CT, Russia, 1941; C.200, 365a Squadriglia Autonomo CT, Napoli, Italy, 1940; C.200, 85a Squadriglia/18 Gruppo, Araxos, Greece, 1942; and a
C.200 from 150 Gruppo Autonomo CT, Tirana, Albania, 1941. This covers many of the variations in camouflage and is a good selection. The only addition I would have liked is for some representatives of the North Africa based units airframes.
I was very pleased with Italeri on this kit. It is a huge improvement over existing kits and I feel Italeri has done a really nice job on this kit. It isn't over-engineered, nor are there any serious shortcuts taken either. Aside from expecting more from an Italeri kit at this price, I found the built kit gave me a lot of building pleasure and filled in a huge gap for Italian Regia Aeronautica modelers.
 There
are unfortunately very few available aftermarket decals for the C.200. Given it
was released a few years ago nothing seems to have materialized for new decal
releases for the MC.200 Saetta. There are some terrific looking and very
colorful color camouflage schemes that I would like to see. I
have the Sky Models 48-021 decal with 37 different C.200 options which Scott Van
Aken used on his Astro Kit build. I learned quite a bit about the C.200 versions
by closely examining the Sky Models decal profiles. It gave me some ideas for
future builds to get a complete set of all the versions of Macchi MC.200’s! I
miss Skydecals too – especially their providing marking alternatives for many
colorful Italian Regia Aeronautica aircraft! There is also an old AeroMaster
sheet, 48-154, with seven MC.200 options that are sure to delight that could go
onto this Italeri release as well.
There
are unfortunately very few available aftermarket decals for the C.200. Given it
was released a few years ago nothing seems to have materialized for new decal
releases for the MC.200 Saetta. There are some terrific looking and very
colorful color camouflage schemes that I would like to see. I
have the Sky Models 48-021 decal with 37 different C.200 options which Scott Van
Aken used on his Astro Kit build. I learned quite a bit about the C.200 versions
by closely examining the Sky Models decal profiles. It gave me some ideas for
future builds to get a complete set of all the versions of Macchi MC.200’s! I
miss Skydecals too – especially their providing marking alternatives for many
colorful Italian Regia Aeronautica aircraft! There is also an old AeroMaster
sheet, 48-154, with seven MC.200 options that are sure to delight that could go
onto this Italeri release as well.
Tauro Models has some recently released decal sheets which could enhance painting of the multi-layer camouflages for this aircraft, Tauro 48454 Smoke Rings Macchi style, Tauro 48455 Amoebas and Worms Breda Style and 48457 Italian Camouflage Breda Style 2 could be helpful for some of the complex camouflage used by the MC.200. Although some may not be MC.200 specific it looks like they could work on some Italian aircraft schemes where finer air brush work would not be enjoyable or attainable for most modelers.
There are some minor nits which I classify as not affecting my opinion of this kit but provided in the hope Italeri is reading this review. In this category as a nice to have request I would have liked to see included with their kit the prominent engine manufacturing detail data plate on the port side of the engine which would have been very nice if added to the decal sheet. Also a few more parts like the external oil coolers for tropical/North Africa versions, the larger MC.202/205 antenna mast, small prop spinner, rear wheel doors, 12.7mm Breda-SAFAT machine guns with a separate hollow flash tube extension (slide mould), and a separate gunsight would have made this kit a better value at its price point. In all other respects – this is a very fine kit. The additional parts I mention would have increased the number of versions you could get from this kit without aftermarket additions.
| CONSTRUCTION |
This is a very simple kit to build. Compared to the alternatives there isn’t much effort required to build this kit. I actually built two of them while waiting for the glued parts or paint to dry on my Classic Airframes and Special Hobby MC.200 builds. I did not have to use any of the metal pins or sanding that alternative kits required. After building the limited run kits I was looking for a boring exercise in assembly. Building the Italeri kit wasn’t boring and it was easy. Just follow the instructions and you will get a nice build.
I started the kit per the instructions which are easy to follow and very well done. It consists of fourteen steps starting with the easy to assemble cockpit. Step five has you inserting the completed cockpit tub and you are looking at a half finished kit within 48 hours of starting your build. The locator pins for the fuselage halves gave me some trouble. The joining of the fuselage parts did not impress me with the typical firm connection found in most kits but was easily overcome with patience.
I did not have a burning desire to add any aftermarket colored etched metal bits as I usually want to do since the kit parts gave me what I most needed.
The
wings connected to the fuselage without hesitation in a tight fit on the topside
portion of the connection. However, underneath where the fuselage and wing join
there is a gap. It looks familiar to those
 of us used to finding this on most
Hasegawa aircraft as well. At the juncture underneath the cockpit, where the
wing mates to the fuselage between the flaps, there is a gap. I filled it in by
cutting strips of Evergreen styrene and gluing them into the gap. Once dry I
used some Mr. Surfacer 500, sanded it and then applied Mr. Surfacer 1000 and
sanded again until it was smooth. There are some raised details in this area so
it was a laborious task to avoid losing this prominent detail. In
an effort to lessen the sanding task and maintain raised details I have tried
using Apoxie Sculpt and sanding but the styrene sheet alternative gave me a
better final look. Once dry Apoxie can be as hard as rock to sand. The styrene
with glue and Mr. Surfacer is more work but it also gave me a better invisible
seam. I found the same gap problem with both Italeri MC.200 versions, kits 2676
and # 2711, so it looks like a permanent moulding problem and not just a
building error on my part.
of us used to finding this on most
Hasegawa aircraft as well. At the juncture underneath the cockpit, where the
wing mates to the fuselage between the flaps, there is a gap. I filled it in by
cutting strips of Evergreen styrene and gluing them into the gap. Once dry I
used some Mr. Surfacer 500, sanded it and then applied Mr. Surfacer 1000 and
sanded again until it was smooth. There are some raised details in this area so
it was a laborious task to avoid losing this prominent detail. In
an effort to lessen the sanding task and maintain raised details I have tried
using Apoxie Sculpt and sanding but the styrene sheet alternative gave me a
better final look. Once dry Apoxie can be as hard as rock to sand. The styrene
with glue and Mr. Surfacer is more work but it also gave me a better invisible
seam. I found the same gap problem with both Italeri MC.200 versions, kits 2676
and # 2711, so it looks like a permanent moulding problem and not just a
building error on my part.
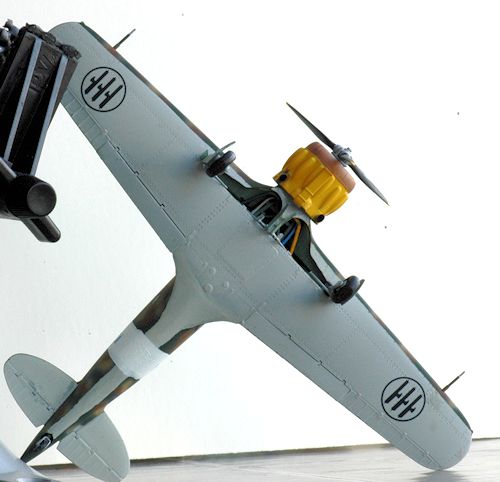
The actual aircraft has a prominent forward wing tip light with the inner orb (the side facing the pilot) painted so that it creates a half-shell light which helps others in formation without affecting the pilots night vision. The wing lights are well represented as two small, in scale, extended lights. Not much more to say about construction since it is for the most part a smooth and trouble free assembly following the kit instructions.
The only small problem I had was self induced. In order to improve the detail inside the main gear bay I added some thick bass string guitar wire to represent the hydraulic hoses. They got in the way of attaching the landing gear retractor struts so be aware if you plan on enhancing this area as I did to locate them in a way that will not affect the struts. Also, if you run the wires through the landing gear bay wall you can affect the clearance and connectivity of the fuselage to the wings as I did. Fortunately, I was able to remove the offending metal wire end points and everything came together including some nice hydraulic hoses with correct color codes. I believe Jaguar resin provided an MC.202 wheel bay years ago which provided this level of detail. This is what I had in mind as a nice to have accessory that is not yet in the aftermarket resin bits that I looked for during this build.
Thanks to the painting guides on the “Stormo” web site the following colors were used on the wiring I added inside of the landing gear bay: the fuel line is yellow, coolant line is bright green, the exhaust recycled heating ducting is black and the pneumatic air line is sky blue. The compartment between frames 7 and 9 housed the compressed air cylinder for the pneumatic and engine start up systems, along with two smaller ones for hydraulic fluid used for flap actuation and landing gear actuation. Take a look at page 70 in the Macchi C.200 SAETTA, Orange Series # 8113, Mushroom Model Publications reference for a great color photo of this area.
| COLORS & MARKINGS |
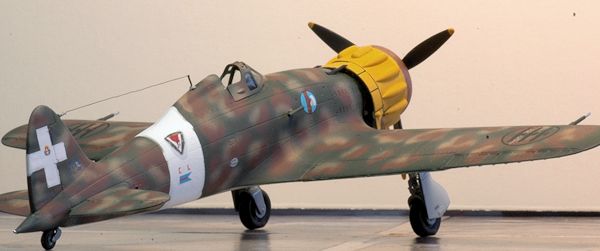
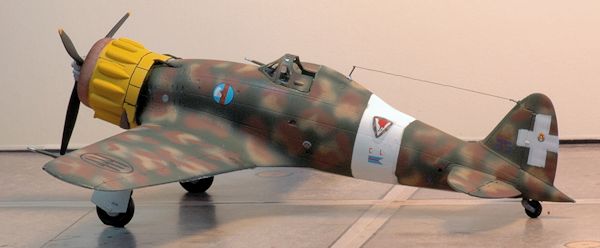
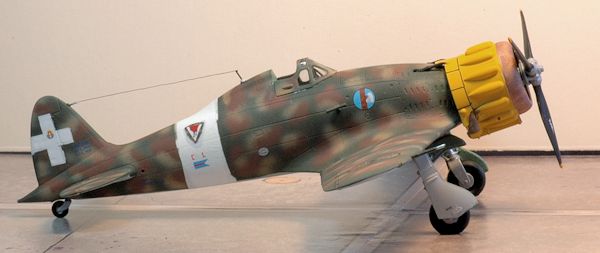
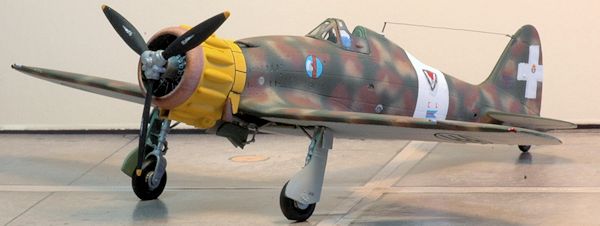
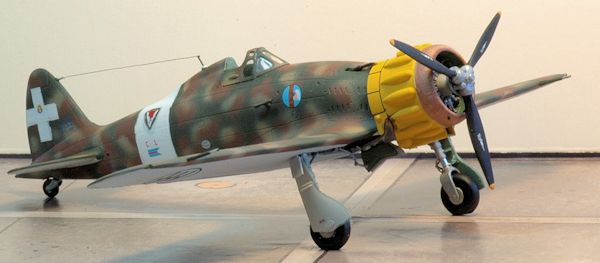
I used the kit supplied decal for an aircraft from the 150th Gruppo Autonomo CT, based in Tirana, Albania during 1941. It was the aircraft belonging to Commandante Vosilla, the commander of the 150th Gruppo. The same markings can be found on the SKYmodels decal # 48-021, marking number 9. A color profile for this aircraft is on page 28 of the MMP book. The camouflage scheme is called out in the MMP book as scheme “M3” which consists of a three-tone scheme comprised of irregular sand and brown patches over dark green. Undersurfaces are light grey. This was the typical color scheme for early Breda-built machines.
The C.200 had three types of camouflage color schemes, mottled, desert and single color. I recommend you get the Mushroom Publications No. 8113 book for a complete description of these (found on page 10). They are very interesting camouflages and a wonderful challenge to paint. The alternatives make for very attractive finishing options. I used the Mushroom Publications extensively during this build and this book made building and understanding everything about the MC.200 Saetta a reality – no more wrong guesses! The Aero Detail # 15 reference book also provides some insight into MC.200 colors and camouflage on page 63-65.
I painted the white fuselage band but used the kit decal to confirm the correct width for the white band. I did consider under painting it in white and using the kit supplied decal because the unit markings were painted along with the white fuselage stripe. However, the rear hump behind the cockpit presents some problems getting a decal to conform to its shape so I omitted the decal except for cutting out and using the unit symbol on decal # D 2. The unit insignia while it is on the white fuselage band does have a trim which exposes the underlying camouflage so I had to paint a small area with the three camouflage colors before applying the 150th Gruppo Autonomo CT unit insignia.
I used Tamiya acrylic colors as they are called out including mixes in the instructions for a Tamiya released version of the Italeri C.200 kit. I looked up the instructions online and felt more confident using the Tamiya acrylics for this project. The Italeri kit instructions give the name of the color and an FS number for the exterior fuselage which is adequate.
 The cockpit and wheel wells of the C.200 were painted in
a color which comes from my declining stocks of AeroMaster paints (# 1120 U.K.
Interior Green Acrylic). The instructions indicate to use pale green Model
Master 1534. I chose to use the same color as the aircraft from the two museums
I reviewed prior to building. However, some of those photos also show a light
grey was used in portions of the lower cockpit areas such as the floor, rudder
pedals and lower cockpit walls. The Tamiya instructions indicate XF-21 Sky and
XF-5 Green in a 50% each mixture for the cockpit. This mixture provides a
similar color to the U.K. WWII color of interior green or cockpit green.
The cockpit and wheel wells of the C.200 were painted in
a color which comes from my declining stocks of AeroMaster paints (# 1120 U.K.
Interior Green Acrylic). The instructions indicate to use pale green Model
Master 1534. I chose to use the same color as the aircraft from the two museums
I reviewed prior to building. However, some of those photos also show a light
grey was used in portions of the lower cockpit areas such as the floor, rudder
pedals and lower cockpit walls. The Tamiya instructions indicate XF-21 Sky and
XF-5 Green in a 50% each mixture for the cockpit. This mixture provides a
similar color to the U.K. WWII color of interior green or cockpit green.
For the overall fuselage finish I used Tamiya acrylics. The exact colors used were XF-59 Desert Yellow, XF-52 Flat Earth, and XF-67 NATO Green. The undersides are a mix XF-2 Flat White (66%) and XF-66 Light Grey (34%) for a very light grey underside. The yellow fuselage band is XF-3 Flat yellow but I used some Aeromaster enamels instead, #9080 ID Yellow. It, both Tamiya and the Aeromaster paints, were easy to use and the results good with a fast drying time and no masking pull-up losses.
The stencils came from the kit decals as well. They are excellent providing most of the stencils found on page 64 of the Aero Detail # 15 reference book. I especially liked the prop stencils which were accurate and finely printed permitting the reading of its small lettering!
Weathering and Final Coat – some pastel chalk and black/brown pin wash was used. I sprayed on a Testors gloss coat to prep for decals and Dull Cote to seal in all the decals instead using the Future coat used during the initial application to seal all of the decals.
The props have the correct decal stencil. Take a look at the prop stencils from the Hasegawa Macchi Mc 202 kit and from the Skymodels decal. The Skymodels sheet for the MC.205 properly shows the two different propeller types (labeled Macchi & Breda) similar to that used by the C.200 one of which was actually a license built Fiat Hamilton-Standard 34DI-1 prop hence a logo similar in shape to the well known Hamilton-Standard logo and the other a Piaggio P.1001 prop which was the most commonly used prop on the MC.200. All of the versions in the kit decals used the Piaggio P.1001 prop requiring the logo artwork found on page 71 of the Aero Detail # 15 reference book which is also part of the Italeri kit decal sheet. I am still learning the nuances of Regia aircraft and especially the prop blade logos. Apparently there is another one shaped like the Hamilton Standard logo which I noticed while reading my references for this build but failed to write down the name.
| CONSTRUCTION CONTINUES |
The last part, Steps “13 & 14” (Final assembly) consisted of adding the prop, open or closed canopy, radio mast, twin pitot tubes (17a) and gunsight clear lens. I also added the venturi tube (part # 34B) to the starboard side which appears in step 12. Since I was handing the kit so much and the venturi is so small and delicate it was the last item I added before final painting. It is such a small item I initially overlooked it in the building cycle and thought it was missing from the instructions.
The canopy was a slight challenge to attach. The parts
are well formed and nicely moulded to permit an open canopy which is frequently
seen in RA photos of the MC.200. The serie represented by this model
 could have
benefitted from having an additional single piece canopy on the clear parts
tree. The three part canopy poses some difficulties to attach because the two
side parts need to be secured while they are on the model to ensure the proper
width.
could have
benefitted from having an additional single piece canopy on the clear parts
tree. The three part canopy poses some difficulties to attach because the two
side parts need to be secured while they are on the model to ensure the proper
width.
The exhaust was finished by brushing on some thinned Pactra IP96 Rust enamel. When it was dry I used Metalizer Dark Iron non-buffing as a wash applied in small amounts with a brush. Many photo references show the C.200 Saetta exhaust were painted the same color as the fuselage camouflage colors so you have a choice to make. After some use a hot exhaust usually burns off its paint leaving it to oxidize. I could not confirm this from the color photos of C.200’s since they all appeared to be finished in the camo paint of the fuselage but they are refurbished and repainted museum pieces.
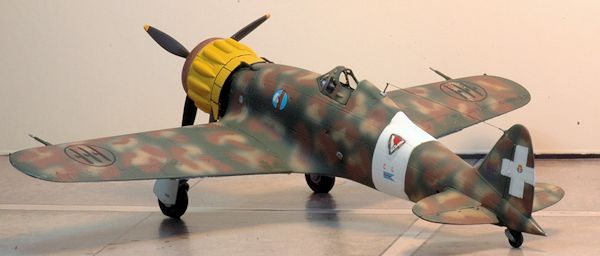
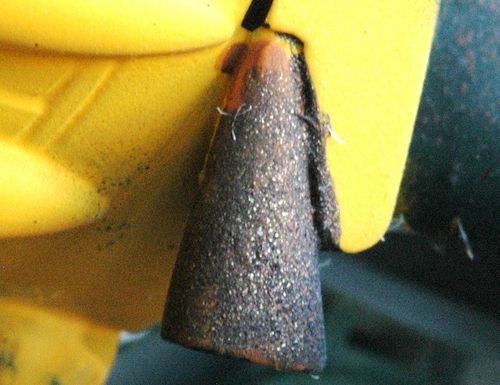
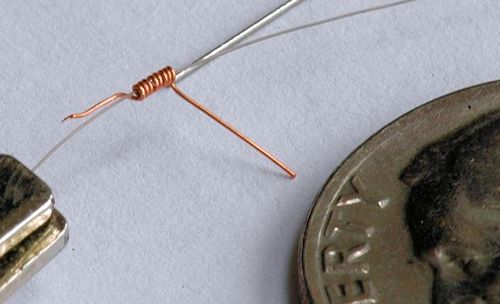 Some
clear sewing thread was used for the antenna wire which was then painted flat
black and attached using gorilla glue. It was a two step process. The first step
was to create a spring which would be attached to the vertical tail. I
attached the antenna wire to the vertical tail front edge in conjunction with a
small copper spring (see photo). The spring was created using a thin piece of
guitar wire as the core and then wrapping the copper wire around it to form a
spring. I removed the guitar wire which was essentially a “mould” or former for
the spring shape. I then passed a piece of invisible sewing thread through the
coil, applied a very small amount of gap filler CA onto a toothpick and sealed
both ends of the spring embedding and securing the antenna wire inside. The
alternative is to form a hook at the end but copper can’t take the tension long
term and will unravel. I like the look of the spring since it replicates the
look of the antenna attachment. I inserted the spring the spring end into the
vertical stabilizer. Once it was dry I attached the other end of the antenna
wire to the post
Some
clear sewing thread was used for the antenna wire which was then painted flat
black and attached using gorilla glue. It was a two step process. The first step
was to create a spring which would be attached to the vertical tail. I
attached the antenna wire to the vertical tail front edge in conjunction with a
small copper spring (see photo). The spring was created using a thin piece of
guitar wire as the core and then wrapping the copper wire around it to form a
spring. I removed the guitar wire which was essentially a “mould” or former for
the spring shape. I then passed a piece of invisible sewing thread through the
coil, applied a very small amount of gap filler CA onto a toothpick and sealed
both ends of the spring embedding and securing the antenna wire inside. The
alternative is to form a hook at the end but copper can’t take the tension long
term and will unravel. I like the look of the spring since it replicates the
look of the antenna attachment. I inserted the spring the spring end into the
vertical stabilizer. Once it was dry I attached the other end of the antenna
wire to the post
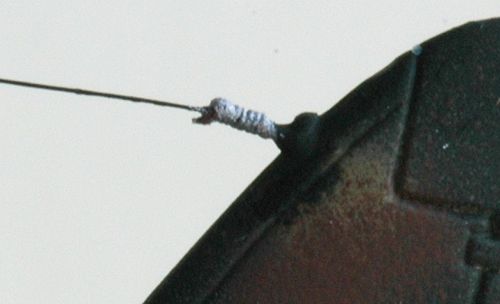 behind the
pilot’s position.
behind the
pilot’s position.
There were three types of communications used by C.200 pilots resulting in three choices for the modeler. Some aircraft had no radio using the time honored hand signal methods from WW I and the Spanish Civil War. Some C.200’s had radios. The radio’s used a small antenna behind the pilot headrest and some of the antennae’s were connected via a wire to the leading edge of the vertical stabilizer. I have also seen pictures and a even a color profile found on page 13 of MACCHI C.200 SAETTA Orange Series # 8113 Mushroom Publications as well as an option in the Pavla 48-038 conversion set using a three point antenna wire configuration attached to the wings in an arrangement similar to a P-40.
The MC.200 has an unusual double pitot arrangement featuring a pitot rod on each wingtip. The reason for this is one pitot is heated and the other is not. It also has an unusual cranked step with an additional small tube under the main tubular component. Italeri faithfully reproduced this, the pitot with a cranked tip in their #2711 version of the MC.200. However, the #2676 release only has the standard straight tubular type of pitot (as does the Quickboost resin part). I would have preferred both types of pitot’s appearing with this kit because many from this serie of MC.200’s appear in photos with the cranked pitot.
Both pitots are just a bit too thick – not overly so but in want of replacement. I used the kit plastic but thought of trying some metal rods and bending them to get a better scale effect. You can use some guitar wire and scratch this part to improve survivability or even create a two part telescopic small diameter metal tubing pitot. The aftermarket part from Quickboost is not the cranked shape but a thin long pitot tube shape which is common to other aircraft. It fixes the thickness issue but does not provide the cranked end tip visible in most MC.200 photos. Some MC.200’s also appear to have two piece straight tubular pitot’s like the Quickboost parts as well but I rarely saw this in reference photos. The straight pitot is available with the QB48341 Quickboost MC.200 Saetta Pitot Tubes & Antennas resin product.
The landing gear covers had a slight bend in order to conform to the tire hump and wing airfoil shape and looked nice once painted. The moulding faithfully reproduces this and when combined with the etched parts creates a very nice combination and is easily secured to the landing gear. The small top portion is also provided so you get a complete landing gear pant assembly. The insertion of the small tab did not quite work as it appears in the instructions.
The clear parts were added using Testors 8876C white glue. I use this because of its long, tapered black plastic applicator that allows small amounts to be carefully placed. The radio mast was attached using Testor’s plastic cement which is what I used for most of the plastic to plastic joins in this build.
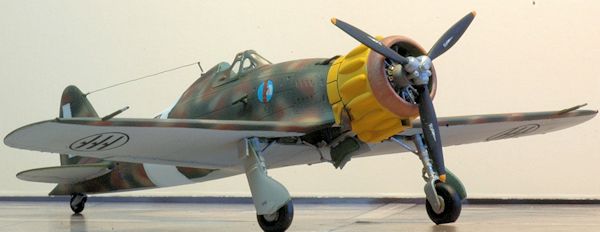
The copper radial oil cooler was painted using Tamiya dark copper XF-28. If you like a shinier surface you can try titanium gold or even gold with some dry weathering dry brushing. I liked the Tamiya dark copper shade since it approaches the tone of a slightly weathered copper visible on the many WWII era color photos of the MC.200. I also added a wash of some flat back to pop out the fins or oil cooler rib details.
The Italeri cowling was a pleasure to detail with painting. The copper cowl ring is a separate part and well moulded with the fine lines representing the brazed copper panels of the cowl oil cooler ring.
| CONCLUSIONS |
I really enjoyed building the Italeri kit especially after building the Classic Airframes and Special Hobby MC.200 Saetta because it looks good and is a much easier build. The Italeri kit is as close to a shake and bake two day build as any other kit I have built. The challenge is in painting the complex camouflages which is something to look forward to. I am anxious to get some more Italeri MC.200’s and make some other representations of the Saetta found on the Skymodels and AeroMaster MC.200 decal sheets. The colorful camouflages and paint variations make for a superb canvas and attractive end result in a finished model.
 The cockpit is fine OOB since it is a small opening so
don’t fret too much about the inside appearance – just get the seatbelts and
seat looking good, fix the gunsight and you should be happy because it is an
adequate cockpit. The gunsight was the only big disappointment in the cockpit
area since it is crudely shaped. Italeri has so many well done fine detail
points in this kit I wonder why this was overlooked. Other than this I was very
pleased overall with this effort by Italeri.
The cockpit is fine OOB since it is a small opening so
don’t fret too much about the inside appearance – just get the seatbelts and
seat looking good, fix the gunsight and you should be happy because it is an
adequate cockpit. The gunsight was the only big disappointment in the cockpit
area since it is crudely shaped. Italeri has so many well done fine detail
points in this kit I wonder why this was overlooked. Other than this I was very
pleased overall with this effort by Italeri.
It is a small sized aircraft so it won’t take up too much shelf space. It does stand out in a crowded shelf since the varieties of camouflages are an attention getter. However, after speaking with a few other persons with a similar interest in this kit it seems there are some industry distribution changes affecting its availability? Some speculated Italeri may have limited the amount and duration of production run for the # 2676 release since they disappeared from the shelves of my local hobby shops and some online retailers have removed them from their availability lists. This is not a good thing for a kit two or three years after its release unless there is a new pending release with some additional decal markings.
I checked the Italeri website (www.italeri.com) today, January 19, 2013, and as of today it is still offered by them and can be ordered directly from their web site. Not finding any through my normal local suppliers and on some big online retailer’s websites is a huge disappointment. Hopefully we will all be able to get some of these into our stashes and built during 2013. I highly recommend the kit for an enjoyable building experience and a nice looking Macchi MC.200 on your display shelf.
| REFERENCES |
Macchi C.200 Saetta, Orange Series # 8113, Stratus Books, Mushroom Model Publications 2012
Aero Detail # 15, Macchi C.200/C.202/C.205 Dai Nippon Kaiga, August 1995
Ali D’Italia #8 Aer.Macchi C.200 Saetta 1997
C.200 Saetta Scale Aviation Modeler International Vol. 2 # 8 August 1996
AeroMaster decal # 48-154 Macchi C.200 Saetta
SKYmodels decal # 48-021 Macchi C.200 Saetta
Andrew Garcia
February 2013
If you would like your product reviewed fairly and fairly quickly, please contact the editor or see other details in the Note to Contributors.