Hasegawa 1/48 Macchi C.205 Veltro
| KIT #: | 9243 |
| PRICE: | $35.00 SRP |
| DECALS: | Two options |
| REVIEWER: | Andrew Garcia |
| NOTES: |
SBS Models resin cockpit used |
| HISTORY |
The Macchi C.205 Veltro was a FIAT engined DB 605 clone, 1475 h.p. inline engine
replacement for the MC.202 Folgore and part of the lineage from the MC.200
radial engined fighter (also identified as the MC.200) built by Aeronautica
Macchi, Ambrosini and Breda in Italy. The MC.205 initial prototype flew in April
of 1942. Its armament was improved
over the MC.200 Saetta and MC.202 Folgore that it replaced. Initially it had the
same armament configuration as the MC.202 but it was quickly improved starting
with the serie III to 20mm cannons in the wings and 12.7mm guns in the nose.
Although heavier it was a marked improvement over the C.202. The first
production aircraft rolled off the assembly line in September 1942. Due to war
time pressures requiring parallel production of the MC.200 and MC.202 the Veltro
had a slow start with just a trickle coming off the production lines for many
months.
 The conversion of MC.202’s to the MC.205
standard was undertaken and after the war sixty-two were built for the Royal
Egyptian Air Force (REAF) with delivery completed by 1951. The Egyptian specials
were distinguishable by virtue of their having a C.202-type fixed tail wheel
with its fairing. The conflict between Egypt and Israel caused the AMI to retain
about twenty from this order which fortunately has led to having some years
later for aviation preservation. Thus of the 62 ordered only 42 were actually
delivered most in the III serie configuration.
The conversion of MC.202’s to the MC.205
standard was undertaken and after the war sixty-two were built for the Royal
Egyptian Air Force (REAF) with delivery completed by 1951. The Egyptian specials
were distinguishable by virtue of their having a C.202-type fixed tail wheel
with its fairing. The conflict between Egypt and Israel caused the AMI to retain
about twenty from this order which fortunately has led to having some years
later for aviation preservation. Thus of the 62 ordered only 42 were actually
delivered most in the III serie configuration.
There is a color profile in the Squadron #5558 Color Walk-Around book of one of
these aircraft that is represented in the kit decals (Arabic numeral 1214). The
profile shows an MC.202 converted airframe with the early thin tapered antenna
mast and non-retracting tail wheel assembly. The Hasegawa kit provides only the
thick antenna mast and retracting tail wheel with its doors version. The
fuselage has the longer fairing for the retractable tail wheel which is common
to MC.205 and not correct for an MC.202 converted to the MC.205 specification
airframes.
Macchi also marked their aircraft with “C.205V” on the tail but quite often the “V” is not found in use for textual accounts where you’ll only see “205” or “Veltro” used to describe the aircraft.
| THE KIT |
Hasegawa released the C.205V "Veltro" in July 1995, following the release of the
Macchi C.202 "Folgore” in April 1994. Both of these kits were among the first
1/48th scale kits to provide an accurately detailed Macchi 202/205 cockpit.
Jaguar was among the first to provide an aftermarket resin cockpit for the C.202
that can be used for the C.205V (many of which were re-engined C.202s). After
building a few using combinations of resin cockpits and the kit plastic with
some Eduard etched I found if you have a set of color seatbelts to use for the
kit cockpit you will be quite pleased with the results OOB. Add a resin pit and
it’s a beauty!
 MC.2XX series of aircraft. The wing
lights should have been moulded on the clear parts tree with a cut out on the
wing tips. This would have improved this kit since changing it for a realistic
appearance requires cutting and a lot of extra effort. Hasegawa in its current
1/48th scale releases has changed its approach for wing tip lights to now use
clear plastic for the wing tip lights.
It is a fast build due to its low parts count and good fit. The fit is
very good, but not perfect, so some putty or gap filling is required but it is a
minor issue.
MC.2XX series of aircraft. The wing
lights should have been moulded on the clear parts tree with a cut out on the
wing tips. This would have improved this kit since changing it for a realistic
appearance requires cutting and a lot of extra effort. Hasegawa in its current
1/48th scale releases has changed its approach for wing tip lights to now use
clear plastic for the wing tip lights.
It is a fast build due to its low parts count and good fit. The fit is
very good, but not perfect, so some putty or gap filling is required but it is a
minor issue.
The MC.205 Veltro's retractable tail wheel made a new fuselage mould necessary
since the MC.202 had a fixed tail wheel and no doors. This modification, just
like the one on the wing tip of the Hasegawa adapted Ju-87D mould, has been a
concern for some modellers who felt it is unfortunately plagued with a seam
line, which runs all around the rear part of the fuselage if you look very
closely. I did not see this as a big problem.
Apparently Hasegawa used a copy of the
MC.202 Folgore fuselage mould, grafted a Veltro tail onto it – and ended up with
what some may feel is an unpleasant ridge that the modeller has to carefully
sand off. To add to the complexity some Veltro’s were simply upgraded MC.202
Folgores keeping their fixed tail wheel with differently shaped speed cover so
you could have either the new or old tail wheel arrangement for your chosen
aircraft. Who said aircraft modelling was simple?
I have read some reviews; well OK actually just one, where the modeler felt one
of the weakest points of the kit was the “Spartan” cockpit interior. I respect
his opinion but I like it OOB and overwhelmingly others have expressed their
satisfaction with this kit’s cockpit in an OOB configuration. I use resin
cockpits frequently for the improved details or to replace a deficient kit
plastic cockpit. This one, the Hasegawa MC.202/205 series, did not motivate me
to do so. I actually used a resin cockpit only because the SBS cockpit looked so
awesome in its sales literature I recently bought one for this build – otherwise
I would have done an OOB with some pre-painted color etched seatbelts.
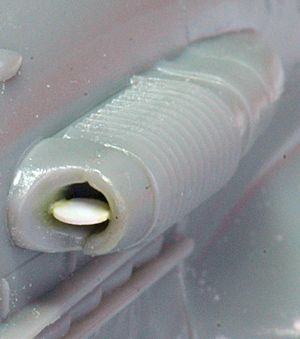
Others have also expressed
dissatisfaction with the undersized and unusable exhaust stacks. Yes, they are a
weak part of the kit appearing undersized and somewhat flat. There are two resin
replacements, one from Quickboost #48282 and one from Ultracast 48177. The
Quickboost exhaust offers a hollowed out version of the kit exhausts and look to
thin and flat for my use. The Ultracast exhaust, # 48-177, provides a much
better detailed robust exhaust and one that I will use in a future build since
it is a clear improvement on a very visible area.
I have followed a practice of purchasing resin or etched detail sets for
“future” builds placing them inside the relevant kit box for future use.
Fortunately a long time ago I bought the now out of production Jaguar #64801
Macchi 202 detail set which includes a resin cockpit, exhaust stacks, two seats
– one with seat belts and one without, and the landing gear bay with all its
complex pneumatic hose and wiring detail. It was designed by Roy Sutherland of
Cooper Details who is now operating his trade through his Barracuda products
shop. Roy’s set for the Jaguar resin Folgore, though 15 or more years have
elapsed, is still a beautiful piece of resin for your Hasegawa kit.
With a little extra work (plus painting, dry brushing and washes)
compared with using the kit cockpit it is easily transformed into an authentic
cockpit for the C. 205 Veltro. (What happened to Jaguar resin?)
Since the Veltro uses the same DB 605 engine as the Bf-109F-K family you could
also try using resin exhausts indicated for those kits. You might even have an
old Moskit metal set in the stash that will work!
The undercarriage legs seemed to be riddled with ejector pin marks
requiring a bit of clean-up. The undercarriage legs have to be filled and sanded
or replaced by a white metal replacement.
 I am just trying to be as open minded about any observation on potential changes
so don’t take these comments as an indication of deficiencies in the kit – it is
an awesome kit in my opinion. It is
nearly perfect in shape and dimensions and shows off some of the finest surface
detail you can get. I have admired Hasegawa’s 202/205 series every time I go to
work building this kit – the details are just that good! From all the cowl
fasteners to the tail wheel – it’s all good.
I am just trying to be as open minded about any observation on potential changes
so don’t take these comments as an indication of deficiencies in the kit – it is
an awesome kit in my opinion. It is
nearly perfect in shape and dimensions and shows off some of the finest surface
detail you can get. I have admired Hasegawa’s 202/205 series every time I go to
work building this kit – the details are just that good! From all the cowl
fasteners to the tail wheel – it’s all good.
The instructions are excellent, very typical of Hasegawa’s time proven
instructions. There’s nothing new here since it is composed of well detailed
explanations and clear illustrations. The parts count is low and will surprise
you because the build goes very fast as a result of the minimal parts count.
This is a “special” release featuring AeroMaster decals. The decals come on a
small but well printed sheet with two options. There is no indication of who
printed them but it looks like Cartograph. They were thin, perfect in color
density and register and went on without any problems. They went on the kit
flawlessly and when dry conformed to all the underlying plastic detail. The
printing is crisp, small details such as stencils are clearly printed and even
the white bands if you choose to use them are opaque and easy to work with.
| CONSTRUCTION |
 I decided to use an SBS Model # 48012 resin cockpit with this build and am very
pleased that I did. It is a superlative cockpit set. Not only are the details
there and the etched metal adds to the detail in a very positive way, it is
essentially a “kit within a kit”. The superlative set is accompanied by good
instructions and a nice painting guide so I can’t say enough about how pleased I
was to use this cockpit set. Over the years I accumulated detail sets for the
MC.202 & 205 from other suppliers like Jaguar, FM Details, Squadron and Eduard
Zoom etched so I will be building some MC.202’s and 205’s with those sets for a
comparison. Right now SBS is my favorite of all the currently available cockpit
detailing sets for all the right reasons.
I decided to use an SBS Model # 48012 resin cockpit with this build and am very
pleased that I did. It is a superlative cockpit set. Not only are the details
there and the etched metal adds to the detail in a very positive way, it is
essentially a “kit within a kit”. The superlative set is accompanied by good
instructions and a nice painting guide so I can’t say enough about how pleased I
was to use this cockpit set. Over the years I accumulated detail sets for the
MC.202 & 205 from other suppliers like Jaguar, FM Details, Squadron and Eduard
Zoom etched so I will be building some MC.202’s and 205’s with those sets for a
comparison. Right now SBS is my favorite of all the currently available cockpit
detailing sets for all the right reasons.
The labor of love that was building this resin cockpit added a great deal to my
satisfaction of building this kit. Once inserted it was a “fits like a glove”
experience which was my big concern going into this project. It is a huge
disappointment to buy a resin aftermarket set only to find it does not fit or
details have to be removed to get it to fit (as in forced fit).
 My only concern in the SBS set is with the gun sight because gun sights are a
complex subject with the Macchi C.205. Several types were used. The initial
models used the San Giorgio Type B gunsight which is similar to that used on the
MC.200 and MC.202. Some used the German Revi C/12 gunsight and others used the
San Giorgio Type C gunsight which was the standard fit used on serie III through
VI MC.205 aircraft. So later MC.205 aircraft need a dual lens configuration with
the look similar to the Revi or S.G. Type C gun sight. The kit plastic is a one
piece inaccurate or overly simplified example.
My only concern in the SBS set is with the gun sight because gun sights are a
complex subject with the Macchi C.205. Several types were used. The initial
models used the San Giorgio Type B gunsight which is similar to that used on the
MC.200 and MC.202. Some used the German Revi C/12 gunsight and others used the
San Giorgio Type C gunsight which was the standard fit used on serie III through
VI MC.205 aircraft. So later MC.205 aircraft need a dual lens configuration with
the look similar to the Revi or S.G. Type C gun sight. The kit plastic is a one
piece inaccurate or overly simplified example.
Since this model is essentially a MC.202
conversion to an MC.205 the SBS gun sight was acceptable but might be incorrect.
I am assuming the Macchi folks who prepared the airframes for the Egyptian order
used the later gun sights and radio communications gear. But, if it was done on
a budget using post-war surplus airframes, which I think is highly likely, the
gun sight is acceptable. If you model a later MC.205 serie version and are a
stickler for perfection I would suggest swapping the SBS gun sight for another
resin aftermarket piece representing the German Revi C/12 which by the way looks
a lot like the later San Giorgio Type B gun sight.
I have experienced other resin detail sets that look good in their packaging not
fitting or requiring some nasty grinding and fitting, (losing some details in
the process), effort to get them to work – but really good news - not the SBS
resin set – it fit perfectly!
The SBS set includes many very nicely detailed components like the afore
mentioned multi-part gunsight. It has resin seatbelts on the seat but the
separate upper belt portion in etched metal – someone was thinking and serious
about getting the look perfect when they mastered this resin cockpit. I was
almost surprised when everything fit so well. The Hasegawa fuselage halves
closed with no concerns coming from the aftermarket resin cockpit. When the
cockpit was painted and dry brushed, then a black wash applied, I felt as though
I had just completed a model. Although you can see much of it from the outside
some of the perfect detail is in the lower portions and not easily visible – a
shame since it is so well cast and precisely detailed.
When you glue the two fuselage halves together don’t forget the propeller shaft,
part A6. When it comes to attaching props I prefer the vinyl washer approach
Hasegawa takes in other kits because it permits you to remove the propeller and
spinner and usually is a tight fit. The problem with this kits engineering of
the attachment is you can easily glue the shaft to the fuselage and it is not a
tight fit resulting in a wobbly prop that can look slightly askew.
Steps 3 and 4 have you construct the main wing, landing gear bay and attach it
to the fuselage. This is where the “snake pit” detailing decision takes place.
You can go OOB or try to replicate some or all of the details appearing the long
OOP Jaguar MC202 resin detail set
to improve the accuracy and intense detail of the landing gear bay with its
myriad pneumatic pipes and electrical wiring connections. I am going the OOB
route this time and looking forward to a build with my Jaguar resin set to see
how it looks. I tried to use wire and guitar wire on some MC.200 builds recently
and the caveat is you need to understand where everything goes and avoid getting
in the way of kit components when you start to add wiring to detail this
 area
before the kit parts are glued in place.
area
before the kit parts are glued in place.
I have read other kit build reviews of this area, the landing gear assembly,
with negative comments on the landing gear. The alternative is to mould it in
one piece which usually is a recipe for disaster because you are faced with
trying to open up the forks to insert a wheel – snap crackle and pop – not for
me thank you. The mould punch out pin marks are unfortunately a by-product of
Hasegawa’s approach so some clean up is required. You can add some wire for the
brake lines and even try some replacement scratch building of the attachment
points for the leg to gear covers for finer detail. I chose not do so on this
build because the kit parts pass the 2 foot viewing test. The landing gear oleo
linkages have weight reduction holes so you should think about some cosmetic
drilling to improve this area as well.
The Macchi 205 has several metal covers over the aileron hinges that you could
use some evergreen sheet to detail (see page 55 in the Squadron Walk Around text
for details). The upper wings are missing the oval access panels to the armament
box. They should be re-scribed into ovals. The spent shell casing ejector
opening underneath the wing is there but there should be two holes. This area is
missing the small raised teardrop shaped “speed bumps” that protected the wing
from spent shell ejection damage. The opening for the belt links is missing so
you will need to open up a second rectangular opening for this and add its
raised tear drop “speed bump”. I used an etched metal template from Eduard to
add the second hole. See page 58 in the Squadron Walk Around for two good color
pictures of the two per-wing spent casing ejection holes for a better look at
this feature.
 Part A1, a boarding foot step on the port side fuselage is very small and the
hole it goes into very large so you may want to use metal wire to replace it
because it can get overwhelmed if you use liquid glue. Steps six and eight of
the instructions have the bottom fuselage parts assembly steps. The kit has one
rod, part B10 added in step eight to hold the part B10 radiator door open. It is
actually two rods, one on each side and one more going horizontally across the
middle. See the Squadron Walk Around # 5558 book page 45 for the details on both
the front and back areas to see Hasegawa used some artistic license in their
model which is not accurate in this area. Maybe they thought since it was
underneath modeler’s would not look? Yeah, right….
Part A1, a boarding foot step on the port side fuselage is very small and the
hole it goes into very large so you may want to use metal wire to replace it
because it can get overwhelmed if you use liquid glue. Steps six and eight of
the instructions have the bottom fuselage parts assembly steps. The kit has one
rod, part B10 added in step eight to hold the part B10 radiator door open. It is
actually two rods, one on each side and one more going horizontally across the
middle. See the Squadron Walk Around # 5558 book page 45 for the details on both
the front and back areas to see Hasegawa used some artistic license in their
model which is not accurate in this area. Maybe they thought since it was
underneath modeler’s would not look? Yeah, right….
One reviewer noted you should be careful
with the main spar (C17) indicating it must be glued absolutely perpendicular to
the wing or it would cause problems later. I'm glad he warned me, as the part
naturally wants to lean forward slightly. He also noted in the real Macchi’s a
lot of the engine plumbing/wiring was visible in the forward part of the wheel
wells but little to nothing is supplied in Hasegawa's kit.
Now, with the benefit of having completed the kits construction, I would
strongly advise you to do as much gap and seam filling and sanding on
sub-assemblies before final assembly. Keep an eye out for sub-assemblies that
require some filler or seam filing to correct them before attachment. For
example, parts A3 that goes on the air filter (part A4), the two oil coolers
G7/G10 and G6/G8, and the fuselage seam where the rear center part of the wings
meet the fuselage all have noticeable seams or tiny gaps that are much, much
easier to fill and sand before they are committed to their attachment points on
the fuselage or partially obscured by other assemblies. For example, the lower
wing to fuselage join I thought would be covered up by the ventral radiator
housing but it is not. It is exposed enough to be visible. Trying to fix this
one after the radiator and its door with a support strut are attached is no fun
– but it could have been so easy with a Flex-I-File clean up done at the right
time.
 The 20mm guns are well moulded but there is a circular dimple on the wing
surface where it goes that must be removed before you attach it. This is due to
the sharing of the common wing platform plastic between the MC.202 and MC.205
kits. The area behind the guns, on the top of the wing, have a few circles and
indentations that Hasegawa’s instructions in step 3 indicates must be puttied
and filled and sanded. I used
Mr. Surfacer 500 to fill this in.
The 20mm guns are well moulded but there is a circular dimple on the wing
surface where it goes that must be removed before you attach it. This is due to
the sharing of the common wing platform plastic between the MC.202 and MC.205
kits. The area behind the guns, on the top of the wing, have a few circles and
indentations that Hasegawa’s instructions in step 3 indicates must be puttied
and filled and sanded. I used
Mr. Surfacer 500 to fill this in.
I am not 100% certain that Hasegawa is correct using their standard MC.205V
moulding for an Egyptian aircraft since reading the story about this airframe
indicates some or all could be converted from C.202 fuselages which do have a
different rear tail wheel structure.
I have found Hasegawa usually does a great job researching their kits so
I am at peace knowing that they did their job well and it should be correct so
don’t panic. However, I noticed the aircraft in the Italian Air Force Museum in
Vigna di Valle at Rome is airframe # M.M. 9546 which is one of the aircraft
destined for Egypt but was retained and never exported. It is prominently
featured in the Squadron Color Walk Around text that was very encouraging and an
excellent resource for this modeling exercise.
The concern I have is the rear wheel in the kit is missing the speed fairing in
front of it seen in the photo on page 4 of the Squadron Color Walk Around and on
the color profile on page 77 which happens to be the color scheme I am modeling.
Fortunately, the Hasegawa kit # 9132 MC.202, on sprue # F, has three sets of
parts for the rear wheel to permit the build of either early or late serie
MC.202 Folgore rear tail wheels. Since only one of them is used in an MC.202
build I was able to take parts F11 & 12 from kit # 9132 to reconstruct what
appears to be the missing part on an Egyptian aircraft if you use the existing
M.M. 9546 airframe and color profile as the base model. This was the final fix
and the model was ready for final construction and the paint shop.
| COLORS & MARKINGS |
The decals come on a small but well printed sheet with two options. There is no
indication of who printed them but they looks like Cartograph. They were thin,
perfect in color density and register and went on without any problems. They
went on the kit flawlessly and when dry conformed to all the underlying plastic
detail. The printing is crisp, small details such as stencils are clearly
printed and even the white bands if you choose to use them are opaque and easy
to work with.
 Black 1214 is a Royal Egyptian air Force (REAF) Macchi MC.205 from the second
squadron. This aircraft is a rebuilt C.202 retaining the fixed tail wheel. In
some photos it appears the fuselage dorsal spine antenna lead-in was removed,
since there were several iterations of radio communications and the planes that
went to Egypt all had the latest radio communications according to the Squadron
Walk around text you could model it with either antenna configuration and be
right. Some references indicate the aircraft was delivered in a “bottle green”
color which approximates Dark Oliver Green and when the Egyptians took
possession they added RAF middle stone to the upper surfaces and Azure Blue to
the undersurface. After the Nasser 1952 coup the national markings slightly
changed and the Third Group Decal provides the slight change.
Black 1214 is a Royal Egyptian air Force (REAF) Macchi MC.205 from the second
squadron. This aircraft is a rebuilt C.202 retaining the fixed tail wheel. In
some photos it appears the fuselage dorsal spine antenna lead-in was removed,
since there were several iterations of radio communications and the planes that
went to Egypt all had the latest radio communications according to the Squadron
Walk around text you could model it with either antenna configuration and be
right. Some references indicate the aircraft was delivered in a “bottle green”
color which approximates Dark Oliver Green and when the Egyptians took
possession they added RAF middle stone to the upper surfaces and Azure Blue to
the undersurface. After the Nasser 1952 coup the national markings slightly
changed and the Third Group Decal provides the slight change.
White K is an MC.205 III serie airframe numbered 1213 in Arabic. References
using photos from January 1949 show the aircraft in a two-tone upper surface of
RAF Middle stone and Dark Earth over Azure Blue with a white spinner. In some
photos it appears the fuselage dorsal spine antenna lead-in was removed, since
there were several iterations of radio communications and the planes that went
to Egypt all had the latest radio communications according to the Squadron Walk
around text you could model it with either antenna configuration and be right.
There are photos of this Veltro at an earlier time when it was painted only Dark
Earth or Desert Yellow with Azure Blue undersides with the spinner the same
color as the rest of the airframe (see Squadron’s Walk Around). The Third Group
recommends not wrapping the camouflage around the leading edges of the wings and
stabilizers as there was uncertainty about this based on reference photos from
some REAF airframes.
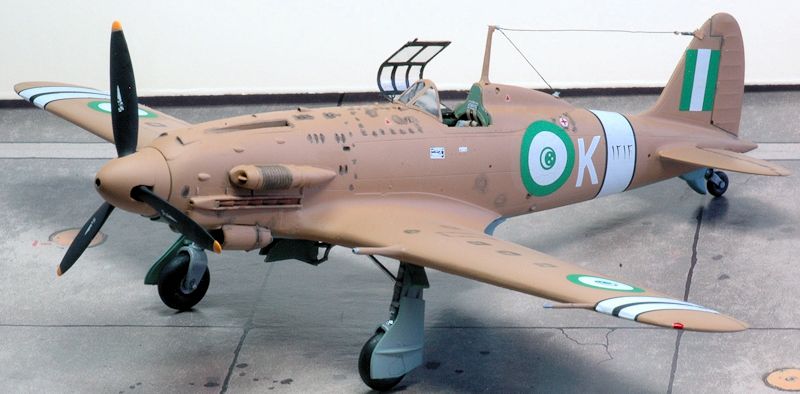
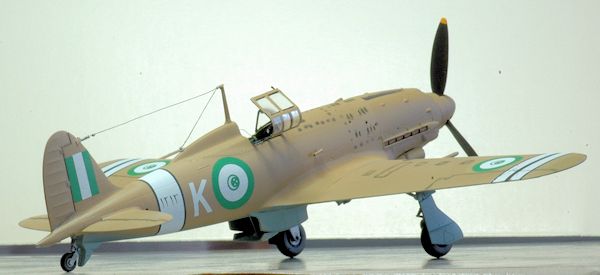
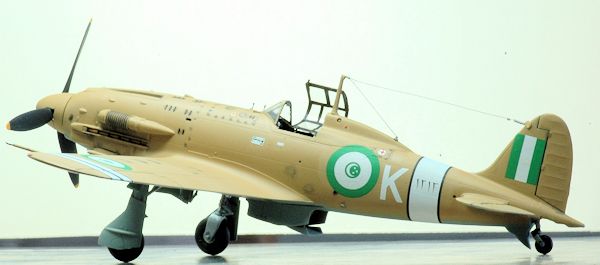
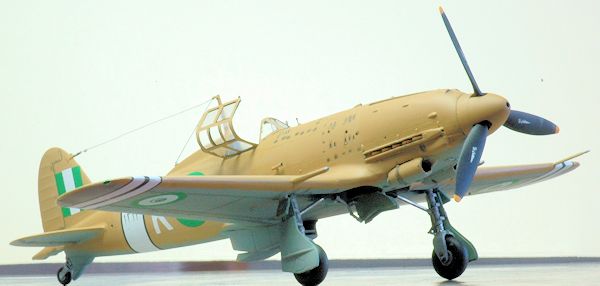
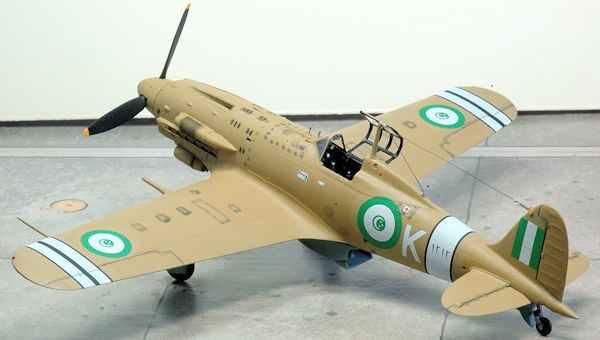
I chose the markings for the second aircraft, “White K” from the AeroMaster kit
decal for a MC.205V, Royal Egyptian Air Force, No. 2 Squadron, in the original
delivery color scheme of Nocciola Chiaro 4 (Light Hazel Tan 4 – FS30219) upper
surfaces over Grigio Azzurro Chiaro 1 (Light Blue Gray 1 – FS36314)
undersurfaces. If you have or can
get the Third Group decals for this build they are excellent. The Third Group
decal is better than the kit decals. Here’s how they differ: the Aeromaster
decals use a two part, white with a black overlay to create the airframe data
plate for example. A close inspection of the real thing shows it to be an
aluminum plate with black lettering. Third Group has its decal printed by
Microscale and used silver with black for the data plate plus added the Breda
circular prop logo which was used on some MC.205’s – nice touch!
The cockpit and wheel wells of the MC.200 were painted in a color which comes
from my declining stocks of AeroMaster paints (# 1120 U.K. Interior Green
Acrylic). The instructions indicate to use pale green Model Master 1534. I chose
to use the same color as the aircraft from the two museums I reviewed prior to
building. However, some of those photos also show a light grey was used in
portions of the lower cockpit areas such as the floor, rudder pedals and lower
cockpit walls. The Tamiya instructions for the MC.200 indicate XF-21 Sky and
XF-5 Green in a 50% each mixture for the cockpit. This mixture provides a
similar color to the U.K. WWII color of interior green or cockpit green. The
Squadron Walk Around text gives some very interesting advice on painting the
interior of the MC.205, all of the components of which I will use on the next
build.
 For the overall fuselage finish I used Tamiya acrylics because they were close
enough in color and I had the paint in hand. A web search indicated Model Master
II Enamels - No. 2037 Flint Gray FS36314 is the exact match for undersurfaces.
The top surfaces are matched by Model Master # 1742 Enamel Dark Tan FS30219
For the overall fuselage finish I used Tamiya acrylics because they were close
enough in color and I had the paint in hand. A web search indicated Model Master
II Enamels - No. 2037 Flint Gray FS36314 is the exact match for undersurfaces.
The top surfaces are matched by Model Master # 1742 Enamel Dark Tan FS30219
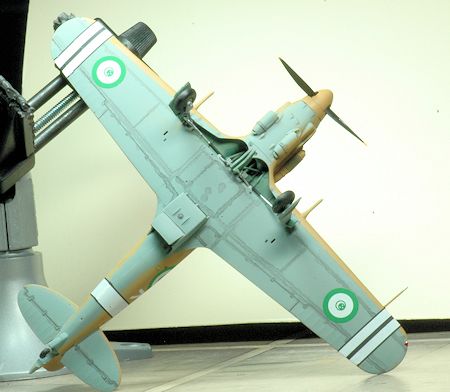
or Gunze Mr. Color # 310 Brown. The exact colors I used were Tamiya XF-59 Desert
Yellow with a small amount of XF-52 Flat Earth. The undersides are painted
Tamiya XF-25 Light Sea Grey (it is spelled “grey” not “gray” on the label) which
is a very good blue gray tone similar to FS36314.
Weathering and Final Coat – some pastel chalk and black/brown pin wash was used.
I sprayed on a Future coat used during the initial decal application and after
decaling was completed I used Future using a brush to seal all of the decals.
Testors Dull Cote was used during the final step to seal all of the decals and
give the correct flat finish.
The props have the correct decal stencil which is found on the AeroMaster sheet.
The Third Group decal provides some additional stencils not found on the
AeroMaster sheet.
| FINAL CONSTRUCTION |
The kit looked very nice once assembly was completed and it was ready for the
paint shop. I set it aside and with a fresh pair of eyes the next morning I
looked it over and felt there were a number of small gaps or incomplete joins
that should get the Mr. Surfacer 500 treatment. They were small and instead of
using Tamiya or Squadron putty I opted for the “500” treatment. It, putty and
sanding, is difficult in places due to the very complex radial surfaces on this
airframe. For example, where part A7 joins the fuselage was an easy assembly
gluing effort but the moulding did not click into place. There was a noticeable
(to my eye) step no matter how I tried to align it while gluing the part to the
two fuselage halves. It fit well with no gap but there was a big step on one
side. This prompted a closer look at all the seams and I went into clean-up mode
on a model that almost looked ready due to its generally perfect fit.
This was the first Hasegawa kit that I have built which did not suffer from the
non-fit of the lower wing to the fuselage. It was perfect. The wing to fuselage
had no gap (it did have a seam). I just had to hold it together with a berna-clamp
and apply some liquid glue. After the glue set and I removed the clamps and
thought NO filler was required which is, or to me, a big shock since I always
have had this concern with 1/48th scale Hasegawa kits not fitting in the lower
wing to fuselage join beneath the cockpit. B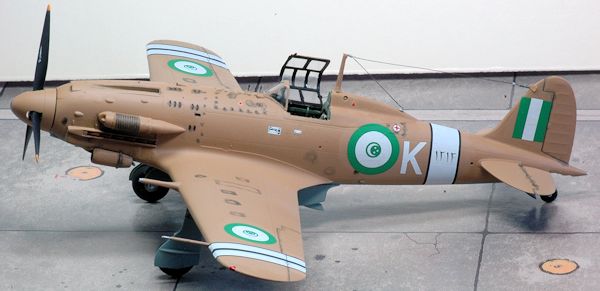 ut, a few days later I was concerned
with the thought that maybe what looks like a panel line (the glue join) should
be smooth and have no seam. Is it a seam or a panel line? Some Mr. Surfacer 500
was applied and sanded smooth.
ut, a few days later I was concerned
with the thought that maybe what looks like a panel line (the glue join) should
be smooth and have no seam. Is it a seam or a panel line? Some Mr. Surfacer 500
was applied and sanded smooth.
Hasegawa supplied a clear gunsight (Part M1) which I did not use. Actually, I
bought this kit from someone who did not realize the entire clear parts tree was
missing. That meant I had no gunsight and no canopy. That’s bad… Thus, I had to
purchase a vac-form canopy, some Eduard Zoom etched and the Squadron 9547 vac-u-form,
to permit me to use the rest of the plastic that I bought. I found the SBS resin
cockpit had a replacement gunsight so I was back in business and used that
alternative. I left off the SBS gunsight and compass (Hasegawa part B17),
leaving them off the instrument panel. The instructions have you inserting them
in step 1 of the assembly process. I added them when the model was almost
complete (post painting and decaling), as they can be very easy to break off and
loose during pre-painting masking especially if you are using the SBS resin
cockpit. They were essentially the very last step, just prior to when I attached
the canopy and its connector wire that goes behind the armor plate (see page 33
photo in the Squadron Walk Around book). I used a “third hand” tool positioned
below the canopy to hold it in position under the Gorilla glue hardened hours
later.
Gun sights are a tricky subject with the Macchi 205. Several types were used.
The initial models used the San Giorgio Type B gunsight which is similar to that
used on the MC.200 and MC.202. Some used the German Revi C/12 gunsight and
others used the San Giorgio Type C gunsight which was the standard fit used on
serie III through VI aircraft. So before this last step think about what you
want to do and then button up the cockpit.
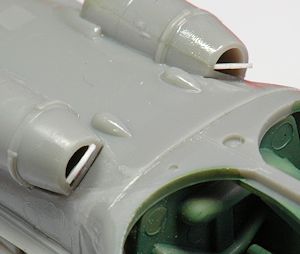
I punched out three styrene disks from an Evergreen sheet to provide the intake
doors for the air filter and two oil coolers. Note, the round door on the air
intake is on the front and was smaller than the two doors on the oil coolers
which go on the rear (see photo) of the oil coolers.
The exhaust was finished by brushing on thinned Pactra IP96 Rust enamel after
the Testors # 1781 Aluminum had dried.
When the Pactra was dry I used some Metalizer Dark Iron non-buffing as a
wash. I was a bit disappointed with the kit exhausts which are too flat and will
use some aftermarket (Ultracast) next time.
 There was a tall antenna radio antenna post (there are two types of these, a
long thin wooden mast and a thicker metal mast version which was hollow inside
used on the MC.205) and antenna wire connected to the tail configuration used
for most of the MC.205 aircraft. I don’t think the kit supplied antenna is
correct for an Egyptian version and should be the thinner tapered top version
(which is part F3 in the MC.202 kit) according to the Squadron Walk Around page
14 information.
There was a tall antenna radio antenna post (there are two types of these, a
long thin wooden mast and a thicker metal mast version which was hollow inside
used on the MC.205) and antenna wire connected to the tail configuration used
for most of the MC.205 aircraft. I don’t think the kit supplied antenna is
correct for an Egyptian version and should be the thinner tapered top version
(which is part F3 in the MC.202 kit) according to the Squadron Walk Around page
14 information.
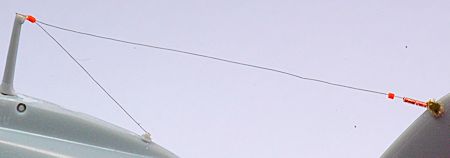
I used some scrap etched copper fret to cut a connection tab for the antenna
wire connection to the vertical tail’s front edge. I wound some thin copper wire
around a thicker piece of wire to create a spring for this part. I also used two
pieces of empty wire insulation as the insulators (see photo). I attached this
before the final painting of the upper surfaces and canopy parts.
The main landing gear covers were painted off the model and added at this point.
The small tabs (part C14) at the top did have a good fit since there was a small
indentation just for them. I found other Macchi kits lacked fit in this area.
Because this is an Egyptian aircraft using the MC.202 airframe I had to
eliminate the tail wheel doors to accommodate the MC.202 fixed wheel
configuration which did not have any doors and just the front speed fairing
portion (see pages 62-65, and 71 in the MMP #8102 MC.202 text). This required
filling in the fuselage fairing area behind and underneath the tail wheel with
some Aves Apoxie Sculpt and not using the doors. The speed fairing in front of
the tail wheel had to be added as well.
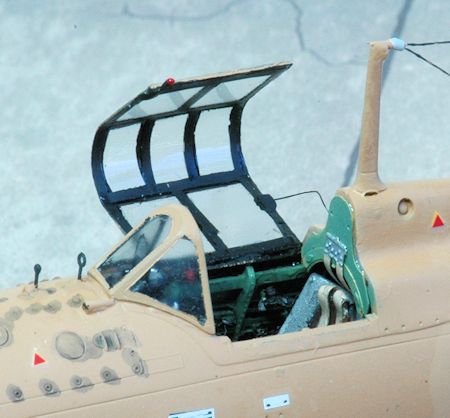
The clear parts were added using Testors 8876C white glue. I use this because of
its long, tapered black plastic applicator that allows small amounts to be
carefully placed. I also used a Squadron “Fast Frames” vinyl canopy accessory #
41016 – on the inside of the vac-form canopy. Since it is an open canopy this is
a very visible part and I needed a very clean delineation of the inside canopy
frame which it provided. The now long OOP “Fast Frames” still works! But before
you use them see if they fit. Since I used a vac-form that is actually sized for
the Tauro kit they did not fit. I had to cut one end of the Fast Frames vinyl
and reposition it. They did make for an easy way to add the black framing of the
cockpit interior to a vac-form – which is not a fun task otherwise unless you
use some pre-cut masks like the ones from Eduard.
I then added an etched metal gun sight and post in front of the canopy.
The gun sight has no crosshair so you essentially need to find a loop on a post
which I found on another etched fret.
There is a thin wire used to restrain the canopy when it is opened. This is
clearly visible in a photo on page 33 of the Squadron Color Walk Around text. I
used some smoke colored Sulky brand invisible sewing thread which is what I also
used for the antenna wire because it is already darkened (not transparent like
other invisible sewing threads) for the restraining wire. It needs to be glued
behind the two mounting bolts on the armor plate behind the pilot. If you keep
the canopy closed you won’t need this.
The SBS resin cockpit set has an etched metal armor plate. The problem I faced
was what color to paint it. Looking at museum aircraft I found natural metal,
dark gray and light interior green used. I went with the interior green but that
was after much deliberation.
| CONCLUSIONS |
I have no hesitation in highly recommending this kit. I really enjoyed this
build. Assembly of the main parts was so quick that I thought I did something
wrong but everything was there. The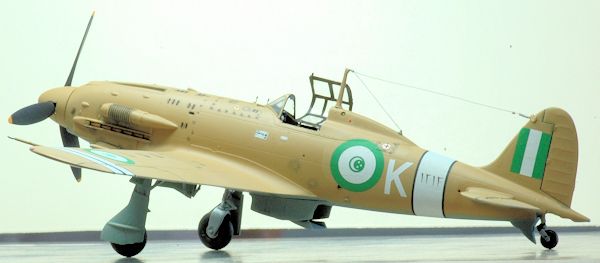 MC.205 is a beautiful aircraft and the model
builds into an accurate replica.
MC.205 is a beautiful aircraft and the model
builds into an accurate replica.
The colorful camouflages and paint variations of the MC.205 include some German
Bf-109 types of gray on blue-gray mottle for ANR aircraft as well as the Italian
desert yellow with green smoke rings desert schemes or even overall green. The
cockpit is fine OOB but you do have many enjoyable interior alternatives. There
is plenty of aftermarket to upgrade the cockpit area using color zoom from
Eduard, or complete resin cockpit sets from Squadron True Details, or SBS Model
resin. My next build will just swap out the seat for an Ultracast seat with
belts and use the Hasegawa instrument panel decals for what I expect to be a
nice looking model. When I finished I thought: “What took me so long to build
one of these nice kits?”.
There are some excellent reference books listed below. The Squadron Walk Around
# 5558 is entirely in color (except for B&W WWII period photos) and answered
every modeling detail question that I had. Throughout the build I was re-reading
this book finding the correct detail for comparison to kit parts or identifying
missing features. It too is highly recommended and its price is very reasonable
given its quality and significant contribution to a fun build. The MMP book was
also very useful in the same regard.
| REFERENCES |
Macchi C.202 Folgore MMP Books Orange Series No. 8102
Warpaint Series No. 78 Aer Macchi C.202-205 Folgore-Veltro
SKYmodels decal 'Macchi MC 205', # 48-020
Macchi MC 205 “Veltro”; Maurizio Di Terlizzi; Avialibri #1; 1997
Squadron # 5558 Macchi MC 205 “Veltro” Walk Around Color Series; Maurizio Di
Terlizzi, 2008
Aero Detail # 15 Macchi C.200/202/205 published 1995
Stormo! web site at
http://www.stormomagazine.com
March 2013
If you would like your product reviewed fairly and fairly quickly, please contact the editor or see other details in the Note to Contributors.