Classic Airframes 1/48 Fiat CR.42
| KIT #: | 475/496 |
| PRICE: | $30.00 when new |
| DECALS: | Several options |
| REVIEWER: | Andy Garcia |
| NOTES: | Short run kits with resin and photo etch |
| HISTORY |
The Fiat CR.42 was a result of Celestino Rosatelli’s innovative aeronautical
designs evolution. Starting with the CR.1 in 1924 the CR.42 first flew May 23,
1938. At a time when low wing, high powered monoplane fighters were flying or in
their prototype stages this bi-plane aircraft seemed to be an anachronism.
Rather than launch into a discussion on the state of the art at that time let’s
focus on how good this was as the apex of development of the CR series of
fighters. Its test pilot after the first flight stated it was “the ultimate
pilot’s airplane”. The CR.42 was powered by the FIAT A.74 RC.38 radial engine
which produced 828 h.p. at 12, 465 feet. Even
an in line DB601E engine was fitted and tested in
 this airframe (CR.42DB) during
1942 but by the end of initial flight testing the air ministry recognized the
day of the bi-plane was over and that ended the development of the CR.42. Its
initial armament consisted of two fuselage mounted Breda-SAFAT .50 caliber
(12.7mm) guns synchronized to fire through the propeller arc. A field conversion
was available and used to replace the weapons with Breda-SAFAT .30 caliber
(7.7mm) guns – as a weight saving gambit.
this airframe (CR.42DB) during
1942 but by the end of initial flight testing the air ministry recognized the
day of the bi-plane was over and that ended the development of the CR.42. Its
initial armament consisted of two fuselage mounted Breda-SAFAT .50 caliber
(12.7mm) guns synchronized to fire through the propeller arc. A field conversion
was available and used to replace the weapons with Breda-SAFAT .30 caliber
(7.7mm) guns – as a weight saving gambit.
The CR.42 was produced from February 1939 through June 1943 for a total of 1700 airframes. It evolved from the initial day fighter design into a night fighter, fighter bomber, Seaplane and two seat training airframes. It was well liked by its pilots and served in the Spanish civil war, Western Europe (Belgium/France), Mediterranean, Russian and North African fronts. It was even used by the Luftwaffe designated CR.42LW in Italy during 1944 and in France during late 1943 for anti-partisan missions. When the war ended it was still in service stationed in Austria and Croatia. It was an ace maker logging air-to-air combat success for pilots from Italy, Hungary, and Belgium.
The version in this kit, CA #496, is the “AS – Africa Settentrionale – North Africa” representing a new version produced in the Autumn of 1941. The “AS” CR.42’s were equipped with dust filters mounted in the carburetor air inlet in a different style than the tropicalized aircraft and used various wheel fairing configurations. The CR.42AS had changes to the wings mounting bomb racks for 50 and 100 kg bombs.
| THE KIT |
Classic Airframes released a series of CR.42 kits, starting in 1995 with # 402, followed a few years later with an improved tooling for kits #474, 475, 496, 497, 498, and 499 spanning all the possible FIAT CR.42 variants including a two seat trainer and seaplane. The Classic Airframes CR.42 kits are still available from many hobby shops, eBay and some internet retailers as well. This release, # 496, came out around 2004.
The Classic Airframes CR.42 was well received when it was released and several in-box reviews appeared giving it positive marks. The main differences in the Classic Airframe CR.42 kit releases are in the landing gear, bomb racks/shackles, extended exhausts, decals and carburetor intake parts.
Our Editor Scott when reviewing another CR.42 kit stated “For decades we had no 1/48 CR.42 until Classic Airframes released their short run kit several years ago (about 1996). While nice, it had some issues in terms of dimensions. This kit was retooled last year (i.e. about 2007) and produced in a much nicer version. So it was with much surprise that we find Italeri producing the same aircraft as a 1/48 kit. Now one might think that I'd compare the two, but really, it is an apples and oranges thing. The CA kit is a short run multimedia kit with lots of resin bits and pieces. The Italeri CR.42 is a mainstream injection molded kit and does not have the usual resin and photo etched bits that one finds in short run kits. Not the same animals at all.”
The instructions are clear and adequate. They are supplemented by an instructions addendum which notes the parts, bombs, air intakes and extended exhausts to be used for the “AS” version from the extra resin parts bag. I say extra because the kit comes with the standard Classic Airframes CR.42 resin parts for the cockpit, engine, and exhaust. The addendum notes the changes needed to the landing gear, inclusion of bomb racks and identifies which prop hub to use depending on the configuration you choose. The bomb racks and bombs are the “extra” resin parts representing the “AS” that come in an additional bag.
 All the styrene plastic parts are molded in a soft grey plastic with the
required engraved detailing. The resin interior looks complete and well detailed
in the box with resin and etched color metal parts for the seat, instrument
panel, rudder pedals, control stick and side panels. Each kit part has nice
detailing and the resin parts are finely cast and accurate in size and shape.
The cockpit turns into a nice model by itself. There are no plastic cockpit
parts with Classic Airframes relying on resin and etched components to create a
masterful little model of the cockpit. All the details are there including
levers, oxygen bottle & pneumatic gas bottles, gunsight, magnetic compass and
complex restraint system parts in color etch. The seat and cockpit interior
should have round tubular rails but are represented by flat etched parts. It
makes for a complex assembly. For the most part they are difficult to see once
the cockpit is closed up and installed into the fuselage. The kit cockpit is
designed for an intermediate or advanced modeler with its mixed media details.
The second release by CA of an improved CR.42 kit greatly benefited from adding
some Eduard color etched details into the package compared to the initial
Classic Airframes CR.42 Kit # 402, released in 1995.
All the styrene plastic parts are molded in a soft grey plastic with the
required engraved detailing. The resin interior looks complete and well detailed
in the box with resin and etched color metal parts for the seat, instrument
panel, rudder pedals, control stick and side panels. Each kit part has nice
detailing and the resin parts are finely cast and accurate in size and shape.
The cockpit turns into a nice model by itself. There are no plastic cockpit
parts with Classic Airframes relying on resin and etched components to create a
masterful little model of the cockpit. All the details are there including
levers, oxygen bottle & pneumatic gas bottles, gunsight, magnetic compass and
complex restraint system parts in color etch. The seat and cockpit interior
should have round tubular rails but are represented by flat etched parts. It
makes for a complex assembly. For the most part they are difficult to see once
the cockpit is closed up and installed into the fuselage. The kit cockpit is
designed for an intermediate or advanced modeler with its mixed media details.
The second release by CA of an improved CR.42 kit greatly benefited from adding
some Eduard color etched details into the package compared to the initial
Classic Airframes CR.42 Kit # 402, released in 1995.
The San Giorgio gunsight, composed of parts PE20 with R7 & R8, is well done and the magnetic compass that sits under the gunsight is also there (part # R7). Initially from the first read of the instructions I thought the magnetic compass was a missing part, and it was the only thing I identified missing from the cockpit area. The assembly instructions diagram for part # R7 make it appear to be a support assembly in step 6. The instruction diagram part does not represent the actual resin part R7 which is a nicely cast magnetic compass which does sit below the gun sight. Properly assembled and painted the cockpit is a beauty because all the parts are there and well crafted. It was a big challenge to get the cockpit to fit once it was built due to a lack of location pins to secure it in the correct spot. Even when you think it is well done you might get a surprise when you close the fuselage parts because it will not appear where it should be which is just behind the front canopy glass (not below it)! You will need to add some scratch building to the gunsight etched part to properly place it between the instrument panels.
The finished cockpit has a brown or natural leather color trim pad running from the headrest to the front edges of the cockpit. This is clearly seen in the photos on pages 30 and 31 of the Italeri booklet. The padding even encompasses the rear edges of the windscreen. The rear headrest padding is provided in this kit (part R14), the rest of the cockpit opening padding is not represented in the kit plastic but that is a small nit since a simple application of a brown leather paint trim takes care of this area. A detail oriented modeler could also use white glue to form and attach a paper or masking tape trim representing this padded feature before painting.
The general color of the interior was given as light grey and not the Italian Interior Green found on most Italian aircraft. However, this is also the color used in the aircraft FIAT built late and after the war. A beautiful restoration CR.42 was created from parts for an Italian Aviation Museum. It is documented in color photographs in the booklet that comes with Italeri’s kit # 2653.
The seat belt detail appears to correctly capture the CR.42 restraint in color etched metal detail since the Regia Aeronautica used a metal chain and seat pad restraint system which is quite distinctive. It is well reproduced by Eduard which is the source of this kits color etched metal.
The two end spar’s steel support rigging cables are indicated in Step 11 of the
general assembly guide and it is suggested that they be formed from stretched
sprue. The kit decals should have the prominent FIAT A.74 e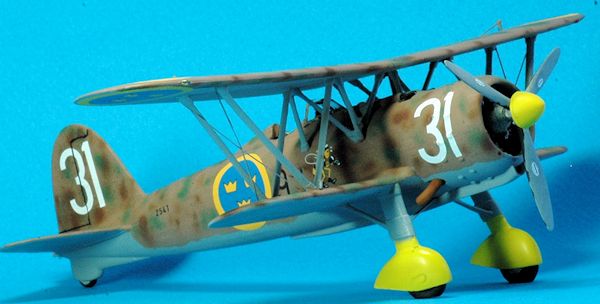 ngine information
plate (see page 24 & 25 of the Italeri kit # 2653 booklet) and the FIAT “eliche”
or propeller logo (which is similar to the Hamilton Standard prop logo - its
picture is on pg. 27 kit of the Italeri Walk-Around Kit # 2653 booklet). The
decal artwork that comes with the kit is a white oval with a black stripe
simplification. It might not be quite right but there is a CR.42 in a museum
with similar details. I found it a bit odd since the prop decal usually looks
like a Hamilton Standard logo and the rest of the decals feature very finely
drawn artwork. These
are small details that don’t take away much from the kit but that would have
been nicer to have.
ngine information
plate (see page 24 & 25 of the Italeri kit # 2653 booklet) and the FIAT “eliche”
or propeller logo (which is similar to the Hamilton Standard prop logo - its
picture is on pg. 27 kit of the Italeri Walk-Around Kit # 2653 booklet). The
decal artwork that comes with the kit is a white oval with a black stripe
simplification. It might not be quite right but there is a CR.42 in a museum
with similar details. I found it a bit odd since the prop decal usually looks
like a Hamilton Standard logo and the rest of the decals feature very finely
drawn artwork. These
are small details that don’t take away much from the kit but that would have
been nicer to have.
The general surface detailing of the wings and stabs is reasonable for low pressure moulding. The tooling used for the injection moulded parts is the limited issue quality but it gives a nice representation without any crudeness found on the early limited run kits in terms of details and finesse. The wing strut placement locations are indicated but very small. This makes them easy to locate but from experience I would suggest you use metal pins and cyano glue to keep things nice and solid on the struts attachment points. I deviated from this and attached the pair of outer spars on each side with liquid glue. Once it was cured, about one day later, I turned the kit upside down to attach them to the lower wing. Then, I added the rest of the spars and rigging working towards the fuselage.
I used a great tool for this project, an “SRAM T02 Biplane Assembly Jig”. Despite this it was a mess to get the struts in place. Visions of other modelers comments on the web forums about “binning” a kit and foul words came to mind but were not uttered as I worked this part of the build cycle. It was no fun and would stop me from building another CR.42 from Classic Airframes if I were not so intent on building a few more CR.42’s due to a passion for the subject. Basically, due to the CR.42’s color schemes and unique versions of this aircraft released by CA, I find it an attractive plane to model in all the variations. I now understand why Classic Airframes and Italeri both produced such a wide range of releases on this aircraft. If you enjoy colorful paint schemes then have a look at the CR.42 (with the Sky Models decal sheets).
It is a sesquiplane configuration with the two lower wings, which are like stubs, attaching in a one part assembly to the fuselage in step 8. It is a one piece part unlike Italeri’s design. The CA one part lower wing aligns the lower wing making it easier to align your strut angles compared to the Italeri kit approach which has two separate lower wing parts.
When this part of the assembly was completed the top wings on some of the builds were misaligned when viewed from above. Even using the SRAM jig failed to assist in this building stage as I had hoped. Classic Airframes has a one piece unit for the entire lower wing section which does help. The engine is complete and nicely done. It is a nice reproduction of the FIAT A.74 RC.38 radial engine. It corrects the early Classic Airframes CR.42 generic engine look by capturing the very visible shape of the FIAT A.74 RC.38 radial. As mentioned before the prominent engine manufacturer’s data plate on the engine’s port side is missing from the kits decals. It is quite large and visible on the actual engine. A tiny silver with black lettering decal is all that was required to improve this area. The upper portion of the cylinders captures the mushroom shaped FIAT A.74 shape. Some etched metal is used for the pushrod tubes but if you want a nicer engine some styrene rod or stretched sprue would look better since the pushrod tubes are very visible and a prominent part of the engine. Classic Airframes did it acceptably well so it is not a deficiency as much as an area an advanced modeler might wish to improve.
The cowling is comprised of a two part construction with a seam down the middle you will want to fix. A one piece cowl would have been much better – but there could be a problem getting the engine inside the cowl so a maybe a two part cowl could be required. It is better than the “dodgy” four part combination cowl construction process that Italeri provided. There is no exhaust collector ring(s), and the resin exhaust part 6, includes hollowed out exhaust outlet tips which is a nice touch. If you model a “CN” night exhaust damper version the flame dampers attach to the engine exhaust outlet. It is not a secure location connection so getting them symmetrical, aligned and looking perfect is an elusive assembly task. In sum – no, there is no locator pin to attach the exhausts. The exhausts are nicely reproduced in resin and look in scale but can be slightly too long depending on how well you can push them into the cowl.
I compared the CA flame damper extensions to the Italeri “LW” kit plastic
dampers and to some aftermarket “CR” night exhaust dampers from Owl Resin.
Italeri’s plastic parts were much larger appe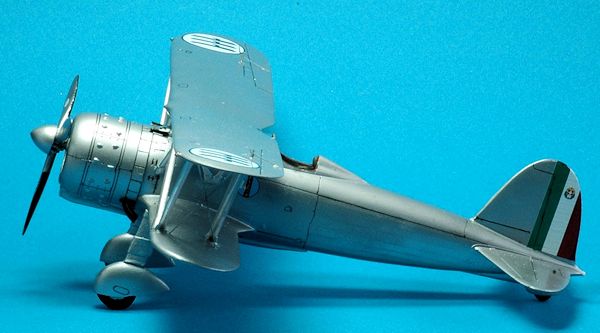 aring like fat sausages compared to
the thin tubing extensions portrayed by the kit and aftermarket resin parts.
Unfortunately one of my resin night fighter extended exhaust damper tips was
missing from the pouring block and not in the sealed bag. It
was a pouring/curing/moulding defect but only one out of four kits that I built
had this defect.
aring like fat sausages compared to
the thin tubing extensions portrayed by the kit and aftermarket resin parts.
Unfortunately one of my resin night fighter extended exhaust damper tips was
missing from the pouring block and not in the sealed bag. It
was a pouring/curing/moulding defect but only one out of four kits that I built
had this defect.
The landing gear has separate one piece plastic moulded tires. They are well moulded, have flattened bottoms and appear very nice on the sprue. The tires are easy to attach and look the part once on the landing gear. I did experience disappointing alignment of the landing gear spats on the Italeri Kit # 2640. The Italeri spats required putty and sanding to fix the gaps. The CA kit has a similar problem. It seems the spats locating pins are imprecise causing a joining malformation. The other Italeri CR.42 kits provide separate lower wheel pants which are removed and those are included as well as a standard set. The CA kit also required spats joint clean up.
Classic Airframes provides both types of prop spinners in all their kits. Separate aileron actuating rods are provided in etched metal for the top and underside of the upper wing. There were no rudder actuating rods components in the CA kit (Italeri has them in parts #17A). Unfortunately the gun barrels are not included in the CA kit and you are advised to create them from plastic rod or 7mm tubes. I used some stainless steel tubing. Classic Airframes should have made it part of the kit resin parts package since they have a unique shape and are a small but very noticeable item. Also missing are the cowl cutouts for the gun blast tubes. That is, and it can be seen on the Italeri kit, when the pilot opens the cowl flaps, there is a cutout portion running under the tips of the machine guns so this operation will not affect the unmovable gun tubes.
The instructions are good, providing clear construction sections with color painting information given as needed. The discontinuation of the Classic Airframes Website means the color and markings guides in color are now gone. They did exist for some time but you need to use the black and white kit supplied information. You could also request a color copy from some kind modeler who made a wise choice to save them when they were available on the web. The colors are all given as “FS” Federal Standard Paint Codes with the Italian color name.
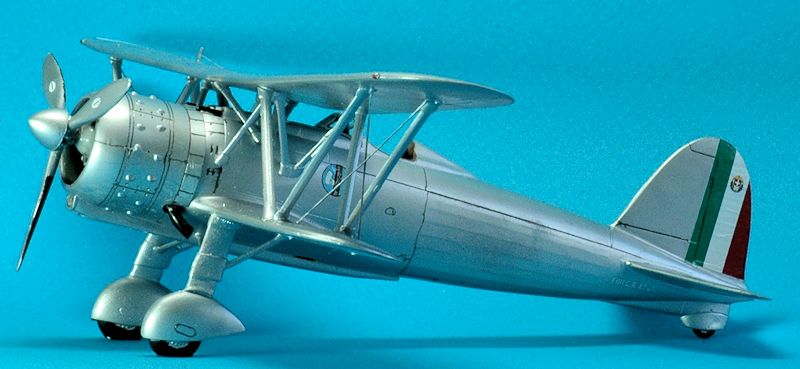
The CR.42 prototype (FIAT CR.42 N.1 or M.M. 4265) first flew on May 23. 1938. FIAT owned the initial prototype. Thus, it was only using a serial number of “FIAT CR.42 N.1” when first built and on the maiden flight. The prototype was soon modified from the initial flight version by having its exhaust shortened, the retractable tail wheel changed to a fixed type and a new cowl with NACA teardrop fairings above the cylinder heads rocker valves. Thus, the same “prototype” airframe changed depending on when you are modeling it. The type designation after acceptance of the modifications by the Regia Aeronautica used serial number, (M.M. 4265). The serial number appears just in front of and extends under the horizontal stabilizer in white lettering with black trim. Production units also had a re-contoured carburetor air intake lip from the initial square fluted shape, small changes to the instrument panel layout, and a redesign of the propeller control housing. An excellent series of photos of the prototype aircraft can be found in International Air Power Review, November 2005, Vol. 17, pages 158 to 173 as well as on page 27 of the CR.42 In Action Squadron #1172. The “M.M.” matricula militar or serial number was a bonus decal found on the CA Kit # 474 decal sheet (and in that kits painting guide instructions).
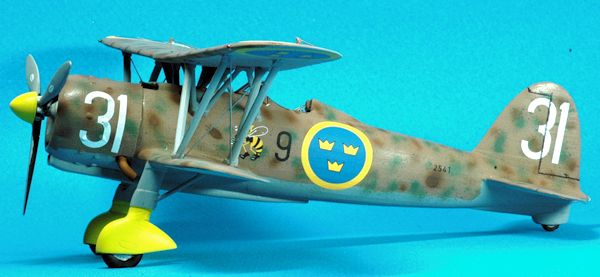
Kit # 475 CR.42 “Export Version” has five choices of markings There are markings for White 31 Swedish Air Force in March 1942, White 17 Belgian Air Force, and three colorful Hungarian Air Force selections Black V-204 and V.2-11, and Red 234.
Kit # 496 CR.42AS markings are provided for four differently camouflaged aircraft, representing two 1942 Regia Aeronautica airframes, one post-war Italian Air Force aircraft and one Luftwaffe unit called Nacht Schlachtgruppe 9 based in Turin during 1944. Three of these color schemes are also used by Italeri in their “LW” and “AS” CR.42 kit releases. The post war version is a nice inclusion by Classic Airframes since this kit provides a very wide choice of color schemes and all are well drawn in a black & white 4-view format in the assembly instructions and painting guide.
The color box art represents one of the decal choices and is a good supplement
to the painting information. Classic Airframes used to provide the color
versions of the painting guide through its web site which is now defunct. I
prefer to have a color profile on glossy paper to help with painting since
camouflage schemes can be misinterpreted from black and white shading artwork
such as that used by Cl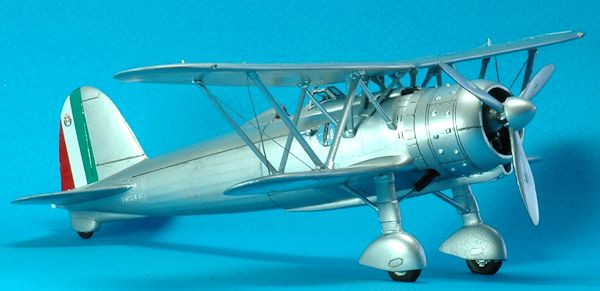 assic Airframes in their kit instructions. The decals are
from Microscale Decals so you know they are well printed and of outstanding
quality. They are very thin, the printing is crisp, small details such as
stencils are clearly printed and are opaque and easy to work with.
assic Airframes in their kit instructions. The decals are
from Microscale Decals so you know they are well printed and of outstanding
quality. They are very thin, the printing is crisp, small details such as
stencils are clearly printed and are opaque and easy to work with.
There are several aftermarket decals for the CR.42. There are many terrific and colorful schemes that I would like to build thanks to these decals. There have been decals released by Skymodels, sets # 48036 & 48037 - FIAT CR.42 Parts I and II, Stormo WW2 Italian Aces Part II; Third Group Decals 48-015 Multi-National Fiat CR.42 Falco, and AeroMaster 48-188 Fiat CR.42 Falco Collection are among the many choices.
One final note - you can build multiple versions of the CR.42 from the CA #496 “AS” kit release because all the basic parts for the CR.42 fighter are in the kit. It uses extra resin to provide the required changes for an “AS” version. I prefer this to the Italeri approach which is by design missing version parts for the CR.42 fighter such as the air intake, and exhausts. That makes the Italeri kit limited to one version, an “AS” or “LW” only, instead of being easily adaptable to more numerous alternative color schemes.
So what’s missing and what does a modeler need to think about adding or changing when building the Classic Airframes CR.42 kit? It is missing the prominent oil cooler inlet at the front lower wing root and the oil cooler outlet at the rear of the lower wing root. This is provided on the Italeri kit. The pitot tubes found on the front edge of the wing spars are missing. They are part of the Italeri kit plastic. There is no location hole on the starboard fuselage for the location to attach the resin venturi tube. You need to determine the spot and drill a hole on the CA kit. The hole is part of the Italeri kit plastic. The two upper wing leading edge formation lights are missing. You need to scratch build or add these. Italeri provides them. The two fuselage machine gun barrels are missing. They are part of the Italeri kit plastic. The CA kit instructions do advise you to add some machine gun barrels from rod or tube but that does not provide for a good representation of the Breda-SAFAT guns barrels and tips. There is an excellent brass barrel machine gun replacement available from Master Models brass parts but that adds about 30% to the cost of a kit which unless you love the subject matter, you might avoid building or stop construction after too many building challenges or surprises. Also missing are the rudder linkage and actuating arm and the same parts for the stabilizer. They are part of the Italeri kit plastic. The CA kit does provide the four sets of linkage and actuating arms required for the upper wing aileron but compared to actual photos of the aircraft the linkages are too short. I used some guitar wire replacements for the parts to get a longer rod. The upper wing is missing the pilot grab handle cut into the trailing edge of the upper wing over the cockpit. CA has it as a recessed panel outline but it is filled in – you will need to cut the hole since it was an opening. Most of these missing items are very visible in the color photos found in the Italeri C.R. 42 Falco photographic reference manual.
The Classic Airframes cockpit parts require a great deal of dry fitting, creative solutions to complicated and sometimes poorly fitting resin, etched and plastic components lacking location connections. It seems no one was in charge of system integration. The kit resin and etched parts except for the moulded plastic parts, which are limited run, look perfect in the box and instructions. Once you try to put them together, the assembly task becomes a challenge. I like challenges, but some improved kit design or engineering or QA is needed. Take your pick on what should have been improved since it applies to almost all of the components in the cockpit. Just a little improvement could have resulted in a better modeling experience for me. The issue is even if you dry fit all parts before gluing the lack of precise location connections means things get out of alignment on parts like the propeller to engine connection, wings, gun sights, etc. Despite these concerns I would also add I am grateful Classic Airframes came out with their entire line of CR.42’s in 1/48th scale with terrific decals, color etched and nice resin enhancements at a reasonable price. It is just not a shake and bake kit with all the correct airframe details.
| CONSTRUCTION |
The kit cockpit is about half of the assembly consisting of many resin and
etched parts. The Eduard color etched for the instruments and restraining system
added a lot of fine detail. Classic Airframes was serious about providing
accuracy, quality and value especially by providing the unique look of the
restraining chains, seat belts and seat cushion that is missing from the OOB
Italeri kit. Italeri provides an incorrect decal to represent the seat belts. If
you can build it well, the CA kit is beautiful. I had numerous problems with the
build despite dry fitting and taking my time. The gunsight for example looks
simple enough in the instructions but when you go to work on this part I could
not make it work and had to do some scratch building of parts including using
some Aves Apoxie to construct a
 easonable gunsight with some mounting location.
A small resin panel incorporating the gunsight and magnetic compass with spots
on the outer edges for the instruments would have improved this area. A locating
connection for the missing resin panel to the fuselage would have then made it
an improved experience.
easonable gunsight with some mounting location.
A small resin panel incorporating the gunsight and magnetic compass with spots
on the outer edges for the instruments would have improved this area. A locating
connection for the missing resin panel to the fuselage would have then made it
an improved experience.
The fuselage halves closed with some minor concerns coming from the cockpit resin assembly caused by the lack of alignment or locator pins. I did not attach the two cowl guns in step 2 preferring to leave them off until the final, post painting detail step.
Steps 1 through 7 are for the cockpit and step 8 inserts the cockpit tub into the fuselage. Step 8 adds the lower wing, part B2 and step 11 adds the upper wing and spar assembly process. The lower wings have to be perfectly aligned or the struts will not fit. Step 11, gluing all the struts was done by using liquid glue to attach the outer struts, parts B9, B10, B15, B16 to the lower wing. Once they were glued onto the lower wing and the join was cured I flipped the fuselage upside down and placed the upper wings in alignment with the fuselage. I then glued the rest of the spars and struts to the upper and lower wing/fuselage. I kept adding parts working from the outside inward. That minimized the alignment problem I had with the first kit. In any event I still had alignment problems. Some struts were short, not reaching their holes, others moved about as I tried to glue them in place. It was not the highlight of building this kit.
Attaching the spars and maintaining the wing to fuselage alignment kept me from building a kit that I would enjoy sharing with others in a contest setting. With better kit design and engineering it could have been a more satisfying experience. I am a novice with strut and spar bi-plane assembly so I will take the fault for mistakes in this area rather than dumping it all on the CA kit parts. I added the wing “X” wires at this point using E-Z line. The E-Z line was terrific and when I accidentally hit it during the build it took the hits like the elastic material should, bouncing back and maintaining a taut state without coming unglued or separating. I drilled the holes for the rigging, used thin cyano to secure them and when dry cut the E-Z line with a Xuron sprue cutter. Once it set I filled in the hole with gap filling cyano followed by a thorough sanding.
Step 9 and 10 have you assembling the engine and engine cowl as well as adding the prop. Steps 12 and 13 have you adding the exhausts and spats. I left the exhausts off for the final step. I secured the spats, after they were sanded and cleaned up using metal pins and cyano glue. No surprises here except for misalignment gaps requiring filler putty. The spats required filler and sanding before attachment. Since they are small it was not a big problem. Due to the delicate nature of the attachment I would recommend all cleanup is finished before you attach the spats/wheels to the lower wing. Note, part A10/A14, a sway support brace connecting the two spats has a forward sweep. Since there is no attachment key aligning it or preventing you from gluing it in backwards be aware of this and dry fit because you could attach it backwards. The brace also serves as a nice alignment tool to keep the landing gear correctly aligned.
Step 9/10 is the engine assembly, two part cowl gluing and propeller attachment step. There is no connection between the prop and engine so you need to use your choice of metal pin, metal rod or plastic rod to connect the two components. This was an oddly missing part but not unusual for a limited run kit. The instructions show an arrow, indicating the mating of the propeller to the engine crankcase, but is missing any indication of the need for a connecting shaft. You could inadvertently misalign the prop and that looks terrible. The kits lack of a proper prop shaft and aligned engine is not appreciated. You can put a lot of effort into this kit only to have it look poorly when finished due to the lack of a well engineered engine and prop alignment.
Step 8 includes the attachment of the windshield, stabilizer and rudder etched parts. I replaced the short rod segments with some guitar wire. I used metal pins as gluing posts for the etched parts PE16 on the wings. It is a tradeoff between finesse, ease of assembly and how much detail you want to add.
| COLORS & MARKINGS |
 The decals come on a crisply printed by Microscale decal sheet with multiple
options. Since this build represents two kits from different kit versions (Kit #
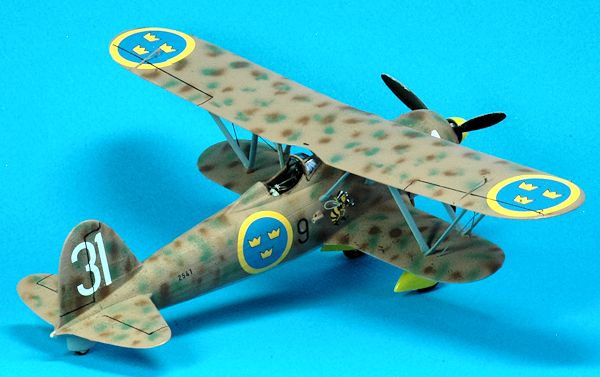
475 & Kit # 496) the selections were; Kit # 475 Cr.42 White 31, Division 3,
Flygflottij F9, Swedish Air Force, Sae, circa March 1942 (also found on
SKYmodels decals 48-036 #11). It was painted in an overall color scheme of Sand
Giallo Mimetico 3 (FS.33434) with mottling in Green - Verde Mimetico 2
(FS.34102) and Red-Brown Marone Mimetico 2 (FS.30076) with Light Blue Gray -
Grigio Mimetico (FS.36293) undersides. It is interesting Italeri gives different
“FS” numbers for the same colors compared to the Classic Airframes “FS” call
outs but uses the same exact names. Verde
Mimetico 2 was applied using Testors Model Master # 2112 Italian Olive Green, with
Model Master # 2110 Italian Sand for the mottle. For Red-Brown I used Tamiya
XF-64. The under surfaces and wing struts used a mixture of Gunze acrylic H67
RLM Light Blue 65 and H307 FS36320.
The decals come on a crisply printed by Microscale decal sheet with multiple
options. Since this build represents two kits from different kit versions (Kit #
475 & Kit # 496) the selections were; Kit # 475 Cr.42 White 31, Division 3,
Flygflottij F9, Swedish Air Force, Sae, circa March 1942 (also found on
SKYmodels decals 48-036 #11). It was painted in an overall color scheme of Sand
Giallo Mimetico 3 (FS.33434) with mottling in Green - Verde Mimetico 2
(FS.34102) and Red-Brown Marone Mimetico 2 (FS.30076) with Light Blue Gray -
Grigio Mimetico (FS.36293) undersides. It is interesting Italeri gives different
“FS” numbers for the same colors compared to the Classic Airframes “FS” call
outs but uses the same exact names. Verde
Mimetico 2 was applied using Testors Model Master # 2112 Italian Olive Green, with
Model Master # 2110 Italian Sand for the mottle. For Red-Brown I used Tamiya
XF-64. The under surfaces and wing struts used a mixture of Gunze acrylic H67
RLM Light Blue 65 and H307 FS36320.
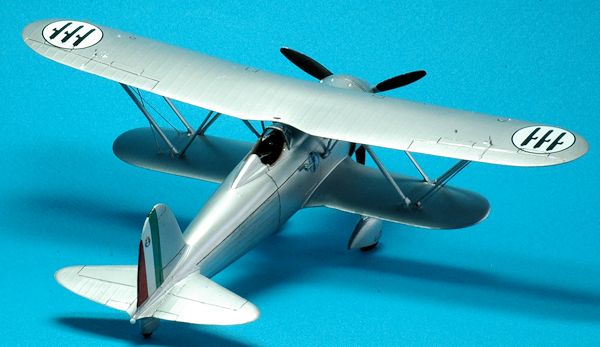
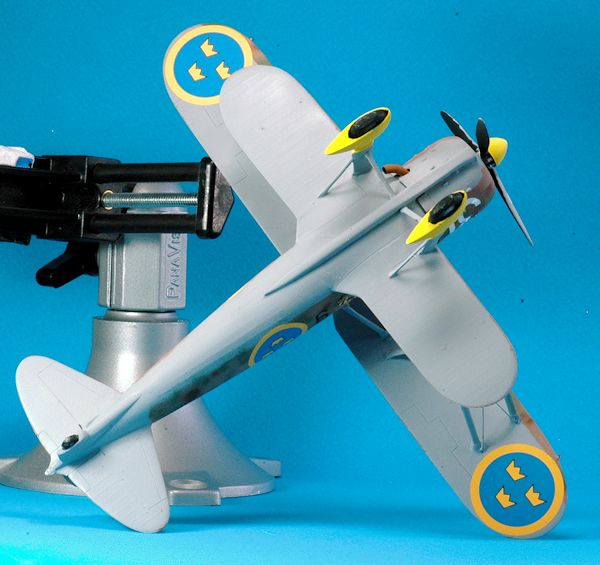
Kit # 496 CR.42AS was converted into the prototype CR.42 saving the left-over “AS” resin bomb and night exhaust parts. It was painted Tamiya X-11 Chrome Silver (enamel) with some Alclad aluminum added into the mix to obtain a durable doped yet polished aluminum look. The second Kit #496 CR.42AS was used as the donor kit for the natural metal finished (NMF) and silver doped CR.42 Prototype Number 1, Guidonia, Giugno 1938, found on SKYmodels decals 48-036 #35. Similar decals could have been used from Classic Airframes kit # 498 for example which has similar markings. It was painted Tamiya X-11 Chrome Silver enamel with Alclad Aluminum as an experiment. Note, Classic Airframes kit # 474 CR.42 Regia Aeronautica has the FIAT prototype decals included as a bonus. I had a spare decal from CA # 498 Fiat CR.42 Floatplane purchased as a stand-alone decal for a great price and used it for the white, green & red tail stripes in this build. The small white stencil “M.M.” matricula militar or airframe serial number was from a bonus decal marking found on the CA Kit # 474 decal sheet. If you wish to model the initial release of the prototype you will need to sand down the cowl bumps and shorten the exhaust stubs and change the rear tail wheel to a retractable with doors version.
I experienced no problems applying the decals. Microscale printed decals are a delight to work with.
The biggest challenge in the painting step was whether to apply the paint to a separate upper wing and struts then attaching the wing after the paint has dried. The alternative was attaching the wings and struts during parts assembly per the instructions and after all the parts are glued together masking the undersurfaces. Given my lack of success or patience with the wing attachment process I went with the secure the upper wing to the fuselage as the instructions would have you do. Next in the process was some strut and brace gap repairing, followed by painting, strut over-spray re-painting, a bit more masking and more touch-up painting process.
The cockpit and related parts were painted in light gray – which was almost the same color as the kit plastic. For the overall fuselage finish I used Model Master Enamels in order to get exact color matches. They worked very well and were more resistant to problems caused when you apply additional layers of paint in a mottled finish since it is a complex multi-layered camouflage. The propeller blade front was painted Grigio Azzurro Chiaro, using Gunze H306 acrylic , as it came from the FIAT factory while the back side facing the pilot was painted flat black.
Weathering and Final Coat – some pastel chalk and black/brown pin wash was used.
I sprayed on a Future coat used during the initial decal application and after
decaling was completed I used Future usin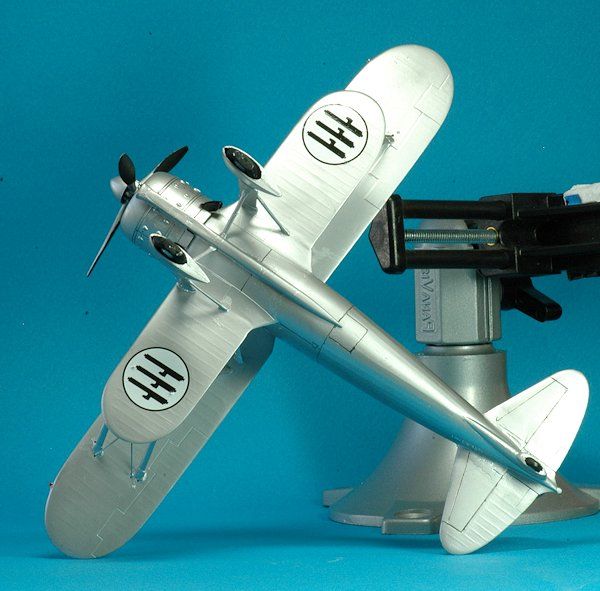 g a brush to seal all of the decals. Testors Dull Cote was used during the final step to seal all of the decals and
give the correct flat finish. For the NMF Prototype I just used a set of Copic
Multiliner .1 and .05 tipped black pens for panel details. It helped with the
bland NMF look. I also used a Sharpie Ultra Fine point (not so fine compared to
the Copic pens!) for the thicker panel lines such as the rudder.
g a brush to seal all of the decals. Testors Dull Cote was used during the final step to seal all of the decals and
give the correct flat finish. For the NMF Prototype I just used a set of Copic
Multiliner .1 and .05 tipped black pens for panel details. It helped with the
bland NMF look. I also used a Sharpie Ultra Fine point (not so fine compared to
the Copic pens!) for the thicker panel lines such as the rudder.
The props had a decal stencil. The kit decal # 1 are the prop logos. They were supplied with the kit and look like the Hamilton Standard logo since the props were license built props. It was so small I could not make out if the printing indicated a “FIAT” logo stencil on the prop since they are similar in shape and appearance the Hamilton Standard logo. As much as I prefer and like Micoscale decals silk screen printing sometimes does not capture small stencil printing accurately. The printing of stencils comes out better using Cartograph’s printing process.
| FINAL CONSTRUCTION |
The kit looked decent once assembly was completed if you don’t look too closely. I went over the kit to fix a number of small gaps or incomplete joins with Tamiya putty and some Mr. Surfacer 500. One of my biggest concerns was the gap between the fuselage cowl and engine air intake. I had to use glue and clamps to mate these parts since they are separate units resulting in large gaps. The intake should have been moulded as part of the cowl but that would mean a loss of ease of manufacture since the other CR.42 versions have a dust filter box at the tip of the intake. Classic Airframes took the same approach as Italeri with this component making it a separate part. The CA kit has you cut off the tip of their air intake and add a resin dust filter box to the end. That would have solved the gap problem I experienced with Italeri.
The very last steps were attaching the wing bracing wires, the venturi and engine with its cowl since I opted to paint the kit with the cowl off. That allowed me to attach the exhausts after the cowl was painted and avoid repainting them. I could do this because Classic Airframes provided something of a keyed attachment point for the engine to the fuselage which was easy to use , secure but not easy to align. The only problem is the air intake tunnel and nose tip underneath the cowl does not get attached as closely as I would like. Normally I would attach the cowl and paint everything at the same time but I did it this way to avoid having paint overspray getting in behind the cowl flaps. That could have affected the aluminum engine or inside cowl green zinc chromate paint.
There is no fuselage locating hole for the resin venturi post so you need to work this out. Even after I drilled a hole getting the resin part to work was no fun. It is there and it worked with the help of a small metal pin to support the resin part.
The sole clear part, the windscreen, was added using Testors 8876C white glue. I use this because of its long, tapered black plastic applicator that allows small amounts to be carefully placed. I was a bit surprised not to find any post and bead sight on the cowl but that is because none was used by FIAT. The kit supplied clear part does not match the location. It is a bit larger than the fuselage section it should fit into.
The wing tip lights were missing so I had to attach some metal pins. They were then painted Testors chrome silver. When it was dry I used Tamiya clear red and green over the lights. After everything was dry I used some clear epoxy on the wing lights and rear white tail light. The white tail light is a very prominent feature on the actual aircraft as seen on page 34 of the Italeri C.R.42 Falco Walk-Around booklet.
The very last step was to paint a leather pad around the cockpit edge including the rear of the windscreen frame using Tamiya XF-64 Red Brown. Testors leather might be a better color choice but the Tamiya is close enough. I did this after reviewing some photos in the Italeri CR.42 Falco walk-around booklet’s pages 30-31 cockpit pictures section. I did not notice this from any other reference book and it is not visible from a distance but when close up it is a prominent feature so I added it as the final step.
The prototype kit gave me great satisfaction since I had not planned this when I started the build but I am pleased I have one. The only concern I have is I might need to build the early initial prototype with the open rear wheel doors and minus the cowl bumps!
| CONCLUSIONS |
The Classic Airframes CR.42 kits feature great box art, beautiful resin, color etched detailing parts and Microscale decals. What a package! The choice Classic Airframes made in subject matter filled in many a gap on the modelers want lists. Each release was a tantalizing package of potential modeling satisfaction just waiting to be built. However, the plastic injection moulded parts created many limitations resulting in building frustrations for me. Unless you are an exceptional modeler, who loves and enjoys turning a sows ear into a silk purse the struggle and disappointment of laboring in the build cycle only to result in an amateurish looking end result is no fun. The Italeri kit is a simpler build with a number of improved engineering provisions including some moulded plastic details missing on the Classic Airframes CR.42 series.
You can get a decent looking model if you work every piece of plastic in the kit by dry fitting, including metal pins with almost every plastic join or mating surface, fill any and every gap with putty and then after sanding it a great deal use some Mr. Surfacer and sand it again to come up with something decent. Don’t forget to re-scribe some panels and add a few missing panels. You need to create a list of missing items to add them to your kit for improved accuracy.
To some it can be and is a challenge they relish. To others this kit will be just a series of ongoing problems that need to be resolved. Small items at every step that a well moulded and engineered kit delights you with during the build this kit magnifies. Like what for example? The landing gear robustness and alignment is a good example of going slow with lots of dry fitting, sanding and use of metal pins to put the plastic together. It is a must to get the same results that would be a “no brainer” assembly step with the comparable Italeri, Hasegawa, Monogram/Revell, Eduard or Tamiya kit. The Italeri kit is not perfect when it comes to its landing gear placement but it is much better than the struggle to get good results with the Classic Airframes kit. Unfortunately the CR.42 has a bowed-shaped gear arrangement with cross braces that link to the center carburetor air inlet tunnel. It requires a precise alignment to get it right. That’s no different than most kits but it is a difference you will notice far more in a front view. Your chances of getting it right with this kit are not very good. Once it is on with styrene glue using the kit plastic locating hole and strut plastic nib, it will come off unless you take great care during construction to use some metal pins with cyano glue to prevent separation error.
Another area where the CA kit has some painful limitations is in the wing spar
attachment placement. It was much easier with the Italeri kit and when I built
the Italeri kit that part of the build did not make me thrilled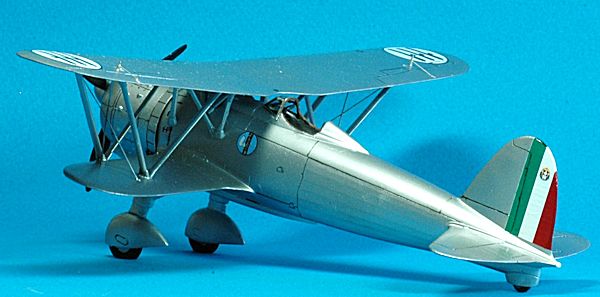 In hindsight, Italeri was a much easier to build kit especially when it comes to adding the
spars and support pieces between the biplane wings including and especially
mating them to the fuselage.
In hindsight, Italeri was a much easier to build kit especially when it comes to adding the
spars and support pieces between the biplane wings including and especially
mating them to the fuselage.
Even some of the smaller detail parts which look great in the box and in the assembly instructions become a building quandary when you try to include them. I noticed in another web build someone built a fine looking CA CR.42 but in one of the photos I noticed the gunsight was below the front cockpit coaming. This is easy to do with the CA kit because there is no good locating or support parts incorporated into the kit. You have to scratch build a work around to put the gunsight and magnetic compass in the correct location.
In the end it was less than fun for me. I loved the subject matter but kept thinking I did not want to show this kit(s) to anyone after they were built. I even stopped construction for a few weeks to build a Hasegawa 1/32nd scale kit which was a delight to assemble. Once I got my modeling mojo back I went at the four kits again (the other two are CA #497 CR.42CN Night Fighters). That’s a shame since the Classic Airframes CR.42 kit contents looks fantastic in the box. The assembly instructions are quite nice and the decals outstanding. There was just way too much clean up, dry fitting and in the end poor parts fit encountered at each assembly step for it to be much fun.
Before I started this build I thought the Classic Airframes kit had so many advantages over the newer Italeri CR.42 kits. Why? You can find the CA kits issued for more versions than Italeri. The inclusion of resin details, lower price, ease of availability and Eduard color etch gets it the nod in value. Italeri could have moulded their CR.42 plastic parts much better and improved the kit assembly process by doing so. Some of the Italeri parts are somewhat crude, especially compared to other major plastic kit manufacturers. Some parts were not the crisply moulded plastic I would have expected from them
The overall shape and dimensions of the Classic Airframes CR.42 kit are correct so don’t lose hope since you can build a very nice model from this kit. With a lot of care and application of modeling skills to overcome kit deficiencies it all works out in the end. I encourage you to build one because some of the problems can be seen as a challenge to apply some modeling skills and it’s part of the hobby. I am very pleased to look at these CR.42’s now that they are completed. My finished kit may not be a contest ready model but it is satisfying to have them sitting on my model shelf next to the Italeri kits. There are other CR.42’s I would like to model so I am not yet done with this journey.
Despite the Italeri kit being an all styrene effort, I would say the Classic Airframes CR.42 kit(s), second release series, is a possible alternative to Italeri. The CA kit has a much better cockpit with far more accurate detail. You have to balance that with the inherent complexity of working with mixed media including some thin and at times flimsy etched metal bracing for the CA kit cockpit interior (especially in its first release) so be careful if the CA kit is your choice. The CA kit is more difficult to build with a far greater parts count than the Italeri so there is a slight ease of assembly concern in the comparison. Italeri has a much better engine and the CA engine has too many resin parts. However, the CA resin cockpit interior and color etched metal parts are impressive if you can get the components to fit.
The exterior plastic detail on the CA kit, despite being a limited run effort,
is not as crisp in some areas as Italeri but in general almost on par with most
of the Italeri kit so you do have a choice. Classic Airframes omitted a number
of important items such as the wing root oil cooler front intake inlet and
outlets at the rear, wing formation lights, spar mounted pitot tubes all of
which are on the Italeri kit. The CA kit comes with color etched metal details.
Italeri has no etched metal parts. Some of the Classic Airfra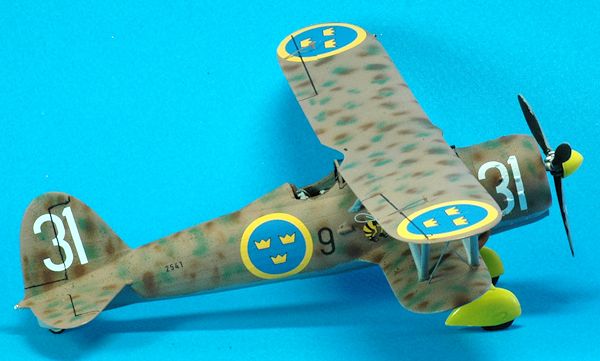 mes parts use hard
to glue (i.e. requiring metal pins for a secure join) butt joins (the gluing is
easy, keeping them together long term and properly aligned is the problem)
compared to the Italeri keyed slots assembly.
mes parts use hard
to glue (i.e. requiring metal pins for a secure join) butt joins (the gluing is
easy, keeping them together long term and properly aligned is the problem)
compared to the Italeri keyed slots assembly.
As Scott mentioned it is an apples to orange comparison so it does depend on your personal modeling abilities, choices and preferences. My point is don’t think the newer kit which is all styrene is much easier to work with as it should be. You can still pick up Classic Airframes’ CR.42 kits at good prices from some retailers and always on eBay at a good price when it is a rational seller. Italeri’s current kit pricing for their CR.42 just doesn’t work for me leading me to consider Classic Airframes CR.42 as a valid alternative on a value based comparison. If you want a fast build or a build that you can forge through quickly, that will result in a sweet looking model you are proud of – then CA is not the kit for you. With a lot of extra effort, clean up and care in assembly, in addition to adding the missing details you can turn this kit into a showpiece.
You could be of the opinion that you can get a great deal more enjoyment out of wrestling an ill-fitting kit into submission and adding scratch built detail than just plugging Tab A into Slot B, slapping paint on it, and calling it done. This might be how some of us enjoy the hobby. We each enjoy it differently. Final thought, Yes I have a number of inaccuracies with these builds. Rather than toss them when I compromised in a build step I tried to push through to completion. My shelf of doom with partially built kits is full and I am determined to avoid this practice. I am of the mind to have fun with every model and the importance of getting it built. So, that’s the point of this build – just to see what they look like when built to enable you to do better than I and avoid the pitfalls that caught me. You can get the same feeling of satisfaction at a final completion as I did. I hope you can accept the “do as I say and not as I do” because some of my cautions are based on bad building events. This is a model best seen from a three-foot distance! Yes, I am fully aware of some errors in these builds – they are there since the get it perfect eluded me. But I did have some modeling fun which is what it is all about! Build you Classic Airframes CR.42’s!
| REFERENCES |
FIAT Cr.42 , Orange Series # 8104, Stratus Books, Mushroom Model Publications 2007
Fiat CR 32/CR 42 In Action, # 1172 by George Punka, Squadron Signal Books 2000
Profile Publications No. 16 FIAT Cr.42
C.R. 42 Falco Italeri Kit # 2653 booklet, 2006
Fiat Cr.42 Ali e'Colori No. 1 La Bancarella Aeronautica
SKYmodels decal 'Fiat CR.42', # 48-036 and 48-037
Fiat CR 42, Ali D’Italia #1, La Bancarella Aeronautica, 1995
International Air Power Review, November 2005, Vol. 17, pages 158 to 173.
Andy Garcia
October 2013
If you would like your product reviewed fairly and fairly quickly, please contact the editor or see other details in the Note to Contributors.