| KIT #: | 48033 |
| PRICE: | $39.99 |
| DECALS: | Three options |
| REVIEWER: | Andrew Garcia |
| NOTES: | Eduard Zoom FE 288 used |
| HISTORY |
The Saetta underwent
very few modifications during its service life. It was unique in that it started
life with an enclosed
 canopy (I Serie) and later production versions went to an
open canopy configuration. Aside from the switch to an open canopy, later
aircraft were fitted with an upgraded radio and an armored seat. Some
late-production Saettas were
built with the MC.202 Serie VII
wing, thus adding two 7.7 mm (.303 in) Breda-SAFAT
machine guns to
the armament.
canopy (I Serie) and later production versions went to an
open canopy configuration. Aside from the switch to an open canopy, later
aircraft were fitted with an upgraded radio and an armored seat. Some
late-production Saettas were
built with the MC.202 Serie VII
wing, thus adding two 7.7 mm (.303 in) Breda-SAFAT
machine guns to
the armament.
There were four main versions (with many subtypes) of the MC.200:
M.C. 200 (prototypes) - Two prototypes fitted with the 623 kW (840 hp) Fiat a.74 RC 38 radial piston engine.
M.C. 200 - Single-seat interceptor fighter, fighter-bomber aircraft. This was the initial production version. Initial production was called the “I serie” with a enclosed canopy, straight rudder and prop spinner with later “serie” versions featuring the open canopy for better visibility, a rudder offset balance and no prop hub. M.C.200AS – was an adaptation for North African use with engine air filters and extra oil coolers. M.C.200CB - Fighter-bomber version with the ability to carry 320 kg (710 lb) of bombs or two external fuel tanks.
M.C.200bis was a Breda-proposed modification with a Piaggio P.XIX R.C.45 engine producing 1,180 hp at 14,800 ft. It flew on April 11, 1942 near its production center of Milan, Italy. The aircraft had a larger propeller and a revised engine cowling. Top speed was 332 mph. It did not enter production as the C.200 had been replaced by more advanced designs such as the MC.202 Folgore.
M.C.201 – this model had a revised fuselage, a new engine - the Isotta-Fraschini Astro A.140RC.40 which was a license variant of the French Gnome-et-Rhone GR.14Krs Mistral Major. After some development experience the decision was made to use the newer Fiat A.76 R.C.40 engine with 1,000 hp. Two prototypes were ordered. It first flew on the August 10, 1940, still with the less powerful engine (i.e. using the A.74). Macchi estimated a top speed of 340 mph but the prototype was cancelled after Fiat abandoned the troublesome A.76 engine. The arrival of the Daimler-Benz DB 601-powered MC.202 Folgore ended further development of the radial powered Saetta.
The most serious handicap for wider utilization before the MC.202 took over was the low production rate. One source claimed it took over 22,000 hours of production time due to antiquated manufacturing technology. A total of 1,153 Saettaswere eventually produced, manufactured by Macchi, Breda and SAI-Ambrosini but almost all were gone from front line use by the time of the armistice between Italy and Allied armed forces in September 1943.
| THE KIT |
 Special Hobby
released a C.200 kit in 2005. I initially thought it was a re-release of the
Classic Airframes kit # 403 which first came out in 1995-96. It is not. It is a
significant improvement over the CA kit but for a different version of the
C.200. The CA kit was a nice kit and the CA kit was a huge improvement over the
SMER kit. However, in all respects the SH48033 release is an improvement. I
built the two side by side to provide a comparison. The Classic Airframes (CA)
kit featured etched metal and a better resin cockpit. However, CA due to the
etched parts and better detailed resin looks slightly better in the cockpit area
but with the addition of an Eduard colored Zoom etched metal set the SH48033
pulls ahead in comparison. The plastic parts are much better as well in the
Special Hobby release. Note, there is no Eduard aftermarket made expressly for
the SH kit. I used the Eduard MC.202 Color Zoom for parts since some of them are
usable in the C.200. While not 100% accurate it gave me the improvement I wanted
and is close enough. It was in my stash otherwise I would have tried using the
Eduard etched made for the Italeri MC.200 which is more correct in some details.
Special Hobby
released a C.200 kit in 2005. I initially thought it was a re-release of the
Classic Airframes kit # 403 which first came out in 1995-96. It is not. It is a
significant improvement over the CA kit but for a different version of the
C.200. The CA kit was a nice kit and the CA kit was a huge improvement over the
SMER kit. However, in all respects the SH48033 release is an improvement. I
built the two side by side to provide a comparison. The Classic Airframes (CA)
kit featured etched metal and a better resin cockpit. However, CA due to the
etched parts and better detailed resin looks slightly better in the cockpit area
but with the addition of an Eduard colored Zoom etched metal set the SH48033
pulls ahead in comparison. The plastic parts are much better as well in the
Special Hobby release. Note, there is no Eduard aftermarket made expressly for
the SH kit. I used the Eduard MC.202 Color Zoom for parts since some of them are
usable in the C.200. While not 100% accurate it gave me the improvement I wanted
and is close enough. It was in my stash otherwise I would have tried using the
Eduard etched made for the Italeri MC.200 which is more correct in some details.
The kit decals are printed by Aviprint (Classic Airframes used Propagteam for their # 403 release then went to Microscale for most other releases). The Aviprint decals are thin, nicely printed crisp graphics but require some care when applying them since they tend to stick when applied and not move once applied, unless you float them on some saliva (water alone may not work).
Overall fit is limited run low-pressure moulding adequate, with a very low parts count making for a simple assembly process. The simplicity in parts count is not a virtue at times because the joining of parts, such as the engine to the fuselage or resin cowl to the fuselage is less accurate. Surface detail is reasonably refined and panel lines are thinly scribed in a petit to scale manner giving a good impression in the box and looks good after the kit has been painted and assembled.
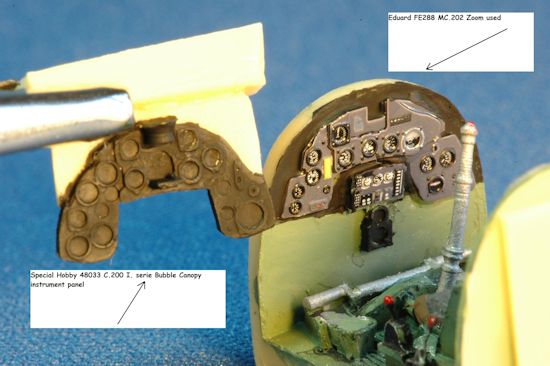
The cockpit resin is very nice but simplified with less details than the CA resin. It is of equal quality to most resin sets but in comparison not an improvement over the older CA kit resin cockpit. I just wish the instruments on the panel had some raised details and that a corresponding decal for the instrument faces would have been included in this package. That’s why I went to a painted Eduard zoom alternative. It is a small cockpit so this is not a big concern – just an observation. Also, unless you cut open the canopy you won’t see much in the cockpit so this is not a huge concern.
For my personal requirements I chose to use the Eduard 48288 zoom etched metal set because I had one on hand to improve the instrument panel and add some additional cockpit detail. There is a better zoom, EUFE-531 MC.200 interior Self Adhesive for the Italeri kit that is now available and a better alternative. Another choice could be to use the kit resin and add some punched–out aftermarket decals from Mike Grant for example for the instrument faces. That would make a very nice enhancement to the kit instrument panel. After all the construction and painting is finished, truthfully, unless you go in with a small dentist mirror and flashlight the cockpit is so small and enclosed once the canopy is on that you don’t easily see much. The seat and seatbelts are the most exposed parts that you would want to improve. The resin seat has some belts included so with some paint and a dry-wash it came out acceptably detailed.
 There are
other kits of the MC.200 Saetta available such as the early Classic Airframes # 403
Macchi C.200 Saetta, Pacific Coast Models 48001 Mc.200 Saetta Series VII, and
the two Italeri Macchi C.200 Saetta releases. I have seen some modelers
completed builds of these kits and they all look terrific.
There are
other kits of the MC.200 Saetta available such as the early Classic Airframes # 403
Macchi C.200 Saetta, Pacific Coast Models 48001 Mc.200 Saetta Series VII, and
the two Italeri Macchi C.200 Saetta releases. I have seen some modelers
completed builds of these kits and they all look terrific.
There is a resin cockpit set from Pavla, # 48020, intended for the Italeri kit which could be adapted to this model. I think the SH kit’s resin is not as good as the Pavla resin but comparable enough for less than competitive comparisons and suffices. The Pavla cockpit set is clearly a big improvement over the SH kit parts. I have yet to see the Pacific Coast Models 48001 Mc.200 Saetta Series VII kit close up (web browsing doesn’t count) so I can’t comment on that alternative at this time but I understand it is essentially the Special Hobby kit repackaged with the serie VII fuselage, new decals and some etched metal.
The main landing gear struts are plastic (the CA # 403 kit used white metal for the main landing gear and resin for the tail wheel). The tail gear is resin with a plastic wheel. In order to get a better representation of the tail wheel Special Hobby provided a resin part. The resin looks beautiful but it is very fragile. I broke mine and wished it was a white metal part. It was a difficult repair task to fix the breakage (see photo). Once the landing gear doors are on you don’t see much of the rear wheel at all.
The cockpit canopy is a vac form. Two copies are provided in case of a mishap (nice touch SH!). They were clear with a slight blue tint and well formed. I used some future floor wax to improve the clarity. They, vac-form canopies, do provide a nice scale thickness compared to injection moulded canopies. I did have a problem cutting and attaching the canopy since the cut lines did not give me a good fit. Part of the concern in this area is with the internal roll-over structure behind the pilot, you need clearance inside the canopy area. I don’t usually have any problems with vac-form canopies but this one needs more care and test fitting.
I always enjoy looking at Special Hobby’s box art and this one is superb. It is your modeling guide for one of the finishes as well. The black and white instructions are not as useful as I would like when comes to final painting especially for Regia Aeronautica color schemes. A color enameled paper of the decal schemes would have been really appreciated for these colorful and complex camouflages.
A close look or comparison of the box art versus the kit contents shows some missing parts. The kit is for a “I. serie” airframe but it is lacking the most significant features for the early version which is featured on the box top such as the prop spinner, the straight rudder without any offset or balance, and there are no wing pitot tubes or gunsight. The pitot tubes in this aircraft are very unusual having a unique cranked shape and there are two of them – one on each wing. The instructions tell you to make some pitots’ from wire. The prop spinner, gun sight and rudder are missing even from the instructions since they are not in the kit parts. Most of these changes you will see in the Pavla resin I serie conversion kit which is designed for the Italeri kit. The SH kit does however have the “bubble canopy” via its vac-form canopy and resin rollover support structure under the canopy which is another distinguishing feature of the “I. serie” aircraft.
The instructions are functional and if you have previously built a special Hobby kit you know they are good except for the color schemes where the small drawings and black & white for finishing options are a limitation. I wish they had the color version available on their website for downloading or included with the kit as an enamel paper printed sheet. Also, the color call-outs are only listed as Gunze Sangyo “H” paint product codes and not spelled out nor with FS color codes.
 When I first
bought the kit I thought it was a later version of the MC.200 because it had a
canopy. With my limited understanding of the MC.200 I assumed the widely
photographed open cockpit version was the initial model. Now that I have the kit
and completed some reading on the subject I was surprised to learn the actual
evolution of the airframe was the opposite. SH released a model of a Macchi 200
variant, the “I. serie” that was quickly replaced by the Regia Aeronautica. The
enclosed or bubble canopy was found only in the initial release of the C.200.
The next revision did away with the enclosed canopy. Apparently the canopy was
difficult to open to allow quick escape, the quality of the clear canopy
material, a layered plastic, was poor and visibility quickly degraded after some
usage. Since there was a lack of good radios in R.A. aircraft the custom of
Italian pilots at that time was to use hand signals in close formation, thus a
closed canopy limited communication between aircraft.
When I first
bought the kit I thought it was a later version of the MC.200 because it had a
canopy. With my limited understanding of the MC.200 I assumed the widely
photographed open cockpit version was the initial model. Now that I have the kit
and completed some reading on the subject I was surprised to learn the actual
evolution of the airframe was the opposite. SH released a model of a Macchi 200
variant, the “I. serie” that was quickly replaced by the Regia Aeronautica. The
enclosed or bubble canopy was found only in the initial release of the C.200.
The next revision did away with the enclosed canopy. Apparently the canopy was
difficult to open to allow quick escape, the quality of the clear canopy
material, a layered plastic, was poor and visibility quickly degraded after some
usage. Since there was a lack of good radios in R.A. aircraft the custom of
Italian pilots at that time was to use hand signals in close formation, thus a
closed canopy limited communication between aircraft.
Another excellent review I read indicated this kit is based on the Macchi 200 Serie VII that was issued by Pacific Coast Models (“PCM”). The sprue with the wings, and nearly all the resin parts appear to be the same as in the PCM kit. The sprue with the fuselage is not the same as in the SH kit which is correct since the PCM kit is for the open cockpit serie VII. The Special Hobby kit does not have the etched metal and superior instructions that were included in the PCM kit. The fuselage sprue however is different in the PCM kit due to the changed area behind the cockpit which represents later VII serie fuselage configurations. An improvement in the engine area is also provided with an add on accessory, PCM 48001es Fiat A.74 engine, which is a 1:48 resin kit for the G.50, C.200 and others.
The picture on the SH box represents the earliest Macchi C.200 I Serie . This includes the bullet shaped cover for the spinner hub, the straight rudder hinge, machine gun barrels without blast tube extensions and a small tubular rollover support structure under the canopy. That creates a question that I have not yet resolved regarding the correct fuselage and propeller – do you rely on the box art or is the kit plastic correct for this version? I went with the references and concluded the instructions and kit plastic are missing some parts like the correct prop hub and vertical tail with a straight rudder hinge (the Pavla correction fixes these). The tail wheel covers need to be modified as well since the wheel was completely enclosed once retracted thus the door has a square shape and not the wheel cut out seen in the SH kit plastic.
The parts in
the box are for the late I Serie aircraft. The fuselage in the kit has the
mass-balance offset rudder, no prop hub cover and it has the extended machine
gun barrels in resin. If you want to do a conversion back to the early Serie I
you would need to fill the horizontal part of the rudder line, re-scribe the
changed rudder line, delete the rollover structure or simplify it into a smaller
tubular support structure instead of the very visible metal keel, and replace
the machine gun barrels. The prop hub would also require a bullet spinner just
as it appears on the box art. The prop
would also have to be changed according to more knowledgeable MC.200 experts
because there were two versions of the prop used - the Fiat-Hamilton prop and
the Piaggio prop. The SH kit is for the Piaggio prop. The
blades in the PCM kit are cast in resin and this release by SH has the blades in injection
plastic and they are not as refined as the PCM release. The SH kit has a resin
 prop hub with plastic blades which is correct for the later variable pitch Piaggio P.1001 propeller. The earlier FIAT-Hamilton fixed blade prop had a
distinguishing counter-weight prop hub which is hidden by the spinner. Since I
built this model as a very early initial production machine I used the Hamilton
Standard prop logo decals. If you build this kit as a later I series version you
should not use the kit prop blade stencil which is for the FIAT-Hamilton prop.
You will need to find the prop blade stencil representing a Piaggio P.1001
propeller which is a very different and distinctive trademark “Aeronautica
Macchi Varese” stencil illustrated on page 71 of the Aero Detail 15 reference
text .
prop hub with plastic blades which is correct for the later variable pitch Piaggio P.1001 propeller. The earlier FIAT-Hamilton fixed blade prop had a
distinguishing counter-weight prop hub which is hidden by the spinner. Since I
built this model as a very early initial production machine I used the Hamilton
Standard prop logo decals. If you build this kit as a later I series version you
should not use the kit prop blade stencil which is for the FIAT-Hamilton prop.
You will need to find the prop blade stencil representing a Piaggio P.1001
propeller which is a very different and distinctive trademark “Aeronautica
Macchi Varese” stencil illustrated on page 71 of the Aero Detail 15 reference
text .
I don't have good enough references to permit me to definitely match the kit decals to the correct prop. It is a convoluted subject for the modeler because there were three different companies producing the aircraft resulting in a variety of configurations. One source confirmed there is a picture of a Macchi 200 with a straight rudder hinge, but with the extended machine gun barrels and the tail wheel placement of what looks like a II Serie, or later, aircraft. Also I noted there were photos of other aircraft with offset rudder hinges, no prop hub and the early style tail wheel arrangement, as in the SH kit. It appeared if the aircraft had a rollover support in the keel configuration that comes with this kit; it did not have a prop hub cover. I really like WWII era Italian aircraft but am new to the subject so this is a learning experience for me. As much as I do want to build a very accurate model sometimes despite good intentions you can fail with a poorly documented subject or limited knowledge. If you want to build the early versions the prop hub requires a fix which is to punch out a circular disc from Evergreen plastic sheet and glue it to the rear of the prop hub assembly and add the counterweights to the front of the hub.
This build caused me to retrieve from my stash the Classic Airframes (CA) # 403 Macchi C.200 kit for comparison. The cowling clearance bulges in the CA kit were in resin requiring you to glue each NACA cowl bulge onto the plastic cowl, also the CA cowl itself was in two pieces of plastic. Each bulge had to be super-glued in place. The SH kit, as well as the PCM kit have a beautifully cast one piece resin cowling. I was really impressed with casting quality of the resin cowl. It was perfectly cast and finely detailed. The NACA shaped rocker valve clearance bulges and exhausts are all molded on a beautifully cast single piece of resin. Separating the cowl from its pour block was a bit of a challenge but not problematic. As an aside, the resin machine guns and tubular front support tubing for the SH kit were placed inside the resin cowl for protection during shipment – what a great idea! They survived thanks to this application of some pre-shipment forethought.
This model is a very nice addition to any 1/48 collection of Regia Aeronautica aircraft. After building it at the same time as the older CA kit I realized you can enjoy how much better limited production kits are today than just fifteen years ago. But – the CA kit still builds up into a very nice representation of the C.200. If you want to do an early version with the tri-color stripes on the fin and rudder and with the prop spinner you will need to back date it to an early Serie I aircraft and get the correct markings. The SKYmodels decal sheet 48-021, has markings for three of the tri-color tailed, early Serie I, with the prop spinner. The AeroMaster sheet, # 48-154, does not have any tri-color/prop-hub versions but features seven other C.200 aircraft which are not part of the CA or SH kit decal selections.
 The machine
gun fuselage openings were non-existent. SH chose to provide an outline on the
fuselage plastic which you have to open up and drill out. I suggest you do this
step before any construction or painting. I chose to do it after everything was
complete including painting so I could get the gun barrels perfectly aligned. With
this first-hand experience I advise you to drill, carve and clean it up with
test fitting before any gluing takes place. I do wish SH would have opened up
this area in their moulds because despite a clear outline and a nice Dremel tool
I did not enjoy this task nor was I happy with the final result.
The machine
gun fuselage openings were non-existent. SH chose to provide an outline on the
fuselage plastic which you have to open up and drill out. I suggest you do this
step before any construction or painting. I chose to do it after everything was
complete including painting so I could get the gun barrels perfectly aligned. With
this first-hand experience I advise you to drill, carve and clean it up with
test fitting before any gluing takes place. I do wish SH would have opened up
this area in their moulds because despite a clear outline and a nice Dremel tool
I did not enjoy this task nor was I happy with the final result.
Attachment of the landing gear covers is also cumbersome. There are some tiny resin bits that are attached to the landing gear and once dry you attach the two-piece gear covers to these. Looks simple enough on the instructions but was not so simple in practice and they did not fit well. CA does the parts in etched metal which were easier to attach. Also, SH chose to provide the main gear covers in two parts which is accurate and correct but it would have been much better as a one piece unit.
The resin engine looks acceptable but could have been better rendered. It is missing the very prominent valve guide tubes on the front of the FIAT A.74 RC38 cylinders and the expanded mushroom like top end. You could add the tubes by using styrene rod as I did for my Classic Airframes C.200. I don’t like to use etched metal for the valve guide tubes preferring the round styrene rod for realism. It would have been ideal if cast in resin with the engine cylinder parts. A comparison with the Italeri kit which renders it nicely and reference photos leads me to want more detail in this area since it is visible and an important part of the aircraft. For most C.200 aircraft the top panel, between the gun barrels, should extend out to meet the fuselage. However, only the very early serie did not have this feature so I did not have to make this change as I did with the CA model.
There is a Pavla conversion set, # 48038 for the Italeri MC.200 to convert that Italeri kit, # 2676 into the Macchi C.200 Saetta I serie update with vac canopy and decal for Italeri. You could also use the newly released Italeri Kit # 2711 MC.200 2a Serie for a similar airframe without the spinner and rudder change. The Pavla conversion does have the prop spinner, new propeller blades and a corrected vertical tail assembly which is not part of the Italeri kit #2711 to provide an accurate C.200 serie I aircraft. Pavla also has a separate resin cockpit, #48019 (early) and # 48020 which could be an alternative for the SH kit as well.
| CONSTRUCTION |
 Even with the
small parts count it is not a fast build due to the need to work with limited
run multi-media components. Just follow the instructions and you will do well by
test fitting before gluing. The Eduard instrument panel was attached to the
plastic kit panel after its plastic surface detail was removed. I glued the
Eduard parts to the kit instrument panel using gorilla glue. After it was
completed I would say the Eduard panel is not needed unless you are a purist.
Even then it is wrong because it is missing the prominent bell shaped magnetic
compass. You can see it, the cockpit, only with a great effort because the
cockpit is quite small and enclosed. With a closed canopy I thought forget it!
But, I did it and liked it that way. The final kit looks great to me and I am
very pleased with it, despite some building and painting mishaps, by including
the detailed cockpit.
Even with the
small parts count it is not a fast build due to the need to work with limited
run multi-media components. Just follow the instructions and you will do well by
test fitting before gluing. The Eduard instrument panel was attached to the
plastic kit panel after its plastic surface detail was removed. I glued the
Eduard parts to the kit instrument panel using gorilla glue. After it was
completed I would say the Eduard panel is not needed unless you are a purist.
Even then it is wrong because it is missing the prominent bell shaped magnetic
compass. You can see it, the cockpit, only with a great effort because the
cockpit is quite small and enclosed. With a closed canopy I thought forget it!
But, I did it and liked it that way. The final kit looks great to me and I am
very pleased with it, despite some building and painting mishaps, by including
the detailed cockpit.
For most limited production, low-pressure injection moulded kits you have to work a bit extra to reinforce the wing and stabilizer joins using some modeling skills. I glued some metal pins to the tail stabilizers. I thought of using some brass tubing inside the wing to insure no separation caused by handing would ruin an enjoyable build. Essentially using a piece of tubing inside the wing is a wing spar just like on the actual aircraft. Since the wing lower portion is one piece this addition is not a requirement. When the main wings are in two parts and attach directly to the fuselage that’s when a tubing spar is a must have. You could get away with not using the pins and tubing for a spar but I have never had regrets adding this extra construction step.
At first take Part A20 looks like a spar in the diagram for step # 4 but it is just the rear bulkhead in the main landing gear bay. Once it is glued in it does not support the wings. Also, I recommend you have an ample supply of clamps, metal clips and Berna Assembler clamps to tackle this kit. This is not a negative comment, just a helpful suggestion to enhance your modeling satisfaction.
Construction
begins with the engine resin parts and cockpit resin. This step went very well.
For some reason, perhaps to be a better model representing the real thing and to
do the wheel well structure justice MPM/Special Hobby usually provide a
complicated engine cradle for their radial engine kits. This one is no
exception. The engine cradle is attached to the firewall. The firewall, part #
20, provides minimal support for the wings that’s why I thought I needed a
tubing spar for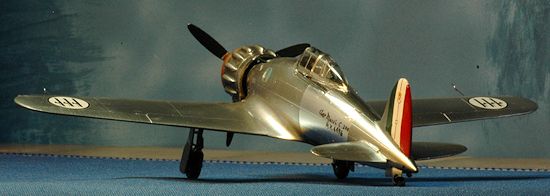 reinforcement. Let me re-state that to say that part 20 will
hold the wings as an attachment once it’s all glued together – just not as a
wing tip to wing tip center spar.
reinforcement. Let me re-state that to say that part 20 will
hold the wings as an attachment once it’s all glued together – just not as a
wing tip to wing tip center spar.
The actual support for attaching the engine cowling to the fuselage will be the cylinder heads and the rear resin block of the engine. There is no positive attachment point between the cowl and the fuselage. I drilled a larger than usual hole for a metal rod made from a large paper clip to secure the engine to the plastic fuselage nose tip. I also used a donut made of Apoxie sculpt to help with the engine to fuselage attachment. Because the cowl is attached to the engine and does not touch the fuselage, this required a careful fitting of the cylinders to the crankcase. You should expect some contact to permit an attachment. This meant the cowling fit was tight. Alignment can be a problem. You need to line up the lower air intake duct and the gun troughs as well without the benefit of any pins or connectors to guide you – remember it is a limited run kit, The Italeri kit eliminates this problem through a keyed engine attachment point. The Italeri kit also has a keyed contact point for the engine to make sure it is correctly set within the cowl. Not so for the SH kit so you need to ensure these are all lined up correctly using your mark 9 eyeball from multiple angles.
The actual connection of the plastic cradle parts to the resin frame, Step # 3 was a challenge. You have two choices. You can use very hot water to improve the flexibility of the frame then force fit it to the mounting holes on plastic part A20. The alternative is to use clamps and strong adhesive to hold it in place while the glue sets. I did both. Since it is not easy to see and in reality not very visible from inside the landing gear opening I was not too concerned about sloppy gluing. I used a combination of slow-gap CA glue and gorilla glue. First the CA was used to position the part. When it was dry I added some gorilla glue and a spray of water to accelerate the gorilla glue curing and strength. It does bubble, even more so if you spray it with water. In a bond which is actually a welded joint in the actual aircraft I was not too concerned about finely gluing the parts together. The plastic tubing representing the engine support to the firewall does not really fit at all together leaving significant gaps. Visibility into this area is underneath the fuselage, looking up through the main landing gear bay. The important thing was the hold and clearance with the fuselage parts A1 and A2 since it is a tapered front end fit and clearance is an issue. I did have to test-fit, file and sand away to get these parts to fit together before final fuselage closing and painting.
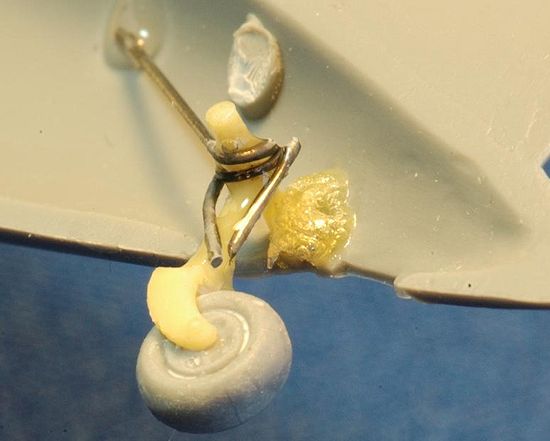 The rear tail
wheel broke during assembly. It is a two part unit, a resin strut and plastic
wheel. This allows for a very nicely detailed rear wheel assembly but it is not
very durable. Some resin is brittle. While attaching the wheel I apparently
applied to much pressure and the fork snapped – and I was being very careful. So
this setback cost two days in fixes (see photo). I first had to use CA to glue
the wheel and fork parts together. Once it was hardened, one day later, I had to
secure one part of the attachment bar to the fuselage plastic to fix this part.
I applied glue to only one side of the fork holding the two fuselage halves
together with clamps. I left it overnight to set. The next day when I separated
the two fuselage halves I CA glued a metal guitar string support rod to the
fuselage plastic and another piece of guitar string to the strut. Once this was
all dry I added some Aves Apoxie Sculpt to help support the weight bearing
parts. Now I was ready to close up the fuselage hoping the rear wheel would be
durable.
The rear tail
wheel broke during assembly. It is a two part unit, a resin strut and plastic
wheel. This allows for a very nicely detailed rear wheel assembly but it is not
very durable. Some resin is brittle. While attaching the wheel I apparently
applied to much pressure and the fork snapped – and I was being very careful. So
this setback cost two days in fixes (see photo). I first had to use CA to glue
the wheel and fork parts together. Once it was hardened, one day later, I had to
secure one part of the attachment bar to the fuselage plastic to fix this part.
I applied glue to only one side of the fork holding the two fuselage halves
together with clamps. I left it overnight to set. The next day when I separated
the two fuselage halves I CA glued a metal guitar string support rod to the
fuselage plastic and another piece of guitar string to the strut. Once this was
all dry I added some Aves Apoxie Sculpt to help support the weight bearing
parts. Now I was ready to close up the fuselage hoping the rear wheel would be
durable.
I would recommend you use and I looked for a Scale Aircraft Conversions replacement metal landing gear for this kit but there isn’t one available at the moment. If or when it comes out you will really want it to fix the tail wheel problem using a SAC replacement. It could be used on the C.200 kits by CA and Special Hobby. If the SAC metal for the main gear is properly done with a flat base where the struts attach to the inside wing instead of the small nipple like the kit part they will get my money for several of these parts. I hope the connecting part at the top on a SAC replacement looks like a small plate rather than a small nipple fitting into a tiny dimple as it comes with the kit. It would be a vast improvement on attaching the landing gear and give a durable mounting which is missing on these kits. The actual joining of the landing gear to the wings was a difficult step. I had to use a third hand with alligator clips to hold the gear while the glue dried overnight. The next day I reinforced it with gorilla glue because it is a flimsy join if you rely on CA or plastic cement.
The actual aircraft main landing gear covers come in three parts. I had to look closely at the references or pictures of museum aircraft to support this assembly in the model. Since I had first built the Classic Airframes C.200 which had a one piece etched metal landing gear cover I was concerned with accuracy on this build. It looks like SH did it correctly and accurately. The landing cover for the main wheels is a three part assembly (four if you count the doors, part # A5/A6), but could be better provided as a two part unit similar to the Italeri injection plastic kit parts 19A/22A. Italeri’s cover consists of a small one piece flap at the top and a two part cover attached to the landing gear to permit oleo bounce as in the real aircraft. The long leg cover has a seam in the middle. The SH kit accurately represents this with parts A5/6, A11/12 and B8/9. See pages 39, 58, 59 and the “undercarriage” section 66-71 of Macchi C.200 Saetta MMP Books Orange Series No. 8113 for more details on the landing gear.
After this build was over I was continuing in my R.A. reading and found the “Stormo” website dedicated to R.A. aircraft has a wealth of information. I found my observation that there were numerous pneumatic and electrical wires and hoses visible in the open main gear bay to have some additional modeling oriented details such as the correct colors for the pneumatic and electrical wires and hoses in a section called “Color Codes for Mechanical and Pneumatic Equipment”. You will find this useful for the C.202/205 as well.
 Step four has
you inserting the resin cockpit, engine cradle, tail wheel and attaching the
horizontal stabilizers. I used gorilla glue to hold the resin cockpit in place.
I used two small metal clamps to hold the cockpit walls to the fuselage plastic
and let it set overnight. I attached the top of one of the wings but left the
other one off to permit me to glue the part A20 firewall into the fuselage and
secure the fuselage to wing join. You can get by without adding the wing spar so
this is the moment of making that decision. Once the second wing goes in it’s
too late but fear not because adding the spar is probably not essential because
part B3, the lower main wing portion is a one piece unit.
Step four has
you inserting the resin cockpit, engine cradle, tail wheel and attaching the
horizontal stabilizers. I used gorilla glue to hold the resin cockpit in place.
I used two small metal clamps to hold the cockpit walls to the fuselage plastic
and let it set overnight. I attached the top of one of the wings but left the
other one off to permit me to glue the part A20 firewall into the fuselage and
secure the fuselage to wing join. You can get by without adding the wing spar so
this is the moment of making that decision. Once the second wing goes in it’s
too late but fear not because adding the spar is probably not essential because
part B3, the lower main wing portion is a one piece unit.
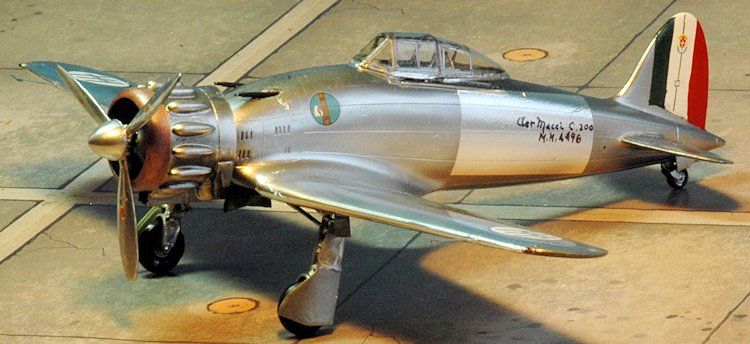
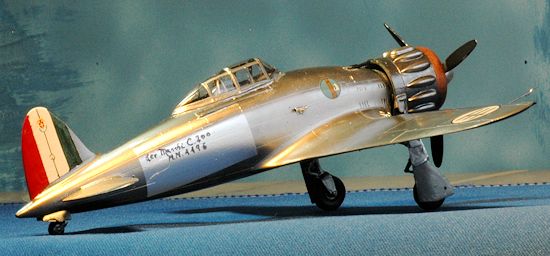
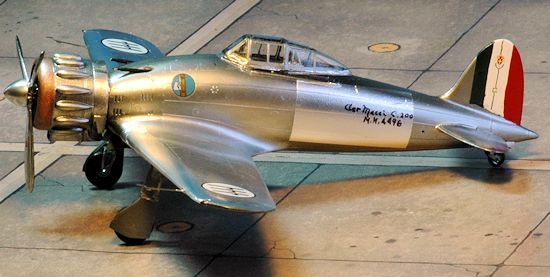
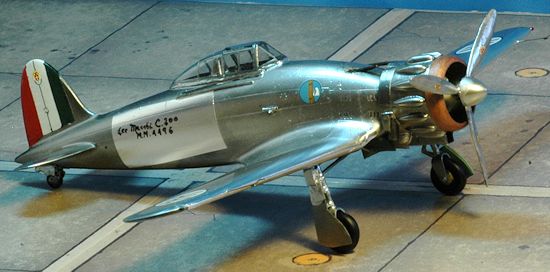
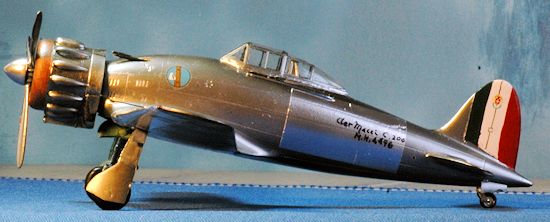
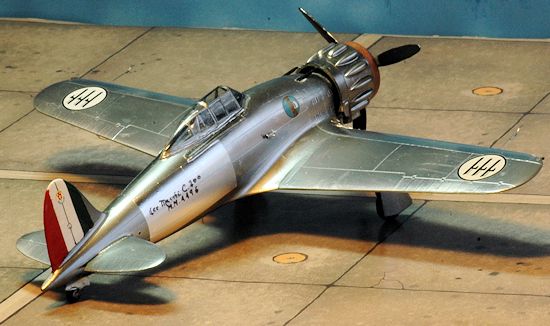
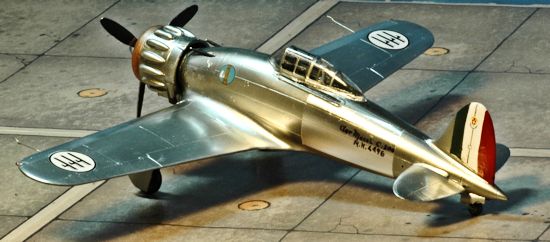
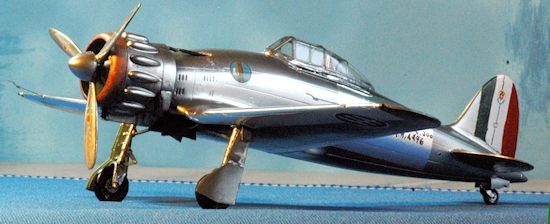
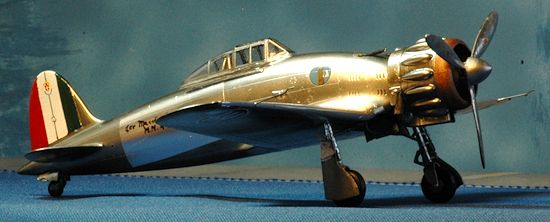
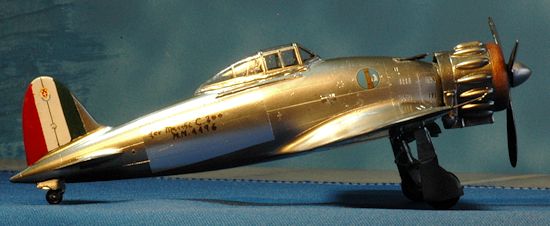
With all the reading I had to do for this project I stumbled upon a color profile of the C.200 in a natural metal finish. The C.200 is usually camouflaged in a variety of interesting schemes which is the main reason I am drawn to modeling it. The unique appearance and challenge of creating a model in natural metal finish of the initial production/prototype aircraft became my goal. The version I wanted to model is not represented by the kit decals.
When I started the build I was going to use the kit decals since the three alternatives all looked attractive. The more I read the Macchi C.200 Saetta MMP reference book the more I wanted to model one of the natural metal finished early Saetta’s. There is a superb set of period photos and a color profile of M.M. 4496, the second aircraft of the first production series, on pages 5 and 8.
The problem is I needed either the Pavla conversion or a bunch of parts like a prop hub in order to model the serie I version seen on the box top artwork and the one I wanted to model - serial numbered M.M. 4496. I found the replacement part in the Special Hobby 48086 Fiat G.50 kit which has three varieties of prop hubs.
Fantastic, what a find! The alternative was to buy the Pavla resin conversion for these two parts. The Pavla product is quite nice and even includes decals but since the SH kit already has the correct canopy, and resin internal roll-over bar it was not essential for this conversion. This is a great opportunity for Quickboost resin parts to come to the rescue with just the two small parts missing so we don’t have to rob a donor kit or buy an expensive conversion intended to for the Italeri kit #2676. Ideally the small prop hub and vertical tail rudder with a top to bottom straight edge is mainly what’s needed to correct the SH kit for a correct serie I airframe and the box art version. The roll-over headrest portion is an easy scratch build with Evergreen styrene plastic rods or a bit of Dremel tool cutting and re-shaping of the SH resin part PUR 22 which is what I did. Some sheet styrene was added to the rear wheel door and that’s it.
I like the kit vac-form canopy. I usually cut it open to permit a view into the nice resin and Eduard enhanced cockpit but one of the key features of this version was the closed canopy. Also, since the instrument panel is a modified C.202 panel I kept it closed. Even the flashlight crowd will have a problem seeing these parts. After its bath in future floor wax the clarity of the transparency was good permitting some viewing inside the cockpit area but not enough to be a concern.
| COLORS & MARKINGS |
The kit has three very attractive paint schemes represented by finely printed decals. However, during my C.200 research the early version represented by this kit box art requires a small prop hub and a different rudder on vertical tail. The beautiful cover box art shows a good example of a serie I aircraft – with the correct rudder and prop hub. I also found some nice decals for a serie I aircraft in the Skymodels 48021 decal sheet. In the Macchi C.200 Saetta MMP Books Orange Series No. 8113, page 8, the profile for an overall aluminum or NMF doped aluminum finish caught my eye. I wanted this model to have those colors including the tri-colored tail. I went with the NMF serial # M.M. 4496 as my choice.
 The cockpit
was painted in a color similar to the UK Spitfire and Hurricane internal color.
The instructions pointed to Gunze H312 which is a Pale Green FS34227 (semi
gloss) in the Gunze Sangyo Mr. Color Paint Line (# C312). I
used some old AeroMaster acrylics (# 1120 U.K. interior green) for this step. Getting
the cockpit color right was another learning experience.
The cockpit
was painted in a color similar to the UK Spitfire and Hurricane internal color.
The instructions pointed to Gunze H312 which is a Pale Green FS34227 (semi
gloss) in the Gunze Sangyo Mr. Color Paint Line (# C312). I
used some old AeroMaster acrylics (# 1120 U.K. interior green) for this step. Getting
the cockpit color right was another learning experience.
For the overall fuselage finish I used Alclad aluminum. You could also rework the finish to look like a silver doped airframe. Based on photos of an aircraft at the Belgrade aeronautical exhibition in 1938 I used a NMF finish and some pieces of bare metal foil.
I used a brush and two step process for painting the exhaust pipes. The exhausts were first painted with Alclad as part of the overall finish. Once dry I brushed on Metalizer Dark Iron non-buffing.
There were no antenna wires on this aircraft. The stencils and House of Savoia decal came from the kit. I used a Copic multiliner .05 pigment ink pen for the hand drawn fuselage markings. They looked great and somehow during finishing steps they were rubbed off or smeared. I resorted to using a Sharpie pen, ultra fine point, to redo them but it is a tad too large and does not look as good as the original artwork. I could have used some clear decal film which would have permitted an improved artwork example but then it adds the clear film which does not look as good as direct to metal painting. Maybe someday there will be a release of decals for the early version of the C.200! The build was not good enough for me to seek custom artwork.
Weathering and Final Coat – none used. My usual process is to use Testors gloss before decals go on followed by Testors Dull Cote but it would affect the NMF to the point where I don’t like the look so not this time!
| CONSTRUCTION CONTINUES |
I got to
use my UMM-USA PropMaster jig for propellers (PM-02 1/48). This is a
fantastic tool and has helped with many kits, especially the limited run
types from Eastern Europe. Actually, I have used it a few times with the
props of mainstream manufacturers as well to make sure the props were well
aligned to avoid the not quite right look of some props after the glue sets.
If you have a kit where the prop hub and propeller blades are separate parts
you need the UMM-USA PropMaster
 jig for propellers (PM-02 1/48). I drilled
out a mounting hole in the resin prop hub (part PUR20) and in the mating
surface of the plastic prop (part A19) and inserted a metal pin made from
guitar wire. A drop of Slo-Zap CA and final adjustment on the UMM-USA
PropMaster jig gets a good prop.
jig for propellers (PM-02 1/48). I drilled
out a mounting hole in the resin prop hub (part PUR20) and in the mating
surface of the plastic prop (part A19) and inserted a metal pin made from
guitar wire. A drop of Slo-Zap CA and final adjustment on the UMM-USA
PropMaster jig gets a good prop.
I have had friends actually build kits and get to this part and set the kit aside on the shelf of doom for a never to be completed status because the multi-part prop just doesn’t look right once it is assembled. I think the SH approach of plastic for the blades and a resin hub gives you a better final result than an all plastic hub and prop since the limited production moulds just don’t have the accurate hub detail most modelers are looking for in a good kit.
Resin prop blades have a tendency to warp so I do prefer injection plastic prop blades. I have tried to assemble hubs and props without the UMM-USA PropMaster tool and the end result is not a pretty sight. A slightly skewed prop will ruin an otherwise well finished plastic model. Using leggos or books, or what ever you have tried in the past is not as good as using this tool.
I also used the Master, Air Master Series, brass machine gun parts # AM-48-054 Breda-SAFAT 12.7mm barrels. I can sum up my reaction to using this addition in one word – WOW. I resorted to it because the kit resin barrels needed to have the small tips hollowed out and cut to remove the blast tubes not used on the early version I was modeling.
Using the Master models brass parts is expensive to some folks since it does cost about 1/3 the price of the kit but it is a superior addition. If you look closely at the product it is insane how well detailed it is. The perforated air cooled jacket alone is a work of art. You just paint it and combined with a slender delicately shaped brass central component the end result comes out looking fantastic. I bought two more after this build because of the amazing quality. Because it is brass it is very durable despite its small size and thin dimensions.
| CONCLUSIONS |
I really enjoyed building the Special Hobby C.200 I serie. It is definitely better than the older alternatives. I recommend this kit if you have minimum modeling skills with limited run and mixed media kits experience. It is a very nice package and the resin parts are superb.
 I am not sure
where the disconnect is in terms of providing the parts in the box that are
represented by the box art so that is the only real concern with this otherwise
very nice kit. It would be an easy to add resin component tree or a low pressure
injection moulded tree with the missing parts to remedy this fault.
I am not sure
where the disconnect is in terms of providing the parts in the box that are
represented by the box art so that is the only real concern with this otherwise
very nice kit. It would be an easy to add resin component tree or a low pressure
injection moulded tree with the missing parts to remedy this fault.
The conversion to a NMF early version, M.M 4496, the second aircraft of the first production run from June 1938 was a very enjoyable experiment and quite easy to accomplish. It looks great among its camouflaged C.200 Saetta brothers! I am pleased to now have other R.A. aircraft in 1/48th scale from Special Hobby available to add to my collection.
One final thought – if you try to build one of the first two MC.200 prototypes M.M.336 and M.M. 337 remember to include the lower folding extension to the main landing gear covers and eliminate the two small doors (parts A7/A8) along the center line. As found in the Japanese Ki-44 Tojo prototypes, Macchi had a folding landing gear door panel attached to the bottom of the main gear doors. After some development work they were found to accumulate debris or in extreme cases lead to a nose over when landing in soft fields and thus deleted.
| REFERENCES |
Macchi C.200 Saetta MMP Books Orange Series No. 8113
Aeroplano Macchi C.200; Ali D’Italia # 8; 2000
C.200 Saetta Scale Aviation Modeler International Vol. 2 # 8 August 1996
AeroMaster decal # 48-154
SKYmodels decal # 48-021
Macchi MC 200 Saetta Part 2; Maurizio Di Terlizzi; IBN Editore; 2004
The Macchi MC.200, Profile Publications, # 64
Stormo! web site at http://www.stormomagazine.com
Andrew Garcia
January 2013
If you would like your product reviewed fairly and fairly quickly, please contact the editor or see other details in the Note to Contributors.