Classic Airframes 1/48 SM.79 Sparviero
| KIT #: | 462 |
| PRICE: | Out of Production, company bankrupt |
| DECALS: | Three options |
| REVIEWER: | Scott Lyle |
| NOTES: | Short run multi-media kit |
| HISTORY |
 With its
tri-motor design, boxy fuselage, and trademark “hump”, the Savoia-Marchetti S.79
was one of the more unconventional looking aircraft of the war.
But if the saying “Don’t judge a book by its cover”
applies anywhere, it applies to the S.79.
It set 26 world records between
1937 and 1939, and was
responsible for sinking over 700,000 tons of Allied shipping during the early
part of the war.
Simply constructed of duralumin, plywood, and fabric skinning
over a welded steel tube frame, some 1,300 were built, several of which
soldiered on in the Italian Air Force until 1952.
With its
tri-motor design, boxy fuselage, and trademark “hump”, the Savoia-Marchetti S.79
was one of the more unconventional looking aircraft of the war.
But if the saying “Don’t judge a book by its cover”
applies anywhere, it applies to the S.79.
It set 26 world records between
1937 and 1939, and was
responsible for sinking over 700,000 tons of Allied shipping during the early
part of the war.
Simply constructed of duralumin, plywood, and fabric skinning
over a welded steel tube frame, some 1,300 were built, several of which
soldiered on in the Italian Air Force until 1952.
The S.79 first saw service in the Spanish Civil War
where its high speed made it virtually immune to all fighters but the Soviet
I-16.
During World War II it came to be the scourge of British shipping in the
| THE KIT |
Classic Airframes’ S.79 is a mixed
media kit with the fuselage halves, wings, engine nacelles, and torpedo made of
light gray injection-molded plastic.
All of the remaining parts are made of cream-colored
resin.
A sprue of well-molded, clear plastic parts is
 included,
as is a small fret of photo-etched parts.
Finally a sheet of decals provides markings for a
plethora of aircraft, and the kit itself is designed to allow you to build a
couple different versions of the S.79, either the popular torpedo-armed “sil”
version or the later “bis” version that saw the removal of the bombardier’s
gondola, amongst other changes.
included,
as is a small fret of photo-etched parts.
Finally a sheet of decals provides markings for a
plethora of aircraft, and the kit itself is designed to allow you to build a
couple different versions of the S.79, either the popular torpedo-armed “sil”
version or the later “bis” version that saw the removal of the bombardier’s
gondola, amongst other changes.
While the quality of the resin parts is excellent, the injection molded parts, at least in my boxing, had some issues. Many of the recessed panel lines had tiny “nodules” of plastic randomly set into them that took some time to remove with a panel line scriber. The starboard fuselage half also had a vicious warp in it that had to be dealt with (see below). Still, none of these issues were show-stoppers, and the overall feeling one gets when one opens the box is that it is a very high quality production that will build into an excellent model.
| CONSTRUCTION |
Before
I can say the usual “Construction began with the cockpit”, there were the
aforementioned part cleanup issues to deal with.
Removing the imperfections in the recessed panel lines
was straightforward using a good scribing tool - I use a sewing pin in an old
XACTO pin vice.
Dealing with the warp in the right fuselage half was a bit more
involved.
The warp caused the aft half of
 the part to
be angled outward – imagine looking straight down on the aircraft from above;
then imagine the right fuselage half angles sharply away from the left half
right in the center of the aircraft.
I tried “cold working” the part – basically just
twisting it by hand, but had no luck as the part is fairly thick.
Ultimately I used my Dremel tool to put a slit in the
“roof” of the fuselage right where the warp started.
At that point in the fuselage the “floor” is open as
that’s where the gondola is mounted, so now I could bend the fuselage much
easier.
With that problem solved the Dremel was still needed, but this time to
open up the back of the hump to display the interior of the dorsal gunner’s
station, and also to open up the crew entry door and the two side windows for
the waist gunner’s station.
And now it was time to start on the interior.
the part to
be angled outward – imagine looking straight down on the aircraft from above;
then imagine the right fuselage half angles sharply away from the left half
right in the center of the aircraft.
I tried “cold working” the part – basically just
twisting it by hand, but had no luck as the part is fairly thick.
Ultimately I used my Dremel tool to put a slit in the
“roof” of the fuselage right where the warp started.
At that point in the fuselage the “floor” is open as
that’s where the gondola is mounted, so now I could bend the fuselage much
easier.
With that problem solved the Dremel was still needed, but this time to
open up the back of the hump to display the interior of the dorsal gunner’s
station, and also to open up the crew entry door and the two side windows for
the waist gunner’s station.
And now it was time to start on the interior.
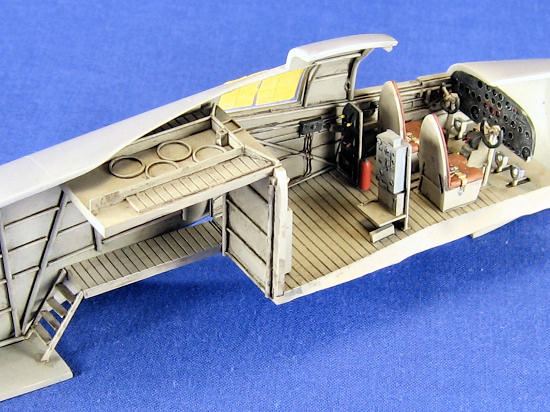
The resin interior parts allow you to build a highly
detailed rendition of the cockpit, the radioman’s station, and the navigator’s
station.
Aft of that you’re on your own, and since I wanted to display the rear
crew entry door open, I had to do a little scratch-building.
To do that I used Evergreen plastic rods to replicate
interior framing, using pictures of similarly detailed models on the excellent
Stormo! website as references.
I then attached the resin cockpit sidewalls to their
respective fuselage halves, attached the various cockpit parts to the cockpit
floor, and otherwise prepared any remaining interior parts.
I primed all of the interior parts and surfaces with Mr.
Surfacer 1000, and then pre-shaded them all with Tamiya XF-69 NATO Black.
The instructions say the interior color of the S.79 was
a light green anti-corrosion shade (Verde Anticorrosione), but the Stormo!
website indicated that in fact S.79
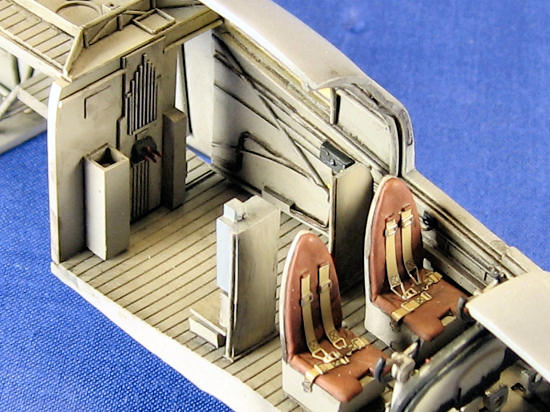 interiors
were painted a light gray shade.
To replicate this I sprayed on some light coats of
Tamiya XF-20 Medium Gray, keeping it subtle to let the pre-shading show through.
interiors
were painted a light gray shade.
To replicate this I sprayed on some light coats of
Tamiya XF-20 Medium Gray, keeping it subtle to let the pre-shading show through.
The instrument panel was painted
There are small guide marks on the inner surfaces of the
fuselage halves that tell you where the cockpit should be glued, and after a lot
of test-fitting and some trimming of the instrument panel I glued the cockpit to
one of the halves.
Once that was set I began test-fitting the fuselage
halves together.
I had to trim one of the cockpit sidewall pieces slightly, but
then the halves went together fairly crisply.
There were seams to be dealt with, the worst of which
involved the surgery I had to perform to undo the warp, but nothing too
terrible.
I spent two nights going around all of the seams with Squadron
Green Putty, Mr. Surfacer 500 and my various sanding sticks before I was
satisfied with the result.
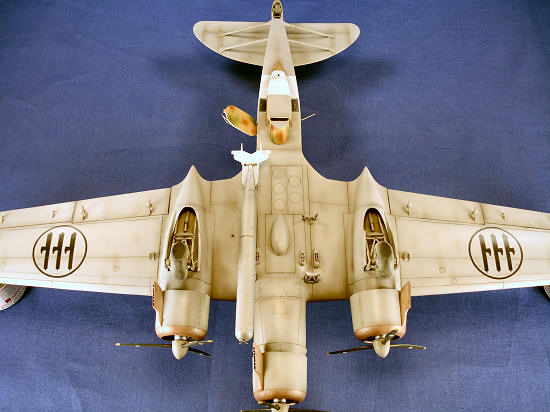
With the fuselage set aside, the wings were next,
followed by the horizontal stabilizers and their support struts.
After that I attached the gondola and front windshield.
The last major components to build were the three
engines.
These consist of a resin insert trapped between two cowling halves.
The resin insert depicts the face of the engine, so I
painted it 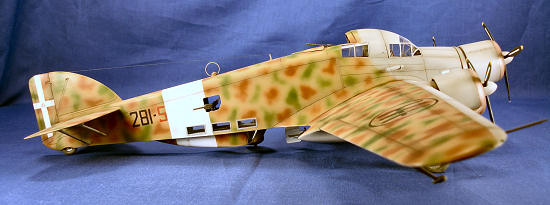 ed
and had their seams attended to I glued them to the airframe.
The attachment of each to the airframe is fiddly – the
basic idea is that the rear face of the engine’s resin insert is supposed to be
glued to the front face of the engine nacelles.
I had to add some scrap pieces of sheet plastic to those
faces so that they would come in contact with each other.
ed
and had their seams attended to I glued them to the airframe.
The attachment of each to the airframe is fiddly – the
basic idea is that the rear face of the engine’s resin insert is supposed to be
glued to the front face of the engine nacelles.
I had to add some scrap pieces of sheet plastic to those
faces so that they would come in contact with each other.
With the airframe now complete I attached the fiddly
bits that I thought stood a chance of not being knocked off during the painting
process.
Flap counter balances, engine exhausts, and a small propeller thingy on
the side of the fuselage were all super-glued on (it did not survive the
painting process).
I fashioned the wire braces that run from the tail to
the upper surfaces of the horizontal stabilizers out of EZ-Line, a great tiny
rubber string product from Bobe’s Hobby House in
| COLORS & MARKINGS |
I sprayed my usual primer coat of Mr.
Surfacer 1200 onto the aircraft and then checked my seam work.
A couple of nights’ extra work was needed to smooth out
the seams, especially around the engine cowlings.
All panel lines were then pre-shaded with
 Tamiya
XF-69 NATO Black, and then the white fuselage band was painted using Tamiya XF-2
Flat White.
Tamiya
XF-69 NATO Black, and then the white fuselage band was painted using Tamiya XF-2
Flat White.
The Stormo! website features a pair of excellent
articles by Mr. Stefano Lazzaro about the history of the aircraft I was modeling
(S.79 Serial Number 23838), and it points out that the color scheme of the
aircraft changed a couple of times throughout its life.
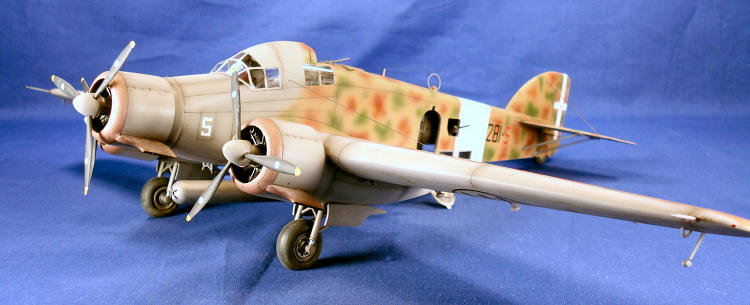
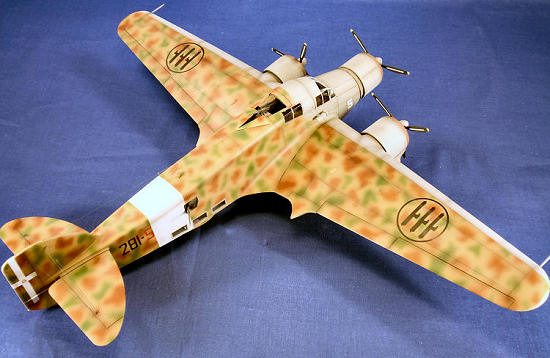
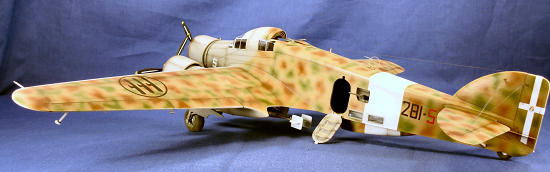
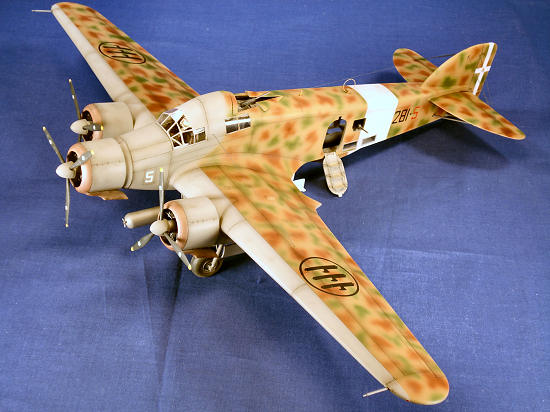
From late 1940 to early June 1941 it had light gray
leading edges, aluminum-colored lower surfaces, and beige upper surfaces with
rust and green mottling.
During June 1941 the aircraft was overhauled and when it
came back to the front in late June, it had been repainted with basically the
same color scheme on the upper surfaces, but the aluminum lower surfaces were
now either light gray or a light blue shade, probably similar to RLM 65.
I chose to depict it at that point in its life, so I
first airbrushed the forward part of the fuselage, leading edges of the wings,
and prop hubs Tamiya XF-20 Medium Grey.
I then chose to spray the undersides Tamiya XF-19 Sky
Grey, though future research may well show that they should in fact be light
blue.
With those areas masked I airbrushed the upper surfaces
a 50/50 mixture of Tamiya XF-60 Dark Yellow and Tamiya XF-59 Desert Yellow, and
then tackled the fine squiggles and splotches that make up the S.79’s
interesting camouflage.
For those I used Testors Enamel Rust and Testors Enamel
Medium Green (FS34102).
I then removed all of the masks (except for those
covering the windows) and thankfully, in doing
 so removed
none of the paint.
The final color to be sprayed on was a 50/50 mixture of
Testors Steel and Testors Rust, and this was airbrushed onto the leading edges
of the engine cowlings and exhaust pipes.
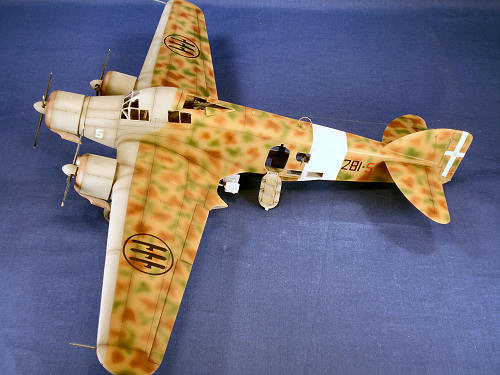
The prominent wing insignias on Italian aircraft often
had white backgrounds, but the aforementioned Stormo! articles pointed out that
on the version I was modeling, they should be transparent.
so removed
none of the paint.
The final color to be sprayed on was a 50/50 mixture of
Testors Steel and Testors Rust, and this was airbrushed onto the leading edges
of the engine cowlings and exhaust pipes.
The prominent wing insignias on Italian aircraft often
had white backgrounds, but the aforementioned Stormo! articles pointed out that
on the version I was modeling, they should be transparent.
With the painting done I sprayed a coat of Future over
the whole model and set it aside to dry for a couple of days.
The decals (produced by Microscale) went on perfectly
and settled into the surface with Walthers Solvaset.
The kit’s decals provide markings for “281-9”, so I was
able to convert the “9” into a “5” and use them as such.
I sealed them with another coat of Future, and then it
was time to start the weathering.
My first step was to apply a thin wash of Mig
Productions “Dark
| FINAL CONSTRUCTION |
At this point I removed all of the canopy and window
masks, which is always a bit nerve-wracking.
Two things often go wrong with this step – one, small
amounts of paint seep under the masks, and two, sometimes removing the masks
removes a chip of paint from the frame, where you want the paint to stay.
Thankfully the Tamiya masking tape I used held up.
At last I was at the final step, attaching the landing
gear, guns, and any other “fiddly” bits, or should I say “naughty” bits in
 this case.
The S.79 is positively bristling with guns, antenna
wires, flap counterbalances, torpedo racks, and pitot tubes.
Throw in the landing gear with their less than perfect
attachment points for the struts and landing gear doors and handling the model
soon became similar to handling a sea urchin.
More than once I knocked off one small part while trying
to attach another, and my frustration level began to rise.
Finishing the model required my constant concentration,
always thinking about how I was going to pick it up.
It became a little stressful, but finally when I
attached the crew’s boarding ladder, I was done - almost.
this case.
The S.79 is positively bristling with guns, antenna
wires, flap counterbalances, torpedo racks, and pitot tubes.
Throw in the landing gear with their less than perfect
attachment points for the struts and landing gear doors and handling the model
soon became similar to handling a sea urchin.
More than once I knocked off one small part while trying
to attach another, and my frustration level began to rise.
Finishing the model required my constant concentration,
always thinking about how I was going to pick it up.
It became a little stressful, but finally when I
attached the crew’s boarding ladder, I was done - almost.
The purpose of the S.79 was ultimately to carry a
torpedo, which it did, usually on its port side.
The kit’s torpedo is a nice reproduction, complete with
tiny propellers replicated in photo etch.
I assembled it and smoothed out its seams with putty and
then primed and pre-shaded it.
Without any hard information on how to paint it, I
sprayed the body a 50/50 mix of Testors Steel and Testors Panzer Gray and the
aft end White.
The prop was painted a brass shade, and then I washed the
recessed areas with the Mig Productions Dark
| CONCLUSIONS |
It took me about twice as long as I
expected, but the finished product was definitely worth it.
The ungainly bomber has some undeniable curb appeal, and
with its very unique camouflage pattern it really sticks out in my collection.
Classic Airframes’ S.79 is not a shake n’ bake kit, but
with a little perseverance it builds into a really neat model.
I understand it’s more accurate in many areas than the
Trumpeter offering, and as long as you’re not afraid of being patient and
applying your modeling experience, you’ll end up with a very rewarding model of
a fascinating aircraft that has been perhaps a bit underappreciated.
| REFERENCES |
- http://www.stormomagazine.com/index.htm - Stormo!, “A Famous Torpedo-Bomber S.79 Carlo Emanuele Buscaglia’s “281-5” – Parts I & II”, Stefano Lazzaro, June 2007
Scott Lyle
August 2010
If you would like your product reviewed fairly and quickly, please contact me or see other details in the Note to Contributors.