|
KIT: |
Hasegawa 1/75 F1M2 'Pete' |
|
KIT # |
? |
|
PRICE: |
$? |
|
DECALS: |
One aircraft |
|
REVIEW & |
Brian R Baker |
|
NOTES: |
|
HISTORY |
The original Mitsubishi F1M1 was designed as a successor to
the Nakajima
E8N1 float observation biplane, code name “Dave” . The original F1M1
prototype was first flown in 1936, and displayed disappointing handling
characteristics. Extensive redesign followed, and in 1938, the aircraft
was reengined with the 875 hp. Mitsubishi MK2 Zuisei radial. Navy flight
tests of this aircraft were satisfactory, and the aircraft was ordered
into production as the F1M2 Type 0 Observation Seaplane Model 11.
The Mitsubishi F1M2 was widely used by the Japanese Navy
during the
Pacific War, and although designed primarily as an observation aircraft,
the type was also used for other duties, including anti-submarine patrol,
convoy escort, gunfire observation, and, on occasion, light bombing.
In
addition, during the occupation of Attu Island in the Aleutians during
1942, a fighter squadron operated the F1M2 for a brief period.
The F1M2’s operated from battleships and seaplane tenders
throughout the
war, and were involved in nearly every major campaign of the Japanese Navy
during World war II. A total of 524 F1M2’s was completed by Mitsubishi
until March, 1944, when production was shifted to Sasebo Arsenal, where an
additional 180 were manufactured.
The F1M2 carried a respectable armament for an aircraft of
its class:
two 7.7 mm. machine guns fired through the propeller, and one “Lewis”
type machine gun was carried on a flexible mount in the rear cockpit. In
addition bomb racks were installed on some aircraft, normally holding two
132 lb. bombs. One aircraft was tested with a single 550 lb. bomb, but
this installation was experimental only, and not used on operational
aircraft.
|
THE KIT |
Almost twenty years ago, our IPMS chapter in Phoenix
was visited by Mr.
Hasegawa, founder of Hasegawa Models. We put on a display of
Hasegawa
products, and one of the aircraft on display was my modification of the
original Mitsubishi F1M2 “Pete” reconnaissance floatplane kit. I had
obtained one of these kits years back, and although it was in 1/75 scale,
it was close enough for my l/72 scale standards of the time. Hasegawa
looked surprised to see the model, stating that he did not even remember
producing the kit. Considering its quality, I’d try to forget it too.
In the 1983 IPMS National Convention in Phoenix,
engineered by the late
great Pat Fowler, Hasegawa presented each guest with a bagged copy of the
“Pete”, probably as a reminder of how far the modeling art has progressed.
They had a big box of them there, and I grabbed four or five of them
because of the great price----FREE. But then, you get what you pay
for,
and even if I had paid a dollar each for them, the kit would
represent
the best entertainment value for the money, or about 5 cents per hour of
serious modeling.
In short, the kit is terrible, and it takes a lot
of work to make an
even remotely presentable kit. I understand that another Japanese firm
has recently produced the same aircraft in 1/72 scale (that would be Fujimi, here's the preview of it. Ed), and I know of at
least one vacuform version produced a number of years ago, so the whole
question is probably moot anyway, but being the masochist that I am, I
decided recently to pull one of the kits out of the storage box in my
hangar, and try to make a decent model of it.
Fortunately, the kit is reasonably accurate in 1/75
scale, so there are
no really serious outline corrections to make in order to come up with an
acceptable model.
However, the kit is so crude that nearly every part needs some work to
bring it up to standard. A lot of putty was required to fill in the holes
and dips, but the effect was worth it.
The major problem was to find a specific version to
model. There were
some basic changes in the production model, even though the designation
remained the same. Early “Petes” had a smooth cowling and a flat
surfaced windshield, while later production aircraft had an air scoop on
the top of the cowling and a different windshield. A number of
photos
exist of the plane in squadron service, so documentation wasn’t a
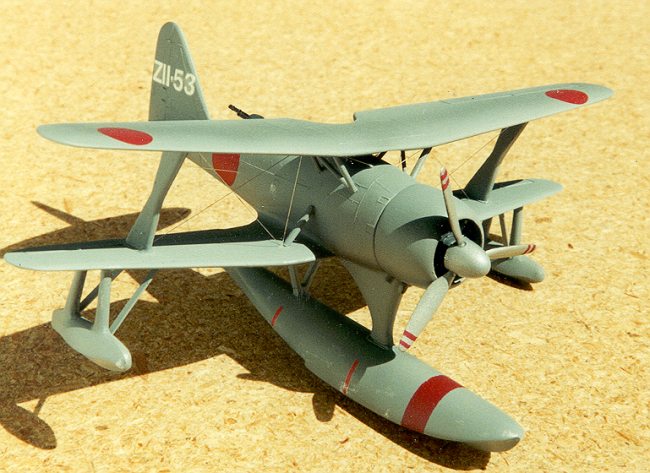
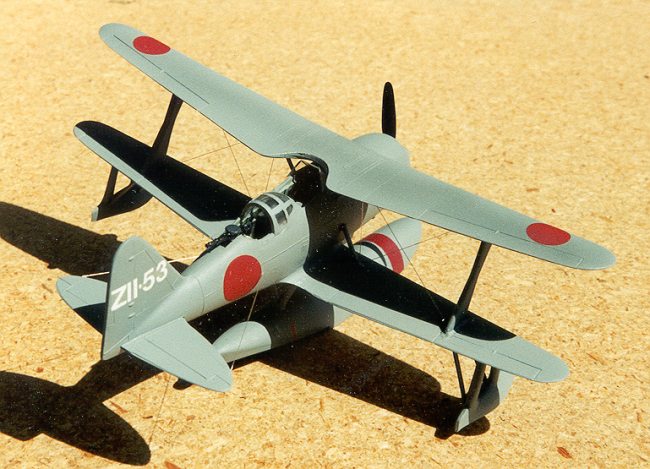
problem. I opted for an early production F1M2 tail-coded ZII-53, which was painted Japanese Navy light grey overall.
I had several
photos of that specific airplane, and since I usually work from photos
when possible, that part of the process was easy.
|
CONSTRUCTION |
The fuselage is crudely molded in brittle dark green
plastic, with an
attempt to provide seats for a crew that more closely resembles the
mythological Roswell aliens that anything remotely human. These
should
be melted down into sprue for stretching.
I completely gutted the fuselage with my Dremel tool, and began
installing a cockpit.
Since I had no reference showing the interior, I scrounged a 1/48
scale (actually it is 1/50, but still looks good. Ed) Tamiya kit from my son Jim. This kit has a fairly complete cockpit, and
between the pieces in the kit and the exploded drawings in the
instructions, I had a pretty good idea of the cockpit layout and
arrangement. Anyhow, after installing steel tubing detail on the
insides
of the cockpit and painting it Japanese interior green,
I scratched an
interior, providing a floor, seats, a control stick, switch
panels,
instrument panel, throttle, mixture control, machine gun
mount, and
radios. Since the cockpits are open, an interior is required on this
model. One thing to remember on this model is that the elevators must be
installed from inside, which means that they must be in place when the
fuselage halves are joined together. In addition, the nose of this
model
needs to be weighted, sol I built a small compartment from card plastic
and filled the nose with shot, held in place by white glue. Then I
masked off the cockpit areas and filled in the seams on the fuselage
join line.
The engine and cowling need replacement for this model.
The kit cowling
is for the later version , and provides a minimal “engine” etched into a
flat plate in the front of the cowling. I opted for using a completely
new cowling and engine. the cowling from the spares box came, I believe,
from an Italiarei SM-81 bomber, while the engine may have come from a
Hasegawa Zeke 21. These, with some filing, are quite
acceptable, and
the cowl fits on the fuselage very nicely. The prop is another spares box
item, as the one in the kit is totally useless--another sprue candidate.
I think it was from a Hasegawa ME-109G. The spinner was also from
the
spares box, but i don’t know what kit it is from. I didn’t
install the
engine and cowling until the rest of the airplane was assembled. The
prop wasn’t put in place until after painting and rigging.
The lower wing can now be installed on the fuselage,
and this is a
critical part as it has to be lined up perfectly. The wing itself is
accurate in outline, but there are some sink holes to fill. The fillets
between the fuselage and wing need some attention, but the problem is not
insolvable with copious amount of putty. Since I was building the version
with a single overall color scheme, I went ahead and installed the upper
wing. The easiest way to do this is to thin down the interplane
struts
(they are way too thick) and install them on the lower wings. Be
sure
they are straight, as they are the only positive alignment guide for the
upper wing. The holes in the attachment points need to be filled in, but
with Tenex, the joints are very strong, and filling the gaps is not
difficult. Once the wing is in place and dry, the next step is the
floats.
The main float is made from two halves, and the fit is
good although the
usual ton of putty is required to get it right. There are some places
that need filling, but again, it is not a big problem. The big
problem
is lining the main float up correctly. A three view of the aircraft is
essential for this maneuver, so use it often. The top portion which
joins the fuselage will need a lot of putty, so spread it on and sand it
down carefully. there is an air scoop on top of the strut, and this
should be hollowed out. It should be round, by the way, and not oval
as
it appears on the kit. The “V” strut needs careful alignment, and it
should be filed down to scale thickness.
The wingtip floats are rather simple, being molded in
two pieces, but
they require careful shaping and sanding to look right. The holes in the
lower wingtip are correctly located for their installation, but I would
fill in the bracing strut holes and replace the thick round struts with
shaped, thinner card plastic.
The cabane struts, between the fuselage in the upper wing
center section,
need to be scratch built. The kit struts are entirely wrong, even
backwards, but since the top wing is already installed and aligned, it is
no real problem to make new ones and install them properly. Again,
check the three view, mark the spots where they should attach, and
go
for it. There are no mounting holes on the fuselage, so you’re on your
own on this one. I drilled holes in the proper locations, and lined
up
the struts in position.
This is the time to install the cowling. It requires
some trimming,
but it fits nicely over the mounting ridge at the fireball. Holes should
be drilled for the exhaust stacks, which I installed later.
The windshields need to be redone. I used the trusty
old vacuform that
I’ve had for many years for the rear enclosure, and just bent a piece of
clear plastic for the front windshield. I masked them off and sprayed
them as I painted the entire model.
|
PAINT & DECALS |
This particular aircraft being modeled was painted IJN light
grey
overall, so painting was a snap. Just mask off the affected areas
and go
for it with the old Pasche.
A couple of coats did it, with time off to inspect for flaws and reputty
and sand. When painted, I sprayed it with Testor’s
glosscote, and
then applied the decals, plain Japanese hinomarus and white tailcoding.
I did use red paint for the prop warning stripe on the main float and the
beaching dolly marks on the sides of the floats. I then applied a
coat
of dullcote to destroy the glossy finish. I also used pastels to
“grubby”
up the airplane a little, and used some silver to chip the paint a little around the main float and other areas where wear would normally appear.
At that stage of the war, the plane would not have been weathered too
badly, so I didn’t overdo it.
When the airplane was painted and with decals
installed, I installed the
windshields, gunsight, and propeller. I then rigged the model
with thin
electronic wire, again using the three view and photos as a guide.
After
the model was completed, wife remarked how my language had improved.
One useful addition to this kit would be a beaching dolly. If I had one, I’d use the one from the LS Mitsubishi-Nakajima Rufe fighter. It is about perfect. I don’t have one, so I used the display stand for the kit, which is awful.
|
CONCLUSIONS |
Being as old as it is, this is still a lousy
kit. As a challenge, it
does have its value. It makes us realize how nice some of the modern kits
are, and how thankful we should be to have modern, up-to-date kits
with
state-of-the-art molding. I won’t do this model again, but
it does fill
a gap in my collection and it was fun, albeit frustrating, to go back in
time and do one of the original models. (I realize that there were plastic
models produced long before this one appeared). It wasn’t much
easier
than some of the old World War II spotter models I used to make from Navy
plans and templates when I was a kid. But that is another story.
If you would like your product reviewed fairly and quickly by a site that averages over 2,600 visits a day, please contact me or see other details in the Note to Contributors.