| HISTORY |
Hasegawa 1/32 Ki-44-II Otsu w/40mm cannon
| KIT #: | 08200 |
| PRICE: | $45.00 SRP when new |
| DECALS: | Two options |
| REVIEWER: | Andrew Garcia |
| NOTES: | Eduard Big Ed 3281 Ki-44 Shoki etched interior and exterior added |
| HISTORY |
The
Ki-44 Shoki “Tojo” was the design platform for a home defense fighter. In
1938, Nakajima Aircraft of Japan received an order for a high speed air
defense interceptor, that was known as the Imperial Army Type 2 Fighter,
also called the Ki-44, almost simultaneously with an order for the Ki-43
Oscar. High speed and better
climb rate were favored at the sacrifice of maneuverability. These
requirements were met through the use of Japan's most powerful engine at the
time, the HA-41 which was originally intended for bomber use. Tei Koyama had
the chief responsibility for designing the Ki-44. He accepted the visibility
restrictions creating an aircraft that was smaller than either the Ki.27
Nate or Ki.43 Oscar creating a small, thinly tapered fuselage with a large
frontal surface. A two way radio and drop tank was also incorporated into
his design. The Ki-44 featured Nakajima designed "butterfly" combat flaps
(Fowler Flaps) to improve maneuverability. This greatly improved its ability
to maneuver in combat as well as reduce landing roll and take off distance.
It did however also have poor visibility at takeoff and landing due to the
large cowling. Many pilots transitioning from the Ki-27 Nate realized this
in addition to its instability during low speed flight. However, in a
comparison test program it beat the Bf-109 and Ki-60 (forerunner of the
Ki-61) in a series of trials. The Imperial Japanese Army adopted it in 1942
as the Type 2 Single Seat Fighter. During a comparison with the IJN Zero-sen
the Tojo was found to climb to interception altitudes better than the Zero
but despite a larger engine was not significantly faster.
 It was
nicknamed Shoki (Demon) and code named "Tojo" by the Allies. The type 2
Model II carried a more powerful engine, the HA-109, with its two-stage
supercharger. There were three versions, the Koh, Otsu and Hei distinguished
by visible external changes. A total of 1,227 Ki-44's were built between
1940 and 1944. For the new to the Ki-44 modelers like me this kit, the
Ki-44-II Otsu release from Hasegawa in 1/32nd scale (# 08200), is for the
second version of the Shoki. The two main characteristics that indicate
which version you have are:
It was
nicknamed Shoki (Demon) and code named "Tojo" by the Allies. The type 2
Model II carried a more powerful engine, the HA-109, with its two-stage
supercharger. There were three versions, the Koh, Otsu and Hei distinguished
by visible external changes. A total of 1,227 Ki-44's were built between
1940 and 1944. For the new to the Ki-44 modelers like me this kit, the
Ki-44-II Otsu release from Hasegawa in 1/32nd scale (# 08200), is for the
second version of the Shoki. The two main characteristics that indicate
which version you have are:
Ki-44-I
has a telescopic gunsight which protrudes through the front windscreen in
the initial version. Later versions used a reflector gunsight.
The oil cooler was initially found
in a copper ring inside the front of the engine cowl similar to the Ki-27.
The second version, Ki-44 II, which is also the version provided with this
kit (#8200), has a reflector gunsight and an external oil cooler (this
change started with KI-44 serial # 1054) on the lower engine cowling.
Initial armament was comprised of two 7.7mm (.30 cal) cowl guns and two
12.7mm (.50 cal) wing mounted guns. A few were armed with a pair of 40mm
wing guns, and the cowl guns used the 12.7mm guns with the 12.7mm guns in
the wings late in the war in the Ki-44-IIb variant. This bomber buster was
made in the units with serial numbers 1356 to 1749. The 40mm guns, utilizing
novel caseless rocket propulsion for the bullet was a disappointment due to
low muzzle velocity. Thus, the armament was changed in later versions to
four 12.7mm guns starting with airframe number # 1750 with two 12.7mm (.50
cal) cowl guns and two 12.7mm (.50 cal) wing mounted guns. Some early
Ki-44-IIc units were equipped with the telescopic gunsight so as always it
is best to model your kit using photo reference.
| THE KIT |
 Hasegawa
released kit # 08200, the Ki44-II Otsu SHOKI (TOJO) w/40mm CANNON in
December 2009. It is a well moulded
kit with very fine details. I usually build in 1/48th scale and
have built several Hasegawa Ki-44 kits in 1/48th so I was looking forward to
this kit. There is a minimal parts count and it goes together rather quickly
unless you want to take some time to detail the cockpit interior.
Even then, the cockpit is sparse and
detailing it did not take very long primarily due to my use of Eduard
painted etched metal parts. Due
to the diminutive size of the actual aircraft it is not overly large in 1/32nd
scale.
Hasegawa
released kit # 08200, the Ki44-II Otsu SHOKI (TOJO) w/40mm CANNON in
December 2009. It is a well moulded
kit with very fine details. I usually build in 1/48th scale and
have built several Hasegawa Ki-44 kits in 1/48th so I was looking forward to
this kit. There is a minimal parts count and it goes together rather quickly
unless you want to take some time to detail the cockpit interior.
Even then, the cockpit is sparse and
detailing it did not take very long primarily due to my use of Eduard
painted etched metal parts. Due
to the diminutive size of the actual aircraft it is not overly large in 1/32nd
scale.
The kit
comes in a large box with a very attractive cover painting of a Ki44-II
hunting a formation of B-29’s. It is a beautiful piece of artwork and quite
useful in final painting details. The main sprues are bagged separately.
Parts are included to build both versions of the Shoki, with an added sprue
labeled “X” attached to the “V”
sprue. Sprue “X” has two versions of
the 40mm gun, one with the streamlined cover tip and the other an exposed
barrel which needs to be joined to the same wing attachment base part.
Clear
parts and a sprue of soft poly caps are in the same package. Unlike many
Hasegawa kits, the very large decal sheet comes inside the instructions
instead of with the clear parts (it won’t fit in the clear decal bag). The
kit has 150 grey styrene parts, 13 clear styrene parts (most of the clear
count is due to the optional clear formation lights), some poly caps and
decals for two versions.
The kit
moulding is excellent, with no flash and on close inspection I was impressed
by the crisply detailed parts. The styrene is typical Hasegawa quality
meaning hard yet easy to work with no sink marks. There were a few light
ejector pin marks, but the kit designers did a superb job minimizing them.
The surface finish is highly polished ideal for the NMF finish, with
delicate and precise panel lines, well done rivets and fasteners, and a few
raised panels. Fabric control surfaces feature rib stitching, but no ribs or
giving a nice impression of well-maintained fabric surfaces.
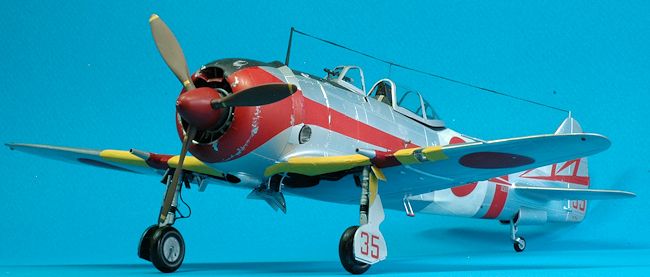
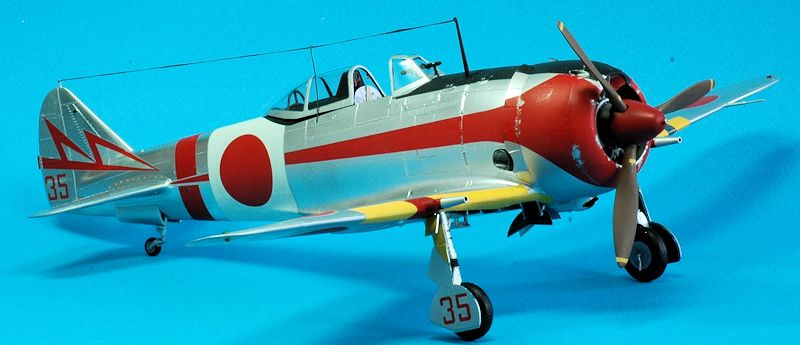
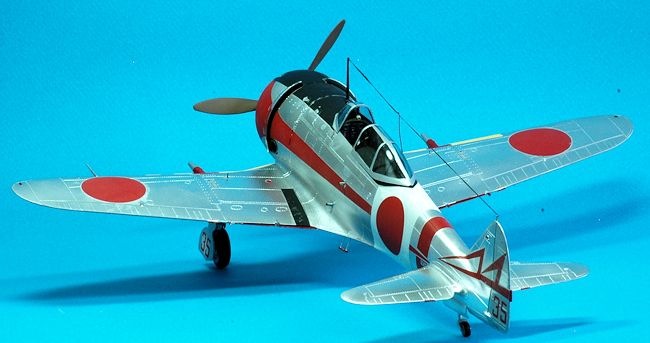
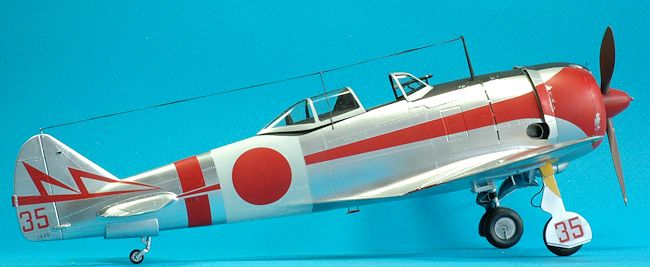
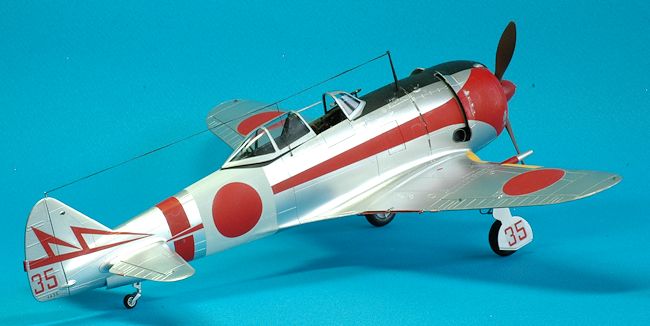
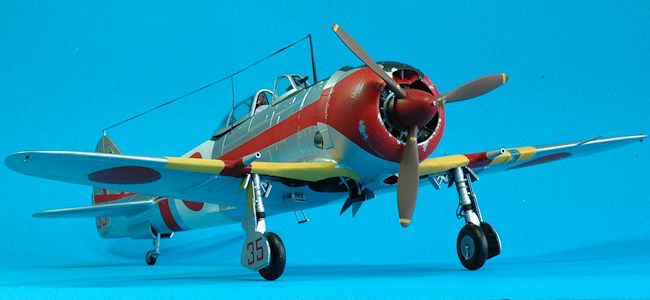
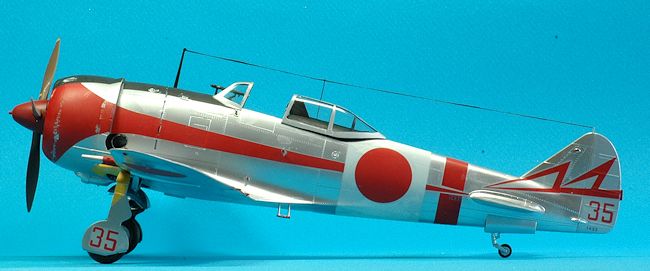
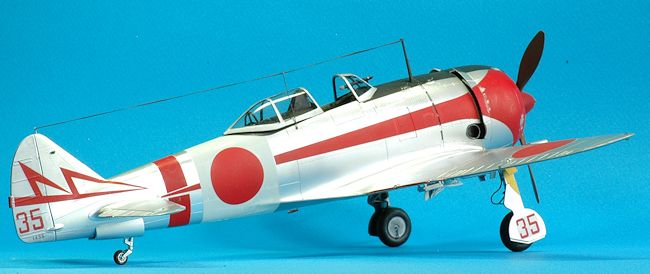
Markings
are provided for two NMF aircraft, one from the 1st Chutai, the
second from the 2nd Chutai, both part of the 47th Hiko
Sentai at Narimatsu Airfield, Japan. These were much more colorful
than the versions found at Clark Airfield in the Philippines since they
incorporate the white homeland defense ID bands with the hinomarus.
The color box art also supplements
the painting information in the kits building instructions. I honestly had a
problem selecting which color scheme to use. Both versions are quite
attractive and colorful. I opted for the box art version.
The decals are well printed, and
gloss finished. I sprayed them with
Testors dull coating as a final finish before they were applied. They are
very thin, the printing is crisp, small details such as stencils are clearly
printed and are the pigments opaque and easy to work with. The white paint
used in the decal was opaque enough and despite some reservations before
applying them (since the alternative is masking and spraying the paint), I
was very pleased with the end result. You might want to paint those areas
around the hinomaru’s white before applying the kit decals.
I liked the off white color of the
kit decals white areas since it added to the subtle weathering and was a
white rather than the cream or off- eggshell beige in earlier kits.
| CONSTRUCTION |
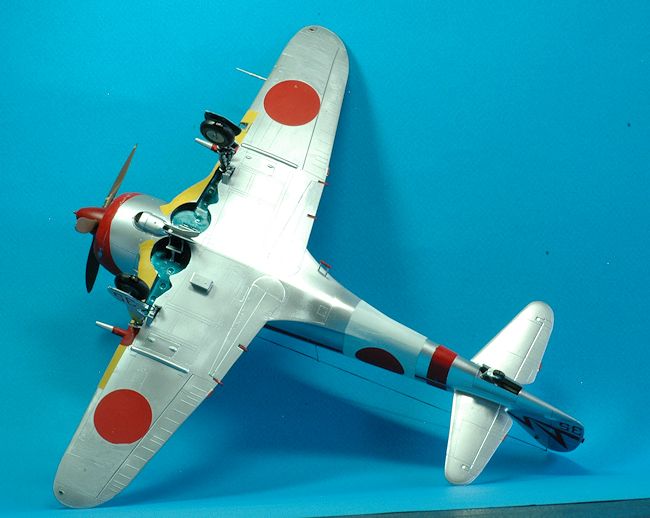
The kit
cockpit is a very simple assembly consisting of four steps. I used the kit
plastic for most cockpit parts and removed some of the plastic surface in
order to attach the Eduard color etched. I was tempted to use the kit decals
for the instruments to maintain the 3D qualities since the kit plastic is so
finely moulded and accurate. I opted for Eduard color parts in the cockpit.
Eduard etched was used for the restraining system and instrument panel. I
chose not to use the etched metal parts indicated for most of the boxes such
as the throttle quadrant since
the plastic parts were nicely moulded, looked more robust, and had better 3D
depth after a wash with thinned black paint. I replaced the kit seat with
the Eduard part
 which I
chose not to paint leaving it in a NMF. I liked the scale thickness and
natural metal finish of the etched part. I decided to use a black wash on
the seat which changed the color unfortunately since I liked the shiny
realistic metallic of the seat as seen on the etched fret (I won’t do that
next time). The combination of some
Eduard and the better kit plastic parts for cockpit detailing added a lot to
this kit. It did not take too long to add them and it added so much to the
final appearance. Some of the Eduard etched was not used and had me
wondering what they were thinking because I could not see any improvement in
replacing some kit parts for etched metal or they were hidden after
assembly. The parts I did use were superb.
which I
chose not to paint leaving it in a NMF. I liked the scale thickness and
natural metal finish of the etched part. I decided to use a black wash on
the seat which changed the color unfortunately since I liked the shiny
realistic metallic of the seat as seen on the etched fret (I won’t do that
next time). The combination of some
Eduard and the better kit plastic parts for cockpit detailing added a lot to
this kit. It did not take too long to add them and it added so much to the
final appearance. Some of the Eduard etched was not used and had me
wondering what they were thinking because I could not see any improvement in
replacing some kit parts for etched metal or they were hidden after
assembly. The parts I did use were superb.
Some of
Eduard’s etched were very impressive and actually fantastic additions. Parts
such as a small color etched cap that goes on the top of the control column.
There are two buttons on the top of the control column which are not the
usual single button gun trigger found at the top of the control stick. There
is an illustration in a Japanese language book (Model Art Profile # 5 page
11) where the buttons are painted yellow and red. The Ki-44 had the gun
trigger on the engine throttle control lever similar to today’s F-16 HOTSA
stick. The two buttons on the top of the control stick are #1 Fowler Flaps
on, and #2 Fowler flaps retract. When you see this color etched size even in
1/32nd it is a work of art – you can’t paint something that small
so precisely. Other etched parts
such as the canopy opening grip (#28) and knob (#38),
brake line clamps (# 15) for the hydraulic brake line, the air vent
(#51) used on the port side in
front of the cockpit and wing light inside which hides the plastic seam were
notable examples of the value added by Eduard’s etched metal.
The fuselage halves closed in step 5
with no concerns coming from the cockpit area. I did not open the butterfly
flaps nor the cockpit access panel. I have never seen a photo of the
butterfly flaps deployed while the aircraft was on the ground.
Also, the cockpit access panel which
has a lot of Eduard etched on the fret is usually not opened except for some
specific ground maintenance tasks.
Steps 6
and 7 have you construct the upper and lower wings followed by attaching
them to the fuselage. Note, the butterfly (AKA fowler flaps) combat
maneuvering flaps trailing edges extend beyond the wing trailing edge – this
is intentional – don’t sand them flush with the rear wing edge. The slotted
tabs found on the parts for the horizontal tail were fantastic. I am often
unsure of getting the horizontal tail right and the slotted tabs align them
perfectly.
Steps 8,
9 and 10 have you assembling the engine and engine cowl. The engine is
beautiful. With some aluminum paint and a black wash the crisp moulding pops
out. I used some copper wire rather than the Eduard etched for the ignition
cables. The etched looks too flat but has a nice, accurate representation of
the wiring. It just looks too flat for my liking but you could benefit from
them if you don’t like the tedious task of wiring each cylinder.
Steps 11
and 12 are easy. The landing gear goes together with no effort and is a
superb moulding. I added some lead fly fishing wire for the brake lines
rather than use the Eduard parts. I did use the Eduard brake line holding
clips (parts 15) and strut linkage (part 11) for their exquisite detailing.
I did use all the parts 14, 20/21, 22/23, 10, 36/37, 27/28 for the inside
panels that go onto the landing gear struts. Under a
 coat
of paint they disappeared and added no to improvement to the appearance.
This is an example of wasted time and parts added to the etched sheet.
coat
of paint they disappeared and added no to improvement to the appearance.
This is an example of wasted time and parts added to the etched sheet.
I choose
not to add the drop tanks to this build. They are very nicely moulded and
represent the late version only. I did assemble them to see how they looked.
They are perfect in every way and went into the spares box.
Step 15, 16 and 17 complete the attachment of the landing gear, all other under fuselage parts, canopy and prop. I thought about cutting the gun scope tip in order to turn the cap on its side linking it to a piece of wire leading back inside the cockpit to represent how this part actually worked. I did not find any photos of Ki-44’s on the ground with them in this condition, nor with open a cockpit access panel so I left that idea for use on some other day.
| COLORS & MARKINGS |
The
decals come on a well printed sheet with two options. I chose construction
number (C/N) 1435, the markings
for the 2nd Chutai aircraft featured on the box art. Before
decaling I thought long and hard about the benefits of using a masking and
paint approach versus use of the decals. If the decals did not work the kit
would be trashed. If the decals did work, their crisp lines especially on
the red scalloped portions would maybe look better than painted on markings.
They are complex and some are on rounded surfaces which do not bode well for
decal application. No problems were experienced applying the decals much to
my surprise. I used warm water to soften them up slightly and it worked!
Microsoft Super Sol decal solvent
was also used when applying the decals. Using the decals also made it easier
to apply some light weathering since they are easier to chip than paint.
Alclad aluminum shades were used for the
 overall
final finish. Tamiya X-11 chrome silver enamel (not acrylic) was used as a
base coat and primer.
overall
final finish. Tamiya X-11 chrome silver enamel (not acrylic) was used as a
base coat and primer.
The
cockpit and related parts were painted in “khaki green” a form of zinc
chromate. I used Tamiya XF-71 cockpit green.
According to Model Art Profile # 5, page 99 explains: “Before
mid-1943 the interior of the Type 2 fighters including #1 prototype had been
painted with general purpose anti-corrosion clear blue paint known as Aotake.
Thereafter, only the cockpit interior was painted with Khaki Green and the
rest of the parts were in principle left unpainted (Alclad). Only the
Ki44-II Hei with c/n 1900 through 2000 seemed to have the lower part of the
inside of the landing gear strut covers painted either in Aotake or Dark
Grey.”
Weathering and Final Coat – some pastel chalk and black/brown pin wash was
used. I did not use any overall sprayed on Future coat or Testors clear
coating on the model. Normally I would use them during the initial decal
application and after decaling was completed. In order to maintain the
luster of the Alclad NMF finish I opted not to seal all of the decals and
gave them a flat finish before they were applied. This required close
cropping of the decals from the backing sheet.
The
props had the correct decal stencil and yellow tip stripes seen in
photographs and found on the kit decal sheet.
| FINAL CONSTRUCTION |
The very
last steps were attaching the fuselage antenna mast and wires as well as the
Eduard pilot entry pegs/steps (parts # 24). For the entry pegs I drilled a
hole and glued in a metal pin. I then cut off the front of the Eduard etched
peg part # 24 and slipped on the square perforated step onto the glued in
pin. The next step was to attach the
landing gear status pins and paint them. They are similar to those found on
the Fw-190 and usually missing on most Ki-44 builds. Once you look for and
see this part on historical period photos of the Ki-44 it makes sense to put
them on the aircraft. While they were not an implicit part of the Eduard
sheet found in its instructions I did use two pieces of unused etched from
the etched metal sheet for this part.
 I
inserted a metal pin for the vertical tip to represent a small antenna tail
mast because this is missing from the kit plastic. I used E-Z-Line for the
antenna wire. The point of insertion for the drop down antenna wire into the
fuselage, on the starboard side of the airframe, has a well moulded
extension which was used to glue on the drop down portion of the antenna
wire. I attached the exhausts after the cowl was painted and avoided
repainting them. Testors exhaust metalizer was used on this part. I could do
this out of sequence because Hasegawa provided a keyed attachment point for
the exhaust to the fuselage mating.
I
inserted a metal pin for the vertical tip to represent a small antenna tail
mast because this is missing from the kit plastic. I used E-Z-Line for the
antenna wire. The point of insertion for the drop down antenna wire into the
fuselage, on the starboard side of the airframe, has a well moulded
extension which was used to glue on the drop down portion of the antenna
wire. I attached the exhausts after the cowl was painted and avoided
repainting them. Testors exhaust metalizer was used on this part. I could do
this out of sequence because Hasegawa provided a keyed attachment point for
the exhaust to the fuselage mating.
The clear parts, the windscreen, canopy, telescopic gunsight and formation lights were added using Testors # 8876C white glue. I use this because of its long, tapered black plastic applicator that allows small amounts to be carefully placed. The clear wing tip and tail formation lights were painted Testors chrome silver on their underside and then painted clear green or red as required. They have small mounting nubs in the underside so you need to do some drilling in the center of the areas you filed down where the formation lights go on the wing surfaces and vertical tail. Before attachment I used Tamiya clear red and green over the transparent lights, glued them with Testors # 8876C white glue and the model was finished.
| CONCLUSIONS |
 This
kit went OOP in 2011 unfortunately and is becoming more difficult to find
although there are still some out there on local hobby shop shelves
including frequent appearances on eBay and Amazon sellers. It is getting
more expensive to buy from its introductory MSRP of $45.00 with upward price
pressures as it becomes harder to find. Given there are usually two 1/32nd
scale Ki-44 releases available at all times from Hasegawa, the Wolfpack
Designs resin 40mm guns let you convert the available kits into the 40mm
version since all the other parts are there to build this version avoiding
the prices of a hard to find kit.
This
kit went OOP in 2011 unfortunately and is becoming more difficult to find
although there are still some out there on local hobby shop shelves
including frequent appearances on eBay and Amazon sellers. It is getting
more expensive to buy from its introductory MSRP of $45.00 with upward price
pressures as it becomes harder to find. Given there are usually two 1/32nd
scale Ki-44 releases available at all times from Hasegawa, the Wolfpack
Designs resin 40mm guns let you convert the available kits into the 40mm
version since all the other parts are there to build this version avoiding
the prices of a hard to find kit.
The Hasegawa 40mm Shoki is a gem. I saw one built and displayed at a model show and knew I had to have one even though I am not a 1/32nd scale builder. The current releases of 1/32nd scale kits are fantastic but due to the room it takes to store and display 1/32nd scale models I have avoided them for the most part (i.e. except for the 1/32nd Tamiya Mustang and Corsair). The overall shape and dimensions of the kit are perfect and you can build a very nice model from this kit with minimal application of modeling skills. I encourage you to build one as a break from AMS since no aftermarket is required for a nice outcome. If you want additional detail as I did, the Eduard set fits in and provides some easy to work with enhancements.
| REFERENCES |
Nakajima
Ki-44 Shoki in Japanese Army air Force Service by Richard Bueschel – Shiffer
Books 1996, original release by Osprey Publications in 1970.
Model
Art Profile Number 5, Nakajima Ki44 Shoki, issued
in 2009 with some English page translations in the rear of the book.
Famous
Airplanes of the World No. 16 (1989-5)
Army Type 2 Fighter “Shoki”
The Maru Mechanic No.9 (1978 – 3) Nakajima Ki44 Shoki.
September 2013
If you would like your product reviewed fairly and fairly quickly, please contact the editor or see other details in the Note to Contributors.
Back to the Previews Index Page