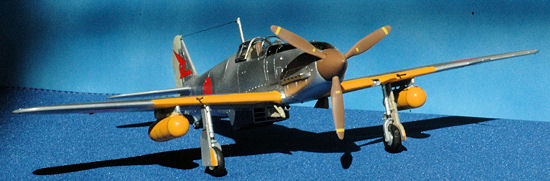
Hasegawa 1/48
Ki-61-I Hei Hien (Tony)
|
KIT #:
|
9087 (Jt87)
|
|
PRICE:
|
$26.95
|
|
DECALS:
|
Two options
|
|
REVIEWER:
|
Andrew Garcia
|
|
NOTES:
|
Eduard Zoom FE315
|
The
Ki-61 Hien “Tony” was the only mass produced fighter used by the Japanese during
WWII which used an inline engine. For
more a more detailed history of the Ki-61 series, see previous build articles in
the Modeling Madness Review Archives.
Hasegawa’s
announcement of a new mold 1/48 Ki-61 Hien (Tony) in late 2004 was eagerly
anticipated by Hasegawa WWII Japanese aircraft subject Fans.
Many folks wondered if it would improve
much over the nice Otaki/Arii kit. Yes, it is a clearly better kit and the
cockpit for example is the major improvement. Also, Hasegawa has correctly
addressed the two different Ki-61 fuselage lengths with dedicated moulds which
Otaki/Arii did not.
 There
are about fourteen (14) Ki-61 releases from Hasegawa since the initial January
2005 release. I had thought the releases were just minor decal changes since the
Ki-61, with my limited knowledge, looked the same in all the photo references I
had. I wish for example Squadron Books In Action and other English language
modelers books would come out with some reference books on Japanese aviation
subjects. How about a Koku-Fan Famous Airplanes of the World No. 17 (7-1989)
Army Type 3 Fighter Hien English translation at a minimum?
While reading and browsing the web trying to understand the Ki-61
variants and their Hasegawa re-boxing I noticed Hasegawa released the two
different fuselage versions - a long fuselage version (8.94 meters long) and a
short fuselage (8.74 meters) version. Based on my limited knowledge, and since
it is not easy to read the Hasegawa box art description and confirm which
fuselage version I am getting in the box I stalled my building effort in order
to sort this one out. When you buy aftermarket decals they are not clear (to me)
which fuselage is appropriate. Sometimes the more you know the harder it is to
model.
There
are about fourteen (14) Ki-61 releases from Hasegawa since the initial January
2005 release. I had thought the releases were just minor decal changes since the
Ki-61, with my limited knowledge, looked the same in all the photo references I
had. I wish for example Squadron Books In Action and other English language
modelers books would come out with some reference books on Japanese aviation
subjects. How about a Koku-Fan Famous Airplanes of the World No. 17 (7-1989)
Army Type 3 Fighter Hien English translation at a minimum?
While reading and browsing the web trying to understand the Ki-61
variants and their Hasegawa re-boxing I noticed Hasegawa released the two
different fuselage versions - a long fuselage version (8.94 meters long) and a
short fuselage (8.74 meters) version. Based on my limited knowledge, and since
it is not easy to read the Hasegawa box art description and confirm which
fuselage version I am getting in the box I stalled my building effort in order
to sort this one out. When you buy aftermarket decals they are not clear (to me)
which fuselage is appropriate. Sometimes the more you know the harder it is to
model.
However, the
Modeling Madness, Tony Hodun Hasegawa kit tables, cracked the code. Look at the
fuselage parts table and you will see the two sizes using separately coded
sprues called out as the “longer” or “shorter” fuselage. This is a big problem
for builders who care about accuracy because I have not found aftermarket decal
makers explaining or mapping into this difference. For example, I have a nice
Superscale decal sheet, 48-511 which has a marking that I am not sure which
fuselage should be used to get the correct end result. The drawings are not
accurate; they are just for decal placement purposes. One of the versions is
found in the Hasegawa Kit # 9112 release, so maybe all three on 48-511 are for
the long fuselage version (?). You are now back to finding a picture of the
aircraft, hoping it is from the correct angle to permit a guess as to which
fuselage to use.
I
had also read a web thread about a 9.16 meter length for the Ki-61-I with its
Ha-140 engine which also had some outline changes to the canopy, tail, rudder,
etc but it is usually called out in references as the Ki-61-II and it is not
part of the Hasegawa releases so far – I think! Sometimes more knowledge is not
better and can lead to avoiding building something until you have better
information.
 There
are wing armament variations as well within the fuselage lengths so be careful
when you build matching your decals to the correct fuselage. A few German MG-151
(20mm cannons) were imported from Germany via U-boat for testing in several
Japanese airplanes. They were evaluated and used after a brief study of its
technical details. The German-Italian-Japanese technology transfer contract was
called "Achse-Vertrag" in Germany. The armament changes can be seen in Japanese
magazines such as Model Art, and in Polish magazines (such as Miniature Lotniczy)
and on the box covers of Japanese short run resin kits in 1/48 scale from "The
Right Stuff" aka the "TC-Berg or Toy Craft Berg" company. They have produced a
resin Ki-61 HIEN in the "-Hei " and in the (lengthened nosed) "-Tei" model which
have been long out of production.
There
are wing armament variations as well within the fuselage lengths so be careful
when you build matching your decals to the correct fuselage. A few German MG-151
(20mm cannons) were imported from Germany via U-boat for testing in several
Japanese airplanes. They were evaluated and used after a brief study of its
technical details. The German-Italian-Japanese technology transfer contract was
called "Achse-Vertrag" in Germany. The armament changes can be seen in Japanese
magazines such as Model Art, and in Polish magazines (such as Miniature Lotniczy)
and on the box covers of Japanese short run resin kits in 1/48 scale from "The
Right Stuff" aka the "TC-Berg or Toy Craft Berg" company. They have produced a
resin Ki-61 HIEN in the "-Hei " and in the (lengthened nosed) "-Tei" model which
have been long out of production.
The
Ho-5 engine was installed in the "Tei" nose! The "-Tei" version (i.e. long
fuselage) only and always had the cannons in its fuselage. This is the reason
why its overall length was increased.
One
surprising flaw in the Hasegawa Ki-61 kit is the lack of intake grills for the
air intake. You need to add a scratch made grill which can be worked up from
stretched-sprue or Evergreen plastic strips to the engine air intakes –
Part A4. The intake is just an open square box whereas the actual aircraft has
four blades (see Model Art # 263 page 31 and
Model Art Profile Kawasaki
Ki61 Hien No. 733 page 80). The same part number is
used for the short and long fuselage versions in all the Hasegawa kits. Some
texts indicate a difference in size of the intakes such as one stating, “The air
intake was modified in outline and position because of the new engine design.
The engine cowl or cover has a rounder outline for better streamlining.” I have
not been able to conclusively affirm this is reflected in the two fuselage
variations moulded by Hasegawa. I always defer to Hasegawa because their
research is usually very reliable. Surprisingly, the easy fix for the missing
intake grill could have been found on the Eduard etched sets for the Ki-61 – but
so far Eduard missed this correction. I hope they address this in the future.
As
Scott and others have pointed out in the past the kit has a one piece cockpit
canopy. If you want to look inside, it is easier with an opened three piece
cockpit. Although I have the True Details vac-form which was originally issued
for the Otaki/Arii kit, it is easier to affix the plastic kit canopy, so I cut
it open the clear kit parts with a thin razor saw. It looks OK but not perfect.
The sit of the open canopy is not perfect for the sliding canopy portion, but it
works for me for this build. I don’t think it would pass muster with the contest
cops. The vac-form could help if this is a concern for you and you wish an open
canopy that properly sits on its canopy rail.
Part
A13, which is a small flap at the top of the landing gear, is very hard to
install since there is insufficient room at the top of the landing gear cover
(part C2/C3). This part comes on the Eduard etched set so you do have a nice but
hard to glue alternative with better scale thickness permitting a better look
than the plastic.
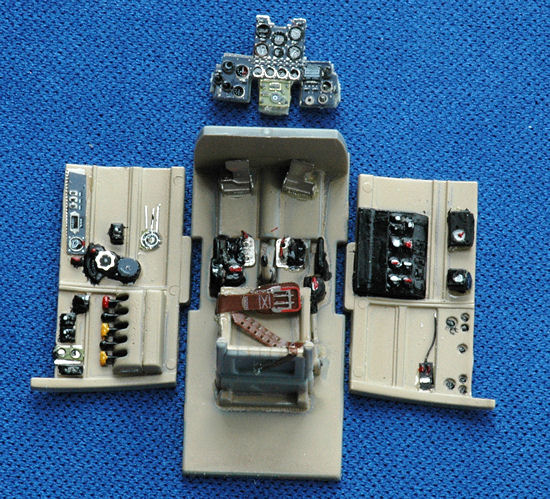
 While
the kit instrument panel with the kit supplied decal looks nice, the Eduard Zoom
pre-painted etched panel looks much better. I was especially pleased with this
after the kit was completed. I built two Hasegawa Ki-61’s at the same time one
with Eduard and one without. Overall I feel it is one of the best components and
really enhanced the kit. I sparingly used gorilla glue to attach all the Eduard
instrument parts. Gorilla glue does expand and bubble up but it is very strong
improving on the occasional strength failure and tendency to wander and leave
vapor burns that plague using cyano glues. I am a big fan of using the Hasegawa
decal instrument panel with some setting solution like Microscale Sol but the
Eduard etched was definitely an improvement. The only trouble I usually have
with Eduard sets is attaching the small “T” handles.
While
the kit instrument panel with the kit supplied decal looks nice, the Eduard Zoom
pre-painted etched panel looks much better. I was especially pleased with this
after the kit was completed. I built two Hasegawa Ki-61’s at the same time one
with Eduard and one without. Overall I feel it is one of the best components and
really enhanced the kit. I sparingly used gorilla glue to attach all the Eduard
instrument parts. Gorilla glue does expand and bubble up but it is very strong
improving on the occasional strength failure and tendency to wander and leave
vapor burns that plague using cyano glues. I am a big fan of using the Hasegawa
decal instrument panel with some setting solution like Microscale Sol but the
Eduard etched was definitely an improvement. The only trouble I usually have
with Eduard sets is attaching the small “T” handles.
There
is a very bad transition from the fuselage parts to the lower wing parts which
is very visible at the trailing edge, of the bottom wing section. I thought this
was my failure to properly align the part on the first one I built. The same
thing occurred on the second build and since I was looking out for this in the
second build I think it is a mould or pattern maker mistake. Obviously the
bottom wing to fuselage join should not have the big step. The connection should
be aerodynamically smooth and it is not. I tried to smooth this out with putty
on the first build but it is a very large step and the end result was not good.
It should be part of the plastic. I love Hasegawa kits but this omission appears
in many of their kits – that is, the lower wing to fuselage join “just doesn’t”
on an otherwise flawless moulding.
I
found the kit rear landing wheel part to be very delicate. It broke on both my
builds (and on my Ki-44 too). I am a generally careful modeler so I would say it
takes some special care in handling so be forewarned.
The
small secondary landing gear doors (parts B2/B3) that have a brace (parts
A15/A16) which I found difficult to assemble. I can only say be careful with
this part of your assembly. I think the fit and contact of the parts could have
been better engineered for ease of assembly.
The
kit decals are nice but too glossy. However, I used Future Floor Wax as the
softening agent because they were the older, thicker Hasegawa decals. Although I
prefer to use the Microscale Sol/Set approach, I have found Future to work well
with older thick Hasegawa and Tamiya kit decals. I also use very hot water when
working with Hasegawa decals and they release faster and conform better with
this modeling tip. Future seems to help the decals adhere and snuggle down into
panel lines. This approach also introduces the potential for glossy decals when
you need flat coats. For aftermarket decals that are thin, the Microscale decal
setting agents work better permitting ease of placement. Since Future floor wax
is sticky and you may not be able to move decals after you apply them using
Future.
I
can’t say enough about the need to be sure of the model (variant) of the Ki-61
you are building because of the two
different fuselage lengths. They are not clearly called out by Hasegawa in the
box art or kit name. Possibly this is not a problem if you can read Japanese.
The changes are always noted in the aircraft assembly instructions introduction,
which is in the initial part of the kit assembly instructions, because the
length is given (8.94 meters “long” or 8.74 meters
“short”) but not really explained or
 included
in the box art name.
included
in the box art name.
Another
easy way to see which version you have is to check the location of the exhaust
to the leading edge of the wing. You will notice the short version lining up
with the wing leading edge and the long version having a slight distance from
the end of the exhausts to the leading edge of the wing.
Also, you do have to look at
the related selection and position of the armament (both wing and fuselage!!!)
before you model one of them. But, until you have the exposed plastic part in
hand how do you know what’s in the box? Find out the fuselage tree codes using
the Modeling Madness charts! Now, if only the aftermarket decal types would
improve their recommendations with explicit Ki-61 fuselage type information, but
for now let’s get back to the build.
Overall
fit is very good, with a low parts count making for a simple assembly process.
Like all the new Hasegawa kits released in the past 15 years, surface detail is
refined and panel lines are perfectly scribed in a petit to scale manner giving
a terrific impression in the box and after the kit has been assembled.
The
cockpit plastic is very nice and there is no obvious need for a resin
replacement – especially when you use the kit supplied one-piece closed canopy.
If you do want to improve the cockpit area the first alternative I suggest is an
Eduard color etched Zoom (FE315) which does a lot and is a very nice addition. I
have the Aires resin cockpit (Aires #4017) and it looks very nice. I am saving
it for a future build once I get a definitive handle on the areas requiring care
during construction so I don’t waste my time and money by “putting lipstick on
the pig”. Not that this kit without aftermarket is a pig in any way, it is just
an endearing term used to describe enhancements to a kit build which has
assembly errors or faults that cannot not be overcome with some fancy
aftermarket add-on.
Because
I intend to build several examples of the Ki-61 I decided to build a set of
reference models with minimal aftermarket and enhancements. I built two kits,
one with the long fuselage and one short fuselage version and did not worry
about some mistakes hoping to avoid them on future builds. I was looking for
some discount priced kits so I kept an eye on eBay for some Ki-61’s. I had the
misfortune of dealing with an eBay seller who sells kits along with buyer beware
notices in the kit listing. After reading his explanation I went ahead and won
the auction (due to a lack of other bidders?!) only to find some major
components missing and some parts glued together that I wished he had not done
so poorly.
 Yes,
it was a bad buy but the hassle and cost of a return prevented me from sending
it back. He won’t ever see any more business from me. After initially blasting
him on the seller evaluation, I spoke with him and took pity on his
circumstances since he claimed he was a disabled retiree in Florida. At that
time I was only aware and disappointed with the decals. They were useless
because he obviously stored them in a very hot and humid location ruining the
decals (they were glued to the box) and not disclosing this. After a chat he
gave me a small shipment credit. That was before I found there were missing
plastic parts, like one of the cockpit sidewalls, and I just wrote the guy off
any future eBay buys. I then put some scratch building to work to remediate the
loss. Caveat emptor.
Yes,
it was a bad buy but the hassle and cost of a return prevented me from sending
it back. He won’t ever see any more business from me. After initially blasting
him on the seller evaluation, I spoke with him and took pity on his
circumstances since he claimed he was a disabled retiree in Florida. At that
time I was only aware and disappointed with the decals. They were useless
because he obviously stored them in a very hot and humid location ruining the
decals (they were glued to the box) and not disclosing this. After a chat he
gave me a small shipment credit. That was before I found there were missing
plastic parts, like one of the cockpit sidewalls, and I just wrote the guy off
any future eBay buys. I then put some scratch building to work to remediate the
loss. Caveat emptor.
Back to the
build - with the small parts count it is a fast build. Just follow the
instructions. I did not add the intake grill to this kit (i.e. to part A4) but
did to the Hasegawa # 9112 version using stretched sprue. I was building kit #
9112 simultaneously and wanted to see if it was a notable change worth doing.
Again, I wish this grill was part of the Eduard etched parts instead of some
other etched components that I elected not to use. The Eduard instrument panel
was attached to the plastic kit panel after its plastic surface detail was
removed. I glued the Eduard parts using gorilla glue which requires a very small
quantity to be effective. This glues bubbles up so use it sparingly.
I found the
wing tanks to be a difficult attachment process unless done before painting the
wing. My recommended solution after building two of the Hasegawa Ki-61’s is if
you are going to attach the wing tanks to attach the rack using plastic glue
without the tank. I suggest painting the drop tank and attaching the tanks after
all other painting and finishing is complete.
The
cockpit of the Ki-61 is an unusual color. When I see one painted in zinc
chromate green or Japanese blue-green I now know it looks wrong. The perfect
cockpit color match is Gunze Aqueous H79 RLM Sandy Yellow/Dark Yellow semi-gloss
which I used. Although the new Mr. Color replacement paints, available in the
U.S. are solvent based, and are very nice, I really miss the aqueous line. I
found I could get perfect results with Aqueous, and using Simple Green (SG)
cleaner I could restore the airbrush parts to like new condition with water &
SG. I found Simple Green when used on Gunze Aqueous was a miracle cleaner
removing all pigment from air brushes, etc. Also, the thinner I used with Gunze
Aqueous, a hardware store Shellac thinner, which is essentially high-grade wood
alcohol, worked perfectly. This gave me a low cost and effective thinner for
Gunze Aqueous to provide more money for buying kits!
Getting the cockpit color right was another learning experience.
There are some color drawings of Ki-61 cockpits which appear to use zinc
chromate green, such as page 48 in the Osprey Duel # 26 book. Based on
Hasegawa’s instructions, Scott Van Aken’s
 previous
Hasegawa Ki-61 build article, and Japanese language references confirming
Kawasaki’s paint colors the sandy yellow was used.
previous
Hasegawa Ki-61 build article, and Japanese language references confirming
Kawasaki’s paint colors the sandy yellow was used.
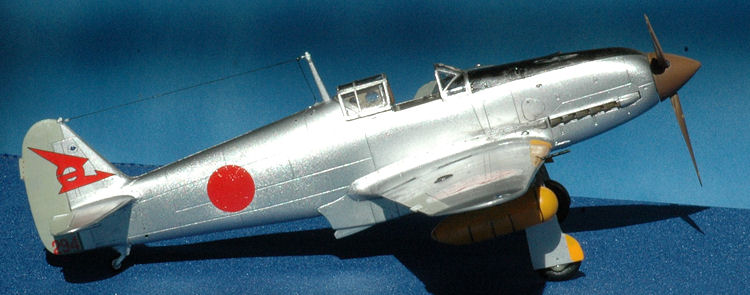
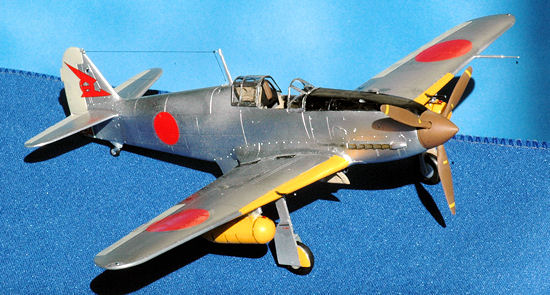
For
the overall fuselage finish I used Alclad Duraluminum and Polished Aluminum. It
was easy to use and the results good with a fast drying time and no masking
pull-up losses. I think with more NMF practice I can improve my use of Alclad. I
normally don’t prime my models, but I will in a future build to see first-hand
the changed metallic finish obtained when you use Alclad over an enamel base. As
Scott has indicated, a gloss black primer, is usually used with Alclad when you
want a high shine surface. I used Aves Apoxie sculpt to fill in any gaps such as
the wing to fuselage join but I try to use water and my wet finger tip for most
of the gap repairs when I use Apoxie to avoid sanding away surface details. It
is also faster and easier to dip your finger or a metal sculpting tool in water
and avoid sanding.
I used a brush
and two step process for painting the exhaust pipes. I brushed on Metalizer Dark
Iron non-buffing. When it was dry I used some thinned Pactra IP96 Rust enamel as
a wash.
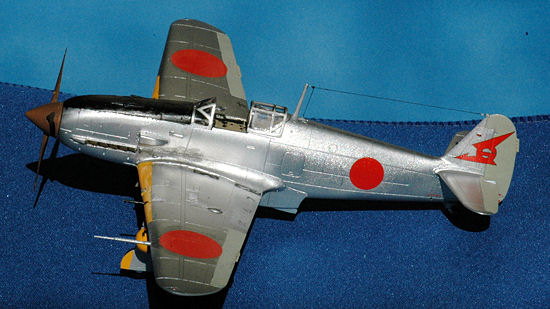
Tamiya
acrylics in a yellow with a few drops of red added to the mixture were used for
the IFF yellow-orange wing edges. Tamiya flat black for the engine cowl and
XF-14 J.A. Grey for the movable wing and tail surfaces finished the other parts
colors.
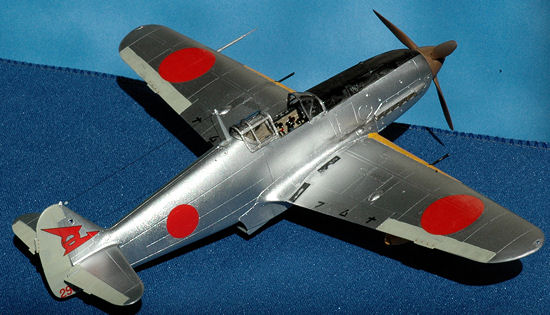
Some clear
sewing thread was used for the antenna wires which were then painted flat black
and attached using gorilla glue.
The stencils
came from the kit decals as well. My Japanese friends might find some placed
upside down so if you find any like this sorry about that oversight.
Weathering and
Final Coat – none due to the NMF finish. I have tried using Future on some NMF
“coats” and the loss of NMF luster is not what I wanted. I have stopped this
practice on natural metal finishes for the most part unless I want or need a
flat aluminum finish. Although it helps hiding decal clear coats unless I want a
very flat finish I usually don’t apply any top coat to a NMF paint.
Aside from the
engine area, I did minimal weathering of the airframe keeping it to using Tamiya
chalk and weathering sets. I did not spray on a gloss coat to seal in all the
decals instead using the Future coat used during the initial application to seal
all of the decals.
I try to set
the kit aside for a day or two then come back with a critical “contest eye”.
This is a fast part for me. I always write up a “finishing steps notes” which is
a written document to help complete the final construction. I also keep this
handy since while fishing the kit I sometimes see or notice so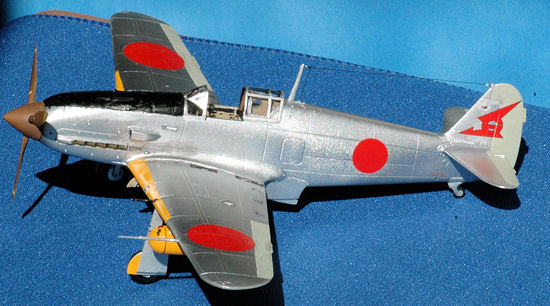 mething
overlooked during the final steps. After making some mistakes in the past I now
keep this document handy for some handwritten additions that I spot while
working the final steps. I list the final detail colors and under each color
linked to the specific part with its painting and assembly step. For example,
under “silver” I noted “add a landing light using a round bead and paint the
bead silver. After gluing, paint on its tip a small gloss white dot.” For Flat
Black the final steps are touch ups to: Tires – main and rear, gunsight, landing
gear oleo rubber boots, antennae wire, anti-glare panel, and drop tank plumbing
pipes.
mething
overlooked during the final steps. After making some mistakes in the past I now
keep this document handy for some handwritten additions that I spot while
working the final steps. I list the final detail colors and under each color
linked to the specific part with its painting and assembly step. For example,
under “silver” I noted “add a landing light using a round bead and paint the
bead silver. After gluing, paint on its tip a small gloss white dot.” For Flat
Black the final steps are touch ups to: Tires – main and rear, gunsight, landing
gear oleo rubber boots, antennae wire, anti-glare panel, and drop tank plumbing
pipes.
Final construction is usually paint
touch-up oriented so I get the flat black items all at one stroke rather than
doing it in multiple steps. Although I did not do it here I will in future
builds of the Ki-61 Hien kit attach the drop tanks in the final steps. The clear
parts including the landing gear light cover on the wing were added using
Testors 8876C white glue. I use this because of its long, tapered black plastic
applicator that allows small amounts of glue to be carefully placed. The radio
mast and antennae wire was attached and painted as the last step.
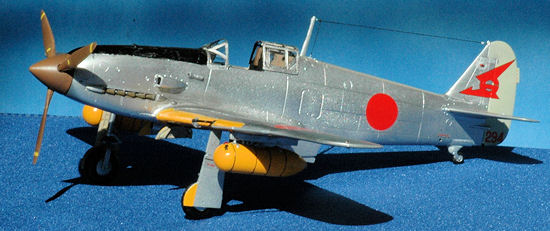
I really
enjoyed building the Hasegawa Tony. It is definitely better than the older
alternatives. By coming up with the thought that this was a “reference build”, I
could overlook some flaws and keep pushing to completion and avoid another
almost finished shelf of doom kit. I found I enjoyed the kit much more and
obtained more relaxation and enjoyment avoiding the shelf of doom status for the
kit as some errors like breaking off the fuselage antenna, drop tanks, rear
landing gear (a very delicate and weak part by the way) could have stopped final
completion of a most enjoyable kit.
Model Art No. 263 Ki-61 Hien Army Type 3 Fighter
Kawasaki Ki-61 Hien by Richard M. Bueschel, Schiffer Books 1996
P-38
Lightning vs Ki-61 Tony New Guinea 1943-44 by Donald Nijboer, Osprey Duel Series
# 26
The Maru Mechanic No. 45
1984/3 Ki-43 and Ki-61
Model Art Profile Kawasaki
Ki61 Hien No. 733
Andrew Garcia
November 2012
If you would like your product reviewed fairly and fairly quickly, please
contact
the editor or see other details in the
Note to
Contributors.
Back to the Main Page
Back to the Review
Index Page