| KIT #: | 53021 |
| PRICE: | $ 21.00 |
| DECALS: | Two options |
| REVIEWER: | Gerson Lopes |
| NOTES: |
| HISTORY |
Mr. Scott Van
Aken already provided a good historic description for the “Peggy” (codename
given by the Americans), when he reviewed the Hasegawa 1/72 Ki-67 'Hiryu' kit,
so I merely will repeat his words:
“Design of
the Ki-67 Hiryu "Dragon Slayer", began in late 1939 with a requirement to
Mitsubishi for a fast heavy bomber.
 The design
was approved in early 1941 and Mitsubishi was directed to start work on the
prototype. This aircraft was completed in late 1942 and 17 preproduction
aircraft were subsequently built. Full production bombers rolled off the
assembly line in August 1944.
The design
was approved in early 1941 and Mitsubishi was directed to start work on the
prototype. This aircraft was completed in late 1942 and 17 preproduction
aircraft were subsequently built. Full production bombers rolled off the
assembly line in August 1944.
Due to the
changed conditions of the war by that time, nearly all of them were outfitted at
torpedo bombers. Unfortunately, the 'Long Lance' torpedoes were too large to fit
in the bomb bay so had to be carried externally under the aircraft. Several were
also upgraded with warning radars, though this did not apply to all aircraft.
Other uses for the Hiryu were as mother ships for the Ohka piloted bombs.
First combat use of the aircraft was in October 1944 by the 98th Group off the coast of Taiwan. Unfortunately for the Japanese, most of their trained bomber crews has already been lost in the years before. The new, poorly trained crews that were left, were unable to effectively use this new bomber. It also didn't help that the Allies had air supremacy over the target.”
| THE KIT |
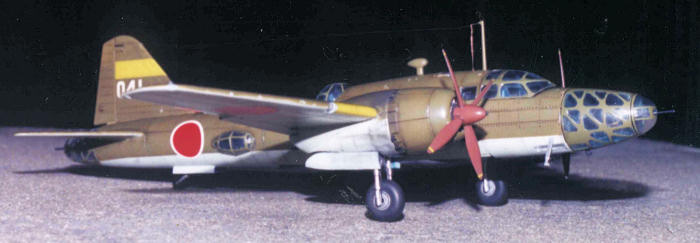
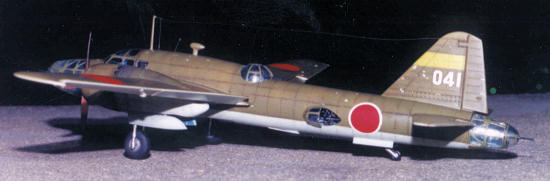
The Ki-67 Hiryu 1/72 scale kit from Arii is over 40 years old, as revealed by the date (1966) printed inside the top half of the right wing; however, it is not a bad kit, and the fittings and alignments are very good, as well as the decals. With careful assembly, it is almost entirely unnecessary to use putty on the junctions, not even on the usual gap between wing and fuselage; it fits perfectly! The rivets are represented like very tiny micro-holes, along the recessed panel lines. The model presented here is the kit #53021 from Arii, that is the bomber version, with ordinary bombs and decals for two options of tail markings; however, Arii also has a torpedo-fitted Ki-67 (kit #53022), and a Ki-109 (kit #53023), which is the heavy night fighter version of the Ki-67, with a 75 mm cannon installed in the non-glazed, “solid” nose.
| CONSTRUCTION |
An old kit,
the Arii Ki-67 has injection marks in some pieces, as well as small depressions
on the nacelles of the landing gear bay, on the pilot seats, machine guns, and
on the tail of the airplane; I fixed all that in my Hiryu kit, applying a little
bit of putty to fill out the depressions, but the worst case was the transparent
(clear) parts: the infamous “circles” (injection marks) printed in the middle of
the canopy and on the nose and tail clear parts! Luckily such “circles” are
inside the clear parts, and they can be sanded away (wet sand with a #400
sandpaper followed by a #1000 sandpaper and later a #2000 sandpaper), not
destroying the contours of the "window” frames on the outside of the clear
parts; in order to recover the shine and transparency I polished the clear parts
with a soft automotive polishing paste.
In the
cockpit, I provided the pilot and co-pilot seats with thin stripes of adhesive
tape to simulate the seatbelts; after the seats were painted dark brown, I used
a silver colored pen (a pen with gel-metallic paint) to draw on the tips of the
belts the metal buckles.
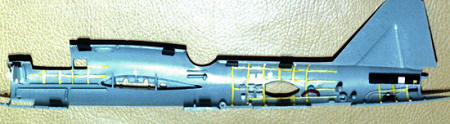 According
to my references of the Ki-67 interior, I decided to open the “canopy-bubble”
(blister) on the left side of the fuselage, with the machine gun installed in
ready-use position; in this case, some items would be visible inside the
fuselage, and therefore it was necessary to reproduce details and the internal
fuselage frame (ribs); I used thin styrene strips (thickness of about 0,25 mm)
to make the frame “ribs”, carefully cutting and gluing them in place, and also
rectangular pieces of styrene sheet (1,0 and 2,0 mm thick) to simulate the
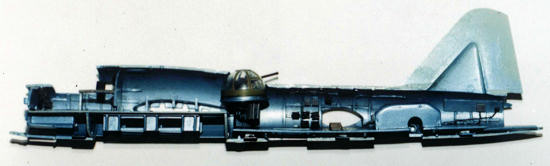
several "black boxes"; thin sprue was used for the pipes, wires and cables. Call
me “paranoid", but I wanted to reinforce the union of the two fuselage halves
with small reinforcement tabs (styrene sheet 0,5 mm thick) glued along the
internal border of the right side of the fuselage, just like is usually done on
vacuum-formed kits; that should keep the fuselage halves together, eliminating
my concerns with mechanical stresses on a kit with movable bomb bay doors and
swinging machine gun turret.
According
to my references of the Ki-67 interior, I decided to open the “canopy-bubble”
(blister) on the left side of the fuselage, with the machine gun installed in
ready-use position; in this case, some items would be visible inside the
fuselage, and therefore it was necessary to reproduce details and the internal
fuselage frame (ribs); I used thin styrene strips (thickness of about 0,25 mm)
to make the frame “ribs”, carefully cutting and gluing them in place, and also
rectangular pieces of styrene sheet (1,0 and 2,0 mm thick) to simulate the
several "black boxes"; thin sprue was used for the pipes, wires and cables. Call
me “paranoid", but I wanted to reinforce the union of the two fuselage halves
with small reinforcement tabs (styrene sheet 0,5 mm thick) glued along the
internal border of the right side of the fuselage, just like is usually done on
vacuum-formed kits; that should keep the fuselage halves together, eliminating
my concerns with mechanical stresses on a kit with movable bomb bay doors and
swinging machine gun turret.
I painted the
interior of the fuselages with acrylic automotive Lacquer paint in metallic
grayish blue color, which is one of the possible colors to use inside Japanese
airplanes (the others are light green, olive drab, beige and sometimes brown);
the references I managed to obtain did not deny the possibility of use of said
metallic blue on the inside of actual Ki-67s. Then, I
 applied the
usual wash with fairly diluted black ink (ordinary synthetic enamel paint),
followed by silver dry-brushing in order to simulate wear providing the coveted
"operational" look.
applied the
usual wash with fairly diluted black ink (ordinary synthetic enamel paint),
followed by silver dry-brushing in order to simulate wear providing the coveted
"operational" look.
This airplane features a kind of internal floor or deck inside the rear fuselage, which I reproduced with pieces of plastic sheet (1 mm thick), cutting openings below the deck for the entrance door of the fuselage and for the tail wheel, for which I even placed it’s corresponding "lodging box". I used the internal floor from an Arii Ki-109 kit like a reference to scratchbuilt my Ki-67 floor.
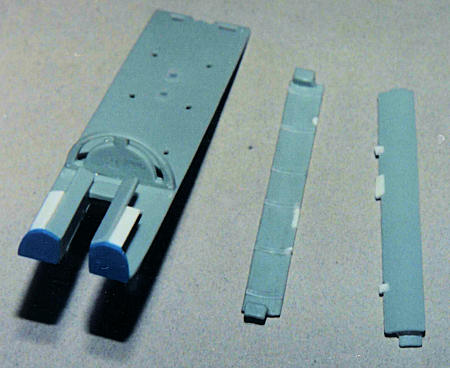 Arii’s
Ki-67 is a kit designed to present several moveable parts: ailerons, flaps,
fully retractable landing gear (including closing doors), propellers, machine
guns, bomb bay doors and the entrance door on the bottom of the fuselage;
however that is exactly the cause for lack of realism, simply because the kit
features the necessary gaps and fins to afford mobility to pieces which yield a
toy-looking kit. So, there were gaps on the landing gear nacelles and the bomb
bay doors. Said gaps have been filled in with a piece of plastic sheet (0.5 mm
thick) and a little putty over it. I have also added some bulkheads to the front
part of the cockpit deck, to improve the visual appearance and also to hide the
gaps for the bomb bay doors, which otherwise would be visible through the glazed
nose.
Arii’s
Ki-67 is a kit designed to present several moveable parts: ailerons, flaps,
fully retractable landing gear (including closing doors), propellers, machine
guns, bomb bay doors and the entrance door on the bottom of the fuselage;
however that is exactly the cause for lack of realism, simply because the kit
features the necessary gaps and fins to afford mobility to pieces which yield a
toy-looking kit. So, there were gaps on the landing gear nacelles and the bomb
bay doors. Said gaps have been filled in with a piece of plastic sheet (0.5 mm
thick) and a little putty over it. I have also added some bulkheads to the front
part of the cockpit deck, to improve the visual appearance and also to hide the
gaps for the bomb bay doors, which otherwise would be visible through the glazed
nose.
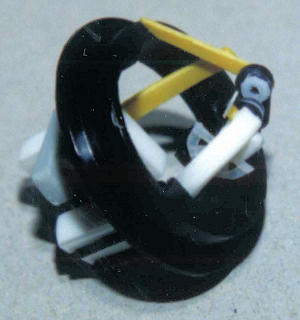 The
fuselage machine gun turret, as it comes in the kit, is very simple. Considering
it is quite visible through its transparent cupola, I decided to improve it a
bit, according to my references, placing together pieces of plastic sheet in
various thicknesses, adequately cut to represent the machine gun supports, gun
sight, ammunition box and assorted mechanisms. After completion, it was all
painted with metallic blue color, with black wash and silver dry brushing. There
is a “tin chute” (made of a piece of plastic strip) which directs the ammunition
belts from the ammo box to the gun; it was painted in a copper color.
The
fuselage machine gun turret, as it comes in the kit, is very simple. Considering
it is quite visible through its transparent cupola, I decided to improve it a
bit, according to my references, placing together pieces of plastic sheet in
various thicknesses, adequately cut to represent the machine gun supports, gun
sight, ammunition box and assorted mechanisms. After completion, it was all
painted with metallic blue color, with black wash and silver dry brushing. There
is a “tin chute” (made of a piece of plastic strip) which directs the ammunition
belts from the ammo box to the gun; it was painted in a copper color.
After masking
with adhesive tape (Tamiya masking tape), the metal frame of the transparent
cupola was painted first with metallic blue, and later, over it, with
nitrocellulous automotive grade paint in the standard Japanese camouflage color,
a variation of the famous IJA green, which lies between brown and olive drab
(please see “Painting and Markings” below).
Continuing
the assembly process, as I chose to leave the left side blister canopy on the
waist, with the machine gun in “ready” position, I cut the blister in half,
splitting it into front and rear halves. After that I started to prepare all the
transparent pieces for painting, and initially started to mask it with little
pieces of adhesive tape. However the results were not being good, because many
of these little windows have rounded corners. The solution was to use liquid
mask, Humbrol Maskol (the blue one)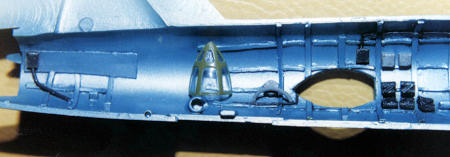 ,
applied with an old n°00 brush; I filled every window with the mask, and after
allowing the Maskol dry for some minutes, I applied the acrylic primer (metallic
blue) and over that my IJA green drab. Some 20 minutes later I used a toothpick
to remove the mask, scratching it carefully out of every window.
,
applied with an old n°00 brush; I filled every window with the mask, and after
allowing the Maskol dry for some minutes, I applied the acrylic primer (metallic
blue) and over that my IJA green drab. Some 20 minutes later I used a toothpick
to remove the mask, scratching it carefully out of every window.
With all the transparencies already duly painted, I proceeded to detailing the canopy on the plane’s nose, as well as the lateral blisters on the fuselage. First I installed the rear half of the blister (the one I had cut before) inside the fuselage (just like on the real Ki-67). It was glued to the inner side of the fuselage.
Before
painting the nose canopy, I had made a scribbling on it’s lower half, marking
the contour for the lower access door. I made the deck that lies inside this
canopy with pieces of thin sprue, which resembles a grid. With pieces of 0.5 mm
plastic sheet plus more sprue I made other internal equipment (bombing sight,
photo camera). Observing photos of the real Ki-67’s nose gun (and the tail gun
too), I added a rear support (plastic sheet). I also made the bubble canopies on
the fuselage sides, with sprue-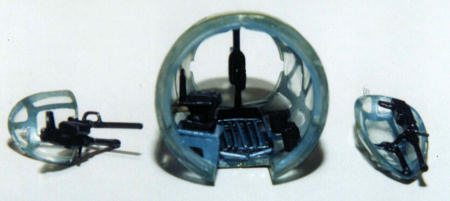 made
support bars for the machine guns. After painting, I glued everything in place.
made
support bars for the machine guns. After painting, I glued everything in place.
The engine nacelles had the rear part of their “exhaust pipes” (the little rectangles rimming the edge) holed with a 1 mm drill, making an oblong shaped opening to offer the impression that they are hollow. The same procedure was done to the tip of all guns in the kit, though these were made with a 0.5 drill and the hole was ring-shaped (not oblong, of course).
After leaving the fuselage gluing overnight, I glued wings and elevators, which presented a very good fitting, requiring no putty on the joints. In the next day I wet sanded and later inspected all joints and surfaces. As everything was OK, I washed the kit in tap water, to paint it the next day.
| COLORS & MARKINGS |
A first base layer (primer) of automotive acrylic white lacquer came first. I
wanted to represent some typical Japanese wear on the plane, simulating cracking
paint, and thus I applied with the tip of a toothpick small pellets of Maskol
liquid mask to some areas of the wings and elevators, as well as the fuselage,
taking care not to exaggerate, for after all I wanted a near “new” Ki-67 in
relatively good shape but with a soft war-weary look.
The kit’s instruction sheet suggests the making of said paint by mixing 50%
white + 30% black + 20% brown. A quick check on my equivalence tables for
Japanese colors for modeling, as well as examination of vintage photos (mostly
black and white, though it served well for comparing the proportion of
dark/light colors), I concluded the Hiryu Japanese camouflage color, at the time
of the pictures, was something really close to olive drab, more precisely color
FS34089 (Federal Standard color code). With the FS catalog with chip color of
FS34089 in hand, I prepared the color mixing together yellow and black, both
drab and automotive grade, correcting the shade by trial and error. Anyway,
after I had reached the same shade of FS34089 I added some brown drab to turn
the shade a little more reddish. It is very hard to establish accurately the
correct shade of a worn, sunburned IJA green, such as the one sported by the
Ki-67 by the end of the Second World War, but I am confident I reached a pretty
good result.
As I was already tampering with color shades, I decided to prepare the color
used for the lower camouflage scheme used on the aircraft (IJA green-gray,
equivalent to a slightly lighter FS34432), and also the propellers color (the
famous “propeller color”, or red brown FS30109). I reached these colors after
crossing the data I had from several color equivalence charts.
After I had airbrushed the lower camouflage IJA green-gray, I applied the
upper camouflage IJA green, both drab
colors. After 15 to 20 minutes drying (in a hot day), I used adhesive tape to
mask the leading edges and the strip on the tail, both painted yellow; after
that I removed the tape wit lots of care, scraping out with a toothpick those
small pellets of Maskol I had applied, leaving the paint with a peeled look,
showing the white acrylic base layer which was under it. Instead of a white
primer, I could have used aluminum color to simulate the peels, but I personally
deem this an exaggeration and also a bit unreal, given the shade of silver on
this kind of effect; in this case I prefer either white or pale gray. It is
worth observing that the front and rear canopies, as well as the engine cowlings
are entirely painted in IJA green, according to information I obtained from
references, and contrary to what is indicated on the instructions sheet. Then, I
applied the “red circles” decals and the “041” on the tail.
A final touch of black artists oil ink wash, lavishly diluted, was applied with
a brush following all the lines of panels and rivets on the top part of the
plane, while an identical wash in gray oil ink was applied to the lower
surfaces. After two hours drying these washes were smoothed using a soft cloth
and gently rubbed, yielding a likable, soft blackening effect on the lower
relief and also around them; once again using the silver color pen I added some
extra, light wear, following some of the panel lines.
| CONSTRUCTION CONTINUES |
 I
assembled the landing gear in their place; each main landing gear has
received a kind of retraction strut (retraction scissors, made of sprue),
that is featured on the real plane. These retraction struts are set inside
the landing gear nacelles; I also added the oil ducts (again made of thin
sprue), that
I
assembled the landing gear in their place; each main landing gear has
received a kind of retraction strut (retraction scissors, made of sprue),
that is featured on the real plane. These retraction struts are set inside
the landing gear nacelles; I also added the oil ducts (again made of thin
sprue), that
 run
along the landing gear legs.
run
along the landing gear legs.
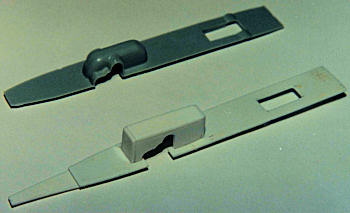
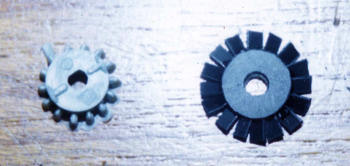
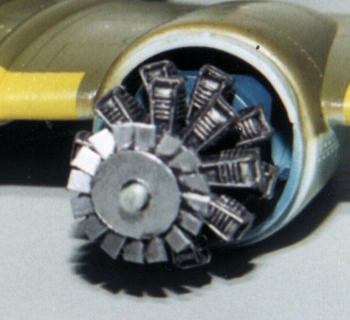
The pieces
representing the fans (ventilation propellers) which are set in front of the
engines, as they come in the kit, are way too simple and incorrect; I decided to
make up new fans, made form a round piece of plastic sheet 0.5 mm thick
surrounded by small rectangles (the fan blades, also made of plastic sheet)
glued around it; on the left side of the picture are the original pieces that
come with the Arii kit, on the right are the fans I made, which were later
painted metallic gray (steel color). With the radial engines already in place, I
introduced the fans on the engine axles without gluing them, and finally glued
the cowlings over them.
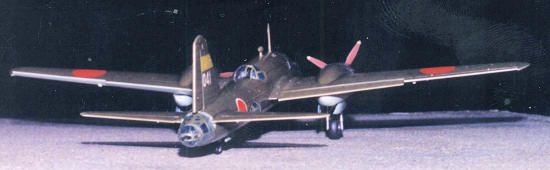
With the doors of the nacelles (glued “hard”, not movable, in place), propellers
(movable), canopies (including the lateral blisters, already with machine guns
installed), leaving it almost ready. The last thing was the antenna aerial,
obtained from an ordinary “very thin” electric copper wire, glued in place with
cyanoacrylate glue.
| CONCLUSIONS |
 I liked
very much to build this kit; due the detailing I made, the total time consumed
to build it was some 50 hours, easily distributed into some 2 daily hours,
always sharing the available time with the “regular duties” (work, family,
etc.); however this long time is not necessary if the modeler do not add the
extra details I put, because this Arii kit is already good enough straight from
the box, and the construction time certainly will be under 20 hours.
I liked
very much to build this kit; due the detailing I made, the total time consumed
to build it was some 50 hours, easily distributed into some 2 daily hours,
always sharing the available time with the “regular duties” (work, family,
etc.); however this long time is not necessary if the modeler do not add the
extra details I put, because this Arii kit is already good enough straight from
the box, and the construction time certainly will be under 20 hours.
| REFERENCES |
- Mitsubishi Ki-67/Ki-109 Hiryu in Japanese Army Air Force service by Richard M.
Bueschel - Schiffer Books
- Research in various internet websites; the material in the website
If you would like your product reviewed fairly and quickly, please contact the editor or see other details in the Note to Contributors.