Nichimo 1/48 Ki-45kai 'Toryu'
| KIT #: | 19 |
| PRICE: | $27.00 |
| DECALS: | Two options |
| REVIEWER: | Dale Rannals |
| NOTES: | Recently reissued |
| HISTORY |
The Ki-45
Toryu ("Dragon Slayer") fighters were results of a
Japanese Army request for a two-seat, twin-engined fighter with a speed of
540km/h (335mph) at 11500ft in Dec 1937. The first prototype flew in Jan 1939
with two Nakajima Ha-20b radial engines of 820hp and received a rejection from
the Army, the prototypes barely reaching 298mph.
 A thorough
reworking of the design produced the Ki-45 Kai, armament consisting of 2 12.7mm
machine guns in the nose and a 20mm cannon in a ventral tunnel, with a 7.92mm
machine gun for rear defense.
The resulting aircraft was designated Type 2
Two-Seat Fighter by the Japanese Army in Feb 1942, while the Allies codenamed
them "Nick". They were first used in
A thorough
reworking of the design produced the Ki-45 Kai, armament consisting of 2 12.7mm
machine guns in the nose and a 20mm cannon in a ventral tunnel, with a 7.92mm
machine gun for rear defense.
The resulting aircraft was designated Type 2
Two-Seat Fighter by the Japanese Army in Feb 1942, while the Allies codenamed
them "Nick". They were first used in
The realization of their weakness against nimbler single-engine fighters led to the change of their primary roles to be anti-bomber and anti-ship. The Kai-c was the anti bomber version, armament consisting of 2 20mm cannon firing obliquely upwards and a 37mm cannon in the ventral tunnel. The nose was left empty for future installation of radar, which was never fitted. Even without radar, they excelled in their new roles. Though their performance suffered visibly at the altitude of 10,000m, they still scored numerous kills on American bombers later on in the war.
| THE KIT |
I like Nichimo kits.
But they run a full spectrum from accurate to
toy-like.
Some, like their Ki-51 Sonia and Ki-43 Oscar, are extremely
well done.
They are accurate and build well, and have cockpit detail
that is a few decades ahead of their time.
Others, like the Aichi Jake, SBD Dauntless, and TBF
Avenger are more toy-like, with features like movable control surfaces and were
designed to include a small motor to spin the prop. For that reason the cockpit
on these are severely lacking.
I don’t say toy-like
 like it’s
a bad thing though….it depends on your perspective.
The Nichimo SBD Dauntless has moveable flaps and a
droppable bomb, which is considered the ultimate in cool by my 7 year old son.
like it’s
a bad thing though….it depends on your perspective.
The Nichimo SBD Dauntless has moveable flaps and a
droppable bomb, which is considered the ultimate in cool by my 7 year old son.
So what do you get with a Nichimo Nick? This is one of their non-toy, more accurate kits. A very nice kit, actually. First off, you get a sturdy box with some really nice box art of the cover and a short history (in English!) on the side. Upon opening the box, you are greeted by separately bagged sprues of grey, slightly pebbly textured soft plastic. There is one sprue of clear bits; mine was wrapped in tissue paper which I thought was a nice touch. Approximately 90 pieces overall. The pieces themselves are well molded, well detailed, and exhibited no flash. The pebbly texture of the plastic disappears under a coat of paint, so no worries there.
The instructions are adequate; a fold out affair, with well done assembly drawings. This is good because even though there are a lot of text instructions on the paper, they are all in Japanese. Color callouts are probably there, but unless you read Japanese, you’d best find other sources. Decal placement is incorporated into the last assembly step……kind of odd, but it works. The single decal sheet gives markings for two aircraft, but the sheet looked, well, several decades old. Probably not very usable, but old decal sheets have surprised me before.
| CONSTRUCTION |
Construction starts with the cockpit,
big surprise there.
Detail here is pretty decent for its age and
consists of 14 parts.
Not bad considering what you can see after the
fuselage is closed up.
Remember, this is an old kit, so if you are
expecting Hasagawa-like detail, you will be disappointed.
I laid the assembled cockpit in the right fuselage
half, using it as a jig to keep the bulkheads and machine gun mount at the
correct angles until all had dried.
Taking into account several resources, including
Bill
Koppos' review
 here, I
painted the interior a brown khaki color, in this case Model Master Wood,
lightened just a bit.
I painted some knobs and switches black and then
slathered a dark brown oil wash on it all to give it some depth.
here, I
painted the interior a brown khaki color, in this case Model Master Wood,
lightened just a bit.
I painted some knobs and switches black and then
slathered a dark brown oil wash on it all to give it some depth.
The tunnel gun is an insert that attaches to the right fuselage half. I left the actual barrel off since I was going to use brass tubing later for this and the oblique cannon. After this was in place the fuselage halves were joined together, trapping the tail wheel in place. I sanded down the resulting seams, using Tamiya’s Surface Primer where needed. Now here’s where some forethought got me in trouble. Just aft of the pilots pit is a upper fuselage insert. In itself not that big a deal. Except it doesn’t fit all that well. Again, no problem….that’s what putty is for, right? But there are two small windows here and some nice petite detail, in the form of rivets and combing around the cannon ports. For this reason I decided to leave the windows off, install the part and do all the sanding, then put the windows in by sliding them into place from the front after I was done. Easy. Oh yeah…I’m a smart one. So this is the course I took. I taped close to the seam lines to minimize losing detail and sanded down the seams. Good so far. Then I tried installing the windows. Hmmmmm….not so easy. I managed to get the port window in first try and with no marring and in so doing, built up false hopes. The starboard side gave me fits though. Probably took a good 45 minutes to get that dang thing in there. I dropped it several times; twice it fell inside the fuselage. I was lucky to get it out each time. I finally managed to get it in place and only boogered it up a little. Definitely not the way to do it. In hindsight it would have been far easier to just glue the darn windows in and mask them off to protect them from sanding…..especially since you need to mask them off for painting later anyway.
The landing gear are next, and each consists of five fragile looking bits that all interlock onto an insert and each other and form a very strong structure. The way these pieces fit together makes misalignment pretty much impossible. Each insert is then, well…inserted into the bottom wing half before the wing halves are assembled.
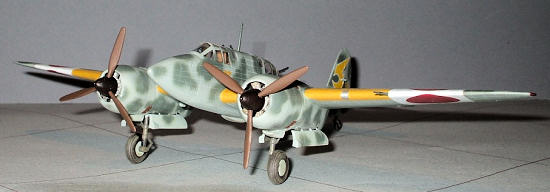
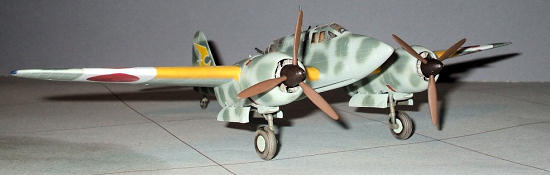
The engines are little kits in themselves. Each one comprises of seven parts and makes up into a nice little replica of a Nakajima radial. Again, considering the kits age, they put a lot of effort into these engines. I’m sure there are aftermarket engines available that you could use, but I think it would be a waste of funds. The cowlings are next and these comprise of two halves and a front ring. The two halves fit beautifully, but the front ring seemed a little too big and required a few passes with a sanding stick to blend it in.
I believe we are ready to do some painting.
| COLORS & MARKINGS |
 good job in
minimizing monotony of monotone.
It sort of brings the paint job to life.
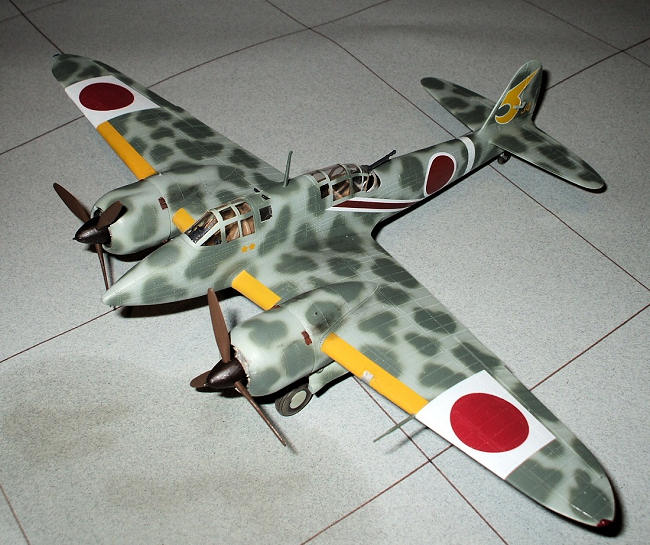
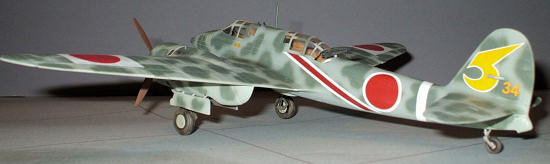
Next on the agenda are the green blotches.
You have a pretty free hand as to how you do this,
for the pictures I’ve seen show everything from a nice neat factory applied
splotches to the field-applied haphazard, rough look.
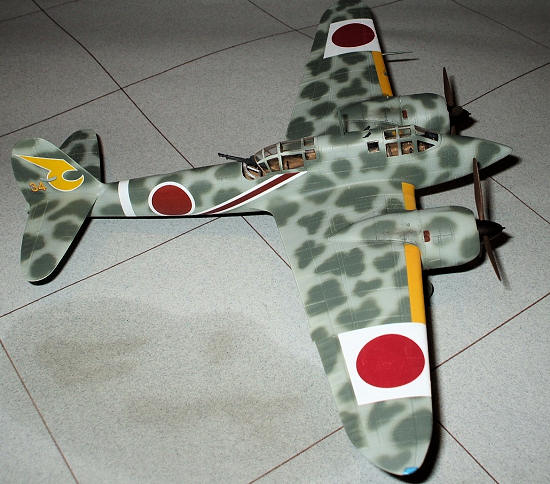
I concentrated on keeping each splotch uneven in
shape and size but uniform over the whole aircraft.
You don’t want to start out big and have them get
smaller as you move across the aircraft.
Easy to subconsciously do.
Trust me, you can see this real easily after you’re
all done….don’t ask how I know this.
good job in
minimizing monotony of monotone.
It sort of brings the paint job to life.
Next on the agenda are the green blotches.
You have a pretty free hand as to how you do this,
for the pictures I’ve seen show everything from a nice neat factory applied
splotches to the field-applied haphazard, rough look.
I concentrated on keeping each splotch uneven in
shape and size but uniform over the whole aircraft.
You don’t want to start out big and have them get
smaller as you move across the aircraft.
Easy to subconsciously do.
Trust me, you can see this real easily after you’re
all done….don’t ask how I know this.
So I
grabbed my trusty Badger 150 and fully assaulted the model.
It took a while, just for the fact that I took my
time and went nice and slow.
Looking at the box art I should have made the
splotches smaller, but I liked the result anyway.
After I let the paint dry for a couple days I coated
the aircraft with some future to gloss things up for the decals.
 Ahhhh….those
decals.
As I mentioned up above, the decals looked old but I was
hoping to use them.
My hopes were dashed when the first one, one of the
wing hinomarus,
broke into about 1027 pieces when I tried to move it off the backing sheet.
Lovely.
Had I thought a little bit I would have tested with
a small…unimportant….decal.
Maybe if I spayed some decal coating on the sheet it
would have prevented this.
Too late now in any event.
Sooooo……onto Plan “B”.
Rather than spend money on another aftermarket decal
sheet, I scrounged thru the decal dungeon for something suitable.
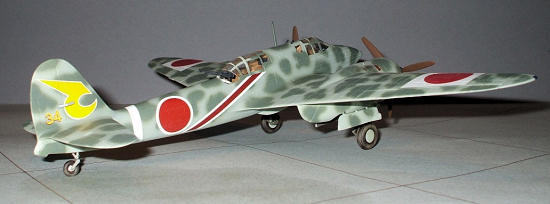
I had a unit insignia from a Super Scale sheet
(48-303) and I found something close in an Aeromaster Ki-84 Frank sheet.
Not quite accurate, but it’ll have to do.
So I put these on.
I was quite impressed in the way they all snuggled
right into the rivet detail after hitting them with Micro-sol.
Ahhhh….those
decals.
As I mentioned up above, the decals looked old but I was
hoping to use them.
My hopes were dashed when the first one, one of the
wing hinomarus,
broke into about 1027 pieces when I tried to move it off the backing sheet.
Lovely.
Had I thought a little bit I would have tested with
a small…unimportant….decal.
Maybe if I spayed some decal coating on the sheet it
would have prevented this.
Too late now in any event.
Sooooo……onto Plan “B”.
Rather than spend money on another aftermarket decal
sheet, I scrounged thru the decal dungeon for something suitable.
I had a unit insignia from a Super Scale sheet
(48-303) and I found something close in an Aeromaster Ki-84 Frank sheet.
Not quite accurate, but it’ll have to do.
So I put these on.
I was quite impressed in the way they all snuggled
right into the rivet detail after hitting them with Micro-sol.
After a
coat of Tamiya flat/Future mixture it was time to add the little bits.
On went the wheels and pitot tube and mast.
I cut some lengths of brass tubing for the gun
barrels and added them after painting them black.
Unmasked the canopies and added a rear gun for some
interest back there.
I somehow managed to lose the rudder actuating
arms……Doooohhhh!
I scavenged thru the spare parts bins and found two
landing gear scissors that fit the bill, so on they went.
And it was done.
| CONCLUSIONS |
I
really enjoyed this kit.
Some will squawk that it is obsolete because of the
new Hasagawa kit.
That’s fine.
Does it compare to the Hasagawa kit in detail?
Not a chance.
The new kit has a few decades on this one, and
therefore better offer something, well, better.
But I judge a kit for what it is, not for what it
isn’t.
This is a very nice, accurate rendition of
Recommended to anyone who doesn’t need to have the latest
wunderkit.
| REFERENCES |
The Internet
Axis Aircraft of World War Two (ISBN: 1-85152-966-7)
February 2009
Copyright ModelingMadness.com. All rights reserved. No reproduction in part or in whole without express permission from the editor.
If you would like your product reviewed fairly and quickly , please contact the editor or see other details in the Note to Contributors.
Back to the Review Index Page 2023