Nichimo 1/48 Ki-43-I 'Oscar'
| KIT #: | S-4820 |
| PRICE: | $ |
| DECALS: | options |
| REVIEWER: | Kelly Jamison |
| NOTES: | Aftermarket: True Details 1/48 Resin Weighted Wheels # TD48021, Squadron Vac-formed canopy Ki-43 #SQ9546, Superscale 48-515 decals |
| HISTORY |
The Japanese Army Air Force was happy flying their Ki-27’s as the main fighter for the Emperor. So they were not too pleased when they first received the Ki-43 test airframe, complaining of the sluggish characteristics, heavy handling and poor engine performance. The retractable landing gear and enclosed canopy were considered expensive luxuries by the elite fighter pilots. Nakajima went back to the chalkboard and came out with the Ki-43-I—KAI. This improved version met with great enthusiasm by the front line pilots. They learned to use the new “Butterfly Flaps” to increase the turning radius and maneuverability to give them the edge to out turn just about anything in the air. There were three basic airframes produced over the years until the Ki-43 was replaced by the Ki-84 Frank.
| THE KIT |
This kit really surprised me. It had been sitting on the shelf for years. I thought I would give it another look and decided to build it to make room for the new Hasegawa kit. As I surveyed the Nichimo offering, I noticed that the detail really was not that bad at all. The surface had a strange rough surface and the dimple rivets were a bit distracting. Then I noticed all the engine detail from the firewall forward and all the extra cockpit pieces. This was going to be a fun build!
The instruction sheet is almost completely in Japanese but is easy to follow and did not give me any problems. It is a single sheet printed on both sides and is about 9” by 22” in size. A bit different than a normal instruction sheet you are use to seeing.
| CONSTRUCTION |
 I started off
with the engine. It went together real nice and was a straight forward
build. Leave off the exhaust stubs for now. I got a little worried about
the accessory gear housing and carburetor pieces fitting against the
firewall. When I mocked it all up the fit was really tight and kept the
engine from lining up right. I decided to leave out all the guts of the
firewall. It wouldn’t be seen anyway. Had I decided to open up an engine
panel or two, I would have worked on this area a little more. The engine
detailed out fantastic. I painted the engine cylinder heads steel and
highlighted it in black. The crank case cover was painted in dark grey and
washed in a black ink wash to bring out the small detail. You really don’t
have to go overboard on detailing because the radiator covers a lot of the
front of the engine. The engine cowling has a small part that needs to be
glued and sanded smooth to the bottom. I put the engine off to the side and
started on the cockpit.
I started off
with the engine. It went together real nice and was a straight forward
build. Leave off the exhaust stubs for now. I got a little worried about
the accessory gear housing and carburetor pieces fitting against the
firewall. When I mocked it all up the fit was really tight and kept the
engine from lining up right. I decided to leave out all the guts of the
firewall. It wouldn’t be seen anyway. Had I decided to open up an engine
panel or two, I would have worked on this area a little more. The engine
detailed out fantastic. I painted the engine cylinder heads steel and
highlighted it in black. The crank case cover was painted in dark grey and
washed in a black ink wash to bring out the small detail. You really don’t
have to go overboard on detailing because the radiator covers a lot of the
front of the engine. The engine cowling has a small part that needs to be
glued and sanded smooth to the bottom. I put the engine off to the side and
started on the cockpit.
You will really like the detail in the cockpit area. The genuine thing is a tangle of hydraulic hoses, hand pumps and switch panels. This cockpit seems to be a cross between a Ki-43-I and a Ki-43-II. You will notice a hand pump on the left side of the cockpit floor. It is not in any of my cockpit photos and I am not sure where it came from. There is also a bank of small boxes on the left side that jams up against the fuselage side and the seat. I nixed that one too and filled in the small holes these parts were supposed to fit in.
On the right side Nichimo did a better job with the levers and knobs. You can follow your instructions here. The large hand pump should be painted yellow and the two smaller pumps should have a yellow knob on the left and a blue knob on the right with black casings.
Now purist might boo me on this one but I have used this color combo before and won contests with it. I used British interior green for the side walls and any cockpit framing. A light wash of thinned out black changes the tone just a bit and brings out the detail nicely. The floor got painted a wood tan color and the foot petals, control stick and seat with backing got a coat of Floquil Old Silver.
 The instrument
panel is a bit scary. It is just a small curved piece of plastic that a
decal is supposed to go on. There these two little stiffeners on the back
side. There are no clear places to glue the pieces to. You just have to
guess and hope you get it right. The instruction sheet shows you the angle
it should be at. It seems a bit extreme to me. My pictures show the panel
at a near vertical position.
The instrument
panel is a bit scary. It is just a small curved piece of plastic that a
decal is supposed to go on. There these two little stiffeners on the back
side. There are no clear places to glue the pieces to. You just have to
guess and hope you get it right. The instruction sheet shows you the angle
it should be at. It seems a bit extreme to me. My pictures show the panel
at a near vertical position.
After painting the fuselage halves, putting the little accessory boxes on the sides and the black wash I fitted the floor board and seat in. I had to fight the instrument panel to get it to line up right. Everything was looking good now in the busy little cockpit. When test fitting the fuselage halves together, I noticed that a lot of the detail is lost to view. That was a bit disappointing but not too unexpected.
I test fitted the fuselage halves together with the fire wall in place. Even though I wasn’t going to use the firewall, I still installed it to add structure to the front of the fuselage. The halves fitted as good as any Tamiya or Hasegawa kit. I used a bead of Ambroid ProWeld to zip up the fuselage. Clamp every few inches to insure a good seal. Some people are familiar with the technique of getting the glue to wick up the two halves right before putting the two fuselage halves together. Then when the plastic gets soft you push the two pieces together and the seam bubbles up a bit looking much like a weld line. When that totally dries, all you have to do is hit it with a sanding stick and polish it out a bit and the seam is totally gone without using any filler. It takes a bit of time and some trial and error to get this technique right.
 Don’t worry
about the periscope or the headrest and canopy or the tail wheel right now.
The wings cleaned up real nice and the wing skins went on with no problem.
I sanded the training edge a bit to thin it out. If you do this make sure
and use thin set super glue and not a melting agent like Ambroid or Testors
liquid glue. It will melt and distort the thin plastic.
Don’t worry
about the periscope or the headrest and canopy or the tail wheel right now.
The wings cleaned up real nice and the wing skins went on with no problem.
I sanded the training edge a bit to thin it out. If you do this make sure
and use thin set super glue and not a melting agent like Ambroid or Testors
liquid glue. It will melt and distort the thin plastic.
I like to sand the leading edges now because I think it is easier to handle the wing off the fuselage. If you want a nice look with the landing light, put a small dot of silver on the back side of the little lens and superglue the piece into the leading edge. Once the superglue dries, sand it to shape and polish it out with a soft cloth. Then tape over the lens to keep from scratching it and it will be ready for painting. Don’t worry about the pitot tube or landing gear at this time too.
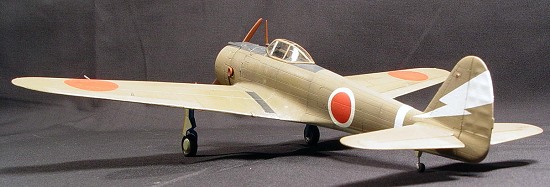
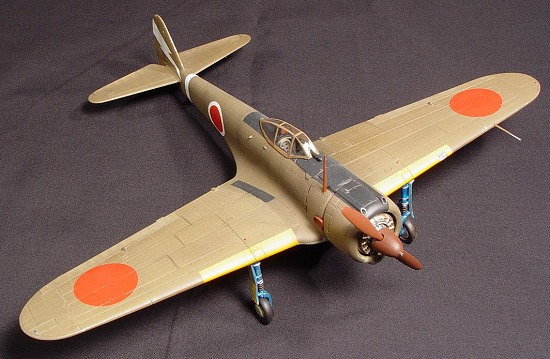
The wings went on the fuselage really easy and the seam looked great. I was really happy with it. Again the fit was as good as any modern casting. And she is starting to look like an Oscar.
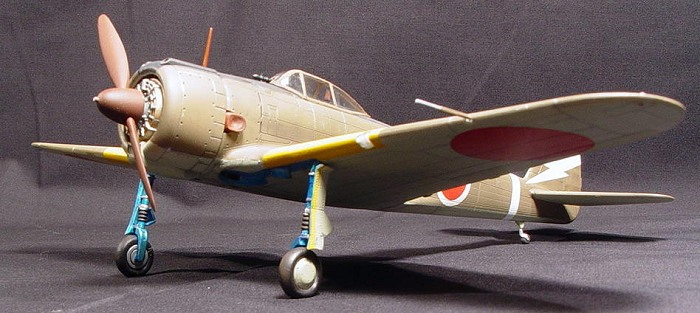
After basic cleanup, the landing gear got a coat of metallic blue. The dust covers for the shock struts got a coat of flat black and silver straps were used to bring a bit of flash to the landing gear. A set of True Detail wheels were used in place of the shapeless donuts supplied in the kit. I painted the tires Aircraft Interior Black with just a touch of brown and the hub got airbrushed IJA Grey from Tamiya’s color line. Final sanding and fitting got the plane prepped for painting. I temporarily installed the engine cowling sans the engine just for painting. I didn’t use the external tanks on this build.
| COLORS & MARKINGS |
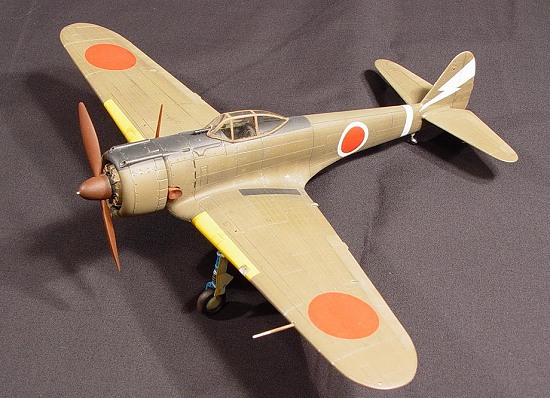
Now I have to decide what color to paint the darn thing. One reason I like the Oscar is that there are so many camo patterns you can use and there are a fair amount of decal companies making them. I wanted an IJA brown plane to offset my green Zero and Metal/palm frond Tony. So I choose an aircraft from 11th Hiko-Sentai of the Dutch East Indies circa 1942. SuperScale Decal sheet #48-515 supplied the decals for my Oscar.
I used a
custom mix of browns to get the Japanese Army Brown (approx FS30117). The
final tone is more like FS30118 which is a bit darker. But not too bad a
match by my un-calibrated eye. The pebble surface seemed to melt away with
the first layer of paint. I was
 much relived after seeing the paint surface
level out. Don’t forget the pitot tube needs painting also. Then masking
off the top side of the plane for the bottom side, I used IJA grey from
Tamiya. I got the landing gear covers while I had the airbrush out.
much relived after seeing the paint surface
level out. Don’t forget the pitot tube needs painting also. Then masking
off the top side of the plane for the bottom side, I used IJA grey from
Tamiya. I got the landing gear covers while I had the airbrush out.
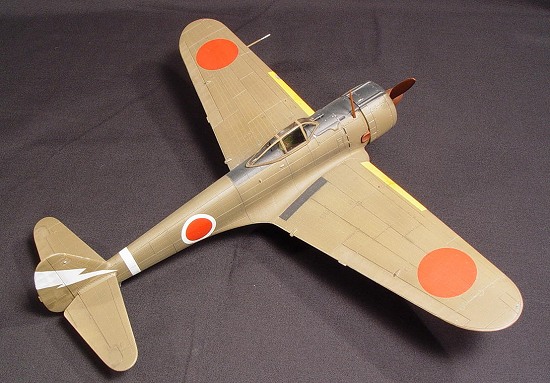
Now I used a smidgen of putty to soft glue the landing gear covers into the wheel wells and masked off the aircraft for the identification panels. I used Floquil Yellow FS 33538 for a perfect match. Use your reference for how big and how far up the wing the panels go. Don’t remove the tape off the landing light just yet.
Mask off the wheel wells and landing gear covers and paint the area metallic blue to replicate the Aotake laquered areas. There are many techniques to doing Aotake metallic blue. You choose the best method that works for you. Aircraft Interior Black was used for the anti-glare panel. I painted the headrest black at this time too.
Now for the decals. I put a coat of Future for a gloss coat and placed the decals down according to the directions from SuperScale. They snuggled down perfect with a dose of Solvaset. The box decals were just too old and went straight to the decal dungeon. I have heard of others using the decals with success. They look very thick to me but Nichimo gives you many options if you want to build something different.
Once every thing was dry, the plane got another coat of Future and was let to dry again. The next day, I gave the plane a light wash of black to highlight all the wonderful surface detail and to done down the yellow ID bands and white decals. Then the whole plane got a coat of Testors Clear Flat. The plane was looking great.
| FINAL CONSTRUCTION |
 The little
bits and pieces were next on the list. I finished out the landing gear
gluing it to the wings with superglue and the very fragile tail wheel went
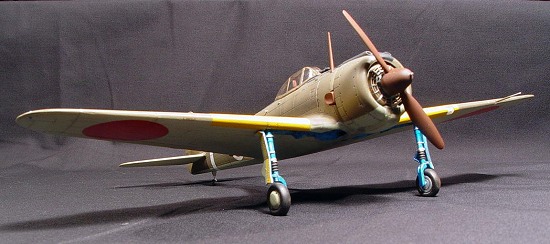
on next. I painted the prop and antenna mast Testors Acryl Rust then while
I had the airbrush loaded, I put a few drops of black to change the tone of
the Rust. Then I painted the spinner and exhaust stubs. This gives nice
tonal changes that add to the look of the model in many ways. The engine
got installed inside the cowling and the prop and spinner went on next.
The little
bits and pieces were next on the list. I finished out the landing gear
gluing it to the wings with superglue and the very fragile tail wheel went
on next. I painted the prop and antenna mast Testors Acryl Rust then while
I had the airbrush loaded, I put a few drops of black to change the tone of
the Rust. Then I painted the spinner and exhaust stubs. This gives nice
tonal changes that add to the look of the model in many ways. The engine
got installed inside the cowling and the prop and spinner went on next.
Everything got glued on then I had to make a hard decision. The kit canopy was lost somewhere over the years and I had a Squadron Vac-formed canopy to replace it. I decided because it is hard to see inside the cockpit anyway that I would display it in the closed position. I filled the canopy with putty and used a very sharp pair of surgical scissors to cut the excess plastic away. Tape it up and shoot it brown. I used a very thin mix of good old Elmer’s Glue to tack the canopy down. It fit like a champ but needed a little work to clear around the periscope.
| CONCLUSIONS |
The plane was finished. I thought it looked great and sits well next to my other planes. You can find this kit at swap meets with no problem. My whole cost was about 15 dollars including the aftermarket canopy and True detail wheels. One of my complaints is the exhaust. It is just a lump that really doesn’t go anywhere. The Hasegawa, Otaki/Arii, Fine Molds offering isn’t any better. If you can find it use the Moskit replacement set. They are expensive but because it is such a prominent piece on the aircraft, the money is well spent.
February 2005
| REFERENCES |
Nakajima Ki 43 Hayabusa “Oscar” by AJ press
Nakajima Ki 43 Hayabusa by Profile Aircraft #46
Peregrine Falcon by Scale Aviation Modeller
Copyright Modeling Madness.com. All rights reserved. No reproduction in part or in whole without express permission from the editor.
If you would like your product reviewed fairly and fairly quickly, please contact the editor or see other details in the Note to Contributors.