Fujimi 1/72 F1M2 'Pete'
| KIT #: | 72046 |
| PRICE: | AUD $12.50 |
| DECALS: | Three options |
| REVIEWER: | Peter Burstow |
| NOTES: | Two complete kits |
| HISTORY |
 Designed to
replace the Nakajima E8N1, the Mitsubishi F1M1 was first flown in 1936. Not a
great success, only four prototypes were built. The aircraft was extensively
redesigned, with a more powerful engine, more dihedral and larger tail surfaces,
and entered production as the Navy type 0 Observation Seaplane Model 11, with
the short designation F1M2.
Designed to
replace the Nakajima E8N1, the Mitsubishi F1M1 was first flown in 1936. Not a
great success, only four prototypes were built. The aircraft was extensively
redesigned, with a more powerful engine, more dihedral and larger tail surfaces,
and entered production as the Navy type 0 Observation Seaplane Model 11, with
the short designation F1M2.
The F1M2, code named Pete by the allies, saw extensive service, operating from battleships, cruisers and the Japanese navy's many seaplane tenders. It was also shore based in many parts of the Pacific, from the Aleutian to the Solomon Islands.
Mitsubishi built 524 F1M2s, and 21st. Naval Air Arsenal at Sasebo built another 590. It was used for reconnaissance, coastal patrol, convoy escort, dive-bombing and even as a fighter. A small number were converted to trainers as the F1M2-K.
| THE KIT |
The editor did a very comprehensive preview of this kit some time ago. Preview at this link.
My kit is a different boxing, but the only things changed are the decals which have different tail codes, the extra clear canopy was missing, and it only cost half the price.
| CONSTRUCTION |
 Started as
usual with the cockpit. Not much detail here, seats, sticks and instrument
panels, plus a machine gun for the observer. The instructions show detailed
painting information for the internals, with a suggestion of dark green. I used
a home brew mixture of Tamiya Metallic Blue, with enough green added to make it
look more green than blue, not sure how much of each. A bit of detail painting
with black, aluminium and brown was also done. Then I added tape seat belts
before closing up the fuselage.
Started as
usual with the cockpit. Not much detail here, seats, sticks and instrument
panels, plus a machine gun for the observer. The instructions show detailed
painting information for the internals, with a suggestion of dark green. I used
a home brew mixture of Tamiya Metallic Blue, with enough green added to make it
look more green than blue, not sure how much of each. A bit of detail painting
with black, aluminium and brown was also done. Then I added tape seat belts
before closing up the fuselage.
Next was the engine, with the front cylinder bank to be added to the rear cylinders which were moulded in relief onto the firewall, trapping the propeller shaft. The engine was painted using Mr Metal Colour Iron, buffed to a shine and inserted into the cowling. I left the propeller off for the time being.
Then I drilled holes for the rigging in the upper half of the lower wing and the lower half of the top wing. The lower wing half was then added to the fuselage, great fit with no filler needed, then I added the tailplane halves.
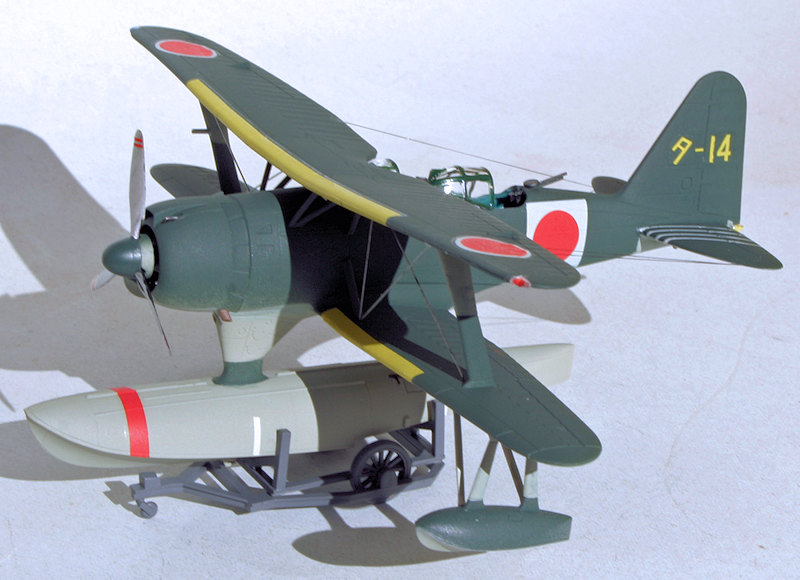
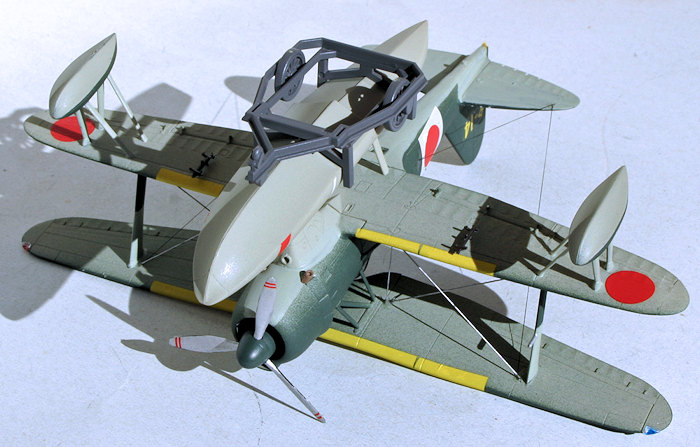
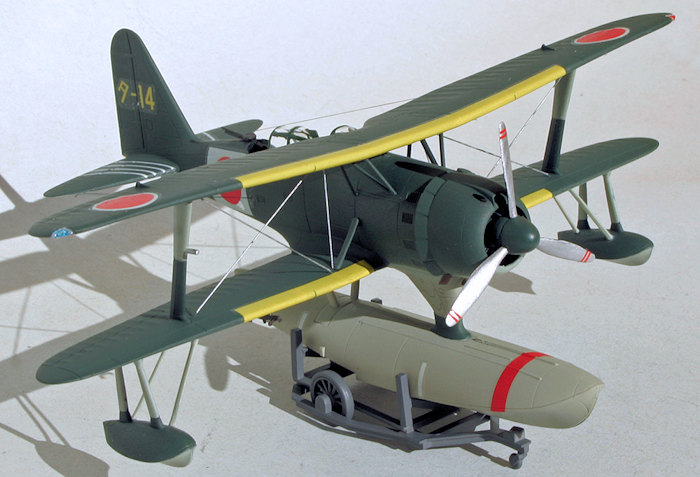
Next a few sub-assemblies, first the two halves of the main float, which I loaded with a 10 gram wheel balance weight, then it's rear struts. The other sub assemblies were the two wing-tip floats which had the main struts moulded onto one half, and the neat little six part beaching trolley.
 The
instructions suggested to add the canopies and gun-sight at this time, but I
left them off to save masking, and avoid the difficult task of trying to remove
the masking when it was all together.
The
instructions suggested to add the canopies and gun-sight at this time, but I
left them off to save masking, and avoid the difficult task of trying to remove
the masking when it was all together.
I then added the lower half of the upper wing, and it was here that the only construction difficulty presented itself, there was no location moulded or even marked, for the cabane struts to fuselage joint. I fitted the struts to the upper wing, all had a large keyed connection so it was straightforward to get them at the right angle. The lower ends of the cabane struts were butt joined to the fuselage.
Rigging:
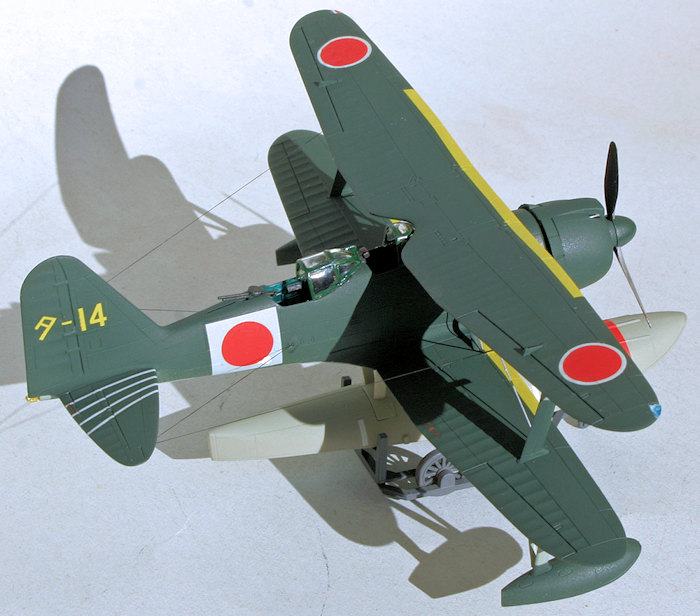
Using the pre-drilled holes the simple rigging was added, just a flying wire and landing wire on each side, for which I used 2kg fishing line, and a inter-plane line from the cabane to the lower wing, which I did with invisible mending thread. The main lines are shown on the instructions, the other lines weren’t but are very obvious in photographs.
With the rigging done I trimmed the dag ends and added the other wing halves, needed a little clean up along the leading edges.
| COLORS & MARKINGS |
I chose the version based at the Tateyama Naval Base in May 1944, only because it was slightly different, having an all grey main float. Stuffed the cockpit openings with some packing foam then I used Tamiya rattle can lacquers, AS-1 'IJN Dark Green' and AS-29 'IJN Gray Green' for the model. I painted the trolley overall dark grey.
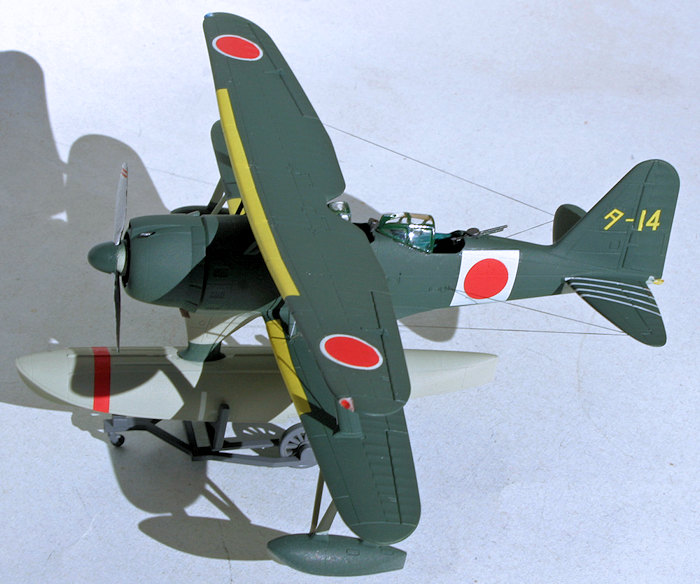 The decals
worked well, were thin, and conformed well to all except some of the deeper
lines. The leading edge stripes wrapped around the wing with no problem. I used
a few strategic scalpel cuts and some Mr. Mark Setter to tidy up a few spots.
Most of the decals only needed water. I damage one of the white squares on the
fuselage side and repaired it with a little white acrylic paint.
The decals
worked well, were thin, and conformed well to all except some of the deeper
lines. The leading edge stripes wrapped around the wing with no problem. I used
a few strategic scalpel cuts and some Mr. Mark Setter to tidy up a few spots.
Most of the decals only needed water. I damage one of the white squares on the
fuselage side and repaired it with a little white acrylic paint.
After the decals had dried I gave the model an overall coat of floor polish, then a spray of Tamiya 'Flat Clear'. A little bit of final detail painting of the observer's gun, pitot, and the exhausts was all that was needed. All the pictures I have seen show the aircraft with heavy weathering, so I didn't do any apart from a little smoke staining around the forward gun ports.
The last bits consisted of fitting the canopies and the gun-sight, which I had hand painted. Then added the floats with a pair of small struts on each of the outrigger floats. I used Microscale Kristal Klear the tiny floor window which I had forgotten to add before closing up the fuselage.
I added the two tiny bomb racks to the lower wing, didn't add the two tiny bombs, and then the propeller. Last job was the antenna, which is also shown on the instructions. I used Uschi elastic thread fixed with superglue.
| CONCLUSIONS |
A neat little biplane kit, very easy and quick to build, with only minimum rigging. No filler was used, and the joints needed just a little sanding to clean them up.
Highly recommended, a great kit for beginners and a good first biplane.
| REFERENCES |
https://en.wikipedia.org/wiki/Mitsubishi_F1M
Francillon, R.J. Japanese Aircraft of the Pacific War. Putnam, London, 1970.
Green, William. War Planes of the Second World War, Volume Six: Floatplanes. Macdonald, London, 1962.
Peter Burstow
April 2016 Copyright ModelingMadness.com If you would like your product reviewed fairly and fairly quickly, please
contact
the editor
or see other details in the
Note to
Contributors.