| KIT #: | |
| PRICE: | $ |
| DECALS: | |
| REVIEWER: | Chris Cowx |
| NOTES: |
| HISTORY |
The Mitsubishi G4M series of bomber was
designed to meet a specification issued in 1937 and entered service in the
spring of 1941. It was planned to be a replacement for the successful Mitsubishi
G3M “Nell”, used widely in
In the early battles the Betty did well. The
attacks on
 The invasion
of
The invasion
of
After the disastrous winter, activity picked up
in the Solomons again in the spring. The Rikko units had reformed and were being
based in Rabaul and it’s satellite fields. Some large scale raids in the spring
were flown against
This was a cycle that was to repeat itself
throughout the war for the Japanese air forces. Bettys soldiered on as bombers,
torpedo bombers, night intruders, anti-submarine patrol and transports.
Spectacularly, if not successfully, they were the mother ships for the Ohka
suicide rocket plane attacks. The final famous flight of the Bettys was
fittingly, flying the surrender delegations to Ie Shima to arrange the cease
fire.
| THE KIT |
This one is a bit of a mixed bag. On the plus
side it is a typical Tamiya kit. Fit and accuracy is good, engineering is
excellent, overall detail is pretty good. It includes some nice options such as
night exhaust, dropped flaps, various payloads, props with and without spinners
and the ability to open some of the transparencies. For a large aircraft kit
especially, it is quite nicely done. It is sadly not common to see such large
aircraft done this well. Typically we have a limited selection of older kits
that neither fit as
 well nor
have such a nice basic airframe and surface detail. Done as an OOB build that
will look great in a display case or as a basis for super detailing, this is a
beautiful kit.
well nor
have such a nice basic airframe and surface detail. Done as an OOB build that
will look great in a display case or as a basis for super detailing, this is a
beautiful kit.
There are a few things to keep in mind though.
The main issues are that this kit is getting a bit long in the tooth, compared
to the current crop of Tamiya kits and there is a surprising lack of references
available. The age of the kit means that I would say it is more contemporary
with the Brewster F2A, Fw190’s, etc than it is with the current crop such as the
Storch and the J1N Irving. Detail is softer, engineering is simpler, etc. The
lack of available reference material manifests itself in the interior mainly.
There is very little to no sidewall detail. No ammo drums for the guns. Aside
from basic items in the cockpit and a partial floor, the fuselage is basically
empty. Ditto for the wheel wells. In some cases the detail that is there is
inaccurate. More on this later.
Aftermarket:
 In
order to correct some of the issues mentioned above and to get the full
potential out of this kit, it is
necessary to do some enhancing. I am surprised at how little aftermarket
specifically designed for this kit has been done and much of it is now OOP. For
the interior I went with the Eduard photoetch set 48-191 and the OOP Tekics
multimedia set. There was a set, also now OOP, from True Details but I am
not sure it has much to offer. The guns desperately need replacing, being
grossly out of scale. The 7.7mm guns were replaced with Vector versions, mainly
because of the large number of ammo drums. There are tons of these all over the
interior! CMK has a very nice 20mm cannon for this plane. The exhaust were
replaced with Moskit items, which look great on this plane particularly. True
details supplied the wheels, one of the cases where the flattening is not over
done. This was a heavy plane on balloon tires! To finish it off, the decals were
replaced with Montex Masks and Hobbydecal dry transfers.
In
order to correct some of the issues mentioned above and to get the full
potential out of this kit, it is
necessary to do some enhancing. I am surprised at how little aftermarket
specifically designed for this kit has been done and much of it is now OOP. For
the interior I went with the Eduard photoetch set 48-191 and the OOP Tekics
multimedia set. There was a set, also now OOP, from True Details but I am
not sure it has much to offer. The guns desperately need replacing, being
grossly out of scale. The 7.7mm guns were replaced with Vector versions, mainly
because of the large number of ammo drums. There are tons of these all over the
interior! CMK has a very nice 20mm cannon for this plane. The exhaust were
replaced with Moskit items, which look great on this plane particularly. True
details supplied the wheels, one of the cases where the flattening is not over
done. This was a heavy plane on balloon tires! To finish it off, the decals were
replaced with Montex Masks and Hobbydecal dry transfers.
| CONSTRUCTION |
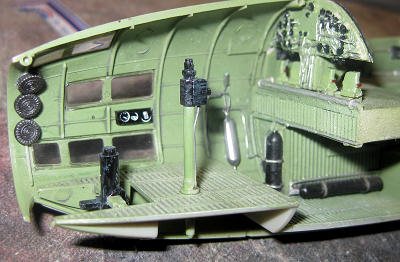
As per usual, work began with the interior. I
decided to open the round crew access hatch in the rear fuselage, so some
additional work was needed. I cut it out and made a frame with a loop of plastic
strip. Now that the interior was a bit more visible I needed to continue the
interior structure farther down the fuselage. I used plastic strip for the ribs
and formers on the walls and also to extend the floor to the rear of the plane.
Probably in hindsight it would have been better to copy the corrugated floor in
resin than to tediously lay down hundreds of strips of plastic, but it looks
pretty good! I added a crew ladder, additional ammo for the waist
 gunners and
a bulkhead for the “in flight sanitary facility, crew for the use of”. This
bulkhead had the happy benefit of effectively blocking the view into the tail
area from inside. The open door hinges that way too, so nothing can be seen aft
of the crew hatch. Speaking of the hatch, I also took this time to make it’s
mounts. I did not want to fish the hatch out and then try to figure out how to
reattach it from the outside, so I over-engineered it. Two pieces of .040 sheet
made angled brackets for the now removed round hatch.
gunners and
a bulkhead for the “in flight sanitary facility, crew for the use of”. This
bulkhead had the happy benefit of effectively blocking the view into the tail
area from inside. The open door hinges that way too, so nothing can be seen aft
of the crew hatch. Speaking of the hatch, I also took this time to make it’s
mounts. I did not want to fish the hatch out and then try to figure out how to
reattach it from the outside, so I over-engineered it. Two pieces of .040 sheet
made angled brackets for the now removed round hatch.
The tail gunner’s position does have some
opportunity for detailing. I added the armor for the cannon ammo from the Eduard
set. That’s right, the only armor of any sort in the entire aircraft protected
the ammunition rather than the gunner. I also used the two photo etch bits for
the ammo stowage. The instructions refer to an early and late rack, but this is
incorrect. In actual fact both should be used. Portside was a crank operated
stowage rack for ready ammo and the starboard one was to keep the empty drums.
Again with sparse references and not much visible, I simply went with the p/e
bits and put some of the CMK ammo drums on them. I used the seat and frame from
the TD interior set but probably would use the kit parts next time. Since there
does not seem to be any belts for the tail gunner, I guess I am done. You could
get a complex being a Betty tail gunner, between the armor placement and the
seat belt situation!
The area forward of the waist gun blisters is
effectively blocked off. Tamiya has this represented as a bulkhead but again, I
think 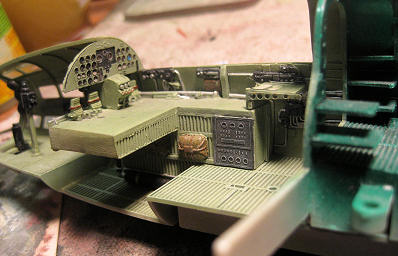 available
references and age of the kit show here. This was a canvas curtain which I
replicated with a card bulkhead faced on each side with tissue painted khaki.
From the little you can see of it, any fabric texture will do. From this curtain
to the cockpit, very little can be seen. I added ammo for the dorsal gunner,
shelves just behind the cockpit and that was about it. Even that much is
virtually invisible. I do wish I had added a couple of oxygen bottles, but even
that may have been wasted effort.
available
references and age of the kit show here. This was a canvas curtain which I
replicated with a card bulkhead faced on each side with tissue painted khaki.
From the little you can see of it, any fabric texture will do. From this curtain
to the cockpit, very little can be seen. I added ammo for the dorsal gunner,
shelves just behind the cockpit and that was about it. Even that much is
virtually invisible. I do wish I had added a couple of oxygen bottles, but even
that may have been wasted effort.
The cockpit was where I concentrated. For the
sidewalls, instrument panel and main floor, I used the Taknics set. In
retrospect, next time I will likely use the main floor only from the set and a
combination of kit parts and scratchbuilding for the rest. Assuming I am ever
brave enough for a next time!
Anyway, the radio provided by Teknics is fantastic and worth it alone. It does
lack the bracing that the original had up to the canopy top, but is otherwise
very good. The sidewalls are fair but not up to current resin standards. They
would be much better if they had p/e for the few instruments and the tubing
molded in could be sharper. They do add a fair bit of detail and are much better
than the virtually bare Tamiya effort. The navigator’s table is wood and needs
to be
 painted
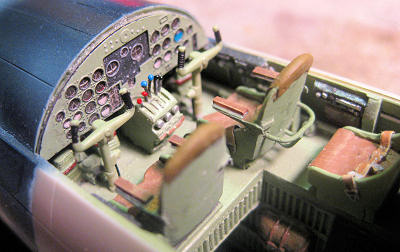
accordingly. The molded in detail from Teknics includes parachutes, piping,
control boxes, rudder pedals, seats, throttle quadrant etc. When it is enhanced
with the Eduard p/e it is a very detailed and busy cockpit. I used a mix of the
Teknics p/e and the Eduard parts. The Teknics seats are enhanced with the Eduard
armrests and belts, for example. I added the map holder on the back of the
pilot’s seat, made from solder and ca’d in place. I also added some grab handles
(8 in fact) to the inside of the canopy along with some tissue sunshades.
painted
accordingly. The molded in detail from Teknics includes parachutes, piping,
control boxes, rudder pedals, seats, throttle quadrant etc. When it is enhanced
with the Eduard p/e it is a very detailed and busy cockpit. I used a mix of the
Teknics p/e and the Eduard parts. The Teknics seats are enhanced with the Eduard
armrests and belts, for example. I added the map holder on the back of the
pilot’s seat, made from solder and ca’d in place. I also added some grab handles
(8 in fact) to the inside of the canopy along with some tissue sunshades.
The bombardier’s position was
enhanced, though I did not go too far since most will not be visible. I
added a couple of instrument boxes and some piping. Ammo drums, an oxygen bottle
and more piping were added. I scratch built a cylinder inside the front glazing
to represent the motor for the rotating nose turret.
And that is where I stopped, it is not worth getting too carried away
here.
 The
wings came up next. Fair bit to do here! I decided not to separate any of the
flight surfaces, despite having the Cutting Edge set to do so. The reason for
that is simple. Real Bettys seem to
have some sort of neutral lock, because in virtually every shot I have ever seen
the surfaces are neutral. Besides, the kit allows for dropped flaps, which will
give the final result some animation and is more representative of real Bettys.
I did add the under wing fuel protection of a later production model 11 since
the kit does not have them. This consisted of flat sheets of 3 cm rubber with
light metal ribbing on the underside of the fuel tanks. It was then painted
silver. I used thin plastic card with strips glued over top to replicate this.
Tamiya gives a key type retention for the wings where a plastic piece fits into
the wing and locks into the spar. I simply cut off the pin, put the piece in the
lower wing and glued it in. I don’t think it could be removed without damaging
the finish anyway. One thing to be aware of is that Tamiya depicts the ailerons
as being fabric covered where in fact they were metal skinned. Only the tail
control surfaces were fabric. I
The
wings came up next. Fair bit to do here! I decided not to separate any of the
flight surfaces, despite having the Cutting Edge set to do so. The reason for
that is simple. Real Bettys seem to
have some sort of neutral lock, because in virtually every shot I have ever seen
the surfaces are neutral. Besides, the kit allows for dropped flaps, which will
give the final result some animation and is more representative of real Bettys.
I did add the under wing fuel protection of a later production model 11 since
the kit does not have them. This consisted of flat sheets of 3 cm rubber with
light metal ribbing on the underside of the fuel tanks. It was then painted
silver. I used thin plastic card with strips glued over top to replicate this.
Tamiya gives a key type retention for the wings where a plastic piece fits into
the wing and locks into the spar. I simply cut off the pin, put the piece in the
lower wing and glued it in. I don’t think it could be removed without damaging
the finish anyway. One thing to be aware of is that Tamiya depicts the ailerons
as being fabric covered where in fact they were metal skinned. Only the tail
control surfaces were fabric. I
 chose to
ignore it and treat it as depicted on the model, but it is not strictly
accurate.
chose to
ignore it and treat it as depicted on the model, but it is not strictly
accurate.
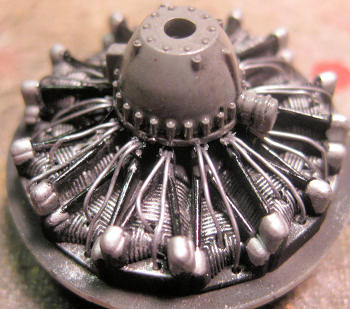
I wired the engines using solder. Not much is
visible and they look great through the cowlings. The wheel wells are a bit of a
dilemma. Tamiya has molded the doors integrally with the flat bulkhead that
boxes in the wheel well. It allows for a very solid connection for the doors and
looks good. The only problem is that they are complete fiction! The inside of
the real nacelles are simply hollow round shells with a bit of wiring. I put
some wiring in and a bulkhead and hatch on the front of the wheel well to hide
the seam and left it at that. On
the plus side, the nacelles have a nice lip to sit upon and a
 very
positive fit to the wing.
very
positive fit to the wing.
A word on interior colours for Bettys. Ignore
the Tamiya instructions!! It is debatable what it was, but RLM 02 it was not!
What is correct for a mid production G4M1 is to do the tail gunners position and
cockpit/nose area in Mitsubishi interior green and the center section in Aotake.
That is the blue green iridescent lacquer that you see as a protective coating.
I did it using Gregg Cooper’s method from his excellent Gekko article. I painted
the interior medium grey and then heavily dry brushed it with silver. This gives
a silver finish with shadows. Over that I sprayed a 50/50 mix of Tamiya clear
blue and clear green acrylics. The exact colour is not important as it was a
pigment put into a clear protective lacquer so that workers did not miss any
spots. It was not a colour that was mixed to any specific standard. The wheel
wells are also in this Aotake along with the bomb bay. Boxes and panels are
black, piping tends to be aluminum.
When all this was done, I buttoned up the
fuselage. Fit was good as expected, but a bit of care does not hurt to minimize
gaps at the bomb bay. I did not choose to detail this area or add the bomb bay
cover. The bomb racks as supplied by Tamiya are again fictional, but I chose to
leave it alone as they will not be seen anyway. My research shows bomb bay cover
as either there, or gone, generally gone. I have no photos at
 all showing
a partial covering as per the kit instructions. I did a bomb carrying aircraft
so I left it off and just painted the area Aotake. The fit is pretty good but
the seams are long so some care is required. After the fuselage was together I
put on the wings and tail surfaces. As expected, they fit well.
Moving along nicely now!
all showing
a partial covering as per the kit instructions. I did a bomb carrying aircraft
so I left it off and just painted the area Aotake. The fit is pretty good but
the seams are long so some care is required. After the fuselage was together I
put on the wings and tail surfaces. As expected, they fit well.
Moving along nicely now!
| COLORS & MARKINGS |
Japanese aircraft are interesting subjects
to paint. Information is often a bit sparse and the Japanese did not succumb
to their axis partner’s mania for standardization. There are significant
differences in colour from manufacturer to manufacturer and at different
times.
When it comes to the Tamiya instructions,
again, they are not 100% accurate. Contrary to long standing myth, it does
not appear that any Betty was done with a grey underside. Either natural
aluminum or in the case of night bombers, overall green is correct. I
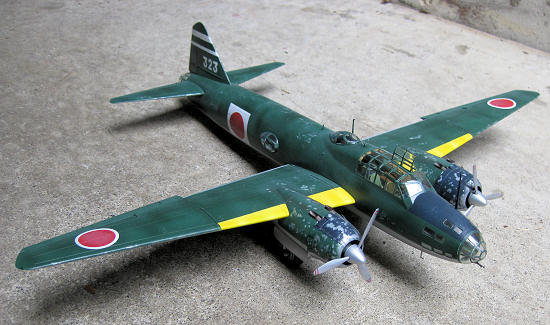 used
Gunze H59 “IJN Green”, which is correct for a Mitsubishi built aircraft. The
undersides were done in Alclad II. Primer was Model Master “Gray Primer”,
which gave a sufficient barrier for the Alclad.
used
Gunze H59 “IJN Green”, which is correct for a Mitsubishi built aircraft. The
undersides were done in Alclad II. Primer was Model Master “Gray Primer”,
which gave a sufficient barrier for the Alclad.
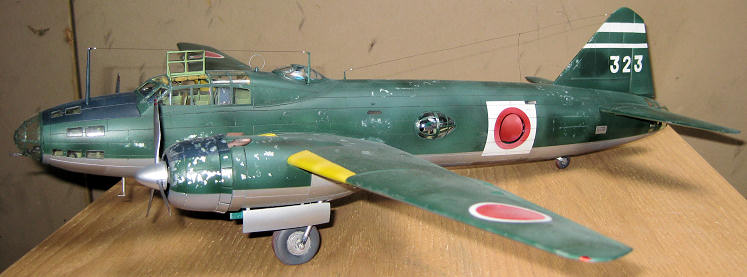
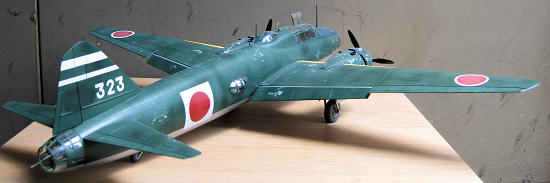
As mentioned above, I used Montex Masks for
this build. Besides basic bone idleness on the canopy masking, it also made
it easier to do custom markings. One of the big influences of my youth was
Charles Darby’s book “Pacific Aircraft Wrecks and Where to Find Them”. I saw
it in a museum gift shop at age 12 and was fascinated. I was particularly
taken with the various Betty wrecks so I chose to model one of them. After
some additional research I came up with some accurate markings for a 702nd
Ku bird that was likely involved in the New
I started by painting the areas where the
numbers and stripes were in white. I did the same as an undercoating for the
yellow wing leading edge stripes and in the places where the national
insignia were. For the leading edge id stripes I used Gunze H329. I wanted
them somewhat bright so I used it straight out of the bottle. Then I went
back after and faded them on the top using about 25% white. After suitable
drying time I masked them off. I also masked off the white panels behind the
fuselage markings, the white tail stripes and the numbers. I put down the
masks for the white outlines on the wing insignia and painted in the red
centers using Gunze H327. I used a red with a bit of brown on the center to
make it look faded and then masked them off too.
Next
was to paint the undersides in natural metal. I did the overall finish in
basic “aluminum” then I masked off various panels and did them in other
shades. I used my usual “White aluminum” and “Dark Aluminum” for some
contrast. I also did some large areas of the upper surfaces in Alclad for
the later salt chipping. After the Alclad was done I took regular Tamiya
silver and painted the underwing fuel protection pads and fabric covered
control surfaces. This was to differentiate them from the surrounding metal.
Originally they were painted silver rather than nmf.
When all was done the overall effect was that of multiple subtle
shades of silver.
For my basic weathering I decided to try
salt chipping. I have never done this before so I was a bit nervous. As this
build progressed I had been duplicating everything I was doing on a scrap
wing. Now I did the salt method. I found that by putting a
 drop or
two of water in a spot and then sprinkling salt on it I got a nice round
patch. I then took a paint brush and moved them around to what I wanted.
Many small to medium sized irregular blotches seemed to work best to my eye.
My suggestion is that whatever you think will look good, half it! I did very
little and only on some areas and I think I did ok. Bear a couple of things
in mind. You will be adding more silver with other methods as part of the
weathering. Also it is hard to make it look right if you overdo it. Even if
you have a photo of a plane that weathered, it still is hard to carry off on
the model. Keep it minimalist.
drop or
two of water in a spot and then sprinkling salt on it I got a nice round
patch. I then took a paint brush and moved them around to what I wanted.
Many small to medium sized irregular blotches seemed to work best to my eye.
My suggestion is that whatever you think will look good, half it! I did very
little and only on some areas and I think I did ok. Bear a couple of things
in mind. You will be adding more silver with other methods as part of the
weathering. Also it is hard to make it look right if you overdo it. Even if
you have a photo of a plane that weathered, it still is hard to carry off on
the model. Keep it minimalist.
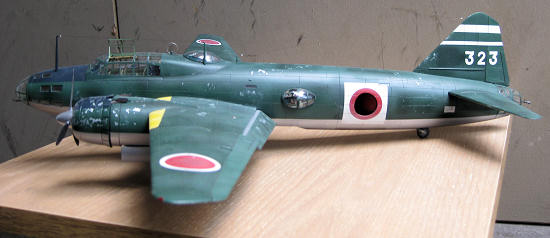
Once the salt was dry I got ready to do the
painting. I mixed three shades of H59. One with about 15% white, one at
25-30% and one with no white at all. I used the medium shade for the overall
upper colour. Then I did blotches of the lightest colour, concentrating on
the higher areas. After that I finished off with some streaks of H59 out of
the bottle, generally following the panel lines. For the fabric covered
surfaces I painted them with the lightest shade as a base coat and put a bit
of the medium green over top. I wanted them to generally look a bit more
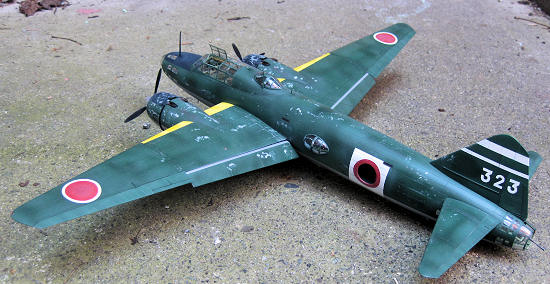
faded. On it’s tail the real
plane had a unit code painted out on each side, so I put a patch of the
darkest green there. This offset the remaining numbers, depending on which
side you look at. When the green was dry enough to mask over I did the
antiglare panels using a home mix for Mitsubishi cowling colour. Painting i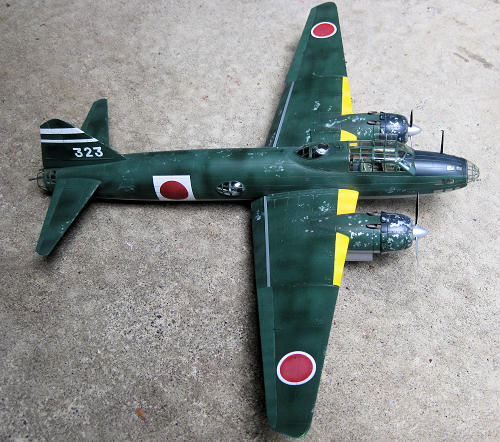 n
the hino maru on the fuselage and wing undersides completed the major
painting.
n
the hino maru on the fuselage and wing undersides completed the major
painting.
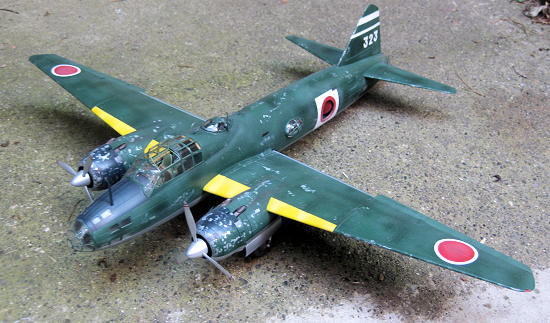
For my weathering I first of all knocked
off the salt, exposing the metal underneath. Then I added some additional
wear and tear. I wanted to show paint worn from the abrasive dust on coral
runways. I used a sponge and Testors aluminum non-buffing metalizer to touch
the backs of the props, the leading edges of the wings and tail and
the cowlings. I also did some light application over some areas of the
transparency frames. That was followed by some work with a silver pencil
around panels, hatches and fuel points. I did a bit of light exhaust with
pastels(actually women’s eye makeup!) and some general dirt. A few oil
streaks painted on the cowling undersides with a fine brush completed the
build.
The only decal on the plane is the data
stencil on the rear fuselage. The one in the kit provides the number for
Yamamoto’s Betty only. I scraped off the constructor number with an exacto
knife and then replaced them using a Hobby Decals dry transfer set of A6M
stencils. After the build number was in place I went over the whole decal
with Microscale’s liquid decal film. Once applied it looks perfect.
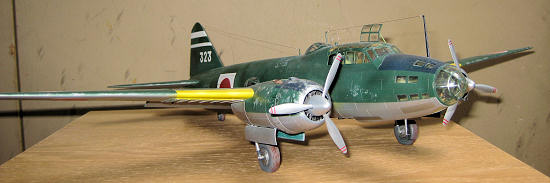
As a final finish over the green camo, I
used Future flat. I make this using Future floor wax and Tamiya flat base in
about an 80/20 mix. It is a nice tough finish and cheap as heck. It is also
easier to tailor the gloss level to what you want. On the natural metal I
did not do anything. That gave the best finish and showed the contrast
between the national marking and the underlying metal. Off came the masks
and looking she was looking pretty good!
| CONSTRUCTION CONTINUES |
The little bits that make it look complete
came next. The prop and spinner assemblies were done and painted with Alclad
II. Warning stripes were painted on. The Moskit exhaust were added next. The
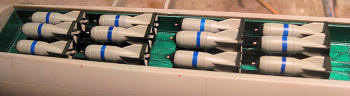
bombs got painted with the yellow and blue first and
 then
the stripes were masked off and the overall bomb was painted in light grey.
For the green nose I dipped them into a capful of IJN green. Extra detail in
the way of braces between the fins was added but otherwise the bomb bay area
was done OOB. In fact the detail for the bomb racks appears to be entirely
spurious but it was have been a lot of work to redo it and it will not
likely be seen anyway. Again, lack of references was obvious again here. I
replaced the kit loop antenna with a piece of wire. Painted silver and
either clear green or red for position lights. Some antenna wire from
invisible mending thread and she was basically done.
I did not like the tail wheel with the solid fork and wheel molded
together. I hollowed it out and replaced the wheel with a 32nd
scale Bf109 tail wheel, if memory serves. For strength I put a steel pin
from the top of the wheel into the fork and main tail wheel strut. Looks
much better in my opinion! Don’t ask how often I broke it during building.
then
the stripes were masked off and the overall bomb was painted in light grey.
For the green nose I dipped them into a capful of IJN green. Extra detail in
the way of braces between the fins was added but otherwise the bomb bay area
was done OOB. In fact the detail for the bomb racks appears to be entirely
spurious but it was have been a lot of work to redo it and it will not
likely be seen anyway. Again, lack of references was obvious again here. I
replaced the kit loop antenna with a piece of wire. Painted silver and
either clear green or red for position lights. Some antenna wire from
invisible mending thread and she was basically done.
I did not like the tail wheel with the solid fork and wheel molded
together. I hollowed it out and replaced the wheel with a 32nd
scale Bf109 tail wheel, if memory serves. For strength I put a steel pin
from the top of the wheel into the fork and main tail wheel strut. Looks
much better in my opinion! Don’t ask how often I broke it during building.
| CONCLUSIONS |
enjoyed this build immensely. The good
solid engineering of this kit gives an excellent basis for
a super detailed build. It allows you to concentrate on the detail stuff
without having to stress over fit or surface details. It has good options such
as positionable surfaces and transparencies. The occasional detail missed or
accuracy issues are not the end of the world and to most the imposing size of
the model and a good paint job will carry the day.
 The lack of
aftermarket for this kit does limit it to some extent. Of particular need is
some decent exhaust since they are so prominent on this plane. Guns are taken
care of but the interior is very poorly served. The only currently available
item for it that I am aware of is the Eduard set, which while useful, is not
overly comprehensive. Mind you, it is a great excuse to practice those scratch
building techniques!
The lack of
aftermarket for this kit does limit it to some extent. Of particular need is
some decent exhaust since they are so prominent on this plane. Guns are taken
care of but the interior is very poorly served. The only currently available
item for it that I am aware of is the Eduard set, which while useful, is not
overly comprehensive. Mind you, it is a great excuse to practice those scratch
building techniques!
The biggest issue you will likely have if you
try to get serious with this kit is the lack of available English language
resources. FAOW, Maru Mechanic, etc are useful, but still interior shots of it
are sparse. Some of the Japanese language references can be very helpful in
filling some of the gaps. The good news is that much of it can not be seen
anyway.
If you like Japanese twins or are a Pacific War
fan in general, you owe it to yourself to do this one.
August 2012 If you would like your product reviewed fairly and
fairly quickly, please
contact
the editor or see other details in the
Note to
Contributors.