Tamiya 1/48 A6M2-N 'Rufe'
| KIT: | Tamiya 1/48 A6M2-N 'Rufe' |
| KIT #: | 61017 |
| PRICE: | $12.99 |
| DECALS: | Two options |
| REVIEWER: | Greg Ewald |
| NOTES: | A really well designed kit. Great for everyone. Two windscreens. |
| HISTORY |
 The floatplane version of the Zero,
the Rufe was actually quite incredible as a scout plane, an anti-submarine
platform, and even as a fighter!
Though the floats slowed the plane
down, it was still so agile as to be able to shoot down Allied fighters in one
encounter at least, and harass shipping to the point where the Rufe became a
prime target for Corsairs and Hellcats in the South Pacific.
The floatplane version of the Zero,
the Rufe was actually quite incredible as a scout plane, an anti-submarine
platform, and even as a fighter!
Though the floats slowed the plane
down, it was still so agile as to be able to shoot down Allied fighters in one
encounter at least, and harass shipping to the point where the Rufe became a
prime target for Corsairs and Hellcats in the South Pacific.
Flying high above the waves at dusk, the pilot could pick out the telltale phosphorescence of ships, boats, and surfaced submarines below, then radio in the location to Japanese Naval vessels, leading to many a sunken American PT boat or barge.
There were a
few photos of damaged Japanese aircraft available from the islands that separate
| THE KIT |
What can you say? Tamiya moldings are crisp and clear, the parts are bagged neatly, with almost zero (pardon the pun) flash and no sink marks to see. Even the clear bits are well done, and while not scale thickness, not so thick as to be chunky looking.
The decals are perfectly in register, and of the perfect thickness…it’s almost too bad I did not use them on this plane !
I’ve heard that some of the boxings actually come with weights for the float, mine did not., I guess that 20g bit of metal was just too expensive.
| CONSTRUCTION |
The cockpit goes together well, though you are going to want to add on some generic belts for the seat. The kit decal for the control console is nicely printed, but not usable in my build. One of the first problems I ran into with this kit is the cowling assembly, it is molded in two pieces, which means you are going to be doing some serious psr to make this bit look o.k.
The little dolly kit goes together
well, no big surprise, and fits the central float without any shimming or
trimming.
Speaking of the floats thems elves,
you are going to run into a little bit of sanding and filler issues, and might
need to rescribe some of the lines. The rear support (b38) needs to be test
fitted a number of times, and even so, will need some careful attention.
elves,
you are going to run into a little bit of sanding and filler issues, and might
need to rescribe some of the lines. The rear support (b38) needs to be test
fitted a number of times, and even so, will need some careful attention.
Unlike some other manufacturer’s, this one has you install the cockpit after gluing the two fuselage halves together, which means that you get it right the first time. Nice !
I attached the bottom part of the wing to the fuselage first, then fit on the two top halves, resulting in a nice flush fit that required little filling. The stabilizers flop around a bit in the slots made for them, so glue them on one at a time, checking to make sure the angle is correct. An easy jig for this is an empty jar, just insert one wing while you work on the opposite surface.
The floats fit into the wing and fuselage fairly well, a little bit of filler was necessary to cover up the seams at each joint, for this I used a combination of white glue and talcum (baby powder), which spreads easily and cleans up to a smooth line.
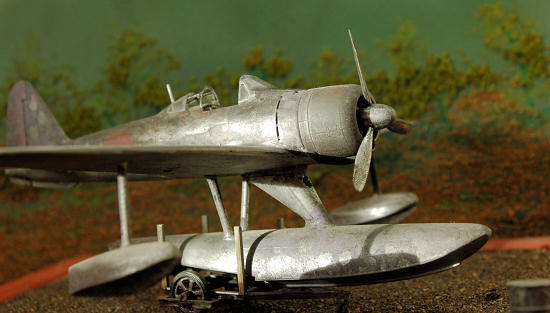
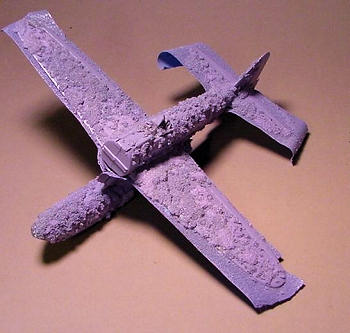
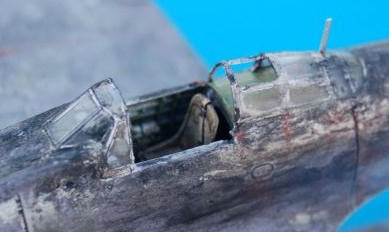
Since this was supposed to be a damaged/abandoned aircraft, I wanted the canopy to reflect this, so a portion of it was cut away using a Dremel and a file, then rebuilt with stock styrene, to give the appearance of missing glass panes. I managed to get the whole thing built in place without getting any glue on the greenhouse, mostly due to the wonderful fit, a bit of clear styrene was used on the front windscreen, but the rear pieces, with some light sanding were easily installed with Krystal Kleer.
| COLORS & MARKINGS |
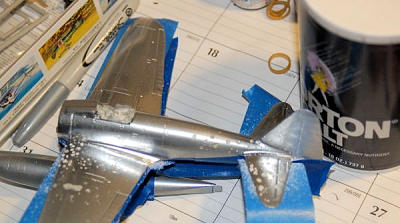 After priming with Krylon
automotive gray, the entire plane was sprayed with flat aluminium. The kit
decals are very nice, but I really wanted an a
After priming with Krylon
automotive gray, the entire plane was sprayed with flat aluminium. The kit
decals are very nice, but I really wanted an a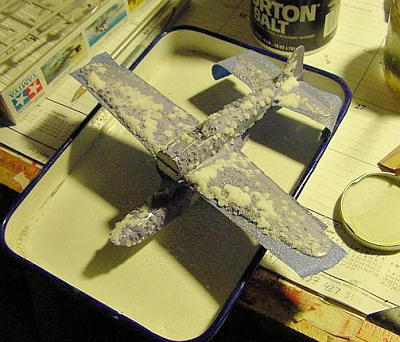 ged
look to the roundels, so I just masked off some circles, and sprayed a faded red
colour. Once this was dry, I did a thin clear flat coat. Overnight curing
allowed me to spray the model with a light coat of water droplets from a hand
sprayer, then salt with a shaker.
A thin layer of light purple is
then applied, to try to replicate the faded primer. Another layer of water and
salt is used, then the craft sprayed with flat aluminium again. This back and
forth method of painting was repeated three times: metal, then lilac, with
salting in
ged
look to the roundels, so I just masked off some circles, and sprayed a faded red
colour. Once this was dry, I did a thin clear flat coat. Overnight curing
allowed me to spray the model with a light coat of water droplets from a hand
sprayer, then salt with a shaker.
A thin layer of light purple is
then applied, to try to replicate the faded primer. Another layer of water and
salt is used, then the craft sprayed with flat aluminium again. This back and
forth method of painting was repeated three times: metal, then lilac, with
salting in
 between.
At one point, the plane looked like it was underwater with coral growing on it!
between.
At one point, the plane looked like it was underwater with coral growing on it!
I let the whole mess dry for a few days, then dunked
the plane in a tub of warm water, and started gently removing the salt with an
old toot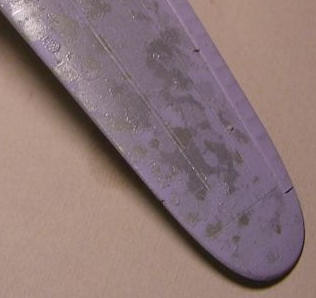 hbrush
(my wife's).
hbrush
(my wife's).
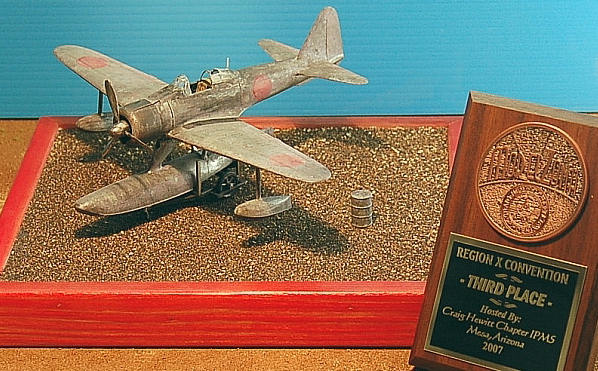
A simple base was made from some scrap wood and a bit of pine trim. Woodland Scenics ballast gray was perfect to replicate the mid-sized stones of those northern islands.
| CONCLUSIONS |
No matter how you build it, the kit is very nice, typical for Tamiya.
| REFERENCES |
If you would like your product reviewed fairly and quickly, please contact me or see other details in the Note to Contributors.