| KIT #: | 60317 |
| PRICE: | $108.00 MSRP |
| DECALS: | Seven options |
| REVIEWER: | Bill Koppos |
| NOTES: | Another fine big scale Tamiya kit |
| HISTORY |
Formed in April 1941, the 3 Kokutai was originally a mix of bomber and fighters, but soon became all fighters. Roughly equivalent to a U.S. fighter Group, in top form the unit had about 45 planes. Pilots of the Imperial Japanese Navy at that time were among the world's best, only the cream of the crop accepted from flying schools, the "newest" of whom had 1000 flying hours. With it's "sister" unit, Tainan Kokutai, these outfits were entirely land-based.
Experimentation by it's dedicated leaders showed the ability of the A6M2 to
use it's designed-in very long range to reach the Philippine Islands, and
still retain fuel for useful combat time. This saved the use of Aircraft
Carriers and freed them up for other tasks. When the 3rd and Tainan Kokutais
hit the Philippines from bases in Taiwan in December 1941, no missions the
likes of this were seen until the advent of the Very Long Range P 51 missions
in 1945. 3 Ku. played a major part in the December
 8th disaster visited upon
the P40 squadrons on Luzon, catching many on landing, low on fuel. This was
the unit involved in the
8th disaster visited upon
the P40 squadrons on Luzon, catching many on landing, low on fuel. This was
the unit involved in the
Other minds thought differently. Far ranging reconnaissance
aircraft showed the Japanese leaders the crowded state of Broome harbor,
packed with ships and flying boats. Lieutenant Commander Takeo Shibata
suggested his long range aircraft could cause trouble deep in the enemy rear.
On March 3 1942, 9 A6M Zeros took off, led by Lt. Zenjiro Miyano, for distant
Broome. U.S. and Dutch personnel had set up a way station at the airfield with
food and fuel, shoving the arriving planes south as soon as possible. The
isolated port was without radar or antiaircraft defenses. The nine
raiders caused havoc. First to go down was an early B24 being used as a
transport, With no opposition the Japanese cruised up and down the harbor,
shooting up the flying boats at anchor with deadly accuracy. By most accounts,
15 boats were sunk and 7 planes on land destroyed. This list included 2
 large
Short Empire boats, Dutch Dorniers, PBY's and B17E's and Hudsons. Heroic Dutch pilot Gus Winckel held a .30 cal. machine
gun in his bare hands, severely burning himself, but one Zero left trailing
smoke. Osamu Kudo's plane did not return.
large
Short Empire boats, Dutch Dorniers, PBY's and B17E's and Hudsons. Heroic Dutch pilot Gus Winckel held a .30 cal. machine
gun in his bare hands, severely burning himself, but one Zero left trailing
smoke. Osamu Kudo's plane did not return.
The raid caused complete panic. Coupled with the February 19th raid on Darwin, invasion panic gripped Australia. Broome soon was a ghost town, the Japanese seen as invincible and everywhere. All this done by 9 machines with 18 cannon and 18 machine guns.
After the conquest of the Indies, the 3rd Kokutai took part in the summer raids on Darwin, fighting the P40's of the 49th fighter group. This was the first outfit to give them trouble, honors being about even. When the invasion of Guadalcanal caused excessive losses to the units involved, 3rd Ku. was sent to Rabaul as reinforcement. Here they came up against the Wildcats of Joe Foss and the Marines, their tactics and teamwork causing problems for even these veterans. In a rearrangement in November, 3rd Kokutai became 202 Ku., all Japanese Groups getting 3 digit numbers. Summer of 1943 was spent raiding Darwin again, escorting G4M bombers on long missions. This time the opponents were Spifire Vc's of the 1st RAAF wing. Once again they bested their enemies, the Spitfire pilots allowing themselves to be drawn into the circling combat that was the Zero's forte.
After this campaign, the 202 Ku. was taken off operations for a time. Split up and distributed among the Central Pacific islands, gradually the units were chewed up and dispersed, disappearing into the maw of the now Allied meat-grinder. In their prime they were a top notch outfit. Many photos of these planes at their newly won bases were published in the Japanese papers, a symbol of the Empire at full flood.
| THE KIT |
The logical successor to the previous A6M5 release,
the A6M2 is the one I REALLY wanted. The best of the Zeros, I think, is also
the best looking. Open the large box, and you get- (deep breath)- 14 sprues,
including one with a sitting and standing pilot figure, cowling bag, spring
bag, arm bag, screw bag, photoetched fret, partly metal landing gear struts,
rubber brake lines, tube of grease and a tiny Phillips screwdriver. (What do
you get when you mix vodka and Milk of Magnesia? A Phillips screwdriver
 Hah
hah!). And a stand. Remember those? It seems the landing gear is fully
retractable, as was the A6M5, and displayable on said stand if folded up, and
the sitting pilot installed. Most of the metal parts are hinges for the
moveable control surfaces and landing gear.
Hah
hah!). And a stand. Remember those? It seems the landing gear is fully
retractable, as was the A6M5, and displayable on said stand if folded up, and
the sitting pilot installed. Most of the metal parts are hinges for the
moveable control surfaces and landing gear.
Molding is gorgeous, the new trend of fine recessed rivets being done very lightly, skin and panel detail a work of art. Sprue attachment points and ejector pin marks are mostly in non essential areas, with exceptions noted later. The interior is busy enough for the scale, with room for super detailing, of course. The Sakae engine is also detailed "enough", but I'll never get why a kit of this stature and price tag can't have a wiring harness of some sort provided. I know, whine, whine.
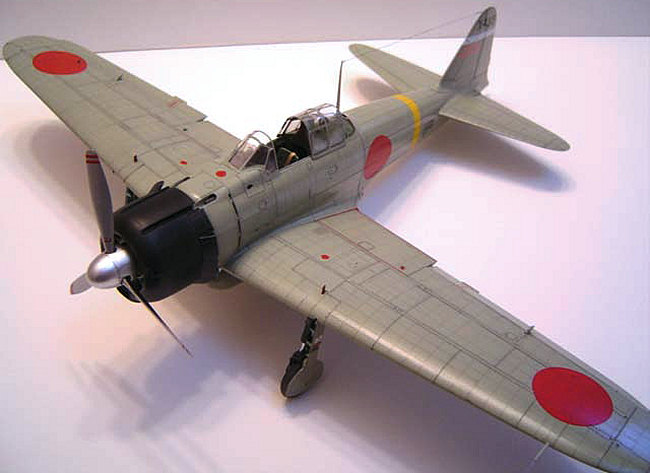
Looking all this over, I decided early on to make all the working features work. Just to be different, despite advice to the contrary. Also was decided to install the seated pilot, and put it on it's stand, something I hadn't done since 1965 or so. Ah, the best laid plans.....Also involved was Yellow Hammer Model's decal sheet # 32015, which features 6 various aircraft, including ace Saburo Sakai's V128, and the aforementioned 3rd Kokutai's X 183, the plane I did.
| CONSTRUCTION |
Here's a switch. The fuselage halves go together before the interior. Gotta paint the insides and put in some small stuff first. The back halves have framing detail, which is painted "Aotake", and the forepart, Tamiya "cockpit green". Now, this "Aotake", from my previous bouts with Japanese A/C, I do by first spraying with Alclad Aluminum, then make a mix of Tamiya Clear green and Blue, in a 1 to 2 ratio, and lightly spraying a well thinned mix of this over the aluminum. From pictures I've seen, this does not have to be a perfect coat, it was applied rather unevenly. I, for one, am happy with the way this looks, as it has a proper "factory sloppy" look to it. Anyway, almost all of this work is hidden when the darn thing is put together, so don't go nuts. The spring mechanism for the tail wheel is built and put in. The upper rear of the fuselage is a separate insert, fitting beautifully, and avoiding a seam here. What variant could this be catering to? A 2 seater?
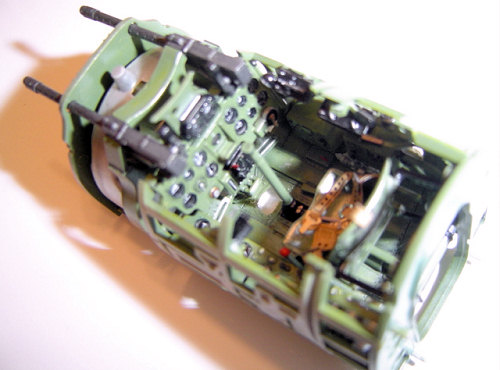 OK, let's tackle the interior. Most of the int. is
Tamiya "cockpit green" and black, with splashes of red and white here and
there on the knobs and levers, washed with black "sludge" for shadow
effects. There are quite a few parts here, levers, radio equip, gauges. The
method of gauges here is nice. A decal is put on under the clear gauge part,
then is installed in holes from under the panel. Looks real good. The
instrument panel is the same. Be careful to read the numbers on the plans, as
there are a LOT of redundant parts (you know, those "not used" ones) from the
A6M5 kit.. Oh, don't forget, if you are doing Sakai's Tainan Group Zero, leave
out the radio-looking stuff. The seat harnesses are stiff paper you must cut
out, with photoetch buckles. VERY fiddly, take your time here. The paper is no
so great, but washed with some tan, look OK. Before you attach the seat to the
frame, the prominent bungee cord for the seat suspension must be made and
added, as the 100 dollar kit doesn't give you one. (whine again). All in all,
once assembled and painted, the thing looks darn good.
OK, let's tackle the interior. Most of the int. is
Tamiya "cockpit green" and black, with splashes of red and white here and
there on the knobs and levers, washed with black "sludge" for shadow
effects. There are quite a few parts here, levers, radio equip, gauges. The
method of gauges here is nice. A decal is put on under the clear gauge part,
then is installed in holes from under the panel. Looks real good. The
instrument panel is the same. Be careful to read the numbers on the plans, as
there are a LOT of redundant parts (you know, those "not used" ones) from the
A6M5 kit.. Oh, don't forget, if you are doing Sakai's Tainan Group Zero, leave
out the radio-looking stuff. The seat harnesses are stiff paper you must cut
out, with photoetch buckles. VERY fiddly, take your time here. The paper is no
so great, but washed with some tan, look OK. Before you attach the seat to the
frame, the prominent bungee cord for the seat suspension must be made and
added, as the 100 dollar kit doesn't give you one. (whine again). All in all,
once assembled and painted, the thing looks darn good.
SO good, in fact, that here's where the best laid plans went.....bye bye. The seated pilot was assembled, and the attempt made to snuggle him into the tight cockpit area, in order to place his hands on throttle and stick. Not only was this not working well, but he completely hid half the nice looking interior! Would have had to figure out how to get the harnesses on him, and masking would be a pain anyway. Out you go, dude. So much for being different. Next the 7.7 machine guns are built and painted and the oil tank/fuel tank ditto. The finished interior is installed from underneath the fuselage...onward.
 Next they have you assembling the stabilizers with
the hinged elevators, welcome to the photo etched fret. The hinges work fairly
well here, better than the ailerons ended up. just follow the instructions, be
careful with the glue, and you be OK. The rudder is similar, with a metal
hinge, and fits nicely onto the fuselage. Moving to the wings, it's time for
the landing gear doors. These involve the bag of wire hinges, again, go slow
and careful with the glue. Here, my plans to use the stand got thrown out,
too, as this would leave a hole in the bottom of the wing I did not want. Gear
doors and cannon are installed. The cannon with ejection chutes and
magazines, nicely done, cannot be seen in the end. Damn. Time for the landing
gear bays. You are gonna love the little dog bones for the gear doors, these
are very fiddly also. But I will persist with the retracting landing gear,
dammit. Just to say I did it. Ok, the gear bays are done, the wing halves can
be put together. The drop tank "o" rings put in, and the wing attached to the
fuselage, which is a very nice fit.
Next they have you assembling the stabilizers with
the hinged elevators, welcome to the photo etched fret. The hinges work fairly
well here, better than the ailerons ended up. just follow the instructions, be
careful with the glue, and you be OK. The rudder is similar, with a metal
hinge, and fits nicely onto the fuselage. Moving to the wings, it's time for
the landing gear doors. These involve the bag of wire hinges, again, go slow
and careful with the glue. Here, my plans to use the stand got thrown out,
too, as this would leave a hole in the bottom of the wing I did not want. Gear
doors and cannon are installed. The cannon with ejection chutes and
magazines, nicely done, cannot be seen in the end. Damn. Time for the landing
gear bays. You are gonna love the little dog bones for the gear doors, these
are very fiddly also. But I will persist with the retracting landing gear,
dammit. Just to say I did it. Ok, the gear bays are done, the wing halves can
be put together. The drop tank "o" rings put in, and the wing attached to the
fuselage, which is a very nice fit.
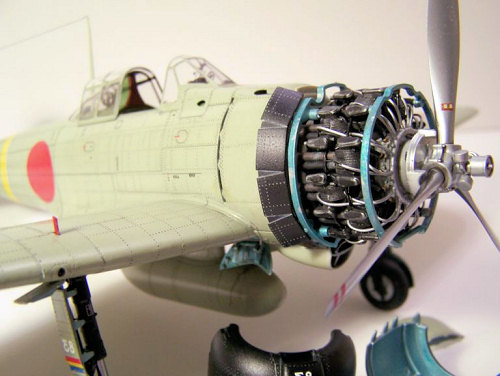
Wing control surfaces are next. These are all moveable, but with problems. The flaps inner surfaces have nasty ejector pin marks that are a real pain to clean up, so I glued them up. I left the ailerons loose but they got too loose, and would not stay in any position. These, too, will be glued eventually. Engine time! This is a nice unit with scope for more detail which I added in the form of inter-cylinder oil lines, and an ignition harness made from soft plastic line used for bracelets, found in a craft store. My wonderful oil lines were now in the way of the intake and exhaust manifolds, making their installation interesting, to be sure. Gotta get more sleep. The firewall and mounting brackets are attached, an attempt to fit the assembly to the fuselage resulted in- a perfect fit! This is to be sure a complicated model, but at least you know the pieces will FIT when you put them together. The canopy was masked with the provided masks and...
| COLORS & MARKINGS |
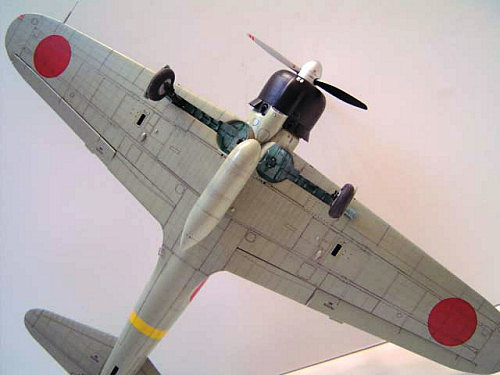
Well Dang! We can finally paint her. I was itching
to try the new Tamiya AS29, which is supposed to be the last word on the
Japanese Navy grey question. They call it IJN Grey- green. I tested it on
scrap, and when I gave it my usual Testor's Metallizer glosscoat, it looked
way dark to me. I added flat white at about 40 percent, this was too light on
ini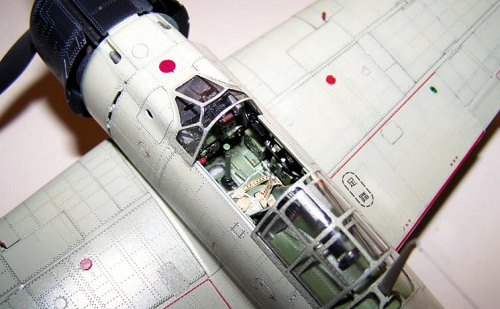 tial coats, but after the sealer looked right to me. After a thorough wipe
down with alcohol, and a flat black preshading of panel lines, the white tail
stripe and yellow fuselage stripes were sprayed and masked, and the main color
laid on. I've learned to be patient with acrylics, especially Tamiya's, as the
initial coats look like dogs--t until some paint builds up. This job turned
out well, and soon the Metallizer sealer could be laid on. The color pleased
me. But after all these years of grey Zeros, the greenish tint takes some
getting used to.
tial coats, but after the sealer looked right to me. After a thorough wipe
down with alcohol, and a flat black preshading of panel lines, the white tail
stripe and yellow fuselage stripes were sprayed and masked, and the main color
laid on. I've learned to be patient with acrylics, especially Tamiya's, as the
initial coats look like dogs--t until some paint builds up. This job turned
out well, and soon the Metallizer sealer could be laid on. The color pleased
me. But after all these years of grey Zeros, the greenish tint takes some
getting used to.
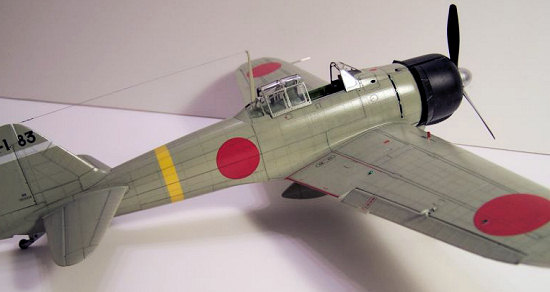
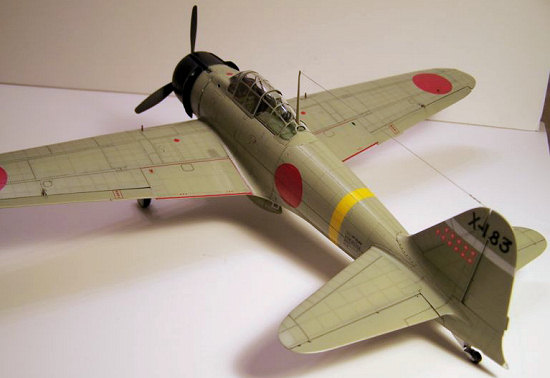
Yellowhammer only provides specific markings, telling you to use kit decals for the national markings. Tamiya decals are normally quite thick and these were par. They did respond to Solvaset fairly well, after repeated applications. Zeros had more stencils than I thought, all these were put on. The Yellowhammer decals worked fine, by the way. The sheet provides both sides of kill markings for the rudder, but since there are no photos of the other side I only used the left one. My usual wash of acrylic black was applied to all surfaces, this being quite a job on this model. With it's multitude of rivets and panel lines, this really shows up well. The cowling pieces were done in Black washed with light grey. Everything sealed in with Metallizer Sealer.
| FINAL CONSTRUCTION |
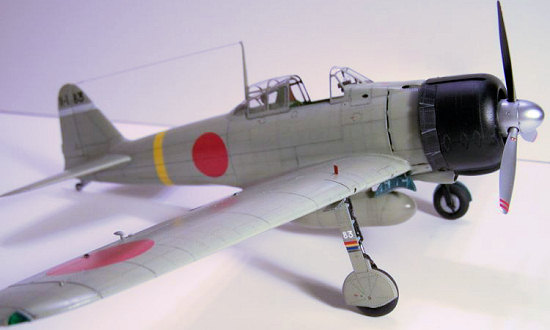
 Let's put it all together. I built the landing
gear struts carefully, with it's shock springs and working oleo scissors.
Nice. The gear legs have a shiny steel shaft with plastic molded around it,
representing the pistons, and look great. Two tiny screws are given, and the
Phillips screwdriver used to screw the legs in. The tail wheel assembly is glued
on. The engine assembly is slipped on now, open cowl flaps chosen and glued
up. The removable cowling snaps right around it, allowing viewing of my
beautifully wired engine. (Ah, something shows!) The vent panels behind the
cowl can be left loose to show the oil/fuel tanks and rear of the engine. Even
without extra detail, it looks good. Oh, yeah, this model does have the
folding wingtips of the A6M2 version, represented by a second set of tips,
that can replace the extended ones, but I didn't do this with my land based
Zero. All the little landing lights go on. The wingtip lights look good
painted over with Tamiya clear green and red. Very Christmassy. A metal pitot
tube is provided, as well as a wire for the antenna, but I used my usual
2-pound fishing line. The etched landing gear position indicators were stuck
into the gear retraction inserts in the wing, and painted red. Is it done?
Omigod, I think it is!
Let's put it all together. I built the landing
gear struts carefully, with it's shock springs and working oleo scissors.
Nice. The gear legs have a shiny steel shaft with plastic molded around it,
representing the pistons, and look great. Two tiny screws are given, and the
Phillips screwdriver used to screw the legs in. The tail wheel assembly is glued
on. The engine assembly is slipped on now, open cowl flaps chosen and glued
up. The removable cowling snaps right around it, allowing viewing of my
beautifully wired engine. (Ah, something shows!) The vent panels behind the
cowl can be left loose to show the oil/fuel tanks and rear of the engine. Even
without extra detail, it looks good. Oh, yeah, this model does have the
folding wingtips of the A6M2 version, represented by a second set of tips,
that can replace the extended ones, but I didn't do this with my land based
Zero. All the little landing lights go on. The wingtip lights look good
painted over with Tamiya clear green and red. Very Christmassy. A metal pitot
tube is provided, as well as a wire for the antenna, but I used my usual
2-pound fishing line. The etched landing gear position indicators were stuck
into the gear retraction inserts in the wing, and painted red. Is it done?
Omigod, I think it is!
| CONCLUSIONS |
Well ,so much for plans. My Zero is pilotless, as
usual, and no stand for support. IPMS has me so well trained. My landing gear
retracts, though. A wrench is given to aid things. To retract, push legs
gently in, till they hit the inner gear doors, fold over doors while pushing
in. They fold up quite nicely. The little outer doors are folded over
carefully, and the tail wheel pushed in. Ready for flight! To land, remove the
covers on the wing leading edge, gaining access to the arm, and use the wrench
to start the legs out. Carefully open inner doors while doing this, then grab
the legs and pull them out. (Get those outer doors out, too). Another tool
extends the tail wheel. Bring her down. Remember, take-offs are optional,
landings are mandatory!
Wow. Not a kit for a beginner, that's fer sure. But you old hands out there
can probably really enjoy this. I have quite a feeling of accomplishment from
it. It is a well engineered thing, it is. It is quite a pleasure to build such
a good- fitting model. Recommended to those with big budgets or on good terms
with Santa Claus.
| REFERENCES |
A6M Zero in Action Aircraft # 59 Shigeru Nohara Squadron/Signal Publications
A6M1/2/2N Zero Arco Aircam series no. 18 Richard Bueschel Arco Pub. Co.
3/202 Kokutai Kagero # 20 Waldemar Pajdosz Kagero Pub.
They Fought With What they Had Walter D. Edmunds 1951 Zenger Pub.
Co.
December 2006
Copyright Modelingmadness.Com. If you would like your product reviewed fairly and fairly quickly, please
contact
the editor or see other details in the
Note to
Contributors.