| KIT #: | 9667 |
| PRICE: | $29.95 MSRP |
| DECALS: | Three Options |
| REVIEWER: | Dan Lee |
| NOTES: | Out of the box aside from belts. |
| HISTORY |
The Imperial Japanese Navy realized from their own and German combat experience that their current crop of fighters would have hard time with B-17s and B-24s (just reaching altitude let alone having the firepower to shoot one down) so they wanted a high altitude bomber interceptor. The Mitsubishi Zero Sen Design team responded a plane with a high rate of climb built around one of the most powerful engines that the Japanese could produce. To get that power, maneuverability (the “Grandmaison” equivalent of WW2 Japanese Air Combat) was sacrificed.
The Raiden aka Thunderbolt (Allied Code Name: Jack) was a radical departure from the “turning fighter” design philosophy that was dominant in both the IJAAF and IJNAF (and much closer to contemporary Allies “energy fighters” like the Corsair, Lightning and Thunderbolt.) The final result was a big, fast plane with a heavy armament of four wing mounted 20 mm cannons which looked a lot like its Allied namesake, the P-47. Unfortunately or fortunately, depending on your view, the Raiden suffered the common fate of WW2 developed Axis aircraft in that it was rushed into production before the bugs could be fixed and the pilots paid the price for correcting the design flaws. The net result was that the Raiden suffered a lot of teething problems that were corrected later including an early fatal tendency to shake itself apart in mid air.
By early 1944, the Raiden was operational as a land based interceptor to defend the Japanese Home Islands and just in time to deal with B-29s flying in from China and later B-29s from the captured Marianas. It was one of the few planes in the IJA or IJN that could reach B-29 altitude and have the firepower to bring a B-29 down. The Raiden did enjoy some success against B-29s, but by then the loss of experienced pilots, material and fuel shortages, and lack of trained maintenance personnel ensured that the successes were limited.
Raiden Ace Temei Akumatsu
 When ace Sadaaki “Temei”Akumatsu was
assigned to the 302 Air Group (the IJN Air Group tasked to defend Tokyo), he was
already an “old” man of 33 (in the pre WW2 Japanese Air Arm, 30 was considered
retirement age.) He was only a mere ensign because his habits of unconventional
thinking, drinking, fighting and whoring got him into trouble with his superiors
many times. Despite his poor discipline (for a Japanese warrior), his superiors
tolerated the feisty Akumatsu because of his flying ability and fighting
spirit.
When ace Sadaaki “Temei”Akumatsu was
assigned to the 302 Air Group (the IJN Air Group tasked to defend Tokyo), he was
already an “old” man of 33 (in the pre WW2 Japanese Air Arm, 30 was considered
retirement age.) He was only a mere ensign because his habits of unconventional
thinking, drinking, fighting and whoring got him into trouble with his superiors
many times. Despite his poor discipline (for a Japanese warrior), his superiors
tolerated the feisty Akumatsu because of his flying ability and fighting
spirit.
Legends state said that once during a scramble, he raced to his plane from the local bordello wearing nothing but a kimono and wooden clog sandals. Another legend claimed that Temei flew while in a drunken stupor. According to his friend, Saburo Sakai, those legends were just legends.
Unlike many of his Japanese contemporaries, Temei actually liked the Raiden because it could do the offensive hit and run attacks that he preferred (again unconventional to the turn minded Japanese.) His “wildman” reputation came from his combat philosophy of going on the offensive even when the odds were overwhelming against him. On April 19, 1945 he showed his fellow pilots what he meant when he took on a group of Mustangs flying from Iwo Jima and showed them that a Raiden could tangle with Mustangs and win. He ended up shooting two down in the unpopular Raiden in a low altitude fight.
He would showcase his abilities again on May 29, 1945 when he took on 75 Mustangs by himself in an obsolete A6M5 Zero. Temei ended up shooting down a Mustang for his efforts and cemented his place as the IJNAF’s best Mustang “tamer.” Despite the fact that his plane was badly damaged by the end of the fight, he was never wounded in combat.
Akumatsu was one of those hotheads (no surprise really) who wanted to continue fighting after the surrender. Post War, Akumatsu was one of those soldiers who had a hard time dealing with the loss and could never quite adjust to peace. He died in 1983 a broken and ostracized man due complications caused by his alcoholism.
Despite his wild drunken claims of shooting down 200-300 Allied aircraft, historians calculate that he ended up with some 30 kills and was the top scorer among Raiden pilots.
Most of the info from this section came from the excellent book Aces of the Rising Sun 1937-1945 by Henry Sakaida from Osprey Publishing.
| THE KIT |
I found this kit at my Local Hobby Shop’s bargain bin. The box was already opened and some of the parts were off the sprue, but nothing was missing or had been glued together. The price was right, $15 CDN. (We assume that it is well molded and includes things like cockpit, wings and such...Ed)
| CONSTRUCTION |
It all begins with the cockpit which
has good enough detail for any out of the box build. To satisfy my AMS, I
fleshed out the detail a bit more by using 30 gauge wire (stripped and
unstripped) to represent various types of conduit. I painted the cockpit using
Tamiya XF-71 IJN cockpit green (supposedly Mitsubishi interior green) and flat
black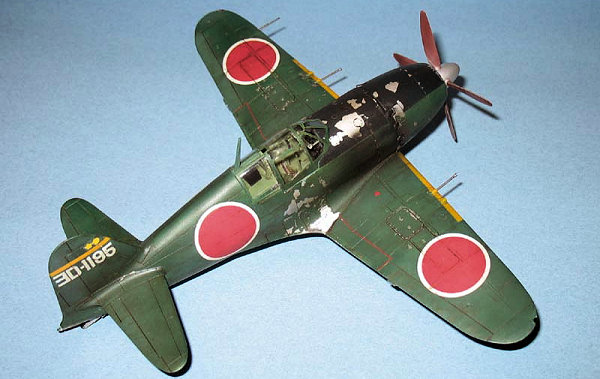 for the instrument panel. The fine details were picked out with a fine
tipped brush using Citadel Warhammer steel, red and black based on photos from
j-aircraft.com. I used a pair of lap belts from the Eduard IJA pre painted
seatbelt set (not exact, but it is close enough for me.)
for the instrument panel. The fine details were picked out with a fine
tipped brush using Citadel Warhammer steel, red and black based on photos from
j-aircraft.com. I used a pair of lap belts from the Eduard IJA pre painted
seatbelt set (not exact, but it is close enough for me.)
The cockpit was installed in the fuselage and the fuselage was quickly glued together with Tamiya extra thin cement. There is a bit of an alignment issue with the pins, but it is nothing serious.
During test fitting, I noticed that the wing does not fit flush to the bottom of the fuselage so I added 10 thou plastic card at trailing edge of the wing where it joins with the fuselage which eliminated most of the step. Unfortunately, when I attached the wing to the fuselage, I found gaps in the fuselage/wing join on the topside of the wing (a typical Hasegawa fit issue.) I jammed a shim of 10 thou plastic card into wing join and glued it in place. I removed the excess with a sharp hobby knife and the damage caused by the knife was scraped away with a scalpel. The remaining gaps in the wing/fuselage join (located at the front of the wing) were filled with Mr Surfacer 1000 and sanded down using 400 grit sandpaper and polished with finer grits.
The centerline fuselage and wing leading/trailing edge gaps were filled with a combination of Mr Surfacer and CA glue. These filled areas were sanded smooth (after a couple of applications) and polished with 3200, 3600 and 4000 grit micromesh. Why? To prep the surface for Tamiya Old Leaf Silver lacquer paint from the spray can for the first coat.
The worst area to deal with was at the front of the razorback and radio compartment where the radio antenna is supposed to go. This needed lots of careful sanding. This area was supposed to be painted XF-71 as well, but I did not do this till later on in the build process.
The engine compartment and stabs were glued to the fuselage. Just one thing to worry about is to make sure the mounting guides for the engine compartment are aligned or you will have a slightly deformed nose.
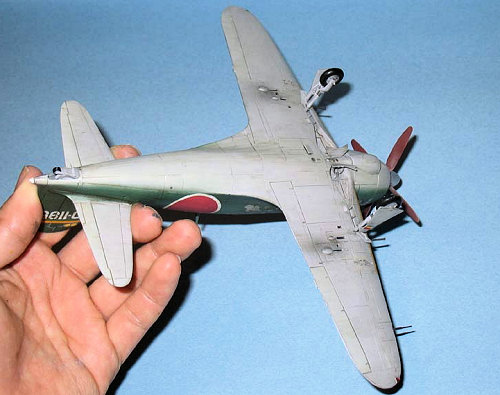
The landing gear was spruced up as I drilled holes in the landing gear doors and pushed 30 gauge wire through to represent brake lines in the Mitsubishi style.
| COLORS & MARKINGS |
The model was washed of all the sanding dust, dried, the cockpit was masked off
and then sprayed with Tamiya Old Leaf Silver from the spray can. Two light
coats were all that was needed. The prop and spinner were sprayed silver
at this time as well. I let the lacquer cure for a couple of weeks before
applying the “Mitsubishi” green and grey (I did this not for build reasons, but
due to
 a
lack of time and desire—busy weekends and laziness on weeknights.)
a
lack of time and desire—busy weekends and laziness on weeknights.)
The bottom of the plane and the landing gear bits were sprayed with FS36375 aka Lt Ghost Grey which is “close” to Mitsubishi Grey was based on information from j-aircraft.com. I don’t claim it is the definitive color, but I have a bottle of Gunze Lt Ghost Grey handy unlike the WEM colors so it was decision of expedience. I read in the Osprey Book: Modeling the Zero that Mitsubishi flaps were painted in a slightly different color so I had up some FS16473 (Aircraft Grey) in the airbrush (from my 4th repaint of my earlier F-106 build) and sprayed the flaps with a couple of light even coats. Again, I let it sit for a couple of weeks for the same reasons as above.
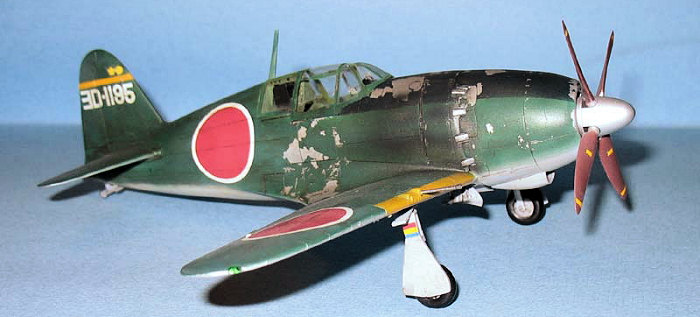
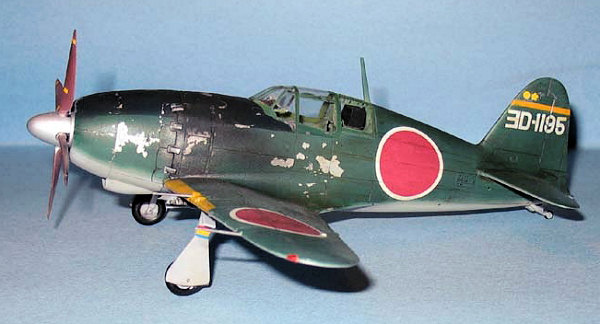
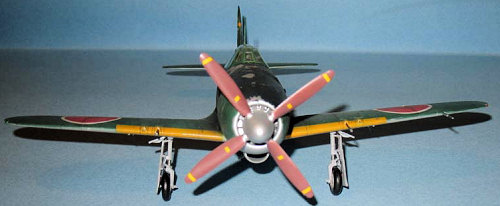
I used Acryl FS34092 aka Euro Dark Green as Mitsubishi Green because it was “close” to the real thing and (not so surprisingly) it was handy. I masked off the underside of the stabilizers using low tack tape and sprayed several thin coats to ensure a somewhat uniform coat. I mixed in a couple of drops of Acryl Flat white in my airbrush cup and sprayed the flaps (it didn’t work as well as it is barely noticeable.) When the green was slightly dry, I masked off the upper area of the engine compartment and sprayed on a mix of 70% FS15092 Gloss Sea Blue and 30% Gloss Black as my equivalent of Mitsubishi Cowling Black Blue.
The chipped paint look was done by sticking some regular masking tape onto the paint when it was just dry to the touch. I concentrated on the cockpit and engine areas as these areas had the most wear. I used a pointed tooth pick to scrape the fine details (including rivets.)
Last but not least were the final painting touches. The wing leading edges and tail were masked off and the area was sprayed with Gunze Orange Yellow H24 in two light coats. The prop blades were painted with Red Brown mixed with a couple of drops of black to represent Tea Brown. Lastly, I removed all the masking from the cockpit, masked the exterior and then painted the radio compartment Tamiya XF-71.
 When the paint was all dry, I
sprayed on a thin coat of Gunze Gloss to prep the surface for the decals.
When the paint was all dry, I
sprayed on a thin coat of Gunze Gloss to prep the surface for the decals.
I used the kit decals for the most part for Akamatsu’s plane. The only modification was to cut out the 8s from 1198 and replace them with a 5. These are typical Hasegawa decals which required some warm water and a healthy dose of MicroSol and Set to get them to conform with the surface detail. When dried, I still had some silvering and several of the larger decals didn’t snuggle in with all the surface detail. I used my thumbnail to score them into the detail and a knife to open up the decal so I could put in some more MicroSol to eliminate it.
I double checked with the profile I found in Japanese Aces of WW2 and noticed that there was an orange yellow stripe on the tail. I masked and painted it with Gunze H24 Orange Yellow.
Once dry, I used my water color wash to darken panel lines and removed the excess with slightly damp Q-Tips. Everything was sealed with Gunze Flat coat.
| FINAL CONSTRUCTION |
I lost the inaccurate undersized radio (actually for the older J2M1/2 series planes) and replaced it with one from the spares box (the replacement is far from accurate, but one can’t really tell with the canopy closed up.) Of course, a day after I sealed up the canopy I found the radio (sigh.) Meanwhile, I added the bullet proof armor and gunsight which were attached using Elmer’s white glue.
 The canopy was a one piece affair
and as I didn’t have the patience to open it up or spring for the Vaccuformed
replacement so I left it as. The canopy was masked then sprayed with interior
and when dry, the exterior colors plus I put a thin watercolor wash on it to
ensure that it blended in with the exterior color while I applied some
“chipping” effects with a 0 brush and Citadel chainmail paint.
The canopy was a one piece affair
and as I didn’t have the patience to open it up or spring for the Vaccuformed
replacement so I left it as. The canopy was masked then sprayed with interior
and when dry, the exterior colors plus I put a thin watercolor wash on it to
ensure that it blended in with the exterior color while I applied some
“chipping” effects with a 0 brush and Citadel chainmail paint.
I added all the small bits and painted what needed to be painted, but left off the (useless in reality and rarely used by Akamatsu) aerial burst bombs and underbelly fuel tank.
| CONCLUSIONS |
The Hasegawa Jack is a good kit for those interested in Japanese warplanes or for something different OOB. The only real area concern in construction is the wing root fit. The only thing I did not like about the kit was the single piece canopy as I prefer an open canopy to a closed one and don’t understand why Hasegawa would not provide that option (unless the way the Jack canopy opened could not be duplicated easily.)
July 2007
If you would like your product reviewed fairly and fairly quickly, please contact the editor or see other details in the Note to Contributors.