Lindberg 1/72 Yokosuka MXY8
| KIT #: | 70519 |
| PRICE: | ~$15.00 |
| DECALS: | Two options |
| REVIEWER: | Christopher Campbell |
| NOTES: | Easy conversion |
| HISTORY |
The story of the Messerschmitt Me.163 is quite well known. It was a sound enough concept, and amazing for its day in terms of top speed and rate of climb. It was also well known for its numerous faults, most of which proved deadly.
Utilizing a Walter HWK 109-509 rocket engine producing 3,307 lbs of thrust. Fueled with a highly unstable, hypergolic bipropellant mixture C-stoff (hydrazine hydrate and methanol -nasty “stoff”) and T-stoff (concentrated hydrogen peroxide with added oxidizers -more nasty “stoff”), it had a unpleasant tendency to catch fire or, just as often, explode! It was known to do so while being fueled, started, taking off, in flight, during landing, or just for fun.
It has been argued that the Me.163 was far more dangerous to the crews who maintained and flew it than it was to the enemy. While this may be an exaggeration, there is definitely some truth to it. During its brief operation career, it managed to down sixteen enemy aircraft with around and equal number of aircraft lost to a combination of enemy action and accidents. This does not include losses in development and testing. I have never seen an exact figure of total losses of Luftwaffe personnel throughout the development and operations of this aircraft. It would be interesting to find out, including ground personnel, as it was by no means user friendly.
However, as the bombing campaign against Japan began ramp up, the Me.163 (not yet having proven itself a failure in combat) looked enticing to Japanese defense strategists. Negotiations were entered into to by the Japanese to produce the Me.163 and its Walter HWK 509A engine under license. This was to include a complete aircraft, three complete engines, blueprints, and more to allow production to be started up in Japan.
 Components
and documents were loaded aboard two different submarines, both of which
were lost to enemy action. The first, submarine RO-501 (formerly the
U-1224), carrying the airframe components was sunk in the Atlantic in May of
1944 by hunter elements from the U.S.S. Bogue. The I-29 carrying the
engines, blueprints, and other documents was sunk by the U.S.S. Sawfish in
or near the Philippine Sea two months later. Yet a third submarine was lost
in a final attempt to provide and a sample aircraft in early 1945.
Components
and documents were loaded aboard two different submarines, both of which
were lost to enemy action. The first, submarine RO-501 (formerly the
U-1224), carrying the airframe components was sunk in the Atlantic in May of
1944 by hunter elements from the U.S.S. Bogue. The I-29 carrying the
engines, blueprints, and other documents was sunk by the U.S.S. Sawfish in
or near the Philippine Sea two months later. Yet a third submarine was lost
in a final attempt to provide and a sample aircraft in early 1945.
Undaunted, though, the Japanese war machine pressed on with the project. Intended as a joint Army and Navy project, this brought inevitable friction, as the two services rarely agreed on anything.
In this case, the Navy wished to copy the Me.163, “proven” design as closely as possible. The Army wished to go back to the drawing board and redesign it from the ground up. The Navy project won out and Mitsubishi designed and produced a small number of J8M Sushui, reverse engineering it in part from a flight manual. Seven were produced and one tested (with fatal results) before the end of the war. Two of these airframes survive today. One is in the United States at Chino and the other with Mitsubishi in Japan.
Such a radical new fighter required a trainer, though. Just as unpowered training gliders had been used in Germany, so would be the case in Japan. These would be produced by Yokosuka as the MXY8 Akigusa, meaning Autumn Grass.
Constructed mostly of plywood, these gliders would be also used in the course of development to test handling and flight characteristics. Testing showed that it handled well enough and closely mimicked the known characteristics of the Komet in unpowered flight. Subsequently, it was to provide pilot training for those who would fly the J8M. Around fifty are thought to have been built, though none are believed to survive.
| THE KIT |
 Released by
Lindberg in 1965, this is, to my knowledge, the first 1/72 kit of the Me.163.
Originally selling for less than a dollar, these now are still in production and
selling in the $15 range. I built several of these during my pre-teen Luftwaffe
phase in the 1970’s, along with Lindberg’s He.162, Ar.234, Hs.129, Me.410, and
Do.335. These were all interesting subjects and not bad kits for their day. They
are decidedly long in the tooth now and there are better kits for all now
available.
Released by
Lindberg in 1965, this is, to my knowledge, the first 1/72 kit of the Me.163.
Originally selling for less than a dollar, these now are still in production and
selling in the $15 range. I built several of these during my pre-teen Luftwaffe
phase in the 1970’s, along with Lindberg’s He.162, Ar.234, Hs.129, Me.410, and
Do.335. These were all interesting subjects and not bad kits for their day. They
are decidedly long in the tooth now and there are better kits for all now
available.
I came by this one as a bagged kit that I got from my uncle, Richard Cobb, along with numerous other bagged kits a decade or so back. I had already built a quartet of 1/48 Me.163’s, based on various kits, though had thought about building a Yokosuka MXY8 for some time.
The kit is as basic as it comes. There are only around ten parts: upper and lower fuselage halves, a seat, clear canopy, wheels and undercarriage, a landing skid, vertical tail, pilot figure, and perhaps one or two more. This kit is very, very basic. Mine had no instructions, but you really do not need them with this very simple kit.
| CONSTRUCTION |
This was going to be pretty easy any way that I looked. I actually started with some of the fuselage and wing detail by removing it. As it comes from the box, or bag, in this case, the kit features raised panel detail, to include the photocell vertically firing rocket tubes in the wing roots. For what it is and when it was done, it is not too bad, though none of it would be needed for my purposes, as it was not present on the Yokosuka glider and photos show them to be noticeably smooth. This was mostly sanded away with 320 grit sandpaper and smoothed down with 0000 steel wool.
The wing bulges for the cannon were removed by some careful carving with a sharp X-Acto blade. This left some pits in the wings that were backed with small bits of plastic card glued in place with CA glue. This was then filled from the outside with Squadron Putty, sanded down, sealed with CA glue and sanded smooth until all traces were gone.
There is no cockpit to speak of, only a rudimentary seat form. However, the MXY8 had very little more than that. Still, some improvement was in order.
 A cockpit
floor was added from plastic card and a better seat was found in the parts bin.
The seat would be mounted on the kit “seat,” which is little more than an “L”
shape, now serving as a seat support/mounting bracket.
A cockpit
floor was added from plastic card and a better seat was found in the parts bin.
The seat would be mounted on the kit “seat,” which is little more than an “L”
shape, now serving as a seat support/mounting bracket.
These along with the interior were given a coat of Tamiya Cockpit Green and while this was drying I found the most basic and tiny instrument panel bit that I had in my spares box. I am not certain of what instruments may have been present in these, as I have never seen any reference to it. However, I suspect that it would have been a basic altimeter, turn and bank indicator, airspeed indicator, possibly a “wet” compass, and little more. Painted black and dry-brushed to pick out the appropriately sparse details, this was glued in place with CA glue.
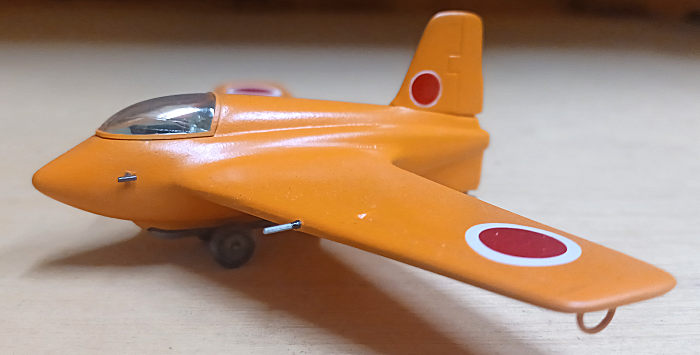
A small control stick was made from another bit from the spares box which was fitted to a hole drilled in the floor with a pin vise. A trim wheel was fitted to the left side of the fuselage and the seat was glued into place.
Then the fuselage halves were closed and sealed up with CA glue. It was quite a clean joining and only a little sanding and minor post filling with thin CA glue was needed at the seam. Now the rocket exhaust needed to be addressed and erased.
To start, I found a piece of plastic rod that fit the opening and glued it in place so that protruded slightly. Thick CA glue was used to make certain that it was filled with some to spare and shot with accelerator.
This was all sanded down with 320 and 400 grit sandpaper until it looked properly tapered and no longer looked like it had ever been an opening. There was also some minor sanding and recontouring of the nose until I liked the shape versus the few photos and drawings that I had seen at the time, as looks a little blunter and more sloped.
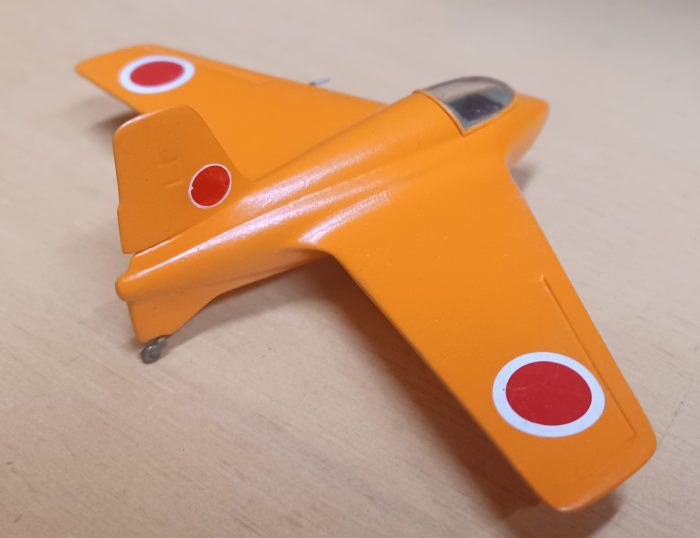
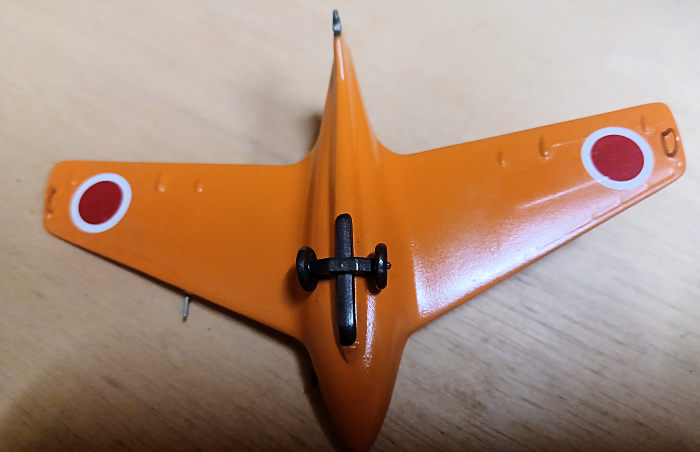
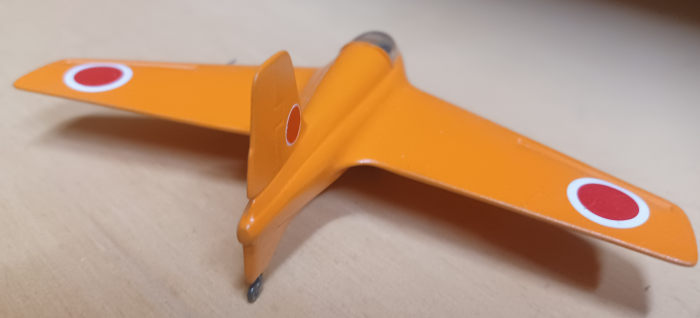
With that the basic build was finished. However, since the model was to be painted in one color overall, I decided to go ahead and add the wingtip skids visible in the few photos that I have found of these aircraft. In my spares drawers I found some parts that were just the right size and shape, though I have no idea what they originally came from. Two small holes were drilled in each lower wing tip, and they went on with a drop of CA glue and hit with accelerator before they moved.
| COLORS & MARKINGS |
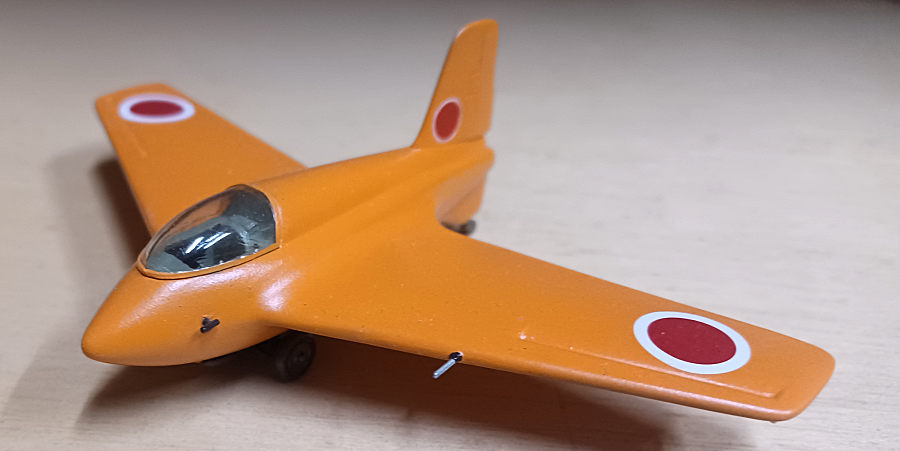
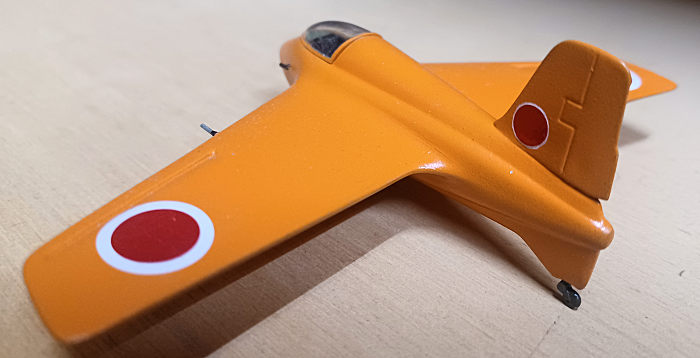
Painting this one was going to be quite simple. The cockpit was masked off and then I mixed up the color that I wanted to use. I am not certain that I have ever seen the specific orange color used one Japanese trainer and prototype aircraft offered as a color. I chose to mix mine from ordinary Testors Gloss Orange, Flat Yellow, and Flat White until a test spot on my workbench top looked to be the right color. This was then sprayed on the lower surfaces and the model was set aside to dry while I worked on the few remaining parts.
 This
consisted of the landing skid, jettisonable undercarriage, and wheels. All of
this was painted in Model Master Dark Anodonic Grey and set aside to dry. The
tires were then hand painted in Testors Rubber. While these in turn were drying,
it was time to paint the upper surfaces in the same orange. Simple as that.
Painting was done!
This
consisted of the landing skid, jettisonable undercarriage, and wheels. All of
this was painted in Model Master Dark Anodonic Grey and set aside to dry. The
tires were then hand painted in Testors Rubber. While these in turn were drying,
it was time to paint the upper surfaces in the same orange. Simple as that.
Painting was done!
Once thoroughly dry, the undercarriage was glued up and fitted in place over the landing skid with a small amount of CA glue. The tail wheel was also painted in Testors Rubber and everything was shot in a coat of Future.
While waiting for this to dry, I started looking for decals. The wing markings were simple, as I have plenty of Hinomarus in various scales. However, I did not have any small enough for the tiny ones on the tail. These I had to make by cutting the right size disc of white decal sheet and then cut a smaller red disc out of an extra Hinomaru decal from the same sheet.
Photos that I have seen showed no numbers or other markings. So, this was what I went with. All went on with little difficulty and settled with Micro Set. The model was given another shot of Future and was very close to being finished.
| FINAL CONSTRUCTION |
 A small
pitot was added to the wing and a venturi to the port side fuselage near the
cockpit, painted silver and black, respectively. Both were bits from the spare
parts bins. This left only the canopy. The kit canopy is thick and heavy, too
thick to be appropriately posed open, though it could be used to vacuform a
replacement.
A small
pitot was added to the wing and a venturi to the port side fuselage near the
cockpit, painted silver and black, respectively. Both were bits from the spare
parts bins. This left only the canopy. The kit canopy is thick and heavy, too
thick to be appropriately posed open, though it could be used to vacuform a
replacement.
This was given a dunk in future and then the frame edges painted in the same orange of aircraft. However, I must have been getting rather anxious to see the results, as I forgot to paint the single framing band approximately one third back. I did not notice this for more than a year later at which point I no longer had the paint. For the time being, I have decided to leave well enough alone, as aside from this, it did come out rather nicely and looks like a Yokosuka MXY8. I will not say it is 100% accurate by any means. However, it certainly does look the part.
| CONCLUSIONS |
This was an incredibly simple build and probably had a total working time of only around two or three hours. I could have gone into a little more detail here and there, though I was happy to come out with a fair representation of the Yokosuka MXY8 that I built out of what was essentially a surplus kit.
This conversion could probably be accomplished with almost any Me.163 kit. However, given the simplicity of the actual aircraft, something like the old Lindberg kit in 1/72 or the Testos 1/48 kit might be the best starting point. There are also likely fewer surface details to be removed than on more advanced and accurate kits.
A check on Scalemates shows that a resin kit in 1/72 was released by A+V Models a few years back (It also shows that I made a mistake by using the Me.163 style tail wheel and attaching the skid in the exact manner that I did. Oops!). I have never actually seen one, though. So, if you want a Yokosuka MXY8, a roll your own conversion might be your best bet.
I would recommend this kit out of the box to novice modelers in their early stages of building 1/72 for its simplicity for anyone wanting to build a simple, basic Me.163. I would also recommend this conversion to those similarly inexperienced with converting a kit to something that it did not start out as. Something as simple as this could be a great way to get one’s feet wet at this, so to speak. It also might give you the gumption to tackle something a little tougher, learning scratchbuilding and conversion skills along the way. As always, have fun!
| REFERENCES |
Japanese Aircraft of the Pacific War by Rene J. Francillon, Naval Institute Press, 1979
https://en.wikipedia.org/wiki/Yokosuka_MXY8
26 April 2024 Copyright ModelingMadness.com.
All rights reserved. No reproduction in part or in whole without express
permission. If you would like your product reviewed fairly and
fairly quickly, please
contact
the editor or see other details in the
Note to
Contributors.