Hasegawa 1/48 B6N2 'Tenzan' (Jill)
|
KIT #: |
09061 |
|
PRICE: |
Approximately $30.00
|
|
DECALS: |
Two Options |
|
REVIEWER: |
Pierre-André Boillat |
|
NOTES: |
Less famous than the Kate, but just as interesting. |
In
December 1939, the Imperial Japanese Navy issued a specification for a new
torpedo bomber that would be the successor of the B5N “Kate”. The new aircraft,
built by Nakajima, should have a crew of three, a top speed of 290mph (460 kmh)
and carry the same payload as the B5N. The prototype’s first flight was made on
March 14,
1941
and several problems soon became evident. A re-design of the tail fin solved the
stability issues, but the plane’s main weakness was its chosen power plant, the
Mamoru 11 14-cylinder radial, which was prone to vibrations, over-heating and
never achieved its expected power rating.
After
many improvement attempts, carrier acceptance trials were started at the end of
1942, mass-production
being launched in early 1943. However, the mechanical problems remained so
severe that the Navy ordered the engine to be replaced with the Kasei 25 radial
after only 133 produced airframes – a relatively simple change that didn’t
require too many modifications, and gave birth to the B6N2 Tenzan model 12, this
review’s subject.
 The
new torpedo bomber entered service in August 1943, reaching front-line units in
small numbers and operating mainly from land bases at Truk and Rabaul. The type
had its carrier-borne first operation at the
Battle
of the
Philippine Sea
which saw the swan song of the once-dreaded Japanese carrier force.
The
new torpedo bomber entered service in August 1943, reaching front-line units in
small numbers and operating mainly from land bases at Truk and Rabaul. The type
had its carrier-borne first operation at the
Battle
of the
Philippine Sea
which saw the swan song of the once-dreaded Japanese carrier force.
Until
War’s end, with the IJN reduced to a shadow of its former self and the US forces
ruling the skies, the Tenzan never achieved any notable success and suffered
heavy losses, also because most of Japan’s crack airmen had been lost in earlier
battles, leaving the new bomber at the hands of enthusiastic, but inexperienced
pilots. Its last major engagement was at the battle of
Okinawa,
some being used on kamikaze attacks.
A
purely land-based, de-navalized version (model 13) was planned for the defence
of
Japan’s
main islands, but the war ended before it could be produced.
Until
August 1945, 1’268 B6N’s were built, one-third of the later batches being
equipped with air-to-surface radar.
All
in all, one can say that this rather good torpedo bomber had the misfortune (as
a type) of taking too long to overcome its initial teething problems and
entering service too late, hence its relative obscurity.
 Released
in the late 90’s, Hasegawa’s B6N Tenzan is one more proof of this manufacturer’s
know-how, and a welcome addition to their brilliant line of WWII Japanese
subjects.
Released
in the late 90’s, Hasegawa’s B6N Tenzan is one more proof of this manufacturer’s
know-how, and a welcome addition to their brilliant line of WWII Japanese
subjects.
What
you get in the box (beautifully illustrated by Grand Master Shigeo Koike) are
the crisply-moulded, finely engraved and well-fitting parts one expects (and
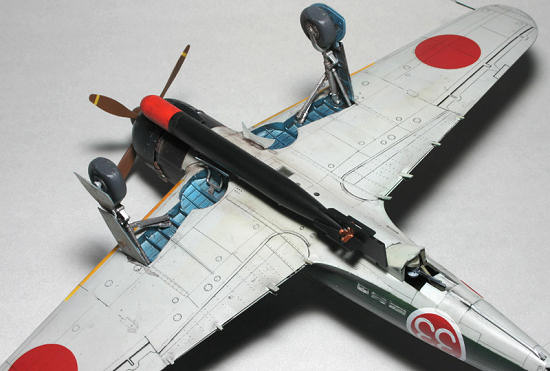
usually gets) from Hasegawa. The cockpit is the proverbial “kit inside the kit”
that lacks nothing except for seat belts, landing gear detail is exquisite (with
“weighted tires”), and the transparencies are crystal-clear (though only a
closed canopy is provided).
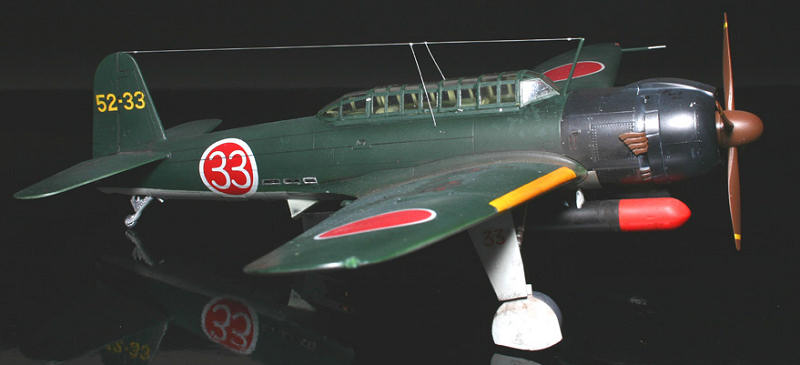
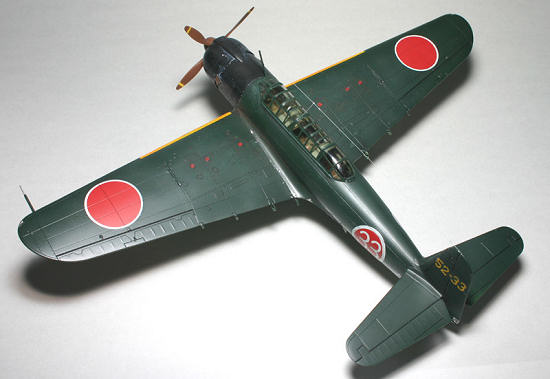
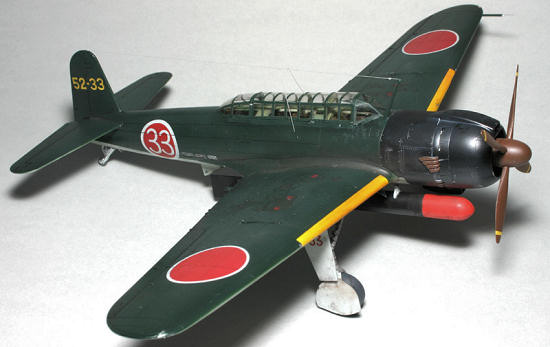
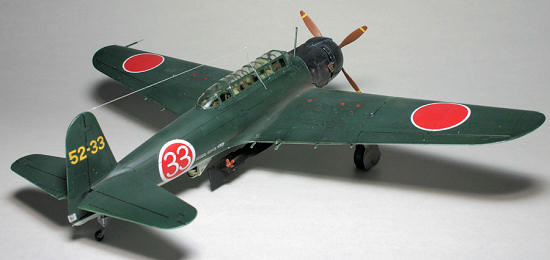
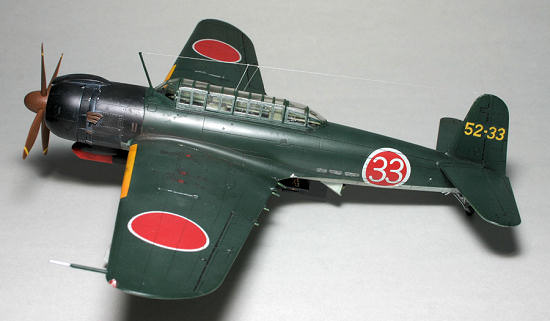
Decal
options include two IJN machines in the standard green over grey (or natural
metal) scheme, the more original of the two sporting a large number 33 in its
fuselage Hinomarus.
For me,
this kit is a double premiere: first model built in my new workshop (after an
almost one-year break spent on house renovation work), and the first to be
painted with
Vallejo
Air acrylics. The long break is the main reason why I chose a kit that’s simple
to build, and the new paint is why I picked one with a solid-coloured two-tone
scheme, as I didn’t know how the airbrush would react to the stuff.
Fear no
problem with this kit. I only wrote “almost” because it includes very tiny parts
that can be tricky to install (such as the little side windows) and because if
you chose (as I did) to represent the aircraft with extended wings, you’ll have
to be very careful
 to make them fit correctly – and at the right angle. Plus,
new holes will have to be drilled in the torpedo, while the original ones will
be filled.
to make them fit correctly – and at the right angle. Plus,
new holes will have to be drilled in the torpedo, while the original ones will
be filled.
As you
see, nothing to worry about. Just assemble the thing and concentrate on the
painting – that’s my definition of modelling fun.
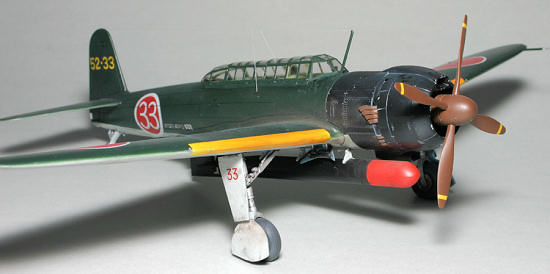
Due to
the kit’s excellent fit and clever design, filling and sanding is reduced to a
minimum. Some might say “no putty required”. OK, I fill and sand every seam on
every model I build, so I’d be lying if I said so – but the wing/fuselage joint
on this one is so tight and well-placed (it passes for a panel line) that I
actually made an exception, this time.
The kit
provides separate “butterfly” flaps, but as all pictures of standing Tenzans
I’ve seen show them with their flaps up, I glued them this way… also because I’m
not fond of large, funky-looking “aotake”-coloured areas showing up. Matter of
taste, I guess.
The lower
MG station can be positioned open or closed. To add a bit of life to the kit, I
went with the open option.
As the
engine cowling and the fuselage section behind it are black and come as a
separate unit, I assembled, painted and left them aside until final assembly.
The finished item is no small plane: roughly the same size as its
US
counterpart the Grumman Avenger, but is less bulky due to its externally-carried
ordinance. Those with room issues will appreciate the folded-wings option.
As said,
nothing too exciting here, the Imperial Navy not being known for its creativity
when it came to painting aircraft… yet, it’s what I wanted for a first
experiment, basically.
Weathering was kept to a decent level (a wash of dark oils, a bit of chipping
and pastel exhaust stains), as most Tenzans hardly ever “grew up” to become
war-weary veterans – if not only used once in desperate missions against US
carrier groups, from which even those who were not performing a “special attack”
had little chance to return. But back to the paint itself:
 The
Vallejo
Air acrylics are pre-thinned paints that can be used “as is” in airbrushes. As I
promised my better half I’d be careful with smelly stuff at our new place, I
purchased a whole bunch of these at model shows prior to our moving, and tested
them on the Tenzan. Result: at least with a 0.35 nozzle, they work perfectly
without clogging the airbrush. Though they don’t cover extremely well (the usual
worst offenders being yellow and red), two coats are enough and surprisingly,
only small quantities are needed.
The
Vallejo
Air acrylics are pre-thinned paints that can be used “as is” in airbrushes. As I
promised my better half I’d be careful with smelly stuff at our new place, I
purchased a whole bunch of these at model shows prior to our moving, and tested
them on the Tenzan. Result: at least with a 0.35 nozzle, they work perfectly
without clogging the airbrush. Though they don’t cover extremely well (the usual
worst offenders being yellow and red), two coats are enough and surprisingly,
only small quantities are needed.
They dry
a bit slower than Tamiya acrylics, but once dry, they are less sensible to
scratches and “span” just as thinly (if not more). Metallic tones look very good
and are much less grainy than Tamiya’s. Other paints of the brand come less
diluted but can be thinned with simple tap water. As for the smell… complete
success – there’s none.
Vallejo’s
colours react well to other acrylics brands (I tried several lacquers), and are
perfectly suited for oil washes and other weathering techniques.
Now, I
still have to discover how they work with the 0.25 nozzle, and how they perform
on a more subtle or less forgiving job, like a mottled camo, a natural metal or
a Wellenmuster. Stay tuned, I’ll have an answer soon.
 The
provided “Long Lance” torpedo is not the kit’s best part. I guess it could be
replaced by a better one from the aftermarket, if there’s one - but never mind,
I chose to live with it. As said earlier, the canopy comes in three pieces and
is not designed for opening, so those who wish to do so will have to grab their
razor saw. As I find this endless “greenhouse” rather funny, I left it alone.
Anyway, it’s clear enough to show the nice cockpit details.
The
provided “Long Lance” torpedo is not the kit’s best part. I guess it could be
replaced by a better one from the aftermarket, if there’s one - but never mind,
I chose to live with it. As said earlier, the canopy comes in three pieces and
is not designed for opening, so those who wish to do so will have to grab their
razor saw. As I find this endless “greenhouse” rather funny, I left it alone.
Anyway, it’s clear enough to show the nice cockpit details.
Careful
with the tiny position lights, as they’re perfect victims for the Carpet Monster
(as I painfully experienced). The little side windows seemed tricky to install,
so I first tried to replace them with Krystal Klear, but, as the result was not
good, I eventually used the kit’s parts. Finally, stretched sprue antenna wires
were added as a final touch.
 This
project was of the “no-problem, piece of cake” category. I’m sure one could do
better by folding the wings, lowering the flaps, opening the canopy or doing a
bit of super-detailing here and there, and I keep this possibility for another
time (a late-model Tenzan with radar waits in the stash).
This
project was of the “no-problem, piece of cake” category. I’m sure one could do
better by folding the wings, lowering the flaps, opening the canopy or doing a
bit of super-detailing here and there, and I keep this possibility for another
time (a late-model Tenzan with radar waits in the stash).
Yet, my
goal being an easy and pleasant comeback to the hobby, this is exactly what I
got and frankly, after one year handling delicate tools such as paint rolls,
electric drills, sledgehammers, circular saws, angle grinders and crowbars, I’m
really happy I still could assemble a fragile thing like that without breaking
anything, and I like this model a lot.
Back in
the saddle again…
As for
the kit, you guess it: highly recommended, of course.
-
Wikipedia
-
Maru
Mechanic # 30
Pierre-André Boillat
February 2011
If you would like your product reviewed fairly and quickly, please
contact
me or see other details in the
Note to
Contributors.
Back to the Main Page
Back to the Reviews Index Page