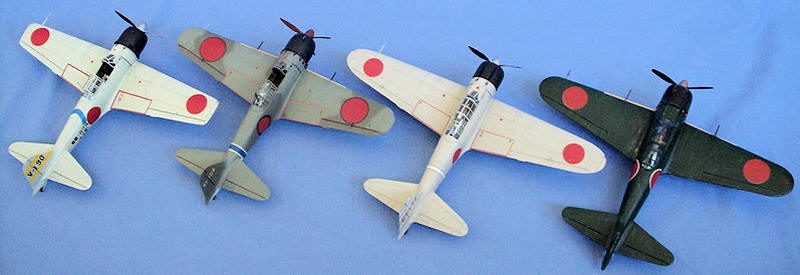
1/48 A6M Comparisons
| KIT #s: |
Hasegawa 1/48 A6M2b Type
21 Zero (JT43) |
| PRICE: | $varies |
| DECALS: | See article |
| REVIEWER: | Jonathan Prestidge |
| NOTES: | Eduard pre-painted IJN seatbelts used otherwise OOB |
| HISTORY |
Rather than give a complete history of the
entire Zero family, I’ll focus on the physical differences of the A6Ms
represented in this comparison.
First into production was the A6M2. This is the
type which first saw action in 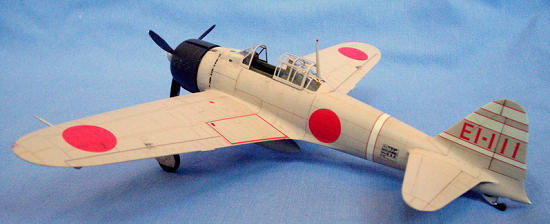 wing cannons were completely recessed in the wings.
The next major variant was the A6M3 which
consisted of two models, the Type 22 and the Type 32. Both Types used the
definitive Sakae 21 engine housed in a longer, more streamlined cowl. The
exhaust still exited beneath the motor. While the Type 22 was otherwise similar
to the Type 21 in appearance, the Type 32 introduced clipped wings for better
roll rate and ease of use on board carriers. The 20mm wing cannons were still
completely recessed in the wings.
The A6M5 Type 52 was the most produced Zero variant. It introduced ejector stack exhaust while retaining the Sakae 21 engine. The Type 52 also used a shorter span wing of longer chord than seen on previous models, eliminating the need for folding wing tips. The barrels of the wing mounted cannons protrude from the wing and increased ammo capacity is housed behind bulged covers under the wings.
| THE KITS |
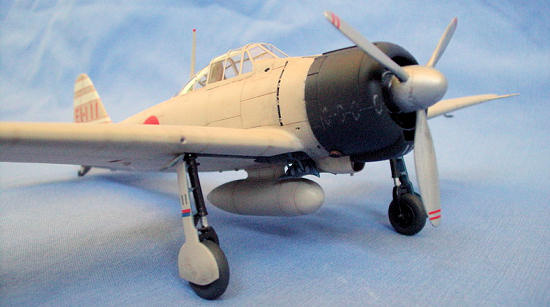
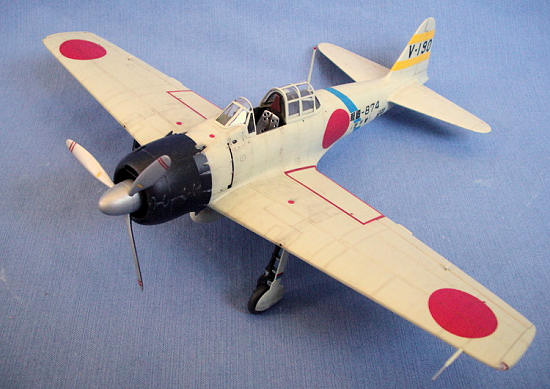
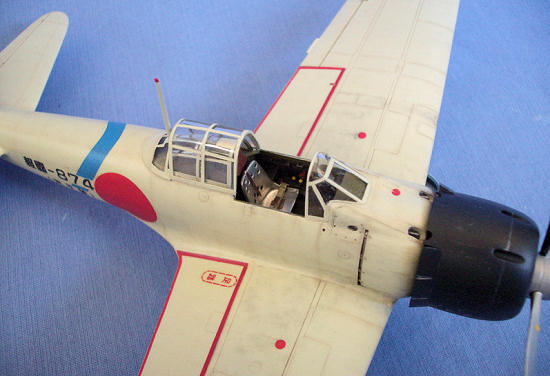
The Hasegawa 1/48 A6M2b Type 21 Zero is the
newest of this quartet and thus sports: recessed panel lines, decent interior,
nicely detailed engine and the best canopy of the bunch. The kit decals are very
nicely printed. The decal colors are not as vibrant as those in the other kits
but they look more correct on a model of this scale.
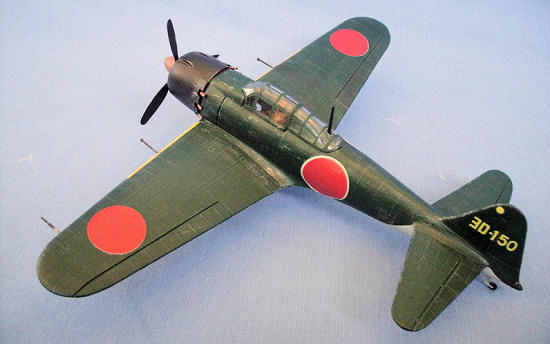
The oldest kit of this bunch, Tamiya’s 1/48
A6M3 Type 32 (Hamp) is truly a classic. Though it once defined state of the art,
it now shows its age a bit with a mix of raised and recessed panel lines,
simplified engine detail, decal only instrument panel and two
 thick canopies.
The kit decals are in register and opaque (at least on the all gray color scheme
I chose). I found the detailing on the landing gear to be the best of the bunch.
My example also came with six standing ground crew. The port upper wing
was significantly warped and no amount of coaxing could straighten it prior to
assembly.
thick canopies.
The kit decals are in register and opaque (at least on the all gray color scheme
I chose). I found the detailing on the landing gear to be the best of the bunch.
My example also came with six standing ground crew. The port upper wing
was significantly warped and no amount of coaxing could straighten it prior to
assembly.
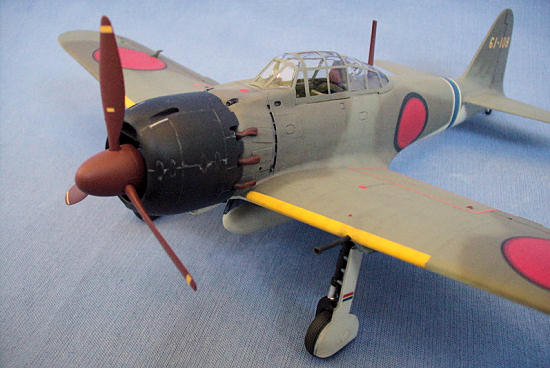
Hasegawa’s J7 kit of the A6M5 Type 52 Zero was
released in 1988. My kit is the initial release and has a set of beautiful resin
wheels included. The panel lines are raised and very petite, the engine detail
is on par with the Tamiya, ditto the interior, the canopy is thin and clear but
does not seat down all the way in the open position.
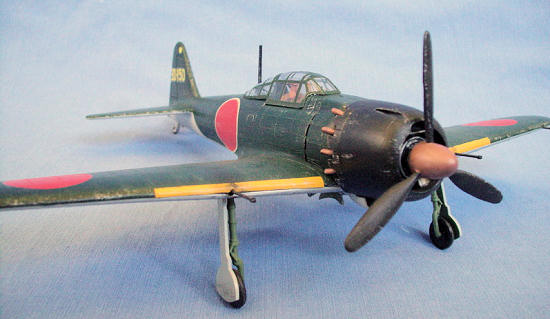
Finally, the Monogram 1/48 A6M5 is best
described as toy-like. The interior consists of a pilot figure and an instrument
panel decal. There are lots of raised rivets and panel lines, the shape of the
thing is
| CONSTRUCTION |
This is the first time that I have tackled
multiple kits of similar planes concurrently. While a bit overwhelming, I
found that once the research on colors and detailing was completed the
builds went fairly smoothly. Also, because the newer tooling Hasegawa A6M2b
kit had unused parts for the A6M3 variant, I was able to use those parts to
update the Tamiya kit. To make for easier reading I’ll treat each kit
individually. In reality, this was a several month long research & build
fest!
Hasegawa A6M2b – I spent the first day removing
parts from the parts trees and cleaning them up. There was no flash on this kit
but the mold seam lines on most parts needed a swipe with the edge of a #11
Exacto blade. I built and painted the engine first – very nice! As good as the
interior on this kit is, I added a scratch built throttle/gun lever and drilled
out the holes in the pilot’s seat
 prior to assembly. The interior was painted
with Polyscale acrylic French Khaki which is a close match to Mitsubishi
interior green. The instrument decals were added then given a flat clear coat.
Each dial received a drop of Future to simulate a glass lens. Details were
picked out in various colors and then the interior was given an oil based wash
and dry brushed with Polyscale acrylic RLM02 (a lighter shade of interior
green). I like the look of a lighter shade of the same color better than dry
brushing with silver. The seat was painted aluminum and I added Eduard’s
pre-painted IJN seatbelts (lap belts only as this is an early-war bird). I glued
the fuselage halves together, adding a sheet plastic shim at the front lower
section in order to get the correct wing-to-fuselage fit. I had a bear of a time
getting the interior into the fuselage while making sure the interior side walls
were held tightly against the sides of the fuselage. After two tries I was happy
with the fit. The rest of the airframe built up without a hitch. The area under
the canopy was painted Polyscale acrylic French Khaki and the canopy was
attached with white glue. The framing on the canopy is so petite that I had to
use Scotch tape in order to see where to cut. Once the masking was complete all
seams got an application of Mr. Surfacer 500 and were then sanded smooth. The
A6M2b was ready for paint.
prior to assembly. The interior was painted
with Polyscale acrylic French Khaki which is a close match to Mitsubishi
interior green. The instrument decals were added then given a flat clear coat.
Each dial received a drop of Future to simulate a glass lens. Details were
picked out in various colors and then the interior was given an oil based wash
and dry brushed with Polyscale acrylic RLM02 (a lighter shade of interior
green). I like the look of a lighter shade of the same color better than dry
brushing with silver. The seat was painted aluminum and I added Eduard’s
pre-painted IJN seatbelts (lap belts only as this is an early-war bird). I glued
the fuselage halves together, adding a sheet plastic shim at the front lower
section in order to get the correct wing-to-fuselage fit. I had a bear of a time
getting the interior into the fuselage while making sure the interior side walls
were held tightly against the sides of the fuselage. After two tries I was happy
with the fit. The rest of the airframe built up without a hitch. The area under
the canopy was painted Polyscale acrylic French Khaki and the canopy was
attached with white glue. The framing on the canopy is so petite that I had to
use Scotch tape in order to see where to cut. Once the masking was complete all
seams got an application of Mr. Surfacer 500 and were then sanded smooth. The
A6M2b was ready for paint.
Tamiya A6M3 Type 32 – Again, I spent the first
day removing parts from the parts trees and cleaning up the mold seam lines. I
built and painted the engine first. This is where I used the front of the motor
(part E25) from the Hasegawa A6M2b kit. The added detail really dresses up this
engine. The interior on this kit got a scratch built throttle/gun lever, rudder
trim tab wheel and various knobs. I drilled out the holes in the pilot’s seat
prior to assembly. The interior was also painted with French Khaki. The
instrument decal was added then given a flat clear coat. Each dial received a
drop of Future to simulate a glass lens. Details were picked out in various
colors and then the interior was given an oil-based wash and dry brushed with
RLM02. The seat was painted aluminum and I added Eduard’s pre-painted IJN
seatbelts. I glued the fuselage halves together and added the interior from the
bottom. Deviating from the instructions, I glued the upper wings to the fuselage
first. I then used Tenax 7R applied with a fine brush to
 glue the lower wing to
the plane. I glued a small section at a time starting with the non-warped wing.
I was able to mostly eliminate the warp in the port upper wing by gluing it and
then holding it flat until the fast-drying Tenax had set up. The rest of the
airframe built up without a hitch. The area under the canopy was painted French
Khaki and the canopy was attached with white glue. I used Tamiya tape to mask
the framing on the canopy. I did add a small piece of evergreen plastic card
stock to represent the shutter in the oil-cooler scoop under the engine. I also
cut out the wing tip lights and replaced them with the unused clear parts from
the Hasegawa A6M2b. After Mr. Surfacer and sanding, A6M3 was ready for paint.
glue the lower wing to
the plane. I glued a small section at a time starting with the non-warped wing.
I was able to mostly eliminate the warp in the port upper wing by gluing it and
then holding it flat until the fast-drying Tenax had set up. The rest of the
airframe built up without a hitch. The area under the canopy was painted French
Khaki and the canopy was attached with white glue. I used Tamiya tape to mask
the framing on the canopy. I did add a small piece of evergreen plastic card
stock to represent the shutter in the oil-cooler scoop under the engine. I also
cut out the wing tip lights and replaced them with the unused clear parts from
the Hasegawa A6M2b. After Mr. Surfacer and sanding, A6M3 was ready for paint.
Hasegawa A6M5 – Again, I spent the first day
removing parts from the parts trees and cleaning them up. I built and painted
the engine. I added a scratch built throttle/gun lever and drilled out the holes
in the pilot’s seat prior to assembly. The interior was also painted with French
Khaki. The instruments were hand painted (no decal here). Each dial received a
drop of Future to simulate a glass lens. Details were picked out in various
colors and then the interior was given an oil-based wash and dry brushed with
RLM02. The seat was painted French Khaki (for something different) and I added
Eduard’s pre-painted IJN seatbelts. I glued the interior walls to the fuselage
halves and then trapped the rest of the interior between the fuselage halves. At
this point I forgot to trap the tail wheel between the fuselage halves, doh! No
issues with the rest of the airframe. The area under the canopy was painted and
the canopy was attached with white glue. I used Scotch tape to mask the framing
on the canopy. I also added the shutter in the oil-cooler scoop under the
engine. After Mr. Surfacer and sanding, A6M5 was ready for paint.
Monogram A6M5 – I actually built this one about 10 years ago but there is not much to tell. The pilot was brush painted and the instrument decal was added. The landing gear and gear wells were painted interior green (I know this is wrong now). The plane was then glued together with good old Testors tube glue. I masked the canopy with Scotch tape and left it off until after painting.
| COLORS & MARKINGS |
What started this massive modeling effort
in the first place was Luftwaffe color research burn out! I was looking for
an easy, non argument inducing paint job. One would think that IJN gray with
a black cowl would fit the bill right? If only life were that simple. Using
black and white photos of each plane modeled, I interpreted the colors to
the best of my ability. I used a Badger Anthem Airbrush to finish all planes
here except the Monogram A6M5.
Hasegawa A6M2b – I chose the markings for a
Shokaku fighter group plane flown by Lt. Takumi Hoashi. Though there is much
 debate, from what I can tell the Zeros of this time period wore a tan-gray
paint. I mixed Polyscale acrylic RLM84 with a bit of IJA brown until I was happy
with the shade. For the cowl color I mixed Polyscale acrylic semi-gloss black
with a bit of Army Air Core blue to simulate Japanese cowl color. Once painted,
I applied weathering to the airframe using various shades of pastel chalks
applied with a closely cropped paint brush. I overdo the weathering and then use
an eraser to tone things down quite a bit. A technique I used on this build was
to apply weathering to highlight the underlying structure of the aircraft (not
just to the panel lines). To my eye, this gives the finish a more realistic
effect. I also use a technique similar to dot-filtering done by armor modelers.
I use various pastel colors and apply splotches and streaks randomly on the
airframe to keep things from looking too perfectly weathered. The airframe was
then cleared with a coat of Future in preparation for decals. The kit decals
were used to good effect. Hasegawa decals can react badly to setting solutions
so I always dip my paint brush in water then in setting solution to keep things
diluted a bit. Once they were dry, I weathered the decals with pastels and
sealed everything with a coat of Polyscale acrylic satin clear.
debate, from what I can tell the Zeros of this time period wore a tan-gray
paint. I mixed Polyscale acrylic RLM84 with a bit of IJA brown until I was happy
with the shade. For the cowl color I mixed Polyscale acrylic semi-gloss black
with a bit of Army Air Core blue to simulate Japanese cowl color. Once painted,
I applied weathering to the airframe using various shades of pastel chalks
applied with a closely cropped paint brush. I overdo the weathering and then use
an eraser to tone things down quite a bit. A technique I used on this build was
to apply weathering to highlight the underlying structure of the aircraft (not
just to the panel lines). To my eye, this gives the finish a more realistic
effect. I also use a technique similar to dot-filtering done by armor modelers.
I use various pastel colors and apply splotches and streaks randomly on the
airframe to keep things from looking too perfectly weathered. The airframe was
then cleared with a coat of Future in preparation for decals. The kit decals
were used to good effect. Hasegawa decals can react badly to setting solutions
so I always dip my paint brush in water then in setting solution to keep things
diluted a bit. Once they were dry, I weathered the decals with pastels and
sealed everything with a coat of Polyscale acrylic satin clear.
Tamiya A6M3 – I chose the markings for a plane
from the Tainan Fighter Group (1st), Buna, East of New Guinea,
1942-1943. I’m a little unsure about the color of this one. While one could
argue that it should be the same tan-gray as that of the A6M2b, I have an
excellent black and white photo of this aircraft and it appears to be a lighter
shade of gray. Maybe it was a Nakajima built example – who knows? Based on t he
photo, I chose to paint this Zero a straight Polyscale acrylic RLM84. I figured
that this plane could have been painted in the same gray as that used on the
underside of later Zeros. I used my home brewed Japanese cowl color on the
engine cowl. Once painted, I applied weathering to the airframe as above. The
airframe was then cleared with a coat of Future in preparation for decals. The
kit decals were used and they went down fairly well, being a little on the thick
side. The decal colors also seem a bit too bright in my opinion. Once they were
dry, I weathered the decals with pastels and sealed everything with a coat of
Polyscale acrylic satin clear.
he
photo, I chose to paint this Zero a straight Polyscale acrylic RLM84. I figured
that this plane could have been painted in the same gray as that used on the
underside of later Zeros. I used my home brewed Japanese cowl color on the
engine cowl. Once painted, I applied weathering to the airframe as above. The
airframe was then cleared with a coat of Future in preparation for decals. The
kit decals were used and they went down fairly well, being a little on the thick
side. The decal colors also seem a bit too bright in my opinion. Once they were
dry, I weathered the decals with pastels and sealed everything with a coat of
Polyscale acrylic satin clear.
Hasegawa A6M5 – I chose the markings for a
plane of the 261st Flying Group June 1944
Monogram A6M5 – This one is the standard IJN
green over IJN gray. I brush painted the plane with Testors oil based paints. I
then dry brushed the plane with a little Testors silver to bring out some
detail. As mentioned previously, the kit decals were junk. I had to pirate the
meatballs from an Otaki kit. I gave the kit a satin clear coat to tone down the
gloss of the paint.
For each plane, I spent another day or so attaching all the final bits (landing gear, etc.) and applying the finishing touches on my weathering.
| CONCLUSIONS |
 I tend to delay building kits until they are no
longer the latest and greatest. With the release of the new Tamiya Zeros ($55
choke!), all these kits have been surpassed. Are they worth building?
I tend to delay building kits until they are no
longer the latest and greatest. With the release of the new Tamiya Zeros ($55
choke!), all these kits have been surpassed. Are they worth building?
Without a doubt, the newer Hasegawa Zeros are
worth every penny of their $20-$30 price. OOB they build easily and look
tremendous. They are easy enough that a novice should have no trouble and
detailed enough to be a great starting place for the experienced modeler.
For $10-$15 the old-tool Tamiya Zeros are still
a great value. They are ideal for the beginner and modelers on a budget. While
they can be finished well, they need help in the engine, interior, decal and
canopy areas to be on par with the Hasegawa offering. Even if one shells out the
money to help these areas, the surface detailing is not as nice – you do the
math! That being said, this was still an enjoyable build that turned out well.
If you have one, don’t be afraid to build it.
I’m not sure about the availability of the
older Hasegawa Zero. Though I’m pleased with the way it turned out, I would
recommend one of the new-tool Hasegawa kits over this one. The engine, landing
gear, and interior parts on this kit are a bit clunky in comparison. When you
factor in the raised panel lines and a canopy that sits too high in the open
position the choice is even easier. However, I did enjoy building mine and
display it with pride. If you have one, build it.
 That brings us to the Monogram Zero. Wow, after
building the other Zeros I realize how horrific this kit is! No amount of time
spent could make this a passable scale replica of a Zero. I’ve built this kit
several times, once as a kid and once when I first got back into modeling.
That’s right – the worst kit here and I built it twice! But, like any kit,
building it will help you improve your skills. I hereby nominate this kit as the
best candidate for use with pyrotechnics! Let’s see, how many M-80s would fit in
there if I omitted the pilot?
That brings us to the Monogram Zero. Wow, after
building the other Zeros I realize how horrific this kit is! No amount of time
spent could make this a passable scale replica of a Zero. I’ve built this kit
several times, once as a kid and once when I first got back into modeling.
That’s right – the worst kit here and I built it twice! But, like any kit,
building it will help you improve your skills. I hereby nominate this kit as the
best candidate for use with pyrotechnics! Let’s see, how many M-80s would fit in
there if I omitted the pilot?
If you would like your product reviewed fairly and quickly, please contact me or see other details in the Note to Contributors.