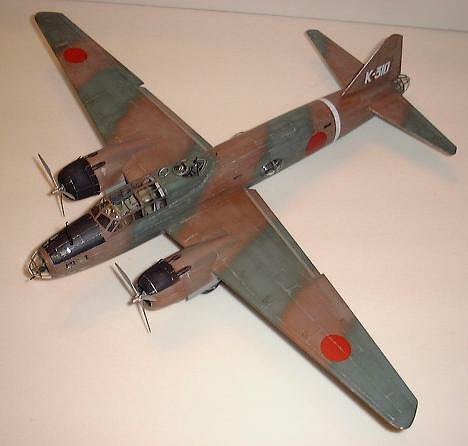
Tamiya 1/48 G4M1 'Betty'
|
KIT # |
61049 |
|
PRICE: |
$69.00 |
|
DECALS: |
See Review |
|
REVIEW : |
Paul Mahoney |
|
NOTES: |
Eduard photo etch set used |
|
HISTORY |
The Mitsubishi 'Betty' was one of the mainstream bombers used by the Japanese Navy throughout WW2. It was one of the key aircraft used in attacking China and the Indo-China area during the opening phases of the War, and carried the surrender delegation to the Allies at the close of the War. The Betty was used in attacks on the Prince of Wales and Repulse, sinking those ships and thus eliminating the majority of British Sea Power in Asia. Bettys based in Celebes even attacked Darwin in 1942. Bettys were able to carry out such long range attacks by sacrificing protective armor for both crew and fuel tanks. This led to another Allied nickname: 'Flying Cigar,' for their tendency to light up or explode with just a few bursts from an attacking plane. In one of the more famous episodes of the War, P-38s attacked and shot down Admiral Yamamoto while he was in a Betty enroute to Bougainville.
|
THE KIT |
Tamiya's Betty is typical of their latest offerings: good detail, great fit (in most areas), crisp panel lines, and an interesting subject. Options include different style exhausts (with or without flame dampers), optional propeller spinners, poseable flaps, and different types of offensive weapons (torpedo, bombs, or 'sealed up' recon version). Bettys in 'bomber' mode had the bomb bay doors removed. The doors were only on (and closed) when the a/c was in 'recon' mode. I chose to model this kit as a bomber.
|
CONSTRUCTION |
The rest of the Eduard set contains some radio faces,
armrests for the seats, seat belts, some interior structure in the tail gunner's
area, rudder pedals, and what seems like hundreds of ammo clips for the Lewis
style guns. Assembling these clips proved quite difficult (perhaps due to
my clumsiness), and attaining a perfectly round shape to the clip was extremely
frustrating. Eduard provides you with a long strip that is to be made into
a circle, and then topped off by the top of the clip (this is already attached
to the strip, and just needs to be folded over. It seems easy enough, but
wasn't! I was eventually able to solve the problem by wrapping the strip
around a paintbrush handle, then folding over the top and tweaking everything
until it looked right. Cyano and/or white glue filled the many gaps.
Repeating this operation 20 or so times became tedious at best!
In addition to Eduard's set, I added sunshades and curtains to the huge
glazed area over the cockpit. Photos of these can be seen clearly in
Monogram's Japanese Cockpit Interiors Book. I also added some wiring and a
few other bits and bobs to fill out the interior a bit more. I painted the
interior sides of the fuselage using Testors Japanese Interior Metallic Blue to
represent the natural metal with a protective sealant. All other main
interior parts were painted RLM 02 with some Interior Green added to it to make
sort of a greenish-grey color. From my research on the net and in books it
appeared that most Japanese interiors (at least at this point in the war) were
painted in a greenish-grey color (in fact the instructions suggest RLM 02),
although I reasoned that the sides of the fuselage might have remained natural
metal. This gave a little more life to the insides and looks reasonable to
me!
The most time-consuming part of building this kit was easily the masking of
all the windows prior to painting. The large gunner's cone comes in two
halves, and has a decent part of the tail assembly molded into it. This
actually helps blend the clear piece into the fuselage quite well. It also
means attaching it prior to painting in order for a seamless paint job. I
masked off all clear pieces and attached them prior to painting except for the
upper turret. Since I was going to pose this in the open position, I used
the 'closed' piece to mask off the opening, and then replaced it with the 'open'
piece afterwards.
My method of masking canopy frames works well for me,
but is painstakingly slow and can be prone to errors. I place small pieces
of Scotch Magic Tape (green plaid box) over each panel, then cut around it with
a very new Xacto, using very light pressure to expose the frames. After I
finish one panel, I move on to the next. I think the total masking job on
the framework on the Betty took me at least 3 nights, one of which was just the
tailcone!! Several of the curved panes took more than one small piece of
tape in order to be properly covered. The nose cap and round hatch on the
upper turret were carefully covered with liquid mask. I had also installed
all the little windows throughout the fuselage per instructions from the inside.
I covered these with liquid mask as well.
After painting (see below), I added the usual final steps. The landing
gear is very well designed, and fits securely into the wheel wells with no fuss
at all. I did add hydraulic lines out of thin wire to the gear struts.
The wheel wells were painted in Interior Metallic Blue, then dry bushed with
Flat Aluminum to show some wear and tear. The wells have some detail, but
are by no means complete. At a minimum you should make some sort of
bulkhead for the front of the bays to block the join line of the upper and lower
wings. After painting the tires, I brushed lots of brown and gray pastels
on them to dirty them up. The propellors were finished with Testors Silver
on the front of the blades and Primer Brown on the rear faces. I hand
painted red stripes near the tips for the warning bands. I added
antennae wires using stretched sprue. I attach it to the mast and tail
with cyano glue. I light a match, then blow it out and run it under the
sprue, letting the smoke drift up to it. A few seconds of this usually
'pops' the sprue taught immediately. I drilled out the gun barrels and
added them to their various stations. Final step was to add the open
canopy hatch, and a finished Betty was on my desk! 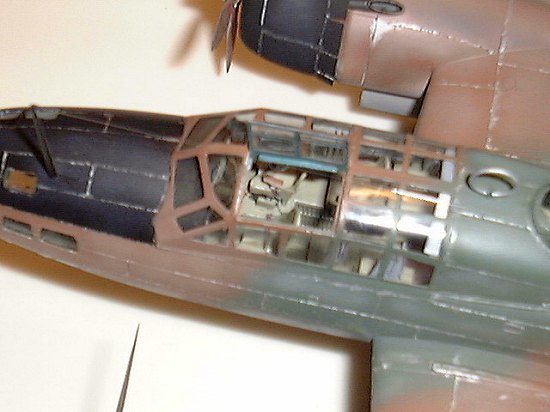 I began my kit, as almost all others, with the build up of the interior.
Tamiya's interior detail is good, but can certainly use some additional
attention. I purchased Eduard's photoetch set, but can't say I was that
happy with what it gave me. It seems that there should have been more to it
for the money that it cost. One thing I do like is the way Eduard does its instrument
panels, and was happy that was part of this set. A clear piece of acetate,
with dials and instruments marked in black, is attached to the back of a brass
instrument panel with hollow holes for the instruments. Once the back of
the acetate is painted white, the result is a neat and extremely realistic
panel. Viewed from the front, the acetate gives a good representation of
glass covered dials.
I began my kit, as almost all others, with the build up of the interior.
Tamiya's interior detail is good, but can certainly use some additional
attention. I purchased Eduard's photoetch set, but can't say I was that
happy with what it gave me. It seems that there should have been more to it
for the money that it cost. One thing I do like is the way Eduard does its instrument
panels, and was happy that was part of this set. A clear piece of acetate,
with dials and instruments marked in black, is attached to the back of a brass
instrument panel with hollow holes for the instruments. Once the back of
the acetate is painted white, the result is a neat and extremely realistic
panel. Viewed from the front, the acetate gives a good representation of
glass covered dials.
 After the interior was finished, the rest of the assembly went fairly
quickly. The fuselage halves went together with no putty, and some light
sanding took care of the seams. The wings did require some putty around
the inside leading edges, and around the engine nacelles. Tail sections
fit with no problem at all. The engines are moderately detailed, but are
so well hidden inside the cowlings that any extra detail would be lost.
After the interior was finished, the rest of the assembly went fairly
quickly. The fuselage halves went together with no putty, and some light
sanding took care of the seams. The wings did require some putty around
the inside leading edges, and around the engine nacelles. Tail sections
fit with no problem at all. The engines are moderately detailed, but are
so well hidden inside the cowlings that any extra detail would be lost.
|
PAINT & MARKINGS |
Although the wings could be left off and attached after painting, I chose to
glue them on prior to painting to make sure my camouflage lined up properly.
After checking for missed seams (I found several -- it's a big kit!), puttying
and sanding a bit more, the paint job commenced. I first sprayed all the
glass framed areas with Interior Metallic Blue, then the major work started.
I chose the green/brown scheme for an a/c that operated in and around Malaysia.
My research suggested that many of these planes were originally delivered in
natural metal, and only the upper surfaces were camouflaged in the field.
I also found information suggesting some were light gray on the undersurfaces.
I chose the latter.
Two good coats of Model Master clear gloss lacquer (in a spray can), and I was
ready for decals. I have only had moderate success using Future, and must
be about the only modeler that doesn't use it for clear coats!! So I stuck
to my tried and true method. Anyway, after the gloss set for a few days, I
applied decals using one of the several schemes offered in the kit. This
is also the subject of a color profile in the Famous a/c of the World book
listed below. According to that book, this a/c is from the Kanoya Naval
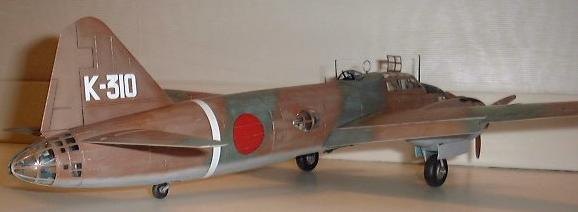
Air Group, Flown by Lt. Haruki Iki on Dec. 10, 1941 off Malaya, Indo-china.
The decals are
'Invisiclear' by Scale Master and are in perfect register.
They went on without a hitch, using Micro Sol and Set to help them snuggle into
all the panel lines. The decals for this scheme are actually pretty basic,
consisting of the national markings and the tail fin number. The white
fuselage band, as well as yellow id bands for the leading edges, are provided
should you choose to use them. This a/c was operational before the use of
the i.d. bands, and I elected to paint the white band. There is a data
plate, but no other stenciling.
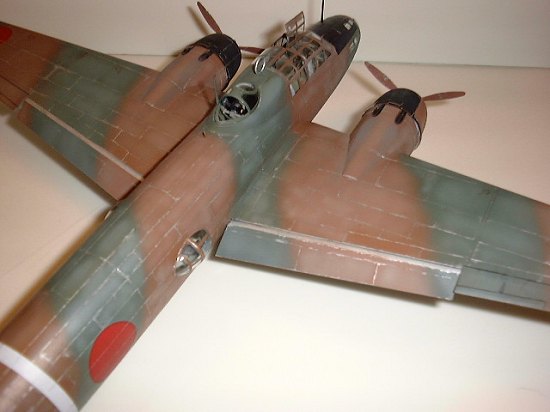
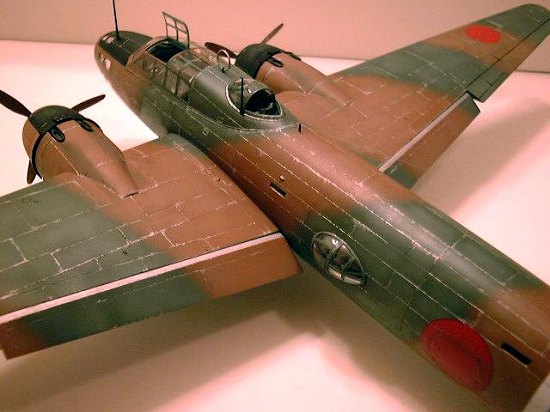
Japanese paints during WW2 are notorious for their ability to erode away,
even early in the war. Thus a lot of peeling and fading and general abuse
needed to be heaped upon the plane, without trying to get carried away! I
primarily used Testors Flat Aluminum, applied carefully with a 000 brush along
panel lines. I used post-it notes to mask one side of the panel while I
'chipped' away at the other side with the paint. I tried to go heavier in
corners and on panels that might be removed more often than others. After
this I applied some additional chipping to the leading edges of the flying
surfaces. Then the pastels came out. I sanded down various brown,
gray, and black pastels to create little piles of powder. I then take a
wide brush dip it into one of the piles. Using this pastel brush, I
lightly highlighted the panel lines. I then went back with a heavier
mixture of gray and black to represent the exhaust stains. 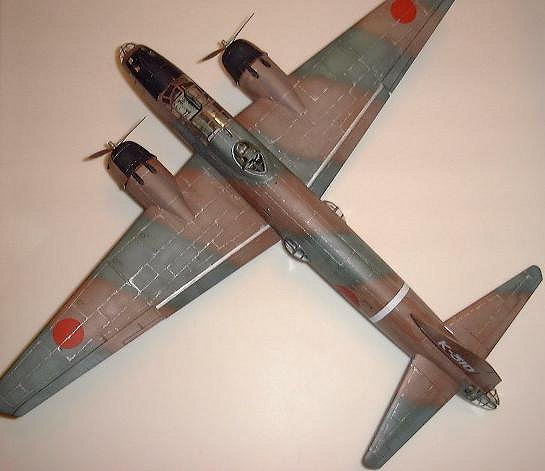 One full bottle of Model Master Japanese Gray later,
the undersides were covered. I used Model Master Japanese Navy Green and
Dark Earth for the upper surfaces, painted entirely freehand using an Aztek 470
airbrush. After the initial camo was done, and retouched, and retouched
again until I was happy with it, I lightened up each of the colors with about
30% light gray (30% white for the undersurfaces), and carefully sprayed the
interior of most of the major panels. I then lightened each color about
50% and lightly sprayed the control surfaces to represent the quicker fading of
these fabric covered surfaces. I then very lightly misted over another
coat of the original color (thinned considerably) to blend them together.
I was fairly happy with this attempt at fading the paint job, but might have
been a bit heavy handed in some areas. After all this was completed, I
masked and sprayed the black antiglare panel in front of the cockpit and on each
of the engines. Finally, I masked and sprayed the white band around the
rear fuselage.
One full bottle of Model Master Japanese Gray later,
the undersides were covered. I used Model Master Japanese Navy Green and
Dark Earth for the upper surfaces, painted entirely freehand using an Aztek 470
airbrush. After the initial camo was done, and retouched, and retouched
again until I was happy with it, I lightened up each of the colors with about
30% light gray (30% white for the undersurfaces), and carefully sprayed the
interior of most of the major panels. I then lightened each color about
50% and lightly sprayed the control surfaces to represent the quicker fading of
these fabric covered surfaces. I then very lightly misted over another
coat of the original color (thinned considerably) to blend them together.
I was fairly happy with this attempt at fading the paint job, but might have
been a bit heavy handed in some areas. After all this was completed, I
masked and sprayed the black antiglare panel in front of the cockpit and on each
of the engines. Finally, I masked and sprayed the white band around the
rear fuselage.
 After the decals had set overnight, I
sprayed two coats of Model Master Flat overcoat to dull things down. After this
dried I devoted several hours to peeling away all the tape on the clear panels.
I sharpened a wooden toothpick and used this to slowly peel up the tape. I
can press a little harder with the toothpick, and since it is wood, it doesn't
leave any scratches on the plastic. When peeling off some of the liquid
mask on the windows in front of the cockpit, I managed to pop one of the strips
of windows loose. This fell into the fuselage and caused quite a bit of
colorful language to be uttered. I was able to shake the strip out through
the upper gun turret, but there was no way I was going to be able to glue it
back in place. Before shaking it out, I tried holding the kit upside down,
and gently shaking it into place, hoping to run some liquid glue around it, but
that plan had no hope! In the end, I made a new window using Kristal Kleer.
Since the windows are at a curved part of the fuselage, the glass should be
curved as well. I had no way of doing this, and the difference is apparent
if you know to look for it. So word to the wise: be sure to fix
those windows strips in tightly!
After the decals had set overnight, I
sprayed two coats of Model Master Flat overcoat to dull things down. After this
dried I devoted several hours to peeling away all the tape on the clear panels.
I sharpened a wooden toothpick and used this to slowly peel up the tape. I
can press a little harder with the toothpick, and since it is wood, it doesn't
leave any scratches on the plastic. When peeling off some of the liquid
mask on the windows in front of the cockpit, I managed to pop one of the strips
of windows loose. This fell into the fuselage and caused quite a bit of
colorful language to be uttered. I was able to shake the strip out through
the upper gun turret, but there was no way I was going to be able to glue it
back in place. Before shaking it out, I tried holding the kit upside down,
and gently shaking it into place, hoping to run some liquid glue around it, but
that plan had no hope! In the end, I made a new window using Kristal Kleer.
Since the windows are at a curved part of the fuselage, the glass should be
curved as well. I had no way of doing this, and the difference is apparent
if you know to look for it. So word to the wise: be sure to fix
those windows strips in tightly!
|
CONCLUSIONS |
If you are a 1/48 scale fan of Japanese a/c, then this kit
is without a doubt for you! Highly recommend! Only drawback is it's
cost. With enough looking around, I think it can be had for $15-20 less
than the list price. Now the only problem will be having a large enough
display area.
REFERENCES If you would like your product reviewed fairly and fairly quickly, please contact
the editor or see other details in the Note to
Contributors.