Hasegawa 1/48 Ki-27 "Nate"
|
KIT # |
U-1 |
|
PRICE: |
$13.20 |
|
DECALS: |
See review |
|
REVIEW: |
Drew Nix |
|
NOTES: |
Ex-Mania kit |
|
HISTORY |
Like most of the Western powers, the Japanese Army Air Force (JAAF) was
dependant on biplane fighters during the 1920's and '30's. At the time of
the War with China (1937), the main JAAF fighter was the Kawasaki Ki. 10
"Perry". Against the ragtag Chinese Air Force (CAF), these
biplanes were enough. But when the Nomonhan Incident occurred with the
Soviet Union in 1939, the JAAF suddenly found itself fighting against
I-16s. Seeing that the monoplane was the wave of the future the Army put out
bids for development of such a fighter. Nakajima won the contract with the
Ki. 27. The Army test pilots, who put maneuverability ahead of any other
aspects of air combat, hated the Ki. 27 at first. In fact, so strong was
their initial opposition that Nakajima was forced to rework the original
airframe to make it more maneuverable. The new fighter was rushed to the
front where it soon became the favorite of JAAF fighter pilots. Flown by
such aces as Tateo Kato, the Ki. 27 soon developed a fearsome reputation over
the war-torn skies of China. Eventually replaced by the Nakajima Ki. 43
"Oscar", the "Nate" soldiered on until the end of the war
being used mainly as a trainer. An interesting historical footnote: Many,
if not most, of the "Zeroes" shot down by the AVG were Nates. In
their defense, some of the Flying Tigers did refer to the Ki. 27 as the
"I-97". It was naturally more prestigious to say you had
destroyed the vaunted Zero in air-to-air combat than a fixed-gear Nate or an
Oscar.
|
THE KIT |
 This kit was
originally by Mania of Japan. Hasegawa reboxed the kit, then its U.S.
distributor, Minicraft, released it again under its logo. Molded in light
gray styrene, the kit features engraved panel lines and two thick, one-piece
canopies (based on which version you decide to do). This kit was one of
the industry trendsetters upon its initial release in the 1980's. Now we
have come to expect this quality and better from even the smallest model
companies. Instructions are printed on one 8 1/2 X 14 page and consist of 6
steps. Written in English, the instructions are easy to follow
particularly with the color of each interior piece given. Decals are for 2
aircraft, a Ki. 27a of the 84th Independent Chutai and a Ki. 27b of the 13th Air
Combat Regiment, 3rd Chutai. The decals are excellent and in register.
This kit was
originally by Mania of Japan. Hasegawa reboxed the kit, then its U.S.
distributor, Minicraft, released it again under its logo. Molded in light
gray styrene, the kit features engraved panel lines and two thick, one-piece
canopies (based on which version you decide to do). This kit was one of
the industry trendsetters upon its initial release in the 1980's. Now we
have come to expect this quality and better from even the smallest model
companies. Instructions are printed on one 8 1/2 X 14 page and consist of 6
steps. Written in English, the instructions are easy to follow
particularly with the color of each interior piece given. Decals are for 2
aircraft, a Ki. 27a of the 84th Independent Chutai and a Ki. 27b of the 13th Air
Combat Regiment, 3rd Chutai. The decals are excellent and in register.
|
CONSTRUCTION |
Construction begins with the very nice four-piece radial engine. Following
the painting suggestions in the instruction sheet, the main cylinder bank was
painted Dark Gray, the push rods and ignition harness Silver, and the oil cooler
assembly was painted Copper using Floquil Paints. After this had dried, a
wash of Payne's Gray artist's oil was applied to the engine assembly for that
greasy, oily look. The engine assembly was then glued to the firewall and
the engine cowl glued over this assembly. The two-bladed propeller was
painted Floquil Old Silver then the back of the blades were painted A/N Brown
using Tamiya Flat Brown Acrylic.
The cockpit interior was next. When I built this kit in 1994, the thinking
of the day was that all Japanese aircraft were painted Aotake Blue in the
cockpit area. Therefore I duly painted the cockpit floor, the rear
bulkhead, the instrument panel, and the fuselage sidewalls Floquil Metalline
Metallic Blue Acrylic, a good match for Aotake Blue. Since then, more
research has shown that the interior should have been painted either Aluminum or
some shade of light green. Oh, well, live and learn.
 The completed and painted
cockpit assembly was trapped between the fuselage halves. The spatted
wheels were assembled next with the wheel hubs being painted Aluminum. The
wings were added next (a one-piece lower with two uppers). Fit was
excellent with only a little filler being needed on the wing to fuselage joint
at the rear of the bottom wing. The tailplanes were also an excellent fit.
The completed and painted
cockpit assembly was trapped between the fuselage halves. The spatted
wheels were assembled next with the wheel hubs being painted Aluminum. The
wings were added next (a one-piece lower with two uppers). Fit was
excellent with only a little filler being needed on the wing to fuselage joint
at the rear of the bottom wing. The tailplanes were also an excellent fit.
The spats were added next, fitting into the slots in the bottom wing perfectly.
Also the drop tanks, exhaust stubs, engine cowl assembly, and magnesium flare
illuminator tubes were added during this step.
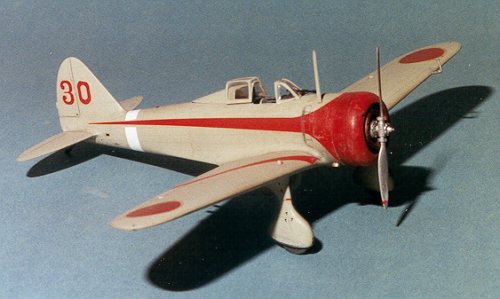
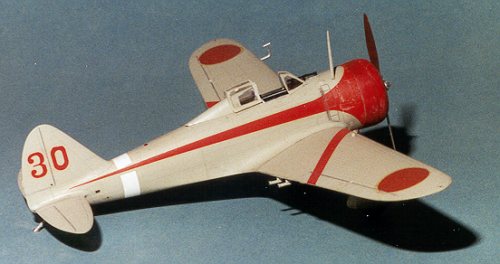
I was doing the Ki. 27a version so that particular canopy was masked using
Scotch Brand cellophane tape and then white glued to the fuselage. Some
Nates carried an overwing gun camera in a bullet fairing on the port wing.
I drilled the camera port out and added this part to the wing (a mistake, as I
was to find out later!). The opening for the telescopic gunsight and the
engine cowl were masked with tissue paper before painting began.
|
PAINT & DECALS |
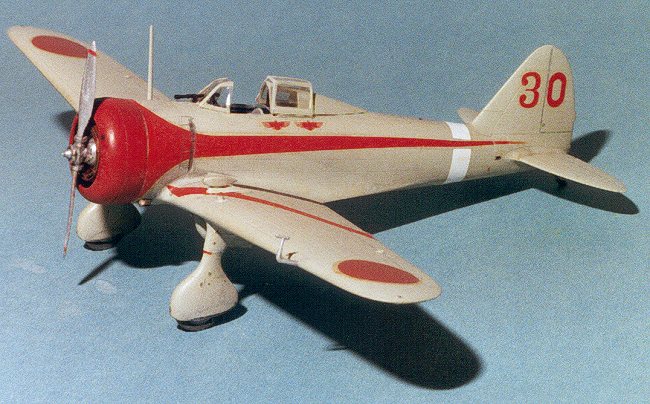
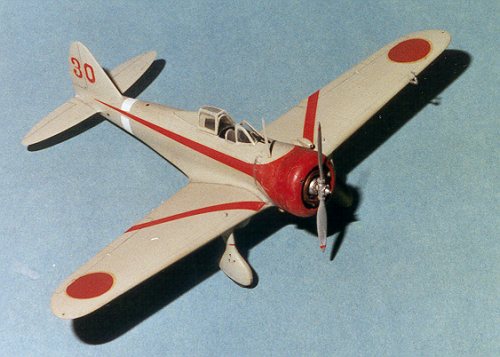
After painting the masked canopy Metallic Blue, the kit was ready for painting. This was an easy paint job. Nates were generally painted an overall gray. I used Tamiya J.A. Gray acrylic to paint the aircraft. This went down very nice with great coverage. The cowl was painted Insignia Red using Testors Model Master enamel (another mistake!). The tip of the tailskid was painted dark metallic gray to show paint worn off by take-offs and landings. After the paint had dried, three light coats of Future floor wax were sprayed over the aircraft in preparation for the decals. The decals went down without a hitch snuggling into and over the details.
 I mostly used
the provided kit decals for the 84th Independent Chutai. The wing
Hinomarus were taken from an old IPMS set that included "weathered"
Hinomarus. It was when I went to apply the red wing stripes that I
discovered a problem. The earlier installed wing gun camera was in the
way! Doh!! Careful cutting and positioning resulted in an acceptable
fit here. After the red fuselage stripes were applied mistake number 2 was
discovered. The red of the cowl did not match the red of the stripes.
Double doh!! The stripes are just a little lighter than the cowl.
Too late to change.
I mostly used
the provided kit decals for the 84th Independent Chutai. The wing
Hinomarus were taken from an old IPMS set that included "weathered"
Hinomarus. It was when I went to apply the red wing stripes that I
discovered a problem. The earlier installed wing gun camera was in the
way! Doh!! Careful cutting and positioning resulted in an acceptable
fit here. After the red fuselage stripes were applied mistake number 2 was
discovered. The red of the cowl did not match the red of the stripes.
Double doh!! The stripes are just a little lighter than the cowl.
Too late to change.
A piece of black decal stripe was cut to shape and put on the port wing to represent the wing walk. A light wash of Payne's Gray was used to accent the panel lines. The drilled out exhaust stubs were painted Metalline Burnt Metal. Another coat of Future sealed the decals. Poly S Flat Coat was thinned 50/50 with Poly S Thinner and the resultant mixture sprayed over the model. Pastel chalks were used to show exhaust stains and to highlight the area behind the cowl flaps.
|
CONSTRUCTION CONTINUES |
After all painting and decaling, the canopy was removed from the kit. I wanted to display an open canopy. Since there were no vacuform replacement canopies available at the time, out came the razor saw. I cut the canopy into three pieces along the engraved separation lines. I will pause for a moment to give all of you who have fainted a chance to recover! Once cutting was complete I noticed how thick the canopy was, a common failing of one-piece canopies.
 I decided to
thin the edges of the canopy. Starting with 240 grit wet-or-dry sandpaper,
the INTERIOR edges of the canopy parts were carefully sanded to more scale
thickness. Any more fainters? As you might imagine, this made the
canopy very scratchy and opaque. Not to worry! The 240 grit was
followed, in this order, by 320 grit, 400 grit, and 600 grit sandpaper. By
this time the canopy had cleared considerably. Next Blue Magic automotive
polish was rubbed over the sanded areas. Clearer still! The final
step was the use of a tri-grit emery board. An application of Future and
voila! a nice, clear, three-piece canopy from a one-piece beginning.
I decided to
thin the edges of the canopy. Starting with 240 grit wet-or-dry sandpaper,
the INTERIOR edges of the canopy parts were carefully sanded to more scale
thickness. Any more fainters? As you might imagine, this made the
canopy very scratchy and opaque. Not to worry! The 240 grit was
followed, in this order, by 320 grit, 400 grit, and 600 grit sandpaper. By
this time the canopy had cleared considerably. Next Blue Magic automotive
polish was rubbed over the sanded areas. Clearer still! The final
step was the use of a tri-grit emery board. An application of Future and
voila! a nice, clear, three-piece canopy from a one-piece beginning.
Before the canopy was glued onto the fuselage permanently, the tubular gunsight
was drilled out and a drop of Superscale Krystal Kleer added to represent the
glass. At the same time a drop of Krystal Kleer was put in the gun camera
opening to represent the camera lens. The gunsight was added to the
fuselage and the canopy glued in place. Finally the propeller was glued in
place.
|
CONCLUSIONS |
This is an excellent kit of an important aircraft. It is relatively easy
to build. Since I built this kit in 1994, at least one resin
interior detail set (True Details?) and some decals for Ki. 27 aces have been
released. As far as I know, it is still the only Ki. 27 in this scale.
This kit is still in Hasegawa's catalogue and should not be that hard to find.
A decent start to my JAAF fighters collection. Recommended.
December 2000
|
REFERENCES |
Green, William and Gordon Swanborough, Japanese Army Fighters, Part 2.
Arco Publishing Company. 1978. 68pp. softcover
Sakaida, Henry, Japanese Army Air Force Aces 1937-45. Osprey Publishing.
1997. 96pp. softcover
Copyright ModelingMadness.com. All rights reserved. No reproduction in part or in whole without express permission from the editor.
If you would like your product reviewed fairly and fairly quickly, pleasecontact the editor or see other details in the Note to Contributors.