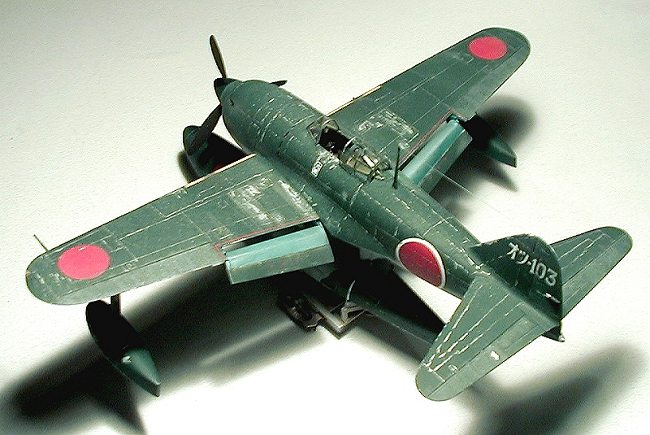
Tamiya 1/48 Kawanishi N1K1 'Rex'
|
KIT # |
61036 |
|
PRICE: |
$26.00 |
|
DECALS: |
Three aircraft |
|
REVIEW : |
Michael Wolf |
|
NOTES: |
Lowered Fowler "maneuvering" flaps |
|
HISTORY |
In 1940, anticipating a coming war in which Japan would be involved in far-ranging offensive operations, the Japanese Navy issued a requirement for a floatplane fighter which could be used for offensive operations in forward areas where no airfields existed. In response to this requirement, Nakajima offered a design based on a modified Mitsubishi A6M2 Reisen ("Zero") carrier-based fighter. This eventually emerged as the A6M2-N and was given the Allied code name "Rufe" when it entered service. However, this aircraft was considered as only an interim solution, and Kawanishi was instructed to begin work on a more advanced aircraft specially designed for the purpose.
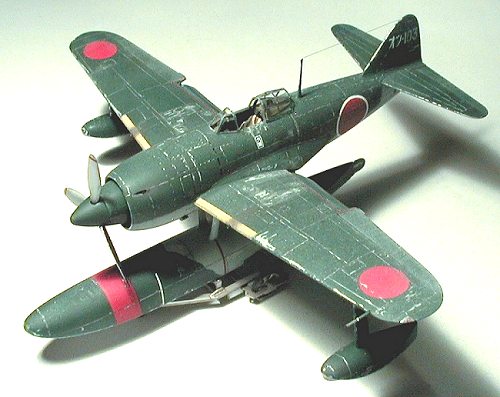
A team of engineers at the Kawanishi plant came up with a design for a compact aircraft with mid mounted wings of laminar flow section. A single large float was to be installed underneath the fuselage with auxiliary floats being carried underneath each outer wing. The central float was to be attached to the fuselage by a forward V-strut and an I-strut at the rear. The initial design had the auxiliary floats being retractable and with metal planing bottoms and inflatable rubberized fabric tops. However, these retractable floats were deemed to be too heavy and complex and were replaced by fixed cantilever floats prior to the first flight of the prototype. The aircraft was to be powered by a 1460 hp Mitsubishi MK4D Kasei 14 air-cooled radial driving a pair of counter-rotating two-bladed propellers. The counter-rotating propellers were intended to offset the high propeller torque on takeoff expected from such a powerful engine mounted in a relatively small airframe.
 The first N1K1 prototype
took off on its first flight on May 6, 1942. The counter-rotating propellers of
the prototype were later dropped as being too complex, and the design was
modified to accept a 1460 hp MK4C Kasei 13 (Ha.32/13) radial engine driving a
single conventional three-bladed propeller via an extension shaft. The single
propeller installation was simpler and less mechanically troublesome, but it did
produce (as expected) an extremely powerful torque on takeoff that required
considerable skill on the part of the pilot to counter.
The first N1K1 prototype
took off on its first flight on May 6, 1942. The counter-rotating propellers of
the prototype were later dropped as being too complex, and the design was
modified to accept a 1460 hp MK4C Kasei 13 (Ha.32/13) radial engine driving a
single conventional three-bladed propeller via an extension shaft. The single
propeller installation was simpler and less mechanically troublesome, but it did
produce (as expected) an extremely powerful torque on takeoff that required
considerable skill on the part of the pilot to counter.
Once in the air, the N1K1 was found to be an extremely pleasant aircraft to fly and it had remarkable maneuverability by virtue of its combat (Fowler) flaps. The Japanese Navy accepted the design under the designation N1K1 Navy Fighter Seaplane Kyofu (Mighty Wind) Model 11, and production began.
Service trials aircraft were delivered to the Japanese Navy starting in August of 1942. 1460 hp MK4C Kasei 13 engines early production aircraft. 1530 hp MK4E Kasei 15 engines, differing only in minor details, powered later production aircraft.
The Kyofu entered service with the Japanese Navy in July of 1943 and was assigned the Allied code name "Rex". Production was slow in gaining tempo and by December of 1943 had reached only 15 per month.
However, by the time that the Kyofu entered service, Japan had been thrown back onto the defensive, and the Kyofu was never to serve in the offensive fighter role for which it had been designed. Instead, the N1K1 was assigned as an interceptor based at Balikpapan in Borneo, a role for which it had never been intended. Even though the Kyofu was a rugged and efficient floatplane, it was no match for the single-seat Allied fighters which opposed it. Consequently, production of the Kyofu was terminated in March of 1944 after the delivery of only 89 production aircraft. Also abandoned at the same time was the N1K2-I Kyofu-Kai project, to have been powered by the improved 1900 hp Mitsubishi MK4R Kasei 23 engine.
Later in the war, one Kyofu unit was assigned as an interceptor with the Otsu Kokutai operating from the inland Lake Biwa on the Japanese home island of Honshu.
The National Museum of Naval Aviation of Pensacola, Florida currently owns an N1K1. It had been brought to the United States after the war and had sat out in the open for many years at NAS Willow Grove, Pennsylvania before being moved to more secure quarters at Pensacola. Another N1K1 is in storage at the NASM Garber Restoration and Storage Facility at Silver Hill, Maryland. It awaits restoration and display.
|
THE KIT |
The kit consists of 33 gray, 4 clear, 10 black styrene parts; 2 poly caps
(for the extended propeller) and 1 weight that is inserted into the central
float to prevent the model from being a tail-sitter. The styrene came bagged
with two sprues per bag, back to back to prevent undue scratching. The clear
parts and weight were bagged separately. The plastic has fine
 recessed scribing and delicately molded panel
attachment "dzus" fasteners. Control surfaces are more deeply scribed, as would
be expected, with the fabric treatment quite acceptable. The original molding
was produced in 1994, if memory serves.
recessed scribing and delicately molded panel
attachment "dzus" fasteners. Control surfaces are more deeply scribed, as would
be expected, with the fabric treatment quite acceptable. The original molding
was produced in 1994, if memory serves.
The clear parts are exceptionally thin and optically clear. All canopy parts have only slightly noticeable raised framing lines; those on the sliding portion of the canopy are quite narrow in dimension. All of the black styrene, except the optional boarding ladder, makes up the landing trolley. As far as I could tell, this trolley would have been steel; therefore, rusted.
The sole options, outside of the three marking possibilities, is for two distinct types of exhaust stacks: the "early" stacks curve aft; whereas the "later" style of stacks merely stick out of the engine cowl a short distance.
With the small number of pieces in the kit, as expected, it was a quick build … or would have been had the builder not decided to do something out of the ordinary.
|
CONSTRUCTION |
What I decided to do was to drop the Fowler flaps. I have the Hasegawa N1K2 "George" waiting its turn and that kit includes the rails for the flap mechanism. Using those parts as a pattern, I duplicated the rails with card stock and "C" channel. The flaps were carefully cut away from the upper and lower wing sections and set aside.
 Kit construction, per se,
began with the cockpit, although the instructions would have you assemble the
engine (basically only the forward cylinders with push rod tubes) and install it
into the fuselage. I built up the cockpit first primarily because I knew that it
would take longer than detailing what little of the engine was presented. I
mixed up the cockpit color according to the directions, although, to be honest,
I was not exactly sure what "olive green" was, so I used olive drab instead. The
end result was only a little darker than pictures that I’ve found on the N1K1
interior. I airbrushed all of the components that would be that yellow-green
color; all cockpit parts, the DF loop and inside of both cockpit halves. The
structural details inside the fuselage halves were treated with a thin wash of
Grimy Black and dry brushed RLM81 and silver to provide contrast and to simulate
wear. Side consoles had the faces painted Interior Black with red and yellow
details (knobs, switches and the like). The ammunition cans for the 7.2 mm guns
were done in Olive Drab. Not that it matters; you can’t see squat inside the
cockpit after the fuselage halves are joined. The instrument panel is a decal
"lifted" from the Hasegawa N1K2 kit … and I didn’t find out until after it was
applied that I should have borrowed the other set. The instrument panels differ
somewhat between the N1K1 and the N1K2 … but the decal still looks better than
my dry brushing attempts would have.
Kit construction, per se,
began with the cockpit, although the instructions would have you assemble the
engine (basically only the forward cylinders with push rod tubes) and install it
into the fuselage. I built up the cockpit first primarily because I knew that it
would take longer than detailing what little of the engine was presented. I
mixed up the cockpit color according to the directions, although, to be honest,
I was not exactly sure what "olive green" was, so I used olive drab instead. The
end result was only a little darker than pictures that I’ve found on the N1K1
interior. I airbrushed all of the components that would be that yellow-green
color; all cockpit parts, the DF loop and inside of both cockpit halves. The
structural details inside the fuselage halves were treated with a thin wash of
Grimy Black and dry brushed RLM81 and silver to provide contrast and to simulate
wear. Side consoles had the faces painted Interior Black with red and yellow
details (knobs, switches and the like). The ammunition cans for the 7.2 mm guns
were done in Olive Drab. Not that it matters; you can’t see squat inside the
cockpit after the fuselage halves are joined. The instrument panel is a decal
"lifted" from the Hasegawa N1K2 kit … and I didn’t find out until after it was
applied that I should have borrowed the other set. The instrument panels differ
somewhat between the N1K1 and the N1K2 … but the decal still looks better than
my dry brushing attempts would have.
While the cockpit was drying, I detailed the engine and cemented it into the starboard fuselage half. I left off the propeller shaft extension until after painting. The fuselage halves mated with no problems; the glue "squeeze-out" was easily trimmed and sanded down. No filler was required at all. The cockpit assembly fits well from underneath and almost snaps into place. I left off the exhaust stacks until after painting.
While everything was drying, I went ahead and joined the wing halves and
outrigger floats. A very nice touch of this kit is the weight added to the
central float. I trapped the weight where instructed, but should have applied
some white glue to keep it from rattling around. It may not move much, but
enough to make some noise. After the fuselage halves had been cleaned up, I
added the wings. I had to use tape across the top of the fuselage to each
wingtip in order to hold the wing roots closed. The dihedral looked correct, so
I guess it was the right thing to do. I flooded the roots with liquid cement to
make darned sure 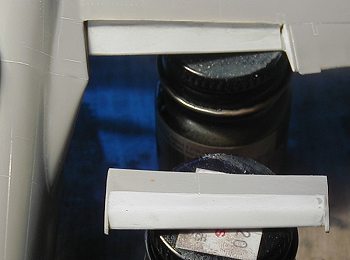 that the joint
held. A spot of gap filling super glue and accelerator was added to the "vent"
(for lack of better word) between the "V" struts; there was a slight
"indentation" where the wing center section and the engine cowl did not quite
line up properly. The rear of the center wing section did not fall on a panel
line, so any filling and sanding required re-scribing of lost detail.
that the joint
held. A spot of gap filling super glue and accelerator was added to the "vent"
(for lack of better word) between the "V" struts; there was a slight
"indentation" where the wing center section and the engine cowl did not quite
line up properly. The rear of the center wing section did not fall on a panel
line, so any filling and sanding required re-scribing of lost detail.
The Fowler flaps were simulated by laying a piece of plastic rod at a position approximating the 30% chord line and laying thin card stock over it, bending to meet the leading edge. All joins were filled with Mr. Surfacer 500 and sanded smooth. The ends were filled with card stock and sanded to shape.
I laid the rear canopy section on the fuselage and traced around it so that I
could paint that area the interior color. After I attached the DF loop, I
attached the forward and rear canopy sections with liquid cement, applied
very carefully so as to not mess up the clear parts. When dry, the area was
carefully and 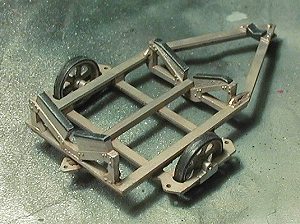 lightly sanded to
smooth out the finish. A paper mask was formed that covered the cockpit and both
canopy sections’ interiors. The canopies themselves were masked with Parafilm.
lightly sanded to
smooth out the finish. A paper mask was formed that covered the cockpit and both
canopy sections’ interiors. The canopies themselves were masked with Parafilm.
The trolley cart consists of 11 parts. I decided to drill out the axels and replace them with brass tubing. On test fitting the parts together, it looked like the join between the axel and the frame could turn out to be a weak link. I drilled out the wheels to accept a brass bushing, cut off the axel and drilled out the "retainer" part. Placing that part on the frame, I drilled through the retainer, through the wheel, into the frame itself. After painting, the brass axles were a press fit.
In only a couple evening sessions, the kit was ready for the paint shop … meaning that I covered everything up.
|
CAMOUFLAGE & MARKINGS |
Aircraft in the Pacific, regardless of nationality, tended to be extremely
well worn … or worn out, depending on your perspective. Between the coral sand,
wind, glaring sun, salt air and the general wear and tear of combat, airframes
just showed a lot of weathering. One of the best approaches to simulating this
effect is to undercoat the camouflage with a metalizer paint, buff it to an
acceptable shine, gloss coat that and then shoot your camo scheme. I actually
prefer 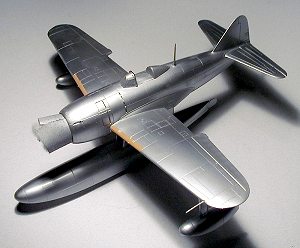 ModelMaster buffable
metalizer finishes. Because this was not going to be that most feared of paint
schemes, the natural metal finish, I did not have to be so ultra careful in
finish and handling. The seams were all finished correctly, but just not to the
degree that I would have had to go with a NMF. Therefore, after cleaning the
airframe with a toothbrush and diluted dishwashing soap (and air-drying, of
course) I shot the model overall with several good coats of buffable aluminum
plate. When dry, I used toilet paper ( !! ) to buff the finish to an acceptable
luster. Not highly polished, but not dull and drab either. Allowing that coat to
set up overnight, I shot Future over the entire model and let that cure for
several hours.
ModelMaster buffable
metalizer finishes. Because this was not going to be that most feared of paint
schemes, the natural metal finish, I did not have to be so ultra careful in
finish and handling. The seams were all finished correctly, but just not to the
degree that I would have had to go with a NMF. Therefore, after cleaning the
airframe with a toothbrush and diluted dishwashing soap (and air-drying, of
course) I shot the model overall with several good coats of buffable aluminum
plate. When dry, I used toilet paper ( !! ) to buff the finish to an acceptable
luster. Not highly polished, but not dull and drab either. Allowing that coat to
set up overnight, I shot Future over the entire model and let that cure for
several hours.
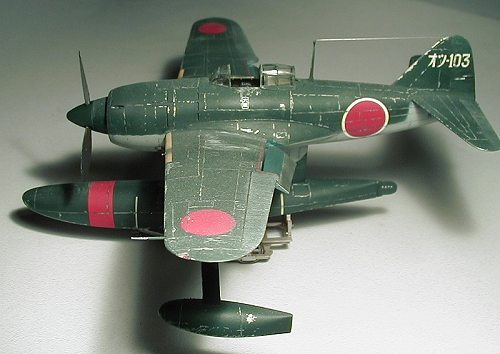
The kit decals include the leading edges but, in my opinion, they were way too orange. No color photograph of Japanese aircraft that I have ever seen shows leading edges that orange. So I decided to use RAF Trainer Yellow instead. I masked off where the yellow was to go using low tack tape and shot the color. I removed the mask immediately and let the paint cure for several hours. I then applied Parafilm-M over the yellow, above and below, and shot the IJN gray. I did not realize until well after I finished cleaning up my airbrush that the IJN Gray is gloss, not flat, as I prefer. Oh well … so I have to let the model sit overnight again … And here in Michigan, this time of year, gloss paints just don’t want to cure right away. The next morning, the paint was still slightly tacky.
Hours later (after a full day’s work) I used a variety of masking materials to mask off the gray in preparation for the IJN Green. Materials such as electrical tape (because it follows compound curves), low-tack paper tape and Parafilm were all used. Masking off the floats and fuselage took me the better part of two hours. Most of that time was spent trying to get a piece of thread to stay 1/16th inch away from the wavy edge of electrical tape. This was done to get a soft-feathered edge on the demarcation line … tedious at best.
 The IJN Green was shot early
in the evening; a thin strip of clear decal was painted first with the interior
color, then the green (for the sliding portion of the canopy). After two hours I
wanted to remove the masking. It was then that I realized that the IJN Green was
also gloss. And in removing some of the masking off of the "I" beam for the
central float, I inadvertently introduced textures to the wing roots that held a
remarkable similarity to my fingerprints. OK, so I wait another day. In the
meantime, various vocalizations that would have made a US Navy Chief Perry
Officer proud …
The IJN Green was shot early
in the evening; a thin strip of clear decal was painted first with the interior
color, then the green (for the sliding portion of the canopy). After two hours I
wanted to remove the masking. It was then that I realized that the IJN Green was
also gloss. And in removing some of the masking off of the "I" beam for the
central float, I inadvertently introduced textures to the wing roots that held a
remarkable similarity to my fingerprints. OK, so I wait another day. In the
meantime, various vocalizations that would have made a US Navy Chief Perry
Officer proud …
I am thankful for many advances in the hobby over the years: sanding sticks is one of them. A fine grade stick was used to smooth out my … uh … gaffs before another quick application of IJN Green. Touching up the green also afforded me the opportunity to correct minor over-spray and to tighten up the demarcation lines aft of the wing roots on both sides. After another 24-hour delay to let the paint cure, I was ready for the weathering process.
Because I knew that I’d have to apply weathering to the markings as well as the camo job, I went ahead and added the decals at this time. I chose the "Ohtsu" Kokutai No. 103 on a whim. After letting the decals set for an hour or so, I applied MicroSol to help them snuggle into the panel lines. The residue was removed with water after letting the decals set for several hours.
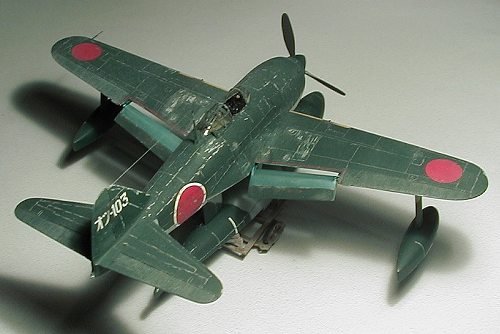
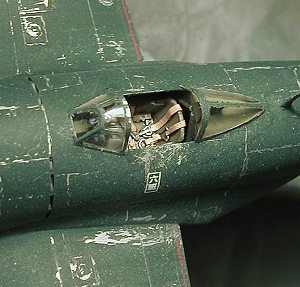 Using the back edge of a
Xacto #11 blade, I followed all of the panel lines, allowing the paint to
randomly chip. The leading edges of the wings and tail feathers were scuffed up
with a course sanding stick which pulled larger chunks of color off, leaving the
natural metal finish exposed. This approach was taken for both the upper and
lower surfaces. The front of the three floats were scuffed in a manner similar
to the leading edges. The "dzus" fasteners were also carefully picked out.
Using the back edge of a
Xacto #11 blade, I followed all of the panel lines, allowing the paint to
randomly chip. The leading edges of the wings and tail feathers were scuffed up
with a course sanding stick which pulled larger chunks of color off, leaving the
natural metal finish exposed. This approach was taken for both the upper and
lower surfaces. The front of the three floats were scuffed in a manner similar
to the leading edges. The "dzus" fasteners were also carefully picked out.
A thin wash was applied to all panel lines. Heavier applications were used around the cowl flaps, vents and control surfaces. The residue of the wash was removed with a Q-Tip and 90% rubbing alcohol, moving in the direction of the airflow. After all panel lines were so delineated, a couple dustcoats of DullCoat was applied … and let cure overnight. In order to accomplish the weather-beaten look on the finish, I thinned some PollyS "Dust" and shot it from directly overhead, adding enough coats to have a definite affect on the finish. The decal strips for the canopy were thus treated as well.
The fabric control surfaces were treated by lightly sanding with a fine grade stick. I found that this lightened the finish just enough to give the effect that I was after without having to mix up special paints.
All of the gun barrels were drilled out, replaced with brass tubing that was super glued in place and painted gunmetal. One-pound monofilament was used for the radio aerial, snapped taunt via cigarette smoke and painted chrome silver. Cordite and exhaust stains were added with Grimy Black, with the exhausts receiving Reefer Gray in the center of the black "soot" stains. The exhaust ports were then installed.
Final construction consisted of adding the Fowler flap rails and flaps. The rails were super glued in place and the flaps super glued to them. The positioning is only approximate; I realize fully that the gap between the flaps and the lower edge of the wing is a little excessive. But allow me to say this … I will NEVER lower Fowler flaps again! Not unless the parts are already supplied, that is …
|
CONCLUSIONS |
This was a most enjoyable kit to build. Had someone, and I won’t mention my name, not decided on the additional surgery, and had flat paints been used instead of gloss, this model could easily fall into that "weekend" category. I found the engineering to be quite acceptable with the fit and finish easily near the top of my list of excellent kits. This aircraft strikes me as being "a Bearcat on floats" because of the stocky, no nonsense fuselage. I definitely like the looks of this aircraft. And I can highly recommend this kit to any builder; the novice should experience little difficulty turning out an acceptable model; the more experienced should find the end result an interesting addition to any collection.
|
REFERENCES |
If you would like your product reviewed fairly and quickly, please contact me or see other details in the Note to Contributors.