Amodel 1/72 Bf-109X
| KIT #: | 72191 |
| PRICE: | $ |
| DECALS: | One option |
| REVIEWER: | Brian Baker |
| NOTES: | Short run kit |
| HISTORY |
The
Messerschmitt Bf-109 series was produced in greater numbers than any other
fighter, and it is not surprising that some pretty bizarre efforts were made to
improve it during the course of its career.
Aside from the jet-powered Bf-109TL prototype, where a primitive ME-262
conversion was attempted, just about all Bf-109’s were powered by liquid cooled
Daimler Benz or Junkers engines.
One odd project was to test the feasibility of installing the excellent BMW 801
radial, as used in the Focke Wulf FW-190A. For a long time, historians doubted
that this airplane actually existed,
and Thomas Hitchcock, in his “0-Nine Gallery”, presents what appears to
be an accurate three view drawing of the type, which was obviously used in the
production of this kit,
 but his
description states that this is what it might have looked like. However,
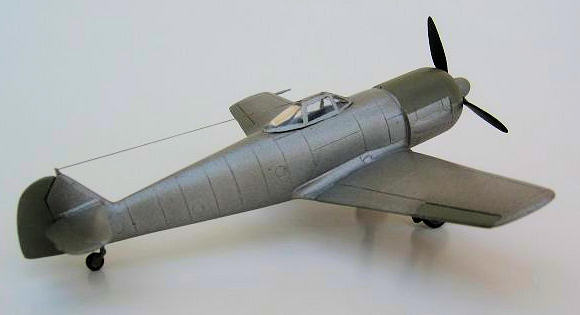
there is a photo that has
been published in various places, showing a rear ¾ view of the airplane, which
illustrates the basic configuration.
Internet articles give a German civil registration, D-ITXP, but the
photo does not show this.
but his
description states that this is what it might have looked like. However,
there is a photo that has
been published in various places, showing a rear ¾ view of the airplane, which
illustrates the basic configuration.
Internet articles give a German civil registration, D-ITXP, but the
photo does not show this.
According to Scott Van Aken’s “in-the-box” review published some time back on this site, flight tests revealed some problems with the engine’s oil-circulation system, leading to the abandoning of the project. It would seem that an engine change could have solved this, leading me to believe some other accounts that state that the plane handled poorly. Certainly, the widening of the land gear track would have helped, and the clear vision “bubble” canopy would have improved visibility immensely, but the basic design would have made armament installation difficult, and the plane certainly would have been a step backwards, especially since the FW-190A was about to go into production at the time. However, in 1940, when this airplane was first flown, the FW-190A was by no means a proven design, so Messerschmitt was probably correct in testing this concept. Anyway, it makes for an interesting model, and I had to have one for my collection.
| THE KIT |
The kit
consists of 30 plastic parts molded in soft light grey styrene, and one clear
canopy. A very complete cockpit interior is provided in box form, with sidewall
details, seat, stick, instrument panel, and rudder pedals.
This all compacts into a small box which fits inside of the fuselage.
The wings are in three pieces, a center section and two upper wing
panels. This assures the correct
dihedral angle. A separate rudder is included, along with one-piece elevators.
The landing gear struts are nicely done,
 and these
fit securely into the wheel wells giving a solid attachment. The landing gear
covers are well detailed. The
tailwheel is designed to be installed before the fuselage halves go together,
but I trimmed the knobs and fitted it afterwards.
The engine cowling simulates the cooling fans similar to those of the old
Revell FW-190 kit, and therefore no engine is provided.
A masochist modeler would cut out the cowling face and include a fan and
engine. The canopy is well
detailed, but fairly thick. Strangely, there is no indication of where the
exhausts would have been, although from the photo, which doesn’t show them, one
could assume that they were located at the rear bottom section of the cowling.
and these
fit securely into the wheel wells giving a solid attachment. The landing gear
covers are well detailed. The
tailwheel is designed to be installed before the fuselage halves go together,
but I trimmed the knobs and fitted it afterwards.
The engine cowling simulates the cooling fans similar to those of the old
Revell FW-190 kit, and therefore no engine is provided.
A masochist modeler would cut out the cowling face and include a fan and
engine. The canopy is well
detailed, but fairly thick. Strangely, there is no indication of where the
exhausts would have been, although from the photo, which doesn’t show them, one
could assume that they were located at the rear bottom section of the cowling.
The instructions are printed on one 8 ½ x 11 sheet of paper, folded into 4 pages. The cover page shows a picture of the airplane, and includes a short statement in English and Russian that the plane was cancelled due to poor performance. Page 2 gives a color chart and a sprue diagram. Pages 3 and 4 give three exploded assembly drawings, conveniently listing the parts that are to be used in each step. The last drawing on page 4 is a painting diagram, showing the airplane with the markings applied.
| CONSTRUCTION |
 Assembly
was as expected from a “short run” kit from A-Model.
Some flash elimination was required, but nothing excessive.
The detailed interior didn’t fit together well,
and considerable trimming was needed to get it to fit inside the fuselage
after the halves were joined. The
interior fits onto a small raised panel on the top of the wing center section,
and getting everything aligned properly too some ingenuity, especially the
instrument panel, which has to be mounted to the fuselage in exactly the right
place. There is a small unidentified
block that is supposed to fit behind the pilot’s seat, but it was too large, and
I don’t know what it was supposed to be anyway.
I trimmed it and fit it behind the seat.
The detail molding, however, is good, and some intricate painting is
required, although this will not be too visible through the thick canopy. The
canopy could be cut and installed in the open position, but it fits fairly well
as is. Here is where a vacuform canopy
would have been a good idea. The fuselage needs some filer once joined, and
after the wings are installed, the dihedral angle needs to be set, and the lines
filled in. The elevators need some
trimming on the attachment ends before they will fit onto the fuselage, as does
the rudder. Just ahead of the
rudder is a small antenna attachment post.
I trimmed this off and made one from scrap. The prop is molded in one
piece, and fits inside the spinner after the holes are enlarged somewhat.
An FW-190 prop from another kit might look better, but this one was
satisfactory and I used it.
Assembly
was as expected from a “short run” kit from A-Model.
Some flash elimination was required, but nothing excessive.
The detailed interior didn’t fit together well,
and considerable trimming was needed to get it to fit inside the fuselage
after the halves were joined. The
interior fits onto a small raised panel on the top of the wing center section,
and getting everything aligned properly too some ingenuity, especially the
instrument panel, which has to be mounted to the fuselage in exactly the right
place. There is a small unidentified
block that is supposed to fit behind the pilot’s seat, but it was too large, and
I don’t know what it was supposed to be anyway.
I trimmed it and fit it behind the seat.
The detail molding, however, is good, and some intricate painting is
required, although this will not be too visible through the thick canopy. The
canopy could be cut and installed in the open position, but it fits fairly well
as is. Here is where a vacuform canopy
would have been a good idea. The fuselage needs some filer once joined, and
after the wings are installed, the dihedral angle needs to be set, and the lines
filled in. The elevators need some
trimming on the attachment ends before they will fit onto the fuselage, as does
the rudder. Just ahead of the
rudder is a small antenna attachment post.
I trimmed this off and made one from scrap. The prop is molded in one
piece, and fits inside the spinner after the holes are enlarged somewhat.
An FW-190 prop from another kit might look better, but this one was
satisfactory and I used it.
| COLORS & MARKINGS |
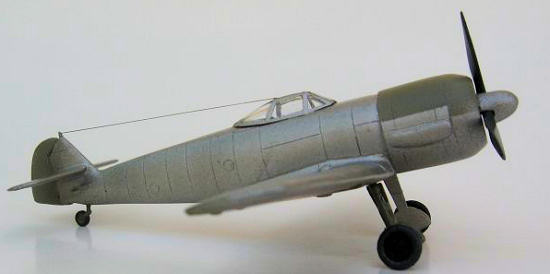 The
airplane in the photo appears to be overall aluminum, with darker colors for the
control surfaces. The instructions say to paint the interior
The
airplane in the photo appears to be overall aluminum, with darker colors for the
control surfaces. The instructions say to paint the interior
| CONCLUSIONS |
If you would like your product reviewed fairly and fairly quickly, please contact the editor or see other details in the Note to Contributors.
Back to the Review Index Page 2020