
Hobby Boss 1/72 Bf-109G-2
| KIT #: | 80223 |
| PRICE: | $9.00 MSRP |
| DECALS: | Two options |
| REVIEWER: | Brian Baker |
| NOTES: |
| HISTORY |
The Messerschmitt 109 needs no introduction, as it is probably the most modeled aircraft in history, especially on the German side. I would suspect that close to 100 kits of the ‘109” have been issued in 1/72 scale alone over the past 50 years, and improving technology and state of the art have rendered most of them obsolete as newer kits become available. Therefore, it is understandable if you ask “Why another kit of the ‘109’?”
| THE KIT |
Hobby Boss has introduced a series of 1/72 scale kits of popular World War II fighters that at the moment numbers at least 31. This company, from the PRC, has apparently marketed them through Squadron, who has them on sale from time to time. I have bought five of these kits so far, and have built three, mainly to see how they compare with the established brands.
This kit, purporting to represent an
early Bf-109G-2, consists of approximately 35 parts, light grey and clear, and
is designed primarily as an “easy assembly” kit, or a starter kit for beginners.
The idea seems to be to create a model that an inexperienced modeler can put
together, even without glue, and come out with a reasonable representation of
the aircraft in question without the usual frustrations and costs associated
with building some of the superdetailed kits currently coming from the major
manufacturers. This model can be built as a “snap together” kit, although I
opted for normal construction techniques. To some
 extent, this approach to is
intended to expand plastic modeling as a whole, and it certainly serves a useful
purpose in attracting younger and newer modelers, as long as the kits don’t
contain lead or other toxins.
extent, this approach to is
intended to expand plastic modeling as a whole, and it certainly serves a useful
purpose in attracting younger and newer modelers, as long as the kits don’t
contain lead or other toxins.
The instructions consist of one standard sheet of glossy paper folded in half, giving a four page color brochure. The cover page shows a photo of a rather poorly painted fully assembled model, some construction symbols, and instructions in the application of decals in English and Chinese. The inside centerfold contains an excellent sprue diagram and five exploded views showing the stages of assembly of the model. The only option shown is an open or closed canopy. The back page shows the two color and marking diagrams for the decal sheet provided. RML and Gunze color references are given, although I don’t think their rendition of RML 65 blue is very close to the actual shade. Most decal locations are shown, although there is no reference to the colors of the cockpit interior, prop, landing gear, wheels, or other details. This material is readily available elsewhere, however, but it might be a problem with a beginner.
Decals are supplied for two aircraft, both presumably Bf-109G-2’s. One is a standard 74/75/76 colored Bf-109G of VI/JG-52 operated in Russia in 1942. The other is a 78/79/80 colored Bf-109G of III/JG53 in Tunisia during 1943. This is the most colorful of the two, but the JG-52 aircraft is also colorful with its yellow theater markings. Although the unit markings are provided, the white and yellow bands and other markings are not, which again would normally be painted by an experienced modeler. There is no supporting documentation for either of these aircraft, and I don’t recall seeing photos or drawings of them in any source that I have.
 The kit follows Hobby Boss’s
usual format, a one piece fuselage assembly and a one piece wing that snaps into
place forming the major portion of the model. These are well molded, with
virtually no flash, although a couple of areas required very light trimming. The
rest of the parts snap into place, although I had to trim the tabs off of the
tailplanes to get them to fit. The exhaust stacks are cast in one piece, the
intention being to install them before the main fuselage and wing units are
joined. This will make the exhausts extremely difficult to paint, so I cut them
in two and assembled them after major painting was done. This takes some careful
work, as the stacks could fall inside the engine cowling, lost forever unless
you want to take the fuselage and wing assembly apart. I put in a small piece of
plastic inside of the cowling to keep that from happening.
The kit follows Hobby Boss’s
usual format, a one piece fuselage assembly and a one piece wing that snaps into
place forming the major portion of the model. These are well molded, with
virtually no flash, although a couple of areas required very light trimming. The
rest of the parts snap into place, although I had to trim the tabs off of the
tailplanes to get them to fit. The exhaust stacks are cast in one piece, the
intention being to install them before the main fuselage and wing units are
joined. This will make the exhausts extremely difficult to paint, so I cut them
in two and assembled them after major painting was done. This takes some careful
work, as the stacks could fall inside the engine cowling, lost forever unless
you want to take the fuselage and wing assembly apart. I put in a small piece of
plastic inside of the cowling to keep that from happening.
The cockpit is typical, consisting mainly of a tub with a seat, a stick, and that’s it. The forward section is a flat wall to which an instrument panel can be attached, but the plus side is that once the cockpit canopy is in place, not much can be seen anyway. The kit provides two canopies, open and closed, so if you want to detail the cockpit, you can leave the canopy open for all to see. On my example, I added tape seat belts, an instrument panel, a gunsight, and some armored glass behind the pilot’s head.
| CONSTRUCTION |
Basic assembly of the rest of the parts is pretty normal. The tailwheel is cast with the fuselage section, even though two extra tailwheels are included, but the landing gear, covers, and wheels have to be assembled separately. The prop and spinner unit consists of four pieces, and should obviously be painted before assembly.
Now come the problems. The kit is
described as a Bf-109G-2, but contains a number of features more often
associated with the Bf-109G-6. As anyone who has made even a basic study of the
Bf-109 will tell you, each production variant had slightly different features,
and the G-2 had the tall radio mast and a retractable tailwheel, while the G-6
usually retained the tall mast but had a fixed tailwheel. The kit provides
several tailwheels, obviously for later model kits that will appear soon, but
the G-2 really should have the cutout behind the tailwheel for retraction. In
addition, the kit features the R3 modification, a belly rack for a fuel tank, a
DF loop 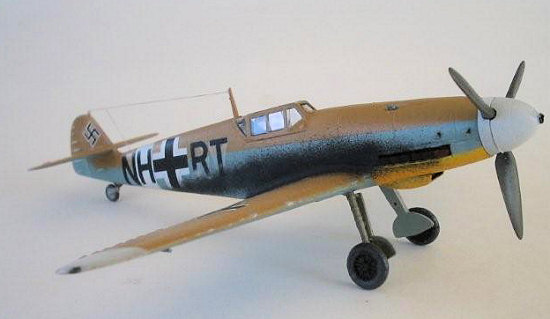 antenna, and the R6
fairings for the MG151/20 cannon carried by later Messerschmitts. Actually,
relatively few Bf-109G-2’s had this, although the Rustsatze (field conversion
kits) were supplied for this variant. These were intended for bomber
interception duties to increase the meager firepower of the aircraft, but they
did degrade the performance considerably. The reason I mention these issues
is that the kit contains large slots for the installation of these parts, and if
you’re going to leave them off, the holes will need to be filled in. This is
not a big job, but it does need to be done if you’re going to model most of the
G-2 series. The loop antenna needs to be discarded in any case, as it is too
small for any variant.
antenna, and the R6
fairings for the MG151/20 cannon carried by later Messerschmitts. Actually,
relatively few Bf-109G-2’s had this, although the Rustsatze (field conversion
kits) were supplied for this variant. These were intended for bomber
interception duties to increase the meager firepower of the aircraft, but they
did degrade the performance considerably. The reason I mention these issues
is that the kit contains large slots for the installation of these parts, and if
you’re going to leave them off, the holes will need to be filled in. This is
not a big job, but it does need to be done if you’re going to model most of the
G-2 series. The loop antenna needs to be discarded in any case, as it is too
small for any variant.
To finish up, the kit needs aileron balances, which can be easily made up from plastic rod. Trim tabs can also be added, as these too were left off. In addition, the wingtip lights are overdone, and should be sanded smooth. I replaced with antenna mast with a longer one, but that was about it. This is a quick build kit, but does require some attention to detail. I used the usual Tenax and got good results. There was almost no filler required, and very little trimming. The parts all fitted very nicely, and everything lined up perfectly. The kit is pretty well engineered for what it is supposed to be.
| COLORS AND MARKINGS |
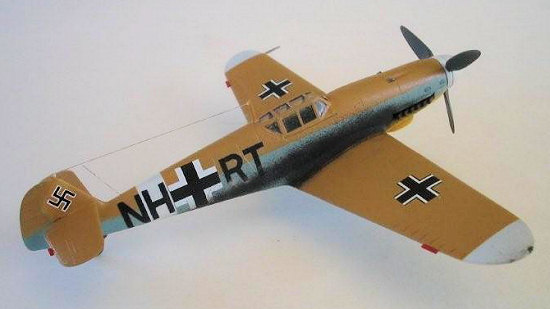
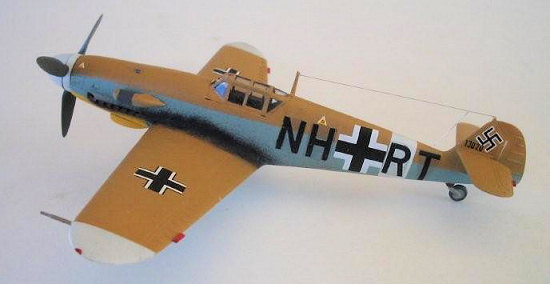
Never being satisfied with what the kit offers, I decided to do a rather obscure Bf-109G-4, normally a reconnaissance fighter, but this aircraft did not have the camera pod on the underside of the fuselage, so it was a standard fighter. Two photos of this aircraft appear in Hitchcock’s “0-Nine Gallery”, a book anyone interested in the Luftwaffe should have. The nice thing is that the photos were taken at the same time but from DIFFERENT SIDES, a real luxury when trying to build a model of a specific aircraft. This plane was a factory test Bf-109G-4, w/n 13 020, coded NH+RT, and the photos could have been taken at the factory. An on-line rendition of this aircraft shows no underwing codes, but since the undersides of the wings do not show in the photos, and many Luftwaffe aircraft operated with the factory codes under the wings while they were removed from the fuselage sides and replaced with unit markings, I opted for the codes on the wings. I used just a couple of the kit decals, relying on my collection of decals and my computer for the markings.
| CONCLUSIONS |
For the young and inexperienced modeler, these kits appear to be a way of getting them into the hobby. Although there some issues for the serious modeler, the kit stacks up pretty well with the biggies, and is much better than the older kits such as Airfix, Frog, etc. I’m getting some of these for my grandkids for Christmas. Recommended subject to the above recommendations.
November 2007
Copyright ModelingMadness.com
If you would like your product reviewed fairly and fairly quickly, please contact the editor or see other details in the Note to Contributors.