| KIT #: | 8263 |
| PRICE: | $39.95 MSRP |
| DECALS: | Three options |
| REVIEWER: | Scott Lyle |
| NOTES: | Weekend Edition |
| HISTORY |
 The Bf 109
may well be the most kitted aircraft in the scale modeling world today.
Virtually every version of the ubiquitous fighter is
available in every scale.
In a plastic model version of an arms race, different
manufacturers have been steadily introducing new Bf 109 kits all the time, each
one always trying to outdo the other.
The Bf 109
may well be the most kitted aircraft in the scale modeling world today.
Virtually every version of the ubiquitous fighter is
available in every scale.
In a plastic model version of an arms race, different
manufacturers have been steadily introducing new Bf 109 kits all the time, each
one always trying to outdo the other.
They wouldn’t make the kits if they
didn’t sell, so I think it’s time we modelers admit we have a problem - and by
that I mean a Bf 109 addiction.
I’m not one to talk.
In the last few years I have built four different Bf
109s, yet in that time I have not built a single Mustang, Thunderbolt, Mosquito,
Fw 190, Corsair, or Hellcat, just to name a few.
Like I said, it’s time to admit I have a problem.
I was on my way to solving that problem when Eduard came out with a brand new 1/48 Bf 109E-4. And as the saying goes, so much for that.
| THE KIT |
A couple of years ago Eduard launched
an all new line of 1/32 Emils that have been generally well received, albeit not
without some gnashing of teeth by modelers on other websites.
Within the last year Eduard started a new line of 1/48
Emils, the first
 offering
being an E-1 that appeared in January.
They followed that up with a Royal Class release in
April that provided all of the parts needed to build two Emils in either E-1,
E-3, E-4, or E-7 guises.
This kit is thus their third 1/48 Emil release, and upon
opening the box, there is a lot to like.
There are four sprues of finely molded parts in Eduard’s
typical olive-beige plastic, one sprue of transparent parts, two frets of photo
etch (including one color set which includes precisely printed instrument
panels, seat belts, and cockpit sidewall details), a set of yellow “kabuki” tape
cockpit masks, and two sheets of decals - one for stencils and one for the
markings for five different Bf 109E-4s.
Amongst those plastic sprues are the parts to build a
nicely detailed DB601a engine and the machine gun bay above it, as well as the
separate cowling panels needed to display them open if desired.
Other options include separate leading edge extensions,
flaps, ailerons, and the rudder.
Two different windscreens are included, as well as two
different prop spinners.
The fuselage and wing surfaces are sublimely molded,
with row after row of tiny, recessed rivet heads that should look great under a
coat of paint and some weathering.
The instruction booklet provides very detailed, full
color painting instructions for each of the five aircraft that can be built out
of the box.
offering
being an E-1 that appeared in January.
They followed that up with a Royal Class release in
April that provided all of the parts needed to build two Emils in either E-1,
E-3, E-4, or E-7 guises.
This kit is thus their third 1/48 Emil release, and upon
opening the box, there is a lot to like.
There are four sprues of finely molded parts in Eduard’s
typical olive-beige plastic, one sprue of transparent parts, two frets of photo
etch (including one color set which includes precisely printed instrument
panels, seat belts, and cockpit sidewall details), a set of yellow “kabuki” tape
cockpit masks, and two sheets of decals - one for stencils and one for the
markings for five different Bf 109E-4s.
Amongst those plastic sprues are the parts to build a
nicely detailed DB601a engine and the machine gun bay above it, as well as the
separate cowling panels needed to display them open if desired.
Other options include separate leading edge extensions,
flaps, ailerons, and the rudder.
Two different windscreens are included, as well as two
different prop spinners.
The fuselage and wing surfaces are sublimely molded,
with row after row of tiny, recessed rivet heads that should look great under a
coat of paint and some weathering.
The instruction booklet provides very detailed, full
color painting instructions for each of the five aircraft that can be built out
of the box.
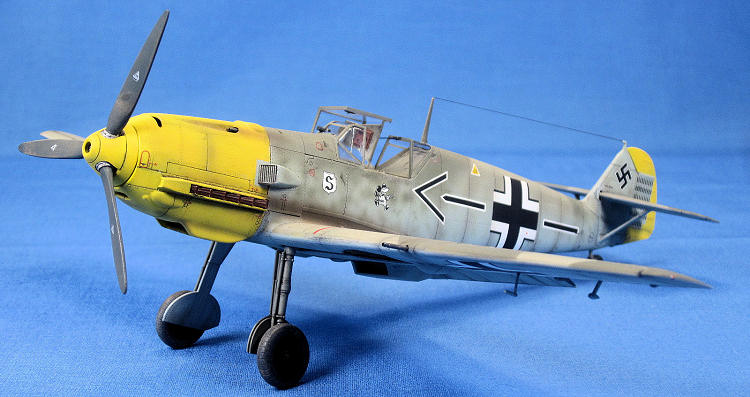
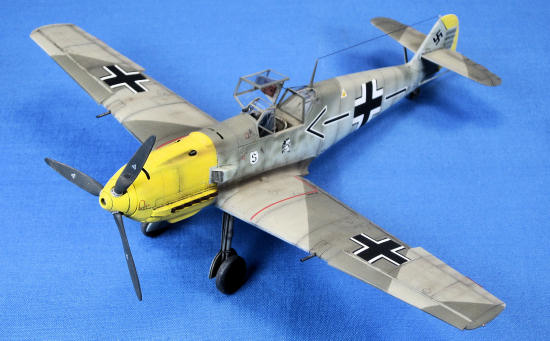
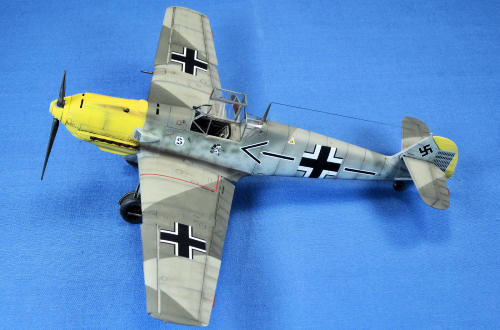
I decided to build my Emil as a replica of Adolf Galland’s famous Werknummer #5819, and started to build.
| CONSTRUCTION |
Construction began with the cockpit as
usual.
The seat, rudder pedals, control stick and other details all fasten to a
floor plate while the instrument panel builds into a separate assembly.
I airbrushed those two subassemblies and the cockpit
sidewalls Testors Acry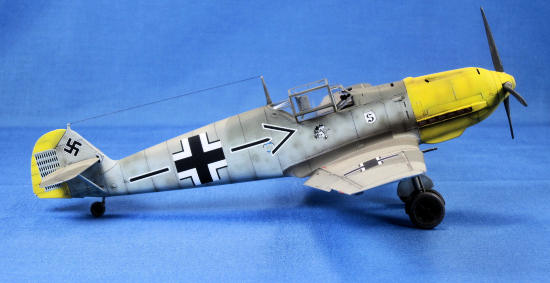 lic
RLM 02 Grey, then followed that up with a wash of MIG Productions Dark Brown.
I then began adding the various parts, plastic and photo
etch, as prescribed by the instructions, painting each by hand as I went until
the cockpit was completely built up and painted.
I finished it off by using some tiny amounts of
lic
RLM 02 Grey, then followed that up with a wash of MIG Productions Dark Brown.
I then began adding the various parts, plastic and photo
etch, as prescribed by the instructions, painting each by hand as I went until
the cockpit was completely built up and painted.
I finished it off by using some tiny amounts of
The next step is to build the engine,
and it’s here that you have to decide if your Emil’s engine compartment is going
to be buttoned up or naked for the world to see.
I went the former route, and you have to follow the
instructions carefully as in this case the engine serves primarily to hold the
exhaust stubs in place (which by the way have noticeable ribs molded onto them –
do not file those off!)
Before you can close up the fuselage
halves you have to build and paint the very delicate tail wheel.
I next glued the cockpit tub onto the starboard fuselage
half, as well as the instrument panels, the plate behind the pilot’s seat, and
the radiator assembly under the engine.
Closing up the fuselage halves required some attention
as you have to make sure all of those items line up nicely as well as trap the
engine in such a way that the exhaust stubs snake through their respective slots
in the fuselage halves.
Ultimately the fit is very good, but make sure you do
some test-fitting beforehand.
The only real seam work I did on the fuselage was on the
underside of the nose.
 Up next I attached the various cowling panels around the
engine.
Once again the fit is very good, but you do have to some test fitting
and fiddling.
This may turn off those that want a “shake n’ bake” kit, but I
like where Eduard is going with this.
Once assembled the collection of different cowling
panels all sit just a tiny bit proud of each other, which to my eye looks more
realistic.
Another neat feature revolved around the gun barrels in the nose.
Eduard provides a single piece containing both barrels
that fits into the upper cowling section.
The hollow tips of the barrels are very finely molded
inside and out, so there is no need to drill them out – a process I often
bungle.
Up next I attached the various cowling panels around the
engine.
Once again the fit is very good, but you do have to some test fitting
and fiddling.
This may turn off those that want a “shake n’ bake” kit, but I
like where Eduard is going with this.
Once assembled the collection of different cowling
panels all sit just a tiny bit proud of each other, which to my eye looks more
realistic.
Another neat feature revolved around the gun barrels in the nose.
Eduard provides a single piece containing both barrels
that fits into the upper cowling section.
The hollow tips of the barrels are very finely molded
inside and out, so there is no need to drill them out – a process I often
bungle.
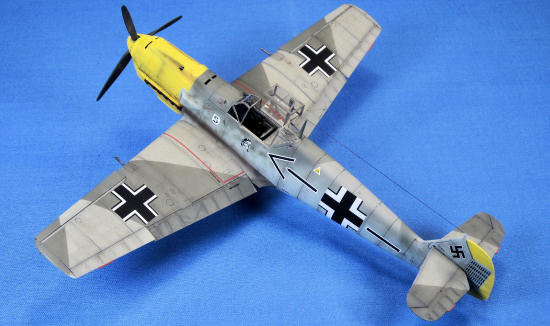
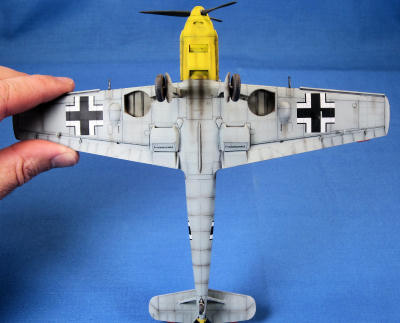
With the fuselage complete I turned my
attention to the wings.
Again the detail of the parts is impressive, and the fit
was flawless.
The ailerons, flaps, and leading edge slats are all separate
parts and can be posed open or closed, up or down, or anywhere in between.
As with the nose Eduard provides hollow gun barrel stubs
for the wings.
Very quickly I had the wings assembled and the very minimal seams
sanded.
I went ahead and glued them to the fuselage.
The fit was excellent – I held them in place with tape
and then ran some cement into the joints to make a solid assembly; no filler
needed.
Up next I attached the rudder and horizontal stabilizers, and followed that up with the transparent canopy windscreen and aft parts. I applied the masks that came with the kit, masked off the cockpit opening, and headed for the spray booth.
| COLORS & MARKINGS |
A primer coat of Tamiya Surface Primer
was sprayed on first, followed by some Tamiya XF-2 White on the areas that will
be painted yellow, which in this case were the nose and rudder.
I preshaded the panel lines with some Tamiya XF-69 NATO
Black and then I painted the aforementioned yellow areas Testors Acrylic
Insignia Yellow.
That was masked off using Tamiya’s masking tape and then I
airbrushed Testors Acrylic RLM 02 onto the wings and upper fuselage as the first
camouflage coat.
That was followed by Testors Acrylic RLM 71, per the well-known
RLM 65/02/71 early war camouflage scheme.
For RLM 65 I mixed a
 50/50
batch of Tamiya XF-23 Light Blue and XF-2 White and airbrushed it onto the
undersides of the airframe as well as up the fuselage sides, carefully mottling
it with the RLM 02/71 that was on the aircraft’s spine.
50/50
batch of Tamiya XF-23 Light Blue and XF-2 White and airbrushed it onto the
undersides of the airframe as well as up the fuselage sides, carefully mottling
it with the RLM 02/71 that was on the aircraft’s spine.
Galland’s 5819 had a good amount of RLM 02/71 mottling
all over the RLM 65 Light Blue, so to I replicated that using the kit’s
instructions as a guide.
I also had to mask off a portion of the rudder and spray
that with my RLM 65 mix to display Galland’s kill markings.
Once everything was dry I sprayed Future onto the whole
model in preparation for the decals.
I used the kit’s decals and they
behaved beautifully.
Very thin, a little bit of Walthers Solvaset was all
that was needed to get them to snuggle down nicely.
I have to say, I think they were the best aircraft model
decals I’ve worked with in the recent past.
Once they were dry I airbrushed another layer of Future
over them to seal them.
 I
post-shaded the panel lines with a very dilute mix of 50/50 Tamiya XF1 Black and
Tamiya XF64 Red Brown, keeping it subtle as I didn’t want the model to look too
dirty.
I used the same mix to add fairly grimy engine exhaust streaks on either
side of the fuselage.
I added some very subtle paint chips around the nose and
the wing roots using a Silver Berol pencil.
My final weathering step was to simulate some dust and
dirt on the undercarriage using some beige pastel powder.
I
post-shaded the panel lines with a very dilute mix of 50/50 Tamiya XF1 Black and
Tamiya XF64 Red Brown, keeping it subtle as I didn’t want the model to look too
dirty.
I used the same mix to add fairly grimy engine exhaust streaks on either
side of the fuselage.
I added some very subtle paint chips around the nose and
the wing roots using a Silver Berol pencil.
My final weathering step was to simulate some dust and
dirt on the undercarriage using some beige pastel powder.
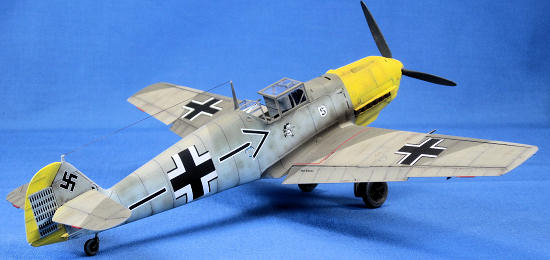
With the weathering finished all that
was left was to glue the final fragile parts in place.
I posed the canopy in the open position and attached it
in using Testors Clear Parts Cement.
The mast was then added, and I used EZ Line to simulate
the antenna wire.
The landing gear went on without a hitch, as did the
prop.
I added the tiny aileron mass balances and Pitot tube, and then painted
the wingtip lights Tamiya Clear Red and Blue respectively.
And with that, the model was done.
| CONCLUSIONS |
| REFERENCES |
-
Squadron/Signal Publications, Aircraft in Action #44,
“Messerschmitt Bf 109 in Action, Part 1”
-
Squadron/Signal Publications, Aircraft Walk Around #34,
“Messerschmitt Bf 109E”
- Wikipedia, the Online Encyclopedia
Scott
Lyle
September 2012 If you would like your product reviewed fairly and fairly quickly, please contact the editor or see other details in the
Note to
Contributors.