HobbyBoss 1/72 Bf-109E-3
| KIT: | HobbyBoss 1/72 Bf-109E-3 |
| KIT #: | 80253 |
| PRICE: | $6.75 at www.rollmodels.com |
| DECALS: | Two options |
| REVIEWER: | Peter Nolden |
| NOTES: |
| HISTORY |
The Messerschmitt Bf109E-3 was
Germany’s premier single seat fighter aircraft during the early years of WW II.
Luftwaffe Fighter units were equipped with the type just after the outbreak of
war. It offered many improvements over the previous models in performance and
armament. Powered by 12-cylinder liquid cooled inverted-vee Daimler Benz
DB601Aa, rated at 1,175 hp for take off. Giving it a top speed of 348mph at
14,560ft. Armament consisted of two wing mounted 20mm MG FF cannons and two
fuselage mounted 7.92mm MG 17 machine guns. An engine mounted 20mm MG FF cannon
that fired through the propeller hub was proposed. However, was not installed
due to reliability issues. The switch from wing mounted machine guns to cannon
armament and the improved powerplant allowed the Bf109E-3 to be a true world
class fighter aircraft. One of its few drawbacks was a very short range. This
proved disastrous during the Battle of Britain. There have been many accounts
of German pilots 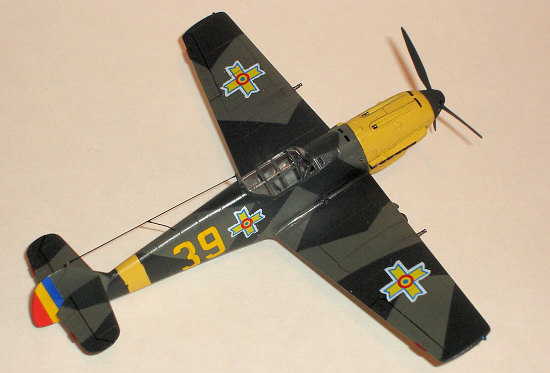 entering air combat over England just as their fuel low warning
lights came on. Combat experience showed the need for better cockpit
protection. Many were retrofitted with improved windscreen glass, seat armour
and curved plating behind the pilots head. Making them nearly indistinguishable
from later Bf109E variants. A fighter Bomber version, the Bf109E3/B was
produced. This had provisions to carry a 250kg(551lbs) bomb. Approximately 1246
Bf109E-3’s were built through late 1940. Making it the most produced of the
Emil series.
entering air combat over England just as their fuel low warning
lights came on. Combat experience showed the need for better cockpit
protection. Many were retrofitted with improved windscreen glass, seat armour
and curved plating behind the pilots head. Making them nearly indistinguishable
from later Bf109E variants. A fighter Bomber version, the Bf109E3/B was
produced. This had provisions to carry a 250kg(551lbs) bomb. Approximately 1246
Bf109E-3’s were built through late 1940. Making it the most produced of the
Emil series.
The Bf109E-3 was also exported to several countries. In 1940, Germany badly needed fighters to replace the ones lost in combat. Aircraft production was still going at almost peace time levels. Although losses in the Western campaign were lower than expected. Fighter units that were sent back to Germany for rest and refit were still under equipped. There was no shortage of pilots, just few aircraft for them to fly. A proportion of Bf109E production was being used to fulfill export orders. Germany was in great need of outside strategic resources. Selling aircraft to other countries was a way for them to obtain these. The Yugoslav government ordered 73 Bf109E-3 in exchange for iron, chrome and copper ore. The Hungarian Government ordered 40 but were not delivered. Five were even purchased by a Soviet Technical Purchasing Commission in exchange for raw materials. Therefore, when Rumania with its oil refineries came to Germany with a shopping list. Hitler was more than happy to sell them some Messerschmitts.
Prior to World War II, the Kingdom of Rumania had the largest Air Force of any Eastern European and Balkan states. The Soviet Union not included. However, the majority of aircraft were obsolete. In light of destabilizing political tensions of the 1930’s. Rumania initiated a multi stage plan in June of 1936 to restructure and modernize their air force. Orders were placed with aircraft manufacturers in Great Britain, France and Germany. Among the aircraft acquired from Germany were a number of Bf109E-3’s. Approximately 50 were supplied between 1940 and 1941. In the early years of Rumania’s war with the Soviet Union, Bf109E-3 equipped squadrons served in the fighter-bomber and bomber-escort role. Leaving the true fighter role to the more experienced Luftwaffe. They served with distinction throughout the initial campaigns. Up to the encirclement of Stalingrad in 1942. In the beginning of 1943, the last remaining war weary Emils were replaced with the newer Bf109G-2. The few surviving aircraft were transferred to coastal squadrons to patrol the western shores of the Black Sea.
| THE KIT |
Hobby Boss, is a Chinese company that produces easy to assemble plastic kits of mostly WWII aircraft. They also offer more modern aircraft and helicopters along with other subjects. These are basically the unassembled versions of kits that are offered pre-painted and assembled by another company. Not a bad way of marketing a product to more than one customer. I did not give the assembled models a second look at the stores. However, I did purchase a few Hobby Boss kits, just to see how they compared with the more traditional models we all know and love. I bought three different Me-109’s, an aircraft I am most familiar with. Each of the kits has decal options for aircraft operated by foreign countries. A subject that currently captures my interest. While the Gustav versions are my favorite, I have not built an Emil in quite a while. Therefore, I will start there.
The kit comes boxed with
a full color picture on the top of the assembled aircraft in flight. Two
photos each on the sides with a brief description on the history of t he
Bf109E-3. Opening the box reveals an instruction booklet, decal sheet and
the kits 36 parts laid in their own plastic cutout tray. There are five
sections. Two are containing the sprue trees for the individual parts, one
for the fuselage, another for the main wing section, and the sprue containing
the clear plastic canopy in it’s own cutout section. A bomb rack, bomb and
external fuel tank are included. The parts are molded in light gray that
is soft and easy to sand. All the parts are very clean and practically
flash free. Requiring little sanding and fitting. Panel lines are
nicely recessed and mostly accurate. I did not check them against any line
drawings. I did notice the fuel filler door was absent. Some of the
surface detail is a bit overstated and requires some work to reduce their size.
The wingtip lights and the post on the vertical tail plane are two things I
noticed right away.
he
Bf109E-3. Opening the box reveals an instruction booklet, decal sheet and
the kits 36 parts laid in their own plastic cutout tray. There are five
sections. Two are containing the sprue trees for the individual parts, one
for the fuselage, another for the main wing section, and the sprue containing
the clear plastic canopy in it’s own cutout section. A bomb rack, bomb and
external fuel tank are included. The parts are molded in light gray that
is soft and easy to sand. All the parts are very clean and practically
flash free. Requiring little sanding and fitting. Panel lines are
nicely recessed and mostly accurate. I did not check them against any line
drawings. I did notice the fuel filler door was absent. Some of the
surface detail is a bit overstated and requires some work to reduce their size.
The wingtip lights and the post on the vertical tail plane are two things I
noticed right away.
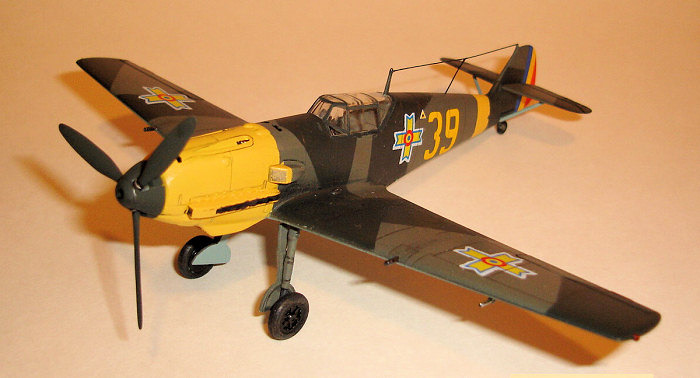
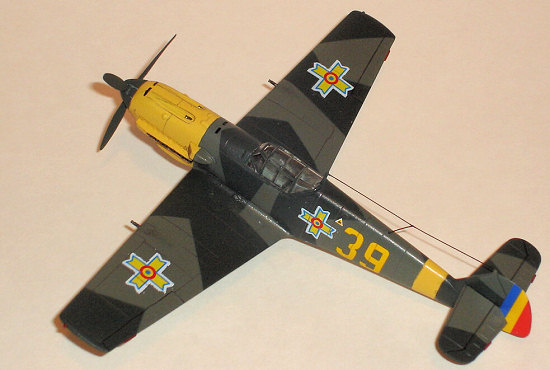
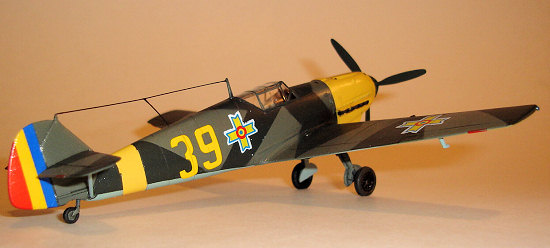
The instructions include the same box photo on the front page. They fold open for two pages of instructions. A parts tree schematic in the upper left corner and a four step instruction guide with clear easy to follow exploded views showing where everything goes. The decal and color scheme references are printed on the back page. Colors by Gunze Sangyo are called for. Full color paint schemes for two aircraft are shown. Black 5, an aircraft from 1/JG 52 with a 70/71/65 paint scheme, and Yellow 39 of the Rumanian Air Force with an overall 70/71/65. This is where things get a bit dicey. Black 5 is shown with an external fuel tank mounted on its centerline. I do not think E-3’s had this option at this time. Yellow 39 has a bomb attached under it. I could not find any evidence suggesting the Rumanians E-3’s were retrofitted with bomb racks. I could be wrong. The reference to paint scheme is incomplete on the Rumanian aircraft. The yellow lower wingtips are shown on the left profile only. This is where studying other reference material is important. The decals while okay are slightly out of register. The squadron insignia on Black 5 looks a bit too large. The Michael’s Cross insignia for Yellow 39 are inaccurate. I rarely use after market decals so these kinds of things can cause a little frustration for me.
| CONSTRUCTION |
Construction of this Bf109E-3
started in the cockpit. I used Testors liquid cement for all joints except
where noted. All paints are Tamiya acrylics unless mentioned otherwise. First
I removed all cockpit-related parts from their trees and cleaned them up and
test fitted them. I noticed that the construction layout is similar to Tamya’s
cockpit, but much simpler. No side detail and a bare instrument panel. I did
notice that the control column had a button located just below the stick grip.
Photo references showed this on E-3/b’s and not on a regular E-3 that I was
modeling. This is something that you probably would not notice with the
canopy closed but was easy to remove with a file. After everything looked
go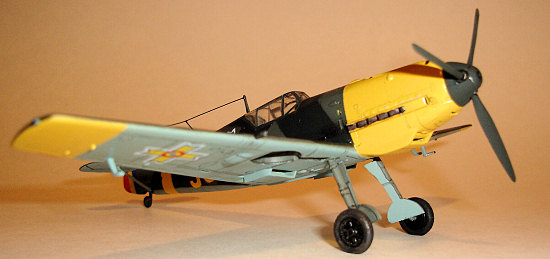 od to me, I washed the
parts with soap and water let dry. I do this with most parts to remove any
mold release or dirt.
od to me, I washed the
parts with soap and water let dry. I do this with most parts to remove any
mold release or dirt.
The floorboard and front bulkhead section along with the instrument panel and control column are then attached to a piece of scrap cardboard with white glue. The seat was put on a separate piece of cardboard. This is to keep them in place while painting. As that was drying, I broke out the fuselage and main wing lower fuselage section. I cleaned them up, resized the vertical radio mast on the tail plane, and reduced the bulbous navigation lights on the wing tips. There really was not much to clean up. Gun barrels were drilled out with .016 drill bit and hand drill. Once everything was ready, I airbrushed all the cockpit-related parts RLM Grey. The seat was brush painted Black Green. The parts were then given a very light wash of Semi Gloss Black thinned with rubbing alcohol. A very light dry brushing of Field Grey was applied along with a little flat earth along the floor and seat area to simulate dirt and grime. Last, I added a very light dry brush of Metallic Grey along the floor, rudder pedals and seats. Anywhere a pilot or ground crew would most likely come in continuous contact.
The kit did not come with any decals for the instrument panel, so I ended up doing it free hand. The Revi gunsight was painted Flat Black with Red Brown for the padded cushion on the front. I painted the reflector sight Metallic Grey to simulate the glass. I usually make these out of thin clear plastic, but I took a short cut. For this particular aircraft, the only thing I really added was seatbelts cut from paper and painted Buff and Metallic Grey. The canopy is going to be in the closed position on this tiny cockpit, so there is not much to be seen. With the cockpit assembled and ready for installation, I glued it into place on the main wing/lower fuselage section. The upper fuselage was then glued on. This kit can be built without the use of glue however; I wanted to be safe. The horizontal seam created by the two halves was filled with Squadron Green Putty and sanded smooth. Panel lines damaged in the process were re-scribed using my modeling knife. Those were the only seams on the model that needed putty. The radiator coolers were attached to the lower wing at this time. Horizontal stabilizers were test fitted and found to fit perfect. Now I carefully washed the kit again with soap and warm water and let dry overnight. In the meantime, I got some of the smaller pieces such at the propeller assembly and main gear doors ready for paint.
| COLORS & MARKINGS |
Now is time for the most
exciting or frustrating part of modeling, the main paint scheme and decals.
This is where all my hours of hard work can be ruined in a matter of seconds.
I still consider myself a novice with the airbrush. Just please do not ask
me how long I have been using one. This was going to be a Rumanian 109
from the beginning. The kit paint guide for Yellow 39 shows the aircraft
in a 70/71/65 paint scheme with yellow 04 fuselage band, lower wingtips and just
the lower part of the engine cowling.
 While doing my research, I
came up with a number of possibilities. Some aircraft had the
70/71/65-splinter camouflage while others appear to have been sprayed one single
upper surface color. Olive green perhaps? All seemed to have a solid
yellow nose with dark colored spinners. Having no photograph of the actual
aircraft, I took the liberty of creating the paint scheme shown. This is
not something I normally do.
While doing my research, I
came up with a number of possibilities. Some aircraft had the
70/71/65-splinter camouflage while others appear to have been sprayed one single
upper surface color. Olive green perhaps? All seemed to have a solid
yellow nose with dark colored spinners. Having no photograph of the actual
aircraft, I took the liberty of creating the paint scheme shown. This is
not something I normally do.
All areas that are to be yellow 04 were first sprayed Flat White to help keep the yellow from changing too much. I used Gunze Sangyo’s acrylic Cream Yellow. I left the supercharger air intake and exhaust stacks off so it would be easier to mask off the nose cowling. These were painted separately and attached later. Next, I sprayed the landing gear doors and underside Light Blue. Allowing the paint to dry overnight each time. The lower fuselage and lower wings were then masked and the entire upper surface was sprayed Black Green along with the propeller assembly. Carefully I masked out the splinter camouflage. Normally I use Deep Green for dark green 71. This time I tried Testors Model Master acryl Dunkelgrun RLM 71. This color might be a better match. It was kind of fun peeling off all the layers of masking tape and seeing how everything turned out. There were no runs and hardly any over spray. I let the model sit for a few days to dry and then gave it a single coat of Future to prep it for decals.
The kit decals while nice, were all but useless for me. These were the reason I ordered the kit in the first place. The Michael’s Cross national insignia are not the correct shape and the roundel in the center is oversized. I had to use a very poor set from my spare bin. These started to disintegrate immediately when I tried to slide them from their backing sheets. This meant I had only one shot to apply them. This is where I made a mistake done only once a long time ago. While applying the national insignia on the underside of the wings. I inadvertently lined up on the wrong panel line. Fortunately this time it was on the underside. Therefore, it will not be as noticeable sitting in my shelf display. Most Rumanian Bf109E’s have Disney’s Donald Duck insignia located aft of the fuselage numbers. The kit decals provided for none. The decals with the exception of the crummy national insignia went on nicely with the use of Solvaset. Another coat of Future was applied over everything few days later. This is to seal the decals and help protect them.
All that is left now is to add the
tiny pieces and the model is near completion. Having painted the tires Flat
Black and dry brushing them with German Grey and Earth. (I forgot to mention
sanding flat spots on the main wheels to simulate weight, was done before
painting). The main wheels are painted Semi Gloss Black and RLM Grey for the
tail wheel. The tail wheel leg seemed a lot taller than it should. I cut tab
attached to it down a bit so the aircraft would sit better. The main landing
gear was attached and painted RLM Grey along with the wheel wells and insides of
the main landing gear doors. All of this was done with a brush. At this time,
I used a wash of Semi Gloss Black and rubbing alcohol to outline the control
surfaces lines wheel wells and landing gear. I used a .05mm number two
mechanical pencil on the rest of the panel lines. I drew in the missing fuel
filler cap and gave the supercharger intake some detail it was missing. The
horizontal tailplanes were then attached with their external bracing. This went
much easier than normal. The pitot tube and aileron counter balances were
installed and painted Light Blue, as were the external braces for the horizontal
tail planes. One light coat of Polly S flat base dulled everything a little.
The area behind the seat was painted RLM Grey and weathered very lightly. Some
Bf109E-3 had armour plating behind the pilot’s seat, some did not. The
 kit did not have one and I
didn’t have a spare. The canopy, which was dipped in Future a while ago,
was attached with white glue and hand painted RLM Grey first then external
colors. I still have not gotten the hang of masking the canopy yet.
Canopy fit was not very good with a few gaps towards the rear. The wheels
were attached using white glue and allowed to sit while drying. The guns
were painted Gun Metal and navigation lights, Metallic Grey, then Clear Blue and
Clear Red. A light weathering job was performed using the same colors as
mentioned earlier. I fashioned the antennae wire from stretched plastic
sprue and painted Flat Black. The propeller assembly is the last thing I
put on to complete the model.
kit did not have one and I
didn’t have a spare. The canopy, which was dipped in Future a while ago,
was attached with white glue and hand painted RLM Grey first then external
colors. I still have not gotten the hang of masking the canopy yet.
Canopy fit was not very good with a few gaps towards the rear. The wheels
were attached using white glue and allowed to sit while drying. The guns
were painted Gun Metal and navigation lights, Metallic Grey, then Clear Blue and
Clear Red. A light weathering job was performed using the same colors as
mentioned earlier. I fashioned the antennae wire from stretched plastic
sprue and painted Flat Black. The propeller assembly is the last thing I
put on to complete the model.
| CONCLUSIONS |
Well, for a kit that could have been assembled straight from the box in an evening. It took me much longer than anticipated. About as long as a regular model. I am very pleased with the results. Turned out better than I expected. This would be a great kit for someone new to modeling. It is hard to take a wrong turn with these. A skilled modeler can make this into an attractive piece for their collection. The only real disappointment were the decal options and what could be confusing paint scheme chart. Check your references well and purchase good after market decals. If Hobby Boss improves in that area, these simple and easy to build kits would be a true bargain. For now, I am on the fence with these kits. I will know more when I complete the other two Hobby Boss Messerschmitt 109’s.
| REFERENCES |
Rumanian Aces of World War 2 by Denes Bernad
Aero Detail 1 Messerschmitt Bf109E by Model Graphix
The Official Monogram Painting Guide to German Aircraft 1935-1945 by Kenneth A. Merrick & Thomas H. Hitchcock
Warplanes of the Third Reich by William Green
December 2007
If you would like your product reviewed fairly and quickly, please contact me or see other details in the Note to Contributors.