| KIT #: | H-284 |
| PRICE: | $20.00 on line |
| DECALS: | One option |
| REVIEWER: | Chris Poulos |
| NOTES: | Kit released in late 1960s |
| HISTORY |
The BF 109 series was developed in the 1930s by Bayerische Flugzeugwerke (BFW) a
Bavarian air
firm run by Professor Willy Messerschmitt. When first introduced into combat in
the Spanish civil
war the design was somewhat underpowered but held its own against Republican
flown Russian I 16s which up to that time had had the upper hand in Spain. The
design was steadily improved with new
 engines
and slight detail changes to make it the premier fighter when war broke out in
September of 1939. By the time of the battle of Britain in September of 1940
came about it had become obvious that the 109 design currently in use, the 'e'
or 'Emil' was at best the equal of the British Spitfire so a redesign was
needed. The 'F' or 'Friedrich' had a redesigned wing as well as a new cooling
system and fuselage aerodynamics were also changed. The biggest alteration was a
new more powerful engine as well as a change in weapons. The 'F' series was
considered to be the ultimate development of the 109 series and German pilots
claimed it was the most effective of the 109 designs.
engines
and slight detail changes to make it the premier fighter when war broke out in
September of 1939. By the time of the battle of Britain in September of 1940
came about it had become obvious that the 109 design currently in use, the 'e'
or 'Emil' was at best the equal of the British Spitfire so a redesign was
needed. The 'F' or 'Friedrich' had a redesigned wing as well as a new cooling
system and fuselage aerodynamics were also changed. The biggest alteration was a
new more powerful engine as well as a change in weapons. The 'F' series was
considered to be the ultimate development of the 109 series and German pilots
claimed it was the most effective of the 109 designs.
| THE KIT |
The revell 1/32 BF 109F is an older kit designed in the late
1960s using the most advanced methods
available at the time. Revell's president lew glasser wanted to revolutionize
aircraft scale modeling
with a series of large 1/32 WWII and later jet era aircraft with as he claimed
'lots of detail'. The
 109F model
was similar to other kits in this series in that it had retractable landing
gear, moving
109F model
was similar to other kits in this series in that it had retractable landing
gear, moving
rudder and flaps, a pilot figure with opening cockpit and a removable panel to
reveal a scale
engine. As the F kit was a redesigned 'g' already released by revell it used
many parts from that kit
without modification and thus inaccuracies appeared in the 'F'.
The major flaw in the kit is the canopy is for a 'gustav' or 'g' with heavy
molded framing. Another
error is the interior cockpit area is inaccurate and some of the engine detail
is also highly suspect.
The twin machine guns are incorrect as they sit side by side and are not offset
as in the real aircraft.
The kit also lacks any kind of wheel well detail. But that is not to say that
its all bad.The kit is fairly accurate in shape and with a little care can be
built up into a nice replica of a 109f. There is nice recessed panel detail on
the fuselage and wings, some of he first seen in the model building world. The
undersides has much engraved detail and an effort was made to provide for
underwing and fuselage filters. The wheels are nicely detailed and seem to be
the correct scale length so the model will 'sit' properly. The nose detail is
nice and the propeller blades have a nice shape and scale thickness, and the
nose 20mm cannon has an opening so it does not have to be drilled out.
| CONSTRUCTION |
I bought this kit off Ebay so it came 'as is'. There were no sprues or gates at
all, every part was detached. This might seem to be a huge problem but the kit
construction is rather simple and Revell helped me out by labeling some of the
parts and having the part number stamped on some parts of the kit. Most of it
was obvious looking at the instructions so this was not a big issue to over come
as it might have been with a more complex kit.
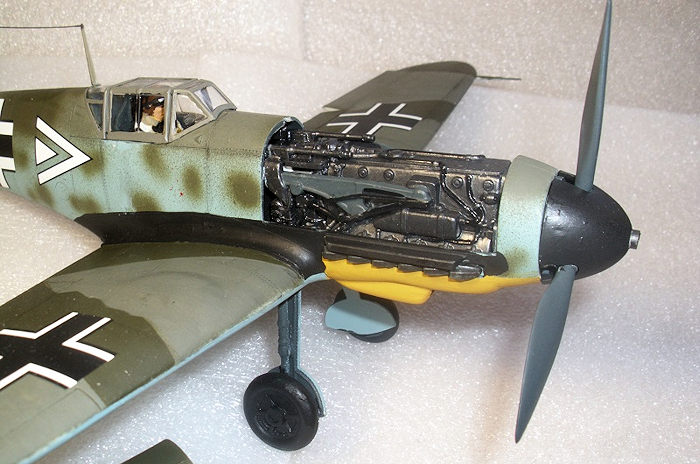
I made the decision to attempt to have all the moving parts workable and to be
able to display the engine with the co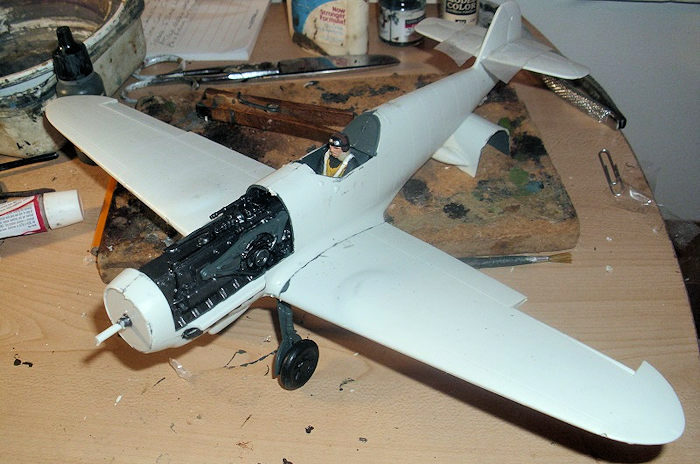 wling
off or on. The kit has the engine built first followed by the rudder and
stabilizers all of which are installed in the fuselage. The kit includes a
decent instrument panel with raised dial detail. The sub assemblies were made
first then the engine was painted Gunmetal with gray/green and black details,
and the interior side walls were painted grey/green before all the needed parts
were glued to the fuselage.
wling
off or on. The kit has the engine built first followed by the rudder and
stabilizers all of which are installed in the fuselage. The kit includes a
decent instrument panel with raised dial detail. The sub assemblies were made
first then the engine was painted Gunmetal with gray/green and black details,
and the interior side walls were painted grey/green before all the needed parts
were glued to the fuselage.
Next the landing gear and pilot were assembled and painted, and the cockpit was
put together and also painted. This area has some nice detail but is not
accurate for a BF 109 but with the pilot figure added its hardly obvious. The
pilot was painted with acrylics as was most of the kit, in his case he is
wearing a black leather jacket, Luftwaffe blue trousers, a yellow life vest and
leather gloves and helmet. All of this was then glued to the lower wing and the
parts for making the landing gear work were carefully assembled, and the
interior of the wing was painted gray/green and the wing filters were painted
gunmetal.
After this had dried a bit the fuselage was joined to the wings. Next the
propeller got some prepainting and the canopy was painted and the pilot armor
painted and joined to the canopy using white glue. Final assembly would have to
wait until the plane was decaled and painted.
| COLORS & MARKINGS |
The kit comes with decals for ace Werner Molders as well as somewhat suspect
color instructions for his aircraft. I had originally intended to use these and
make his plane as he is a personal favorite of mine but alas the decals had
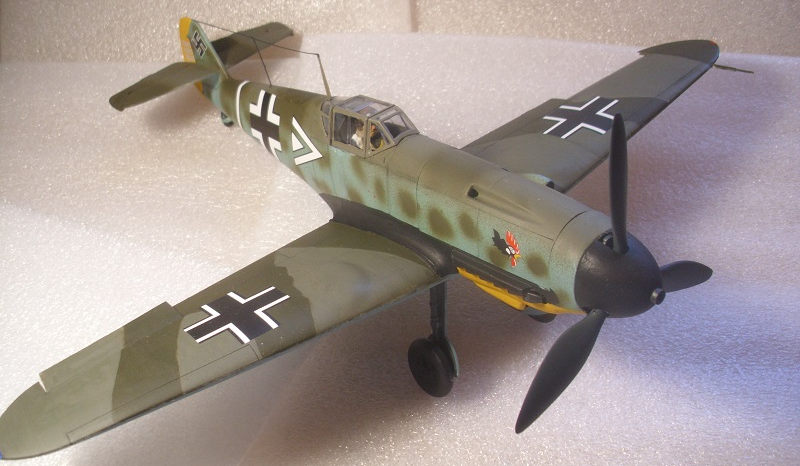
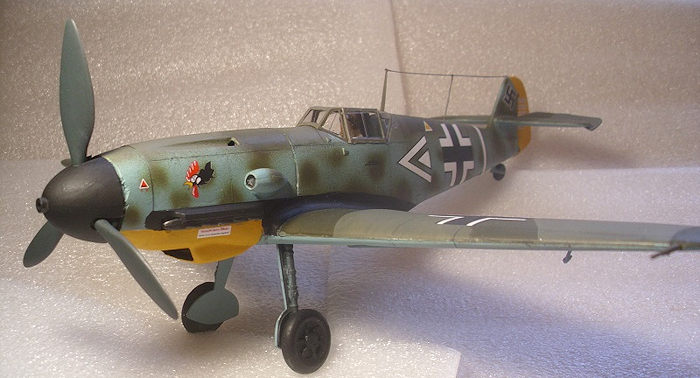
cracked and were beyond saving. I decided therefore to buy aftermarket decals
and selected a set from Eaglecals based on the aircraft flown by Luftwaffe ace
Major Hans 'Assi' Hahn. Hahn was an ace with 108 kills before being shot down
and captured by the Russians in 1943. He was also a stickler for clean aircraft
and demanded his crews keep his plane as clean as possible.
 The
aircraft was painted using the older Vallejo Luftwaffe colors set. This set has
all the surface colors needed for European and Russian based German aircraft.
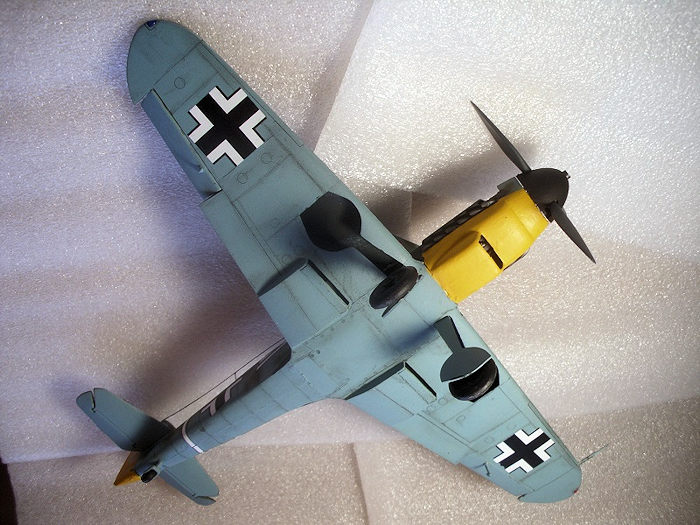
The plane was first painted blue on the undersides and well as the fuselage.
Next the two tone green and gray/green was painted and lastly the mottle was
done freehand. The nose underside was then painted white as was the rudder, and
this was covered with an enamel German yellow as I don't have an acrylic of this
color currently in my paint collection. The aircraft was then brushed with
'future' for a clear cote and the decals were applied. These were sealed with
another cote of 'future' and the panel line were highlighted with 'AK' enamel
wash, another Vallejo product. I like using enamels for panel lines as it will
not interact with the 'future' covering. After this had dried overnight the
plane was sprayed with Testor's dullcote to provide a flat finish. The small
bits and canopy where then attached as was the prop assembly and that completed
the project.
The
aircraft was painted using the older Vallejo Luftwaffe colors set. This set has
all the surface colors needed for European and Russian based German aircraft.
The plane was first painted blue on the undersides and well as the fuselage.
Next the two tone green and gray/green was painted and lastly the mottle was
done freehand. The nose underside was then painted white as was the rudder, and
this was covered with an enamel German yellow as I don't have an acrylic of this
color currently in my paint collection. The aircraft was then brushed with
'future' for a clear cote and the decals were applied. These were sealed with
another cote of 'future' and the panel line were highlighted with 'AK' enamel
wash, another Vallejo product. I like using enamels for panel lines as it will
not interact with the 'future' covering. After this had dried overnight the
plane was sprayed with Testor's dullcote to provide a flat finish. The small
bits and canopy where then attached as was the prop assembly and that completed
the project.
| CONCLUSIONS |
This was an older kit and as such was hardly state of the art. As is my habit I tried to build it 'out of the box' in a sort of tribute to these older kits and with a little work produce decent models. The fit of this kit was actually quite good only requiring a little putty on the wing roots and stabilizers, the rest of the kit went together very well. Considering what I paid for this kit it was well worth the money and it makes a fine addition to any collection of WWII Luftwaffe aircraft.
28 December 2016
Copyright ModelingMadness.com. If you would like your product reviewed fairly and
fairly quickly, please
contact
the editor or see other details in the
Note to
Contributors. Back to the Main Page
Back to the Review
Index Page
Back to the Previews Index Page