Hobby
Boss 1/72 Focke Wulf FW-190A-8
|
KIT #: |
80244 |
|
PRICE: |
$10.00 MSRP
|
|
DECALS: |
Two Options |
|
REVIEWER: |
Brian Baker |
|
NOTES: |
Easy Build Kit |
The Focke
Wulf FW-190A has been issued in 1/72 scale in nearly every known variation over
the years, with over 100 kits produced in 1/72 scale alone. It is so well known
that there is no reason to repeat its history.
Variations of the A model ran from A-0 through A-9 in the fighter
configuration, and the F and G models for ground attack.
The A-8 was the last major production model, and more were built than any
other variant. The F-8 and G-8
versions were based on the A-8 with the .50 caliber machine guns replacing the
.30’s of earlier models. Note that Hasegawa issued an FW-190G-8 a few years ago,
but there is no difference between this kit and their standard A-8/F-8 kit.
And Hasegawa provides no definitive color and marking information either.
I have yet to see a bona fide photo of a G-8 with any markings showing.
 The
kit is a simplified one, as we have come to expect from Hobby Boss, with one
piece wing and fuselage sections, and a small number of other components.
I recently reviewed the companion kit, labeled FW-190A-6, but actually an
FW-190A-7, as it has the larger machine gun bulges on the forward cowling, a
feature not yet included in the FW-190A-6 series. Both kits are apparently
identical, as the only other distinguishing feature, the pitot tube, has to be
added separately. Needless to say,
the kit can be almost thrown together from a distance,
but the modeler should note that the cockpit tub should be detailed as
much as possible before assembly, as it will be difficult to get at once the
wings and fuselage are joined. It also
sits too low as it is designed to sit on the lower fuselage section , so I glued
it to the upper portion of the fuselage interior, getting the seat in the right
position. A problem I encountered on
both kits was the cockpit canopy, which although it fits very nicely, had a
slightly exaggerated slope on the front windshield.
My solution, then as now, was to replace the forward section with one
from another kit, and use the rear section from a Tamiya kit.
The little raised portion of the front cockpit decking needs to be
removed and replaced with one with a more accurate outline. In this case, I used
card plastic bent to shape. I then added an instrument panel and used some
printed panels I had laying around.
I added some details to the cockpit, including some side panel decals and rudder
pedals. Seat belts were made with
masking tape.
The
kit is a simplified one, as we have come to expect from Hobby Boss, with one
piece wing and fuselage sections, and a small number of other components.
I recently reviewed the companion kit, labeled FW-190A-6, but actually an
FW-190A-7, as it has the larger machine gun bulges on the forward cowling, a
feature not yet included in the FW-190A-6 series. Both kits are apparently
identical, as the only other distinguishing feature, the pitot tube, has to be
added separately. Needless to say,
the kit can be almost thrown together from a distance,
but the modeler should note that the cockpit tub should be detailed as
much as possible before assembly, as it will be difficult to get at once the
wings and fuselage are joined. It also
sits too low as it is designed to sit on the lower fuselage section , so I glued
it to the upper portion of the fuselage interior, getting the seat in the right
position. A problem I encountered on
both kits was the cockpit canopy, which although it fits very nicely, had a
slightly exaggerated slope on the front windshield.
My solution, then as now, was to replace the forward section with one
from another kit, and use the rear section from a Tamiya kit.
The little raised portion of the front cockpit decking needs to be
removed and replaced with one with a more accurate outline. In this case, I used
card plastic bent to shape. I then added an instrument panel and used some
printed panels I had laying around.
I added some details to the cockpit, including some side panel decals and rudder
pedals. Seat belts were made with
masking tape.
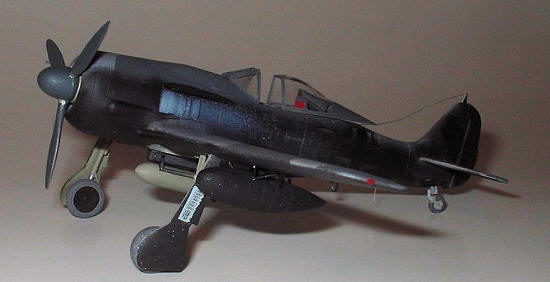
The
other parts are reasonably accurate, although I had some questions about the
landing gear, which seems to be slightly too long. In reality, it would probably
be about the correct length for the airplane while it was in the air with the
oleo struts extended, but in truth, it looks acceptable even in the slightly
longer form, although the gear looks a little “spindly”.
Photos showing FW-190’s in flight and on the ground don’t show much
difference in landing gear extension length.
The propeller is also acceptable, and uses the original Hobby Boss shaft
with metal insert method of attaching the prop, and this can be done after the
airplane is a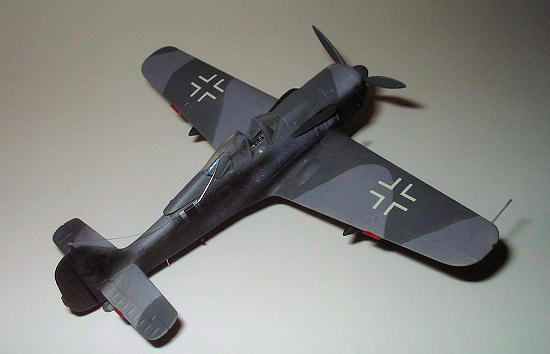 ssembled
and painted. The little fan behind the prop hides the engine detail that isn’t
there anyway, so this is not a problem.
The guns are molded into the wings, with barrels too long for anything. I
just cut them off and drilled holes in the leading edges of the wings where I
wanted them to be, adding gun barrels made from rods with the ends drilled out.
. I also had to trim off the
fairings for the outside cannon, as I did not include these, and, of course, I
did not use the little flat plates used to cover the breech fairings
for the outboard cannons on the top of the wings.
Even the center rack is acceptable, although the little mounting unit
provided in the kit is a little fragile and some of the protruding rods broke
off.
ssembled
and painted. The little fan behind the prop hides the engine detail that isn’t
there anyway, so this is not a problem.
The guns are molded into the wings, with barrels too long for anything. I
just cut them off and drilled holes in the leading edges of the wings where I
wanted them to be, adding gun barrels made from rods with the ends drilled out.
. I also had to trim off the
fairings for the outside cannon, as I did not include these, and, of course, I
did not use the little flat plates used to cover the breech fairings
for the outboard cannons on the top of the wings.
Even the center rack is acceptable, although the little mounting unit
provided in the kit is a little fragile and some of the protruding rods broke
off.
The
Hobby Boss kit provides decals for two
variants, “Red 19” of 5/JG 300,
which was flown by Umteroffizier Ernst Schroder from Lobnitz, Germany, during
November, 1944, and “Red 8”, flown by
Uffz. Willi Maxinmwitz of IV/JG 3, in June, 1944.
John Weal’s “FW-190 Aces of the Western Front” illustrates the “Red 8”
with some variations, showing it as “Black 8” with a black instead of a grey
cowling, and a red and yellow spinner as opposed to the black and yellow shown
in the kit instructions. The Weal drawings for the former aircraft show only
slight variations, such as the gruppe bar.
I
have always wanted to do an accurate FW-190G-8, the long range fighter bomber
version. I’ve done a lot of reading
on this variant, but there isn’t much documentary evidence on this type.
Baugher states that the G-8 was similar to the F-8, except that it had
wing racks for extra fuel tanks, although bomb racks could also be fitted.
A standard bomb rack was installed under the fuselage as on the F-8, and
the fuselage guns were omitted, although the bulged fairings remained.
Night attack variants had exhaust flame shrouds, such as are provided in
the Revell-Germany kit, and I used these on my model.
The outboard 20 mm
 cannon
were not installed. The aircraft
were reported to have been delivered with blown canopies as were the
FW-190F-8’s, although some may have used the flat variety.
No
IFF
antenna was carried under the wing, or at least it doesn’t show on drawings and
photos purporting to depict the G-8 variant.
The wing tanks were similar to those carried on Luftwaffe fighters, and I
used a pair from the spares box
that originally came from some Bf-109G kit.
I had to construct the small struts that were mounted on each side of the
tanks for stability. Aerodynamically, they must have caused a lot of drag, but
other variants used larger fairings for mounting the tanks, and these stayed on
the plane after the tanks were dropped, whereas those on the G-8 were probably
dropped with the tanks, thus making the planes faster on their return flight.
cannon
were not installed. The aircraft
were reported to have been delivered with blown canopies as were the
FW-190F-8’s, although some may have used the flat variety.
No
IFF
antenna was carried under the wing, or at least it doesn’t show on drawings and
photos purporting to depict the G-8 variant.
The wing tanks were similar to those carried on Luftwaffe fighters, and I
used a pair from the spares box
that originally came from some Bf-109G kit.
I had to construct the small struts that were mounted on each side of the
tanks for stability. Aerodynamically, they must have caused a lot of drag, but
other variants used larger fairings for mounting the tanks, and these stayed on
the plane after the tanks were dropped, whereas those on the G-8 were probably
dropped with the tanks, thus making the planes faster on their return flight.
The
FW-190G-8 variant was used by
various ground attack units, but I wanted to do one of the G-8’s used by I/SKG.
10 in their nocturnal operations against
England
before D-Day, or after D-Day, when they operated against the invasion forces.
This unit began operations in 1942 as 10/JG 2 before becoming SKG 10 in 1943.
They used standard FW-190A-4’s and A-5’s with the undersides and sides
painted a sooty black. Later they
received some specialized F and G models. Their pilots were not trained for this
kind of operations, and needless to say, although they got a significant
response from the British defensive network, they did not do well, and losses
were very high. Quite a number of
FW-190A’s were presented to the RAF when their pilots landed on British
airfields, thinking they were in
France.
The men in this unit were mainly former bomber, Stuka, and transport
pilots, although a few fighter pilots were included.
 Since I
could not find a photo, I used some creative research to create my model.
I recently reviewed Chris Goss’s “Luftwaffe Hit and Run Raiders:
Nocturnal Fighter-Bomber Operations over the Western front, 1943-1945” published
by Classic Books, for IPMS, (Here
is the MM review) and although only
one set of photos purports to show the G-8 variant, albeit in day fighter
camouflage with no markings visible, a list of loss reports for SKG 10 showed
several FW-190G-8’s. I chose the
aircraft of Oblt. Walter Stark, Staffel Commander, flying “White 8”, werke
number 190137, which was shot down over
France
on
18 June 1944,
by an RAF Mosquito night fighter.
The Mosquito crews seemed to have no trouble catching and destroying night
flying FW-190’s, as their pilots had no radar and were usually unaware that they
were being stalked, their first warning coming when the tracers hit their
aircraft.
Since I
could not find a photo, I used some creative research to create my model.
I recently reviewed Chris Goss’s “Luftwaffe Hit and Run Raiders:
Nocturnal Fighter-Bomber Operations over the Western front, 1943-1945” published
by Classic Books, for IPMS, (Here
is the MM review) and although only
one set of photos purports to show the G-8 variant, albeit in day fighter
camouflage with no markings visible, a list of loss reports for SKG 10 showed
several FW-190G-8’s. I chose the
aircraft of Oblt. Walter Stark, Staffel Commander, flying “White 8”, werke
number 190137, which was shot down over
France
on
18 June 1944,
by an RAF Mosquito night fighter.
The Mosquito crews seemed to have no trouble catching and destroying night
flying FW-190’s, as their pilots had no radar and were usually unaware that they
were being stalked, their first warning coming when the tracers hit their
aircraft.
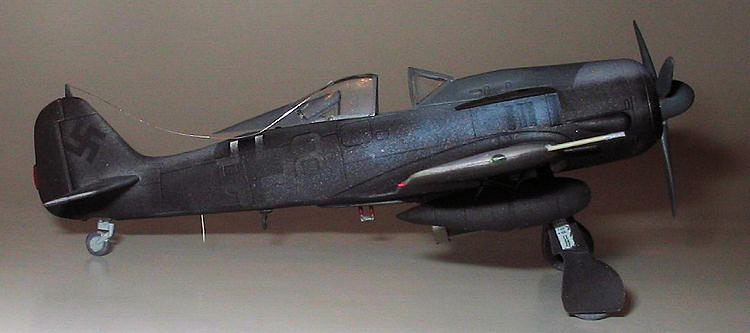
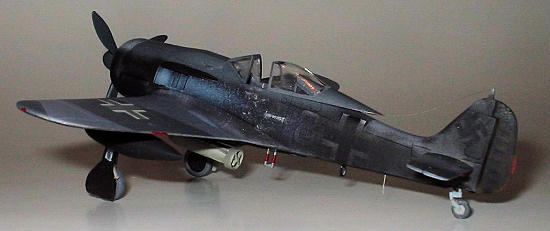
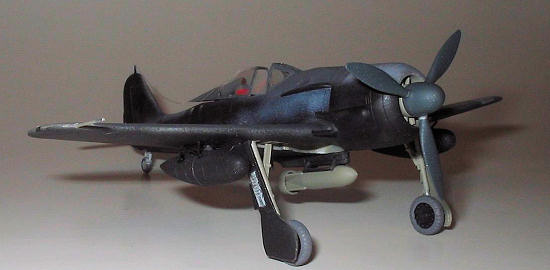
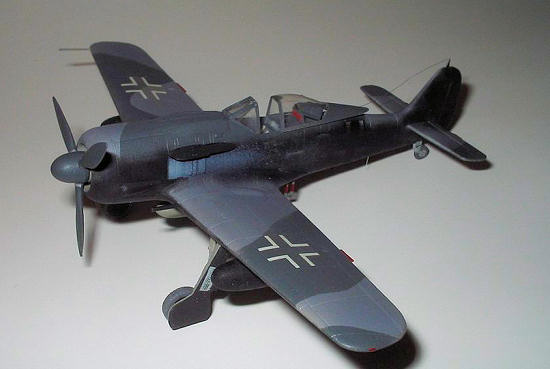
I
did my model in standard 74/75/76 Luftwaffe camouflage, with standard day
fighter markings, crosses, and a “White 8” on the fuselage sides. I then used
thin black paint to apply the night camouflage, making it look as dirty and
splotchy as possible. The black
would have been applied just before the mission, so there would not be much
weathering on the sides and bottom at first. Later, the black would wear off
unevenly. The top and around the wing
and tailplane leading edges would have some chipping, as would the cockpit area.
Some exhaust staining would also be evident.
You do a nice paint job, and then dirty it up.
Isn’t that what modeling is all about?
 This
kit is aimed at younger, inexperienced models, and has some accuracy issues that
need to be addressed. However, it
was fun to build, and doesn’t provide the frustrations sometimes encountered in
building more sophisticated kits. If you’re really serious, use the Hasegawa or
Tamiya kits, but for a diversion, try one of these.
You’ll be done in a couple of days, and it really looks pretty good
sitting next to your other models.
This
kit is aimed at younger, inexperienced models, and has some accuracy issues that
need to be addressed. However, it
was fun to build, and doesn’t provide the frustrations sometimes encountered in
building more sophisticated kits. If you’re really serious, use the Hasegawa or
Tamiya kits, but for a diversion, try one of these.
You’ll be done in a couple of days, and it really looks pretty good
sitting next to your other models.
Brian Baker
October 2009
If you would like your product reviewed fairly and quickly, please
contact
me or see other details in the
Note to
Contributors.
Back to the Main Page
Back to the Review
Index Page