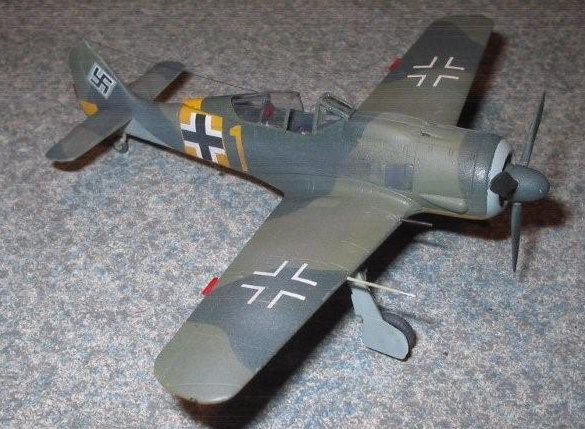
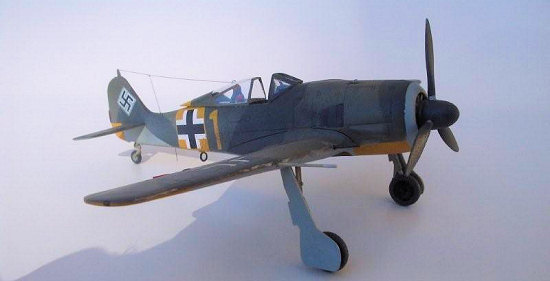
Hobby Boss 1/72 FW-190A-7
| KIT #: | 80245 |
| PRICE: | $9.00 MSRP |
| DECALS: | Two Options |
| REVIEWER: | Brian R. Baker |
| NOTES: |
| HISTORY |
The Focke Wulf FW-190A, like most
kits in this series, is familiar to anyone who builds model airplanes, and its
history is well  known. The FW-190A-6 was a development of the FW-190A-5, which
was the first of the radial engine variants to have the slightly extended engine
mounts to compensate for additional equipment carried aft of the CG. To
accommodate the heavier loads, the wing was strengthened, and armament was
increased to four MG151/20 cannons in the wings. The fuselage, however, retained
the 7.92 mm. MG17 machine guns. Many, however, flew with only two wing mounted
cannons.
known. The FW-190A-6 was a development of the FW-190A-5, which
was the first of the radial engine variants to have the slightly extended engine
mounts to compensate for additional equipment carried aft of the CG. To
accommodate the heavier loads, the wing was strengthened, and armament was
increased to four MG151/20 cannons in the wings. The fuselage, however, retained
the 7.92 mm. MG17 machine guns. Many, however, flew with only two wing mounted
cannons.
A further, and interim development, the FW-190A-7, switched to the 13 mm. MG131 machine guns in the cowling, and featured the bulged cowling deck which became standardized on all later variants, although the flat canopy was used on all of these. Both variants could carry an external rack for long range fuel tanks or bombs. The A-7’s were used primarily on the Western Front, although a few found their way to Russia. Less than a hundred A-7’s were completed before the major production model, the FW-190A-8, replaced it.
| THE KIT |
The kit is typical of the Hobby Boss
offerings in 1/72 scale. Consisting of 30 light grey plastic parts (some of
which are not used), one clear plastic canopy, and a short piece of metal wire
that is supposed to serve as a crankshaft, the model is nicely detailed
 with
very little flash. It is almost a “snap together” kit, but smaller parts will
probably have to be glued in place. A few areas need trimming down, although
very little filler is required.
with
very little flash. It is almost a “snap together” kit, but smaller parts will
probably have to be glued in place. A few areas need trimming down, although
very little filler is required.
The instructions are typical of Hobby Boss kits. They consist of one sheet of 8 ½ by 11 inch glossy paper folded to make four pages. The first page has a color view of the model, plus process instruction codes and decal instructions. Page 2 has a sprue diagram and assembly step one, which is the basic wing-fuselage-tail sections. Page 3 shows the final assembly steps, including the landing gear and propeller assembly. The rack and drop tank are shown, along with the Morane mast and rear fuselage mounted VHF whip antenna and DF loop. According to my sources, the Morane mast wasn’t used on any A of F variants used on the Russian Front, although they did appear on FD-190D-9’s. The back page gives color schemes for two aircraft, neither of which is represented by this kit. More on this later.
| CONSTRUCTION |
That said, there are some issues that
need to be addressed. The cockpit is a small tub containing the seat and a
control stick. There is no instrument panel as such, unless the small forward
wall that serves as the front of the cockpit is supposed to be a panel.
Scratchbuilding one and gluing it to the forward portion of the cockpit tub is
no problem. Also, the small deck immediately beneath the windshield is cast at
a grotesque angle. This needs to be trimmed off and redone. I used a small piece
of thin plastic card to correct this. A more serious issue is the shape of the
windshield, which is several degrees more vertical than it should be. There is
no way to correct this short of replacing the windshield with
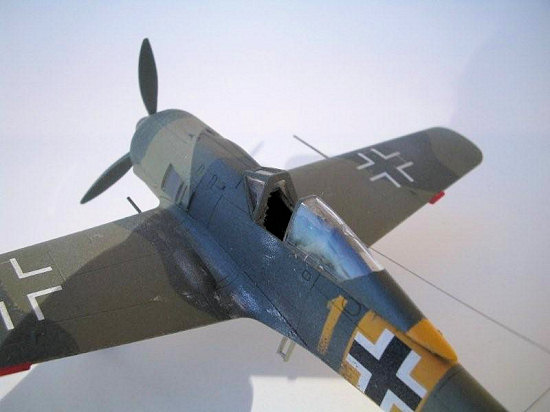 one from any
accurate FW-190 kit that you happen to have. I cut off the forward part of the
Airfix unit, thinned it down, and installed it in position. It fitted pretty
well. For the sliding canopy, I used another “flat canopy” from the spares box,
probably from a Hasegawa FW-190F. It worked perfectly, and I left it in the
open position. By the way, the rear cockpit armor and headrest unit is way too
thin, and I also replaced this with one from probably the same Hasegawa kit I
took the canopy from. Adding seat belts will add to the minimal effect of the
cockpit, especially if you leave it open as I did.
one from any
accurate FW-190 kit that you happen to have. I cut off the forward part of the
Airfix unit, thinned it down, and installed it in position. It fitted pretty
well. For the sliding canopy, I used another “flat canopy” from the spares box,
probably from a Hasegawa FW-190F. It worked perfectly, and I left it in the
open position. By the way, the rear cockpit armor and headrest unit is way too
thin, and I also replaced this with one from probably the same Hasegawa kit I
took the canopy from. Adding seat belts will add to the minimal effect of the
cockpit, especially if you leave it open as I did.
There were a few other minor problems. The trailing edge of the wing contains the same shape error that some other kits, notably Tamiya and Hasegawa have, in that the trailing edge of the wing should be completely straight, the only protrusion being the small aileron trim tab. This kit shows the aileron to be deeper than it actually is. Filing off the added section and adding a trim tab from plastic strip will solve this problem. However, you will then notice that the wingtips appear to be too ‘square”, and these must be rounded slightly towards the rear to get the proper shape. Any good three view drawing can be used as a guide here.
The bomb rack looks a little heavy, but it is very close to that of the other kits, and could be used as is. One problem is that many FW-190A’s did not have the belly rack, and to build this kit without the rack, the large square holes must be filled in. The easiest way to do this is to trim off the mounting lugs from the rack, insert them into the receptacles, and sand and fill them smooth. Another hole under the wing, designed for the Morane mast used for Reich Defense aircraft, needs to be filled if your particular models didn’t carry this equipment.
The propeller and fan assembly are imaginatively done, using a small piece of metal driven into the plastic end cap and fan assembly. All of this is mounted on a cylindrical shaft, and somehow it works. The prop is realistic looking, as is the fan.
The landing gear struts, cast in one piece, are the right size and angle, and mount squarely into the wing. The gear cover also mounts into the wing, although I trimmed mine somewhat and only glued it to the strut opposite the axle. The wheels appear slightly different, with the bolts on one looking a bit larger.
 The major problem with this kit is
not a quality issue, but one dealing with accuracy. This is NOT an FW-190A-6,
and it would take some serious trimming to make it one. The upper cowling has
the bulges associated with the FW-190A-7 and FW-190A-8. So, in effect, this kit
can be done as an FW-190A-7 or FW-190A-8, making the decals inaccurate for this
version. The major difference between the -7 and -8 models is the location of
the pitot tube, which is inboard on the -7 and on the right wingtip on the -8.
Since the wings are solid, drilling the hole for mounting the tube poses no
problem. The instructions show where it goes, but don’t mention the drilling
required. In addition, there are four long barrel 20 mm cannons cast into the
wings, with instructions to trim off the outboard ones. Some A-7’s and A-8’s
had them, while they were removed on others. Check your references on this one.
I removed all four, and replaced the inboard ones with brass tubing, which is
much more realistic. This allows the builder to make either the four or six gun
variant. Even the breech fairings mounted behind the outboard cannon are
provided as separate units, although they are not supposed to be used for either
of the planes represented here, but they are common to most A-8 aircraft.
The major problem with this kit is
not a quality issue, but one dealing with accuracy. This is NOT an FW-190A-6,
and it would take some serious trimming to make it one. The upper cowling has
the bulges associated with the FW-190A-7 and FW-190A-8. So, in effect, this kit
can be done as an FW-190A-7 or FW-190A-8, making the decals inaccurate for this
version. The major difference between the -7 and -8 models is the location of
the pitot tube, which is inboard on the -7 and on the right wingtip on the -8.
Since the wings are solid, drilling the hole for mounting the tube poses no
problem. The instructions show where it goes, but don’t mention the drilling
required. In addition, there are four long barrel 20 mm cannons cast into the
wings, with instructions to trim off the outboard ones. Some A-7’s and A-8’s
had them, while they were removed on others. Check your references on this one.
I removed all four, and replaced the inboard ones with brass tubing, which is
much more realistic. This allows the builder to make either the four or six gun
variant. Even the breech fairings mounted behind the outboard cannon are
provided as separate units, although they are not supposed to be used for either
of the planes represented here, but they are common to most A-8 aircraft.
There is another issue of this kit depicting an FW-190A-8, and I suspect that it is exactly the same with different decals and instructions, although I haven’t seen it.
| COLORS AND MARKINGS |
Decals are provided for two aircraft,
neither of which can be accurately built from this kit. Both are Russian Front
aircraft of JG54, which used a series of bizarre camouflage schemes. First is
an FW-190A-6 flown by Leutnant Emil Lang of 5/JG54 in Northern Russia during the
summer of 1943. This aircraft, “Black 7”, has an unusual three color camouflage
scheme consisting of 70/71/79 over 76 light blue, with the usual yellow Russian
Front tactical markings. The second option is an FW-190A-6 flown by Hauptmann
Walter Nowotny when he was Gruppenkommandeur of 1/JG54 at Vitebsk, Russia, in
November, 1943. Too bad that these aircraft cannot be accurately modeled from
this kit. This aircraft seems to be painted in 70/71/76.
| CONCLUSIONS |
For what it is, this is a good kit, and can be recommended for younger modelers wanting to hone their skills. For the serious modeler with a large spares box, it is a fun build with few serious surgical adventures. But I wish they’d do an accurate A-4 version.
December 2007
Copyright Modeling Madness.com. All rights reserved. No reproduction in part or in whole without express permission.
If you would like your product reviewed fairly and quickly, please contact the editor or see other details in the Note to Contributors.