Eduard 1/48 FW-190D-13
| KIT #: | |
| PRICE: | $22.50 |
| DECALS: | One option |
| REVIEWER: | Dave Cummings |
| NOTES: | Weekend edition |
| HISTORY |
I will defer to Tom Cleaver’s
informative history done in his builds of the D-13 available in MM Build
Reviews.
I could have just cut and pasted it with a few changed
words to make myself look smart.
But I won’t.
| THE KIT |
It had been one of those weeks at work and my
nerves were way on the frazzled side.
It was with relief I got home Friday evening for a
much needed weekend break.
I decided the best prescription for putting job
stress behind me would be to hole up in my hobby room away from the world
and lose myself in creating a model.
I looked at my little stack of un-built kits in the
cabinet and the words “Weekend Edition” jumped out at me.
Just what the doctor ordered, a simple build that
could be completed in a weekend.
I had never built an Eduard kit before and
remembered purchasing this one mainly for the price.
The Eduard Weekend Editions apparently are
simplified kits without photo-etch and stuff.
But a modern mold 1/48 kit for under 25 bucks is
rare.
I opened the box to see just what kind of a deal this was.
I was stunned.
Greeting me were five whole individually packaged
sprues of parts in varying colors of light grey, tan, dark grey and clear.
Plastic heaven!
A vast array of parts, fascinating, they all looked
so precise and important.
Open hatches that reveal gun-bay detail, and
separate control surfaces. I looked over the big pieces and found the panel
engraving to be petite yet well defined.
There was a little flash here and there but nothing
major.
There was a nasty mold seam running the length of the landing
gear legs on mine.
The s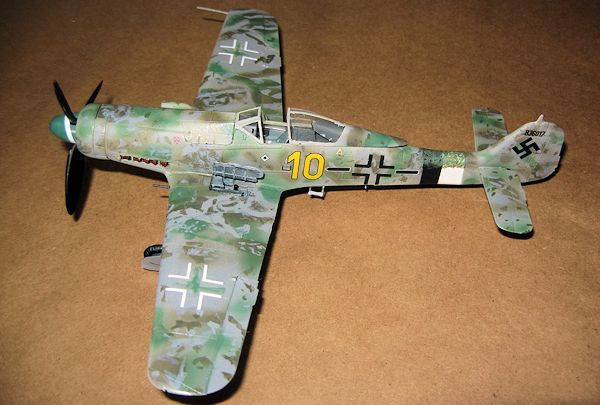 prue
attachment points are pretty thick and require care when cutting.
I found a razor saw would come in handy in several
places.
Clear parts are well done if a little cloudy, with well
defined framing.
Beautiful; them Czechs must not know what they’ve
got here, what a steal.
prue
attachment points are pretty thick and require care when cutting.
I found a razor saw would come in handy in several
places.
Clear parts are well done if a little cloudy, with well
defined framing.
Beautiful; them Czechs must not know what they’ve
got here, what a steal.
Options include open or closed canopy, open or
closed armament compartments, choice of wheels, and a drop tank.
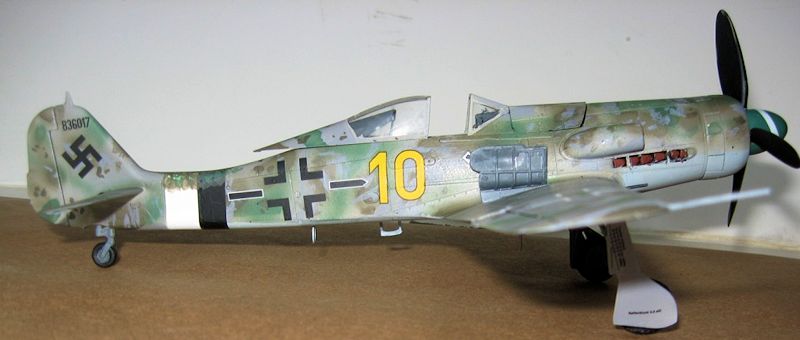
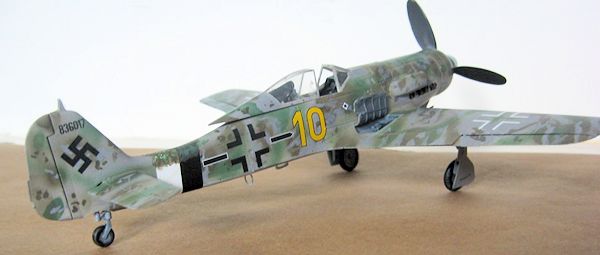
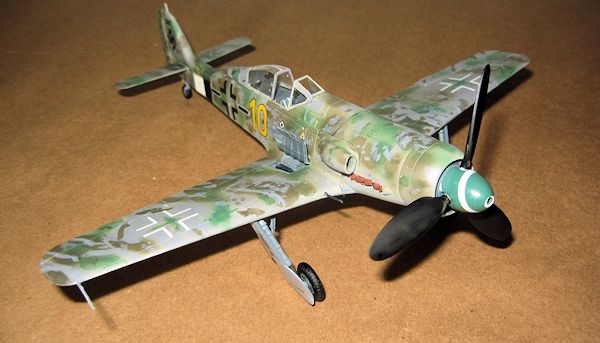
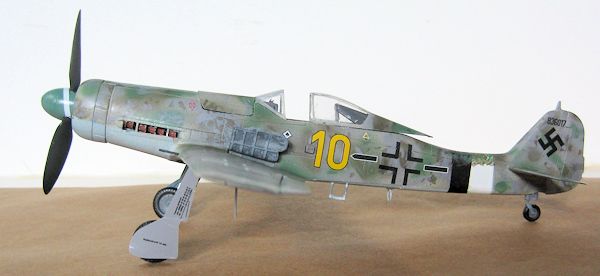
Decals are for the one known operational D-13,
yellow 10 flown by MAJ Goetz of JG-26 in the closing weeks of the war.
The white/black fuselage stripe is not included on
the sheet.
There is a separate sheet for stencils which is quite
extensive.
If you use all of the stenciling provided the plane would
look like a pill bottle with all those side effect warnings printed on it.
The instructions are a bit sparse having few
words but five pages of construction drawings.
The construction steps are well drawn but a bit
vague in places.
Paint references are for Mr. Color.
The back page offers a black and white 4-view
drawing of the aircraft showing paint scheme and decal placement.
A color
profile would have been nice for the very complex camo scheme on this bird.
Then again, Eduard’s painting instructions vary
quite a bit from that done by Tom Cleaver in his build.
Since Tom always seems to know what he’s talking
about I went with the paint scheme in his MM build article (well I attempted
to anyway). It was obvious from the complexity of the drawings this would be
no “wham-bam-thank-you-Tamigawa.” I could see my weekend would be full
indeed.
Of note, Tom’s very interesting history tells of
the mysterious wing switch between this aircraft and a D-9 as they resided
at Wright-Patterson post war.
This has affected other model companies dutifully
studying the Museum aircraft and faithfully reproducing the wrong wing in
their D-13 kits.
I stole a glance through the clear bag at the wing
underside to see if it was a he or a she.
Eduard has also faithfully reproduced the wrong wing
with the D-9 shell ejection chutes.
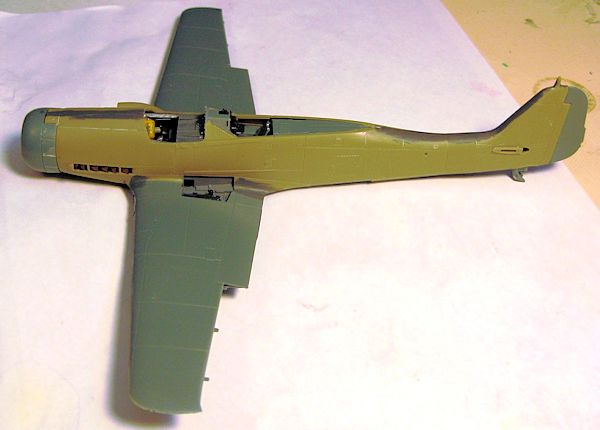
| CONSTRUCTION |
I began next day by first studying the
instructions to be sure I understood what they were trying to convey.
First is the cockpit which begins, as most 190 kits
do, with a cockpit tub.
The Weekend Edition cockpit is pretty basic with the
option of instrument panel decals on a smooth panel or one with molded
instrument detail to paint.
In keeping with my objective of a simple and
relaxing build I chose the decals.
I painted the whole affair RLM 66 with black console
panels. Seat
belts are a must and are not provided.
I just used white decal with a dab of silver paint
for hardware.
I was not seeking perfection. I dry brushed a little
medium grey and aluminum; good enough.
This
machine was not in the fight long enough to sustain much wear. Step 1
complete.
So on to Step 2 feeling quite cheerful by now.
 Next is
the bay detail for the
motoren cannone.
Wow, a lot of engine plumbing is in there also.
Decision time, open bay or close it up and skip
those bazillion little parts.
I held the fuselage halves together and test fit the
bay cover.
Not even close, my first disappointment with the kit so open
it is.
The instruction drawings are pretty good, but there is just
so much stuff that it is still confusing in places. As I came to a part
whose exact placement was questionable I test fit until I achieved an “ohhh,
I get it,” or as would sometimes happen, a “!*^#*. +@!!”
Not exactly a soothing experience to my jangled
nerves.
But it is an impressive little assembly when all painted up
and finished and forces one to become quite intimate with the Jumo powered
FW.
Next is
the bay detail for the
motoren cannone.
Wow, a lot of engine plumbing is in there also.
Decision time, open bay or close it up and skip
those bazillion little parts.
I held the fuselage halves together and test fit the
bay cover.
Not even close, my first disappointment with the kit so open
it is.
The instruction drawings are pretty good, but there is just
so much stuff that it is still confusing in places. As I came to a part
whose exact placement was questionable I test fit until I achieved an “ohhh,
I get it,” or as would sometimes happen, a “!*^#*. +@!!”
Not exactly a soothing experience to my jangled
nerves.
But it is an impressive little assembly when all painted up
and finished and forces one to become quite intimate with the Jumo powered
FW.
The above sub-assemblies are glued into the left
fuselage half along with the tail wheel.
Eduard gives you an option here also; a complete
strut and wheel molded as a solid piece or a four piece sub-assembly of
separate strut, yoke halves, and wheel.
After pondering this weighty decision I went with
the sub-assembly which allows you to attach the wheel after all painting is
complete.
The exhaust pipes are attached to the inside of the fuselage
meaning you can paint them now and mask somehow or paint them after the
airframe is painted.
Alright, glue the fuselage halves together and we
are on our way.
Wait, better test fit first.
#!!.*^=, not even close.
Quick shift all the sub-assemblies around before
their glue hardens, no difference.
OK, rip everything out again and start cutting.
Cut and test fit, cut, sand, and test fit.
I am not having fun now.
Ok, that’s pretty close.
I squirt a bunch of glue on it and match on!
I get the front closed up around the engine
compartment, the back half gapes open, close that, the front breaks loose.
Rubber bands, clothes pins, both hands, then both
feet, then brace against the wall!
After an interminable struggle, shaking with my
strength nearly exhausted, I let go.
It held, not too bad really.
A few gaps to fill and the usual scraping, sanding,
and priming of the fuselage seam. Ok, think I’ll take a break now and have a
beer.
 With
the hard part behind me (I thought) I proceeded to the wings.
Wings, what could go wrong here?
First thing was to correct those ejection chutes in
the bottom half.
I cut a new center slot and closed up the others
with some plastic sheet cut to size.
A little putty and sanding, then I primed to see how
it looked under paint.
Little more sanding and I was satisfied.
Then the bay details for the wing root cannons.
Not so complicated but I knew how this works now and
test fit the wing halves to see how these assemblies affected that fit.
A little filing and sanding seemed to do the trick
and I was full of confidence now that I had headed off that problem.
The gear wells were next.
Where the likes of Tamiya offer an insert with most
of the detail molded in, Eduard gives you another zillion little pieces to
assemble offering many more opportunities to get something misaligned.
Y-33, now there’s an insidious little piece.
With the wheel wells finished it was time to slap
the wing halves together, which, of course wouldn’t slap.
Not even close.
More filing and sanding (and cursing and swearing)
of these internal assemblies.
Knowing I would be working on a wing seam I cut off
the cannon barrels to get them out of the way.
Hose it down with glue, rubber bands, both hands,
you get the picture.
Despite my efforts there were major gaps to fill.
With those problems fixed I was done with the wing,
and done for the day.
I need a drink.
With
the hard part behind me (I thought) I proceeded to the wings.
Wings, what could go wrong here?
First thing was to correct those ejection chutes in
the bottom half.
I cut a new center slot and closed up the others
with some plastic sheet cut to size.
A little putty and sanding, then I primed to see how
it looked under paint.
Little more sanding and I was satisfied.
Then the bay details for the wing root cannons.
Not so complicated but I knew how this works now and
test fit the wing halves to see how these assemblies affected that fit.
A little filing and sanding seemed to do the trick
and I was full of confidence now that I had headed off that problem.
The gear wells were next.
Where the likes of Tamiya offer an insert with most
of the detail molded in, Eduard gives you another zillion little pieces to
assemble offering many more opportunities to get something misaligned.
Y-33, now there’s an insidious little piece.
With the wheel wells finished it was time to slap
the wing halves together, which, of course wouldn’t slap.
Not even close.
More filing and sanding (and cursing and swearing)
of these internal assemblies.
Knowing I would be working on a wing seam I cut off
the cannon barrels to get them out of the way.
Hose it down with glue, rubber bands, both hands,
you get the picture.
Despite my efforts there were major gaps to fill.
With those problems fixed I was done with the wing,
and done for the day.
I need a drink.
Nightmares of huge gaping seams with plastic
teeth trying to gobble me up.
So it was with waning enthusiasm I started in again
next day.
Step 5, attach wing to fuselage.
I steeled myself for the battle, but to my surprise
it went on with little hassle.
A snug fit required a little prying and force but it
went together with no wing root seam and only the usual belly seams.
My mood lightened, maybe today would be different.
Tail planes next.
Test fitting showed the alignment tabs are too long
and butted against each other preventing the parts from seating properly.
No biggie, easy to trim down, but man, it’s just one
thing after another.
Now for the nose, if you want the prop to turn you
either have to assemble it now or just tack the nose on and remove after
painting.
I chose the glue it on now and cement the prop later because
I don’t care if it turns option.
I painted the annular radiator in the nose steel
with a black wash.
For painting I tacked the cannon bay coves in place
after sanding and shaping to `kinda’ fit.
I will spare you the details of that one.
I now packed damp toilet paper into all the openings
and masked the canopy with Tamiya tape.
At last, ready for painting.
| COLORS & MARKINGS |
This was the part I was looking forward to.
I readied my metal Aztec double-action airbrush and
fired up the mini-compressor. I first sprayed the underside starting with
the wing’s aluminum section using Model Master Enamel.
All the other colors were done with Model Master
Acrylics.
When dry I masked and
 painted
the RLM 75 part of the wing and then completed the underside RLM 76 portion.
I next tackled the white/black fuselage stripe.
I masked and painted the white and decided to use
decal for the black.
Masking the white stripe and cowl I sprayed the
uppers RLM 75 along with the canopy and landing gear covers.
For this
complex camo scheme I see the challenge as not trying to recreate the
original squiggle for squiggle, even if you are able to access original
photos.
I saw it more as recreating the effect, more Impressionist
than Realist.
So here we go, airbrushing free hand with a fine tip
and low pressure, RLM 83 Green then RLM 82 Braunviolet.
painted
the RLM 75 part of the wing and then completed the underside RLM 76 portion.
I next tackled the white/black fuselage stripe.
I masked and painted the white and decided to use
decal for the black.
Masking the white stripe and cowl I sprayed the
uppers RLM 75 along with the canopy and landing gear covers.
For this
complex camo scheme I see the challenge as not trying to recreate the
original squiggle for squiggle, even if you are able to access original
photos.
I saw it more as recreating the effect, more Impressionist
than Realist.
So here we go, airbrushing free hand with a fine tip
and low pressure, RLM 83 Green then RLM 82 Braunviolet.
I stopped when I realized I had painted Van
Gogh’s “Daubigny’s Garden.”
Ughh, Post-Impressionist.
I re-sprayed RLM 75 to make a blank canvas and
started over again.
This time I got closer to what I envisioned.
It’s a bunch of green and brown squiggles, how can
it be wrong?
I didn’t have the right color green for the prop
spinner, though the “right” color seems open for debate.
I mixed some green with a little teal blue, pretty,
I like it.
When dry I covered with Testor’s GlossCoat for
decaling.
I surmised the extensive field applied camo would have
covered most stenciling so just used a few of the more obvious ones.
The decals are thin and well printed, but maintain
the theme of the kit in being finicky.
 I only used some Micro-Sol on the wing crosses. They
don’t like being moved around much when applied so work quickly.
I got a little anal on exact placement of a fuselage
cross and worked it too much.
It wadded into a tiny little ball and, “phtttt!”
I recreated the cross with some lines of black decal
doing 8 separate little lines making up the cross.
It looks OK, whew.
I nervously applied the white spiral decal to the
prop spinner getting it “close enough” and left it alone.
Another coat of gloss to seal it all up and sprayed
a final coat of Testor’s flat acrylic.
I only used some Micro-Sol on the wing crosses. They
don’t like being moved around much when applied so work quickly.
I got a little anal on exact placement of a fuselage
cross and worked it too much.
It wadded into a tiny little ball and, “phtttt!”
I recreated the cross with some lines of black decal
doing 8 separate little lines making up the cross.
It looks OK, whew.
I nervously applied the white spiral decal to the
prop spinner getting it “close enough” and left it alone.
Another coat of gloss to seal it all up and sprayed
a final coat of Testor’s flat acrylic.
| FINAL CONSTRUCTION |
The landing gear was assembled after choosing which tire to go with, smooth
or treaded.
I chose treaded which means it will be the wrong one.
Speaking of wheels, the instructions show the proper
8 degrees of wheel camber which you achieve by holding the loose fitting
wheel on the too small axle until it sets.
It works, but why not just a good fitting axle
molded in the proper angle?
Eduard has a system for aligning the struts to the
proper angle unique to 190s.
A protrusion molded in the wheel well has a slot
which accepts the rear edge of the gear doors aligning the strut to the
correct angle.
The strut itself is just a butt join.
It works OK but on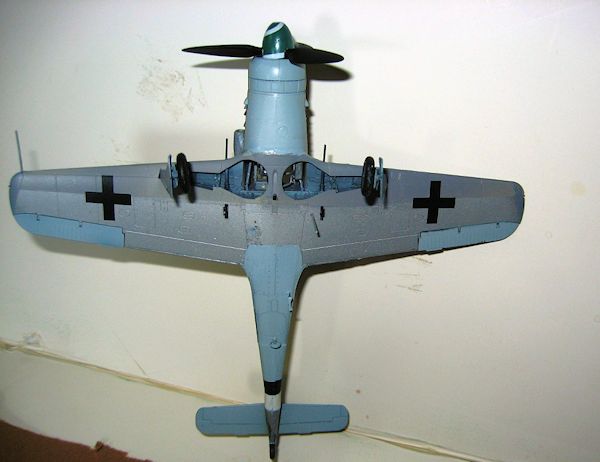 e
strut wanted to align itself with the wheel pointed at a 30 degree toe-in.
A small battle, eventually won.
e
strut wanted to align itself with the wheel pointed at a 30 degree toe-in.
A small battle, eventually won.
There are two canopies provided.
The instructions specify part N-2 for an open canopy
and N-8 for a closed one.
Of curiosity I studied them to determine what the
difference was in the two.
This turned into a wasted twenty minutes as try as I
might I could not find one whit of difference in the two, even measuring.
Snapping back to reality I gazed about for any
hidden cameras recording my little monkey act.
There had to be a reason for this besides just
another assault on my sensibilities.
The windscreen was a beautiful fit which only served
to cause me to let down my guard.
The 3-piece pilot armor/head-rest assembly was a
finicky bit getting it cemented into the canopy without smearing glue on
clear parts.
When I attempted to fit the canopy to the fuselage the
headrest assembly interfered with the fit.
Snatch it out, file down where things hung below the
canopy edges, re-attach (sigh).
Then all the teensie bits, cannon barrels, pitot,
and various antennae.
The prop was glued in place and it was done.
I sat there gazing at it, hands shaking, un-believing it was all over. It looked OK, but I was expecting something to happen. Like those old silent films when the car suddenly falls apart into a hundred pieces. But it was OK, and dang, it is a great looking 190.
| CONCLUSIONS |
It
had been one of those weekends so it was with relief I went to work Monday for a
much needed break.
Seriously, The Eduard 190D-13 does make into an
excellent replica.
But I would not recommend it to modelers with beginner
level skills, (or those seeking stress relief).
The term
over-engineered
comes to mind. I
am sure I will build another Eduard kit in the future, but maybe not for awhile.
| REFERENCES |
Kit plans, MM Build Reviews, and The Way of Zen.
Dave
Cummings
August 2013
If you would like your product reviewed fairly and fairly quickly, please contact the editor or see other details in the Note to Contributors.